
Best Way to Clean Bathroom Grout
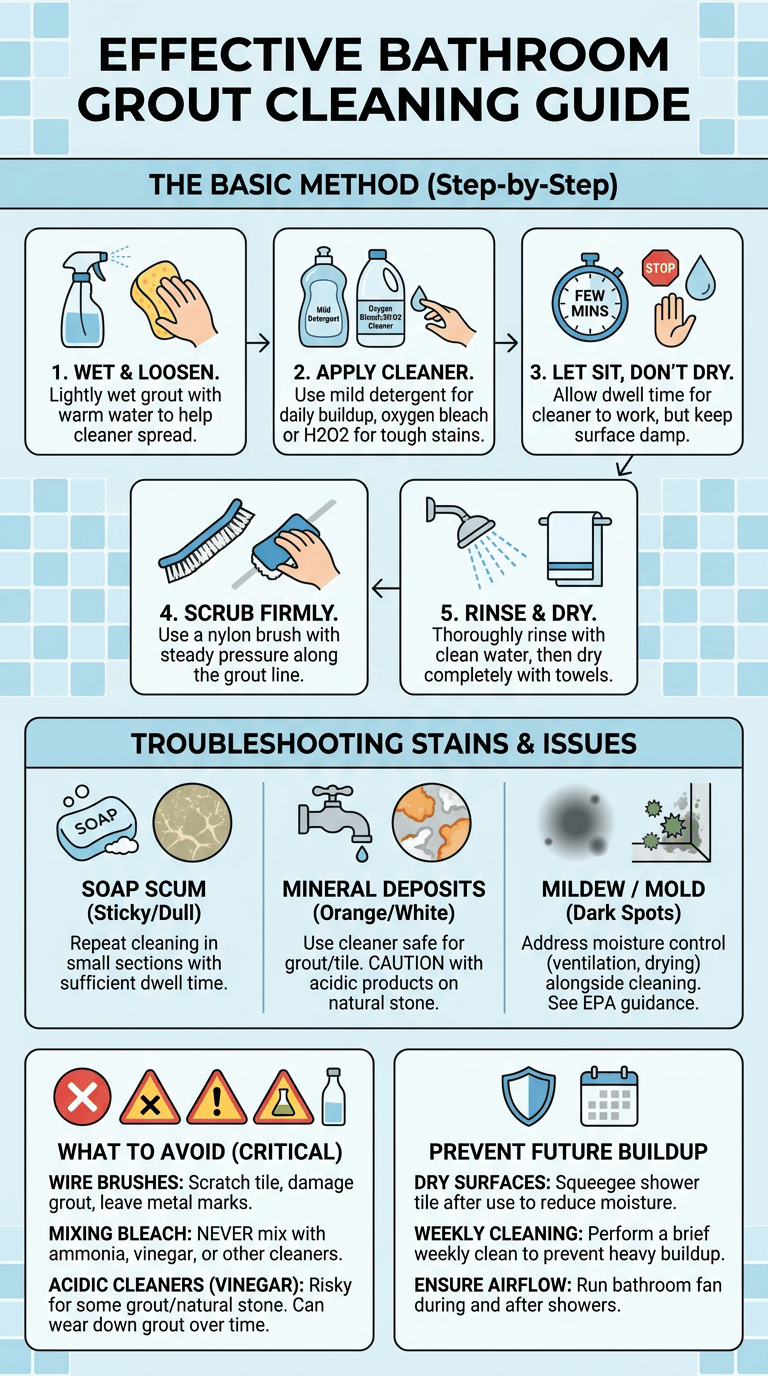
The basic method
- Wet the grout lightly with warm water to loosen surface grime and help the cleaner spread evenly.
- Apply a grout-safe cleaner. For everyday buildup, use warm water with a small amount of mild detergent. For tougher staining, use an oxygen bleach or hydrogen peroxide-based bathroom grout cleaner according to the product label.
- Let the cleaner sit for a few minutes, but do not let it dry on the grout.
- Scrub with a nylon grout brush, following the grout line with steady pressure.
- Rinse thoroughly with clean water, then dry the grout with towels.
When stains need a stronger approach
Soap scum may leave grout feeling sticky or looking dull after a mild detergent wash. Repeat the cleaning process in small sections and allow enough dwell time before scrubbing.

White crusty buildup or orange discoloration may come from minerals in water. Use a cleaner that is safe for your grout and nearby tile material. Be careful around natural stone, which can be damaged by some acidic products.
Dark specks or patches on shower grout may be surface mildew or mold growth. The EPA explains that moisture control is central to mold prevention and cleanup, so cleaning should be paired with drying and better airflow. Review the EPA’s mold prevention and cleanup basics for general guidance.
What to avoid
Avoid wire brushes on bathroom grout. They can scratch tile edges, wear away grout, and leave metal marks behind.
Never mix bleach with ammonia, vinegar, toilet bowl cleaner, or other household cleaners. Poison Control provides safety guidance on household cleaning products.
Use caution with vinegar and other acidic cleaners. They may be risky for some grout and tile materials, especially natural stone. Occasional use on compatible materials may be acceptable if a product label allows it, but repeated acidic cleaning can wear down grout over time.
Why Bathroom Grout Gets Dirty
Grout is porous
Grout is not a smooth surface like glazed tile. Its pores and texture can catch dust, soap residue, skin oils, shampoo, minerals, and mop water. That is why grout lines often look dirty even when the tile faces look clean.
Unsealed or worn grout absorbs residue more easily. When water and grime sink into the surface, discoloration can be harder to remove with a quick wipe. Sealing does not make grout maintenance-free, but it can help slow staining when the grout is in good condition.
Soap scum sticks to grout
Body wash, shampoo, conditioner, shaving cream, and bar soap can leave residue on shower grout. This film is often most noticeable on lower shower walls, shower floors, tub surrounds, and corners where water does not rinse cleanly.
For a related walkthrough, see our guide to how to clean bathroom tiles.
Body oils can mix with minerals from water and residue from products. Over time, the mixture can make grout look gray, brown, or uneven. If the grout feels slick before cleaning, soap scum may be part of the problem.
Moisture encourages mildew
Bathrooms hold steam and moisture, especially after hot showers. If the fan is weak, off, or not used long enough, grout can stay damp longer. Damp grout lines in showers and around tubs are more likely to develop musty odors or mildew-like discoloration.
Corners, edges, shower benches, niches, and low areas on shower floors can stay wet after the rest of the bathroom looks dry. These are common places for recurring dark or pink residue.
Hard water leaves mineral deposits
Hard water can leave chalky or crusty deposits on grout lines. This buildup may look white, cloudy, or rough. It can trap more dirt, making grout appear dingy even after normal mopping or rinsing.
Orange staining may come from minerals, rusty water, product residue, or biofilm. The exact cause can vary, so start with a gentle cleaning method before moving to stronger products.
Identify the Grout Problem First

Gray or dark grout
Gray or dark grout is often caused by ordinary dirt mixed with soap film. On bathroom floors, the discoloration may be heaviest near the sink, toilet, door, and shower entrance. In showers, it often appears where water and products run downward.
If grout darkens quickly after cleaning, the sealer may be worn or missing. Water soaking into grout instead of beading on the surface can be a clue, though not all grout is sealed the same way.
Pink or orange residue
Pink or orange residue often appears in wet places, such as shower corners, grout around tubs, or the lower edge of shower walls. It may feel slimy and may wipe away at first, then return if moisture and residue remain.
If the area stays damp or soap residue remains in the grout texture, pink or orange film can come back soon after cleaning. Drying the shower after use and cleaning corners regularly can help reduce recurrence.
Black spots
Small black spots on grout may be surface mildew, especially if they appear in damp corners or along shower floor edges. If the spots lighten after proper cleaning and drying, the issue may be limited to the surface.
If black staining keeps returning in the same place, spreads under caulk, or appears near cracked grout, moisture may be trapped behind the surface. In that case, cleaning alone may not solve the problem.
Cracked or missing grout
Cleaning can remove surface grime, but it cannot restore missing grout, seal gaps, or repair crumbling joints. Scrubbing damaged grout too aggressively may make gaps larger.
Repair is needed when grout is cracked, loose, powdery, missing, or separating from tile edges. Regrouting or professional evaluation may be necessary if water has been getting behind the tile or if mold-like staining keeps returning from beneath the surface.
Supplies You Need
Basic cleaning tools
- A stiff nylon grout brush narrow enough to fit into the grout line without scraping the tile
- Microfiber cloths for wiping loosened grime, controlling drips, and drying grout after rinsing
- A spray bottle for applying cleaner directly to grout lines
- Cleaning gloves, especially when product labels recommend them
Cleaner choices
- Mild dish soap or gentle household detergent diluted in warm water for routine dirt
- Oxygen bleach product for stained grout, used only as labeled
- Hydrogen peroxide-based bathroom grout cleaner for compatible surfaces, used according to the label
- pH-neutral cleaner made for natural stone if your bathroom has marble, travertine, limestone, slate, or other stone near the grout
Optional tools
- Steam cleaner, if suitable for the surface and grout condition
- Small nylon detail brush for corners, fixtures, and tight areas
- Wet-dry vacuum for removing dirty rinse water from bathroom floor grout
Step 1: Prepare the Bathroom Grout
Remove surface debris
Before wet cleaning bathroom floor grout, remove loose hair, dust, and grit. If you skip this step, debris can turn into muddy residue that settles deeper into the grout lines.
For shower grout, rinse the walls and floor with warm water first. This removes loose product residue and helps the cleaner make contact with the stained grout rather than sitting on top of surface film.
Ventilate the room
Run the bathroom exhaust fan before you begin and keep it running while the grout dries. Good airflow helps reduce humidity and lingering cleaner odors.
If the bathroom has a window, open it when weather and safety allow. Follow product label directions for ventilation, especially when using stronger bathroom cleaning products.
Test the cleaner
Apply the cleaner to a small hidden grout area first, then wait and rinse according to the label. Check for discoloration, surface damage, or residue before cleaning the entire bathroom.
Grout lines are surrounded by tile, stone, caulk, metal fixtures, and sometimes painted surfaces. Make sure your cleaner is suitable for everything it may touch, not just the grout itself.
Step 2: Apply Cleaner to the Grout Lines

For routine dirt
Mix warm water with a small amount of mild detergent. Apply it directly to the grout using a spray bottle, sponge, or cloth. The goal is to dampen the grout line, not flood the area.
Clean one small area at a time so the cleaner does not dry before you scrub and rinse. For shower walls, a section about shoulder-width wide is manageable. For floors, work in a few square feet at a time.
For stained grout
If mild detergent is not enough, apply an oxygen bleach product according to the package directions. Use only the amount recommended and avoid mixing it with other cleaners.
Stained grout usually needs contact time. Let the cleaner sit long enough to loosen the stain, but do not allow it to dry on the surface. If it begins to dry too quickly, apply a little more cleaner or work in a smaller area.
For natural stone nearby
Do not use vinegar, lemon juice, or acidic bathroom cleaners near acid-sensitive stone unless the stone manufacturer specifically allows it. Acid can damage the stone even if your main goal is to clean the grout.
Use a brush, cotton swab, or carefully aimed spray to keep the cleaner on the grout as much as possible. Wipe drips right away and rinse thoroughly.
Step 3: Scrub the Grout Properly
Use the right brush angle
Place the brush over the grout and scrub along the joint instead of across the tile. This keeps the bristles where they can loosen dirt from the grout texture.
Hold the brush at a low, controlled angle near delicate tile edges. If you see scratching, dulling, or flaking, stop and switch to a gentler tool.
Apply steady pressure
Press firmly enough to lift grime, but not so hard that you dig into the grout. Grout that is already soft, cracked, or powdery should not be aggressively scrubbed.
Tough stains usually respond better to repeated cleaning rounds than to one harsh scrubbing session. Reapply cleaner, wait, scrub, rinse, and reassess.
Focus on corners
Shower floor edges collect water, soap residue, and body oils. Spend extra time along the perimeter, especially near the drain and corners.
Bathroom floor grout behind the toilet often darkens because it is hard to reach during routine cleaning. Use a small detail brush and wipe away rinse water carefully.
Grout around the tub can collect shampoo residue, bath products, and splashed water. Be careful where grout meets caulk, since caulk can tear or lift if scrubbed too hard.
Step 4: Rinse, Dry, and Inspect
Rinse away cleaner residue
Cleaner left in grout can dry sticky or powdery, which makes new dirt cling faster. Rinse carefully, especially after using stronger products.
Use a handheld showerhead, a cup of clean water, or a rinsed sponge to flush cleaner from the grout lines. Wipe the surface with a clean cloth as you rinse so loosened residue does not resettle.
Dry the grout completely
Press clean towels into the grout lines to absorb water. On shower floors, pay attention to corners and low spots where water pools.
Keep the bathroom fan running while the grout dries. If the space still feels humid, leave the door open after cleaning when privacy and household safety allow.
Inspect for remaining stains
Surface dirt, fresh soap scum, light mineral buildup, and some mildew-like residue often improve with careful cleaning. If the stain lightens after the first pass, a second round may help.
Deep staining, old dye transfer, rust that has penetrated, worn grout, or discoloration beneath the surface may not fully clean away. If the grout is structurally sound, resealing or color sealing may be an option.
How to Clean Specific Bathroom Grout Areas
Shower wall grout
Start high on the shower wall and move downward. This prevents dirty drips from running over areas you already cleaned.
Spray lightly and keep a cloth in your hand to catch cleaner before it reaches metal trim, glass seals, natural stone, or caulked seams.
Shower floor grout
Shower floor grout often stains most where water drains slowly. Look near corners, along the wall-floor joint, and around the drain.
After scrubbing, rinse until the water runs clear and no cleaner remains in the grout texture. Use towels or a wet-dry vacuum to remove standing rinse water.
Bathroom floor grout
Remove hair, dust, and grit before applying cleaner. This keeps debris from spreading into a wider gray film.
Once you scrub the grout lines, mop the floor with clean water to remove loosened residue. Change the rinse water as soon as it looks dirty.
Grout around tub and sink
Caulk is flexible and is often used where surfaces meet, such as around tubs, sinks, and corners. Scrub grout nearby carefully so you do not tear or loosen the caulk.
Gaps between grout, caulk, tile, and fixtures can let water into places it should not go. If you see open seams, lifting caulk, or crumbling grout, repair the area before relying on cleaning alone.
When Bathroom Grout Needs More Than Cleaning

Crumbling grout
Grout that flakes, powders, cracks, or falls out is failing. It may look dirty because moisture and grime are collecting in damaged areas, not because the surface simply needs scrubbing.
Damaged grout can allow water to move behind tile or into surrounding materials. If the area is in a shower, around a tub, or on a bathroom floor that gets wet, repair should not be delayed.
Mold keeps returning
If mold-like spots keep returning after cleaning, the bathroom may be staying damp too long. Use the fan during showers, keep airflow moving afterward, and dry wet grout lines when possible.
Recurring dark stains in the same location may signal moisture trapped behind caulk, under grout, or behind tile. If stains spread, smell musty, or come back quickly despite cleaning and drying, consider repair or professional evaluation.
Grout stays stained after cleaning
If the grout is intact but absorbs water and stains quickly, resealing may help protect it after it is fully cleaned and dried. Sealer should be applied only to suitable grout and according to product directions.
If grout is permanently discolored but still solid, color sealing may create a more uniform appearance. If grout is damaged, missing, or deeply stained, regrouting may be the better long-term solution.
How to Keep Bathroom Grout Clean Longer
Dry shower surfaces
After showering, use a squeegee over the tile faces so less water runs into the grout lines. This quick habit reduces the amount of moisture and residue left behind.
Keep the fan on and leave the shower door or curtain open enough for air to circulate. Drying the shower faster helps limit the damp conditions that make stains return.
Clean weekly
A brief weekly clean is easier than a deep grout restoration. Spray grout lines with a suitable mild cleaner, let it sit briefly, scrub problem areas, rinse, and dry.
You do not always need to scrub every grout line with the same intensity. Spend extra time on shower corners, floor edges, around the tub, and other places where moisture lingers.
Seal grout when appropriate
Sealing can help clean, intact grout resist staining. It is most useful after the grout has been thoroughly cleaned, rinsed, and dried.
Sealer will not fix cracked grout, active moisture problems, loose tile, or mold growing from behind the surface. Repair those issues first.
Frequently Asked Questions
What is the best way to clean bathroom grout?
The best way to clean bathroom grout is to start with the gentlest effective method: wet the grout lightly, apply a grout-safe cleaner, let it sit, scrub with a nylon grout brush, rinse well, and dry completely. For stained grout, use an oxygen bleach or hydrogen peroxide-based cleaner as labeled, then rinse thoroughly.
Can I use vinegar on bathroom grout?
Use caution with vinegar. It is acidic and may not be suitable for some grout, sealers, or nearby tile materials, especially natural stone. If you choose to use it on compatible surfaces, test first, do not overuse it, and rinse well. Avoid vinegar near marble, limestone, travertine, and other acid-sensitive stone.
How do I clean black grout in a shower?
First decide whether the grout is intentionally black or stained black. For black stains, clean with a suitable bathroom grout cleaner, scrub with a nylon brush, rinse, and dry. If the black spots return quickly, appear under caulk, or show up near cracked grout, moisture may be trapped behind the surface and the area may need repair or professional evaluation.
Why does my bathroom grout turn orange?
Orange grout discoloration can come from mineral deposits, rusty water, product residue, or biofilm in damp areas. Clean it with a grout-safe cleaner, scrub the grout line, rinse thoroughly, and dry the area. If it returns quickly, focus on moisture control, airflow, and more frequent cleaning of corners and low spots.
Should I use bleach on grout?
Bleach may be allowed by some product labels for certain bathroom surfaces, but it should be used carefully and never mixed with ammonia, vinegar, or other cleaners. Always read the label, ventilate the room, wear gloves when directed, and rinse well. For routine grout cleaning, a mild detergent, oxygen bleach, or hydrogen peroxide-based cleaner may be a better first step depending on the stain and surface.
How often should bathroom grout be cleaned?
Bathroom grout should be cleaned lightly and regularly, with more attention to showers, tub edges, and damp corners. A weekly quick clean helps prevent soap scum and moisture-related residue from building up. Deep cleaning is needed when grout looks dark, stained, sticky, or uneven after normal bathroom cleaning.
Final Thoughts
Cleaning bathroom grout is easiest when you match the method to the problem. Start with mild detergent for routine dirt, use a labeled grout-safe cleaner for stains, scrub with a nylon brush, rinse thoroughly, and dry the grout completely. Pay special attention to shower grout, floor grout, corners, and areas around tubs and sinks where moisture collects.
If stains keep returning, do not just scrub harder. Check for poor ventilation, worn sealer, damaged grout, failing caulk, or moisture trapped behind the surface. Clean grout can make a bathroom look fresher, but cracked, missing, or mold-prone grout may need repair, resealing, regrouting, or professional evaluation before the problem improves.

Ethan Carter is the Founder & Editor of HomeCleanSecrets. Based in the United States, he has 5 years of experience creating practical home cleaning, laundry care, stain removal, decluttering, and home organization content. His goal is to help everyday households clean smarter and build simple routines that are easier to maintain.
Read more about Ethan Carter on his author page: https://homecleansecrets.com/ethan-carter/