
Dark clothes keep their appearance longer when you reduce unnecessary friction, separate unstable dyes, measure detergent accurately, and choose settings from the care label rather than from color alone. Dark colors can share a load only when their care needs align.

No routine can stop every gradual color change. Dye chemistry, fiber type, garment finish, wear, sunlight, body friction, and repeated laundering all affect appearance. The practical goal is to avoid preventable fading, transfer, lint, streaks, and surface damage while still cleaning the garment properly.
Quick Answer: A Low-Friction Dark Laundry Routine
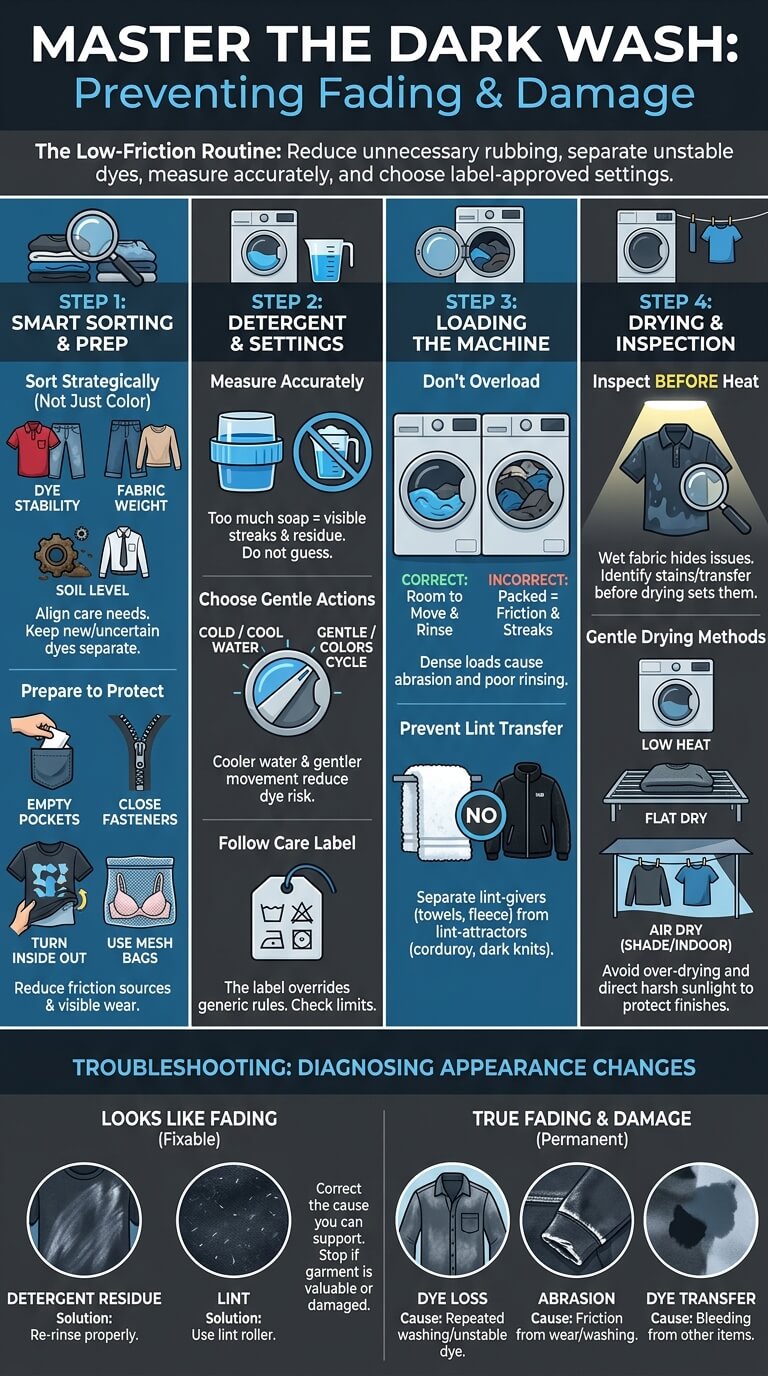
A dependable dark-load routine starts before the washer and ends with an inspection before heat. These four decisions prevent many visible problems without requiring a shelf full of specialty products.
Sort by dye stability, fabric, and soil
Keep new or uncertain dark garments away from lights and from established darks that no longer release noticeable dye. Separate delicate knits, stretch activewear, smooth synthetic shirts, rough denim, lint-heavy fleece, and heavily soiled work clothing when their care needs conflict.
Follow the care label
Read washing, bleaching, drying, and ironing instructions together. The Federal Trade Commission care-label guidance explains that clothing labels provide at least one safe care method, so a generic dark-clothes rule should never override the garment’s stated limits.
Measure detergent accurately and avoid overloading
Use the dose for the exact product, washer type, load size, soil level, and water conditions. Leave enough room for clothing to move and rinse. Extra detergent and a packed drum can create the pale streaks and dull film that show clearly on black fabric.
Choose label-compatible cycle, water, spin, and drying
Select the least aggressive settings that can clean the load. Cooler water and gentler movement often reduce some dye and friction risks, but they are not guarantees. Inspect the load before tumble drying, then use only the heat, tumble, hanging, or flat-drying method the garment allows.
What Actually Changes the Appearance of Dark Clothes

Several problems look like fading at first glance. Identify whether the change is inside the fibers, sitting on the surface, or concentrated where the garment rubs. The correction depends on that distinction.
Dye loss and fading
True fading is a reduction or shift in the garment’s original color. It may appear evenly after repeated washing or first become obvious at seams, folds, knees, elbows, pocket edges, and other high-contact areas. Once dye or a surface finish is gone, routine washing cannot put it back.
Dye transfer or bleeding
Transfer creates an added color on another area or garment rather than simply making the original item lighter. New denim, black cotton, reds, and deeply saturated fabrics can release dye. A patchy blue, purple, gray, or black cast on a lighter panel suggests transfer rather than normal fading.
Detergent residue and streaks
Residue may look white, gray, chalky, oily, or shiny. It often follows folds, compressed areas, or spots where a product contacted fabric before dispersing. Unlike dye loss, residue may change when the item is rinsed again using label-compatible settings.
Lint
Lint sits on the surface and can make black clothing look dusty or faded from a distance. Towels, fleece, flannel, tissues, paper, pet bedding, and shedding fabrics are common contributors. Smooth dark synthetics, corduroy, and some knits show small fibers especially clearly.
Surface abrasion, pilling, and normal wear
Friction can roughen fibers, form pills, flatten a finish, or expose lighter fiber ends. This change often appears at cuffs, underarms, seat areas, thighs, knees, bag-contact points, and garment seams. Washing may contribute, but daily wear can be the larger cause.
The Dark-Clothing Decision Framework

Before choosing a load, setting, or product, assess five factors. The strictest garment limit should control the shared wash process.
New versus previously washed garments
Treat a new saturated item as uncertain until the care label, manufacturer information, and early washes show how it behaves. Wash it separately or with very similar colors when practical. Do not assume a dye-catching sheet makes an incompatible load risk-free.
Fabric and construction
Dark cotton denim, rayon, wool knitwear, polyester activewear, coated fabric, lace, and a structured black jacket cannot share one default method. Check stretch content, lining, interfacing, prints, embroidery, metal hardware, bonded layers, and fragile seams.
Color depth and dye stability
Group black and deep colors with other stable darks, but be cautious with saturated red, purple, indigo, and newly dyed garments. A good test is to inspect rinse water, hidden areas, and adjacent light trim after the first label-approved wash rather than relying on color alone.
Soil level
Lightly worn office clothing does not need the same wash action as muddy jeans or sweat-heavy workout gear. Separate heavier soil when it would require a longer, stronger, or differently dosed wash that could expose lightly worn darks to unnecessary friction.
Care-label and product limits
The garment label, detergent label, and washer manual must agree. Check whether the item permits machine washing, bleach, tumble drying, a particular temperature range, or only professional care. Stop if instructions conflict and the garment is valuable or difficult to replace.
Step 1: Sort Darks by Color Stability, Fabric, and Soil
Sorting is the most effective point to prevent transfer, lint, and incompatible wash action. Build a load that can share the same cycle, water, spin, and drying decisions.
Black, navy, deep colors, and saturated brights
Established black, navy, charcoal, and deep brown garments may wash together when their fabrics and labels align. Keep saturated red, violet, teal, and indigo separate when they are new, untested, or known to bleed.
New garments and uncertain dyes
Wash new dark jeans, heavily dyed cotton, and uncertain fashion items separately for their first label-approved cycles when possible. Check pockets, cuffs, pale stitching, and logos afterward. Stop combining the item if color appears on other fabrics.
Dark delicates versus durable darks
Separate lace, lingerie, fine knits, rayon or viscose, wool, and embellished pieces from denim, hoodies, towels, and rough workwear. A mesh bag can reduce snagging for some machine-washable items, but it cannot make a harsh cycle safe.
Lint givers and lint attractors
Keep towels, fleece, flannel, chenille, and shedding fabrics away from smooth black tops, leggings, corduroy, and uniforms that display lint. Empty tissues and paper from every pocket before the garments enter the washer.
Heavily soiled items
Muddy clothing, greasy work garments, and heavily used cleaning textiles need their own assessment. Brush off loose debris outdoors when appropriate, check whether pretreatment is needed, and do not increase the whole load’s detergent or agitation just to address one item.
Step 2: Read the Care Label and Inspect the Garment
Good light makes it easier to identify vulnerable construction and existing damage. Complete this inspection while the garment is dry, before products or water hide the clues.
Wash, bleach, dry, and iron limits
Read every stage. A dark garment may permit machine washing but prohibit bleach, high dryer heat, or ironing over a print. When a label says professional clean only, do not experiment with a home wash because the fabric looks sturdy.
Prints, coatings, trims, stretch fibers, and embellishments
Turn the item inside and out. Check screen prints, reflective details, coated denim, faux leather, elastic, lace panels, glued decoration, beads, studs, and contrast piping. Follow the needs of the most vulnerable component.
Existing fading, abrasion, or dye transfer
Note pale knees, cuff edges, shiny seat areas, pills, and faded seams before washing. Photographing a valuable garment under consistent light can help distinguish a new problem from wear that was already present.
Pretreatment boundary
A localized stain needs a suitable stain process, not a stronger dark-load wash. Check the garment and treatment labels, test when directed, and keep dryer heat away from an unresolved mark. Do not add unapproved chemicals to the entire washer.
Step 3: Prepare Dark Garments to Reduce Friction
Preparation protects the outer surface and prevents loose objects from creating lint, scratches, snags, or concentrated product marks.
Empty pockets and remove tissues
Check every pocket, including small watch, coin, and hidden security pockets. Remove receipts, tissues, pens, lip balm, coins, keys, and paper tags. A forgotten tissue can cover an entire dark load with visible fibers.
Close fasteners while protecting delicate hardware
Zip zippers, fasten hooks where appropriate, and secure hook-and-loop closures so they cannot scrape nearby fabric. Protect bras, decorative hooks, straps, and sharp hardware in a suitable mesh bag when the care label permits machine washing.
Turn garments inside out when construction permits
Turning jeans, printed shirts, sweatshirts, and some dark basics inside out can reduce direct rubbing on the visible face. The American Cleaning Institute’s dark-clothing care advice includes inside-out washing among several practical steps, but the label and garment construction still control the decision.
Use mesh bags for fragile dark items
Choose a bag large enough for the garment to move rather than folding it into a tight bundle. Keep fragile pieces away from rough denim, exposed zippers, and heavy towels. Remove shoulder pads or detachable ornaments only when the manufacturer permits it.
Step 4: Measure Detergent Without Creating Visible Residue
Dark fabric does not need a larger dose. Accurate measurement and correct placement matter more because small amounts of residue are easy to see.
Product concentration, load size, soil, water, and washer type
Read the chart for the exact detergent. Match the dose to the actual load and soil level, then account for water conditions only as the label directs. Confirm HE compatibility when required and check automatic-dispenser concentration settings in the washer manual.
Why excess detergent is obvious on dark surfaces
Too much product can be difficult to disperse and rinse, especially in a dense load or low-water machine. It may leave pale streaks, a dull film, stiffness, slick patches, trapped fragrance, or extra suds. More detergent can also hold loosened material in the fabric instead of helping it leave.
Liquid, powder, pod, and sheet placement
Place each format exactly where its label and the machine manual specify. Keep powders dry until use, do not put a pack in a dispenser unless instructed, and do not pour concentrate directly onto a garment unless the product allows it. Incorrect placement can create local marks that resemble fading.
Step 5: Choose Cycle, Water Setting, and Spin
Settings should clean the soil while limiting avoidable abrasion, stretching, dye movement, and heat exposure. Select them from the weakest item in the load.
Durable everyday darks
A normal or manufacturer-recommended colors cycle may suit sturdy cotton basics when labels align. Choose a soil level that matches actual wear, not the darkest color. Avoid a heavy-duty setting simply because the load contains jeans.
Synthetics, stretch fabrics, and activewear
These garments may need a cycle that limits tangling and excessive spin. Check labels for heat, softener, and tumble restrictions. Wash hook-and-loop straps and rough hardware separately so they do not damage smooth stretch surfaces.
Dark delicates
Use hand washing, a gentle cycle, or professional care only when the label permits that method. Lower agitation does not make every silk, wool, lace, rayon, or embellished garment machine-safe.
New dyes
Use the stated temperature and cycle, then keep the item with very similar colors. Do not lengthen the wash or soak it merely to test colorfastness. Prolonged wet contact can increase transfer for some garments.
Why cooler water and gentle action cannot stop all fading
They may reduce some dye movement and surface friction, but unstable dye, poor manufacturing, sunlight, wear, and repeated laundering still change color. Whirlpool’s colored-clothing washing instructions also place sorting, care tags, settings, and drying together rather than presenting one water choice as a complete solution.
Step 6: Load the Washer to Limit Abrasion and Poor Rinsing
Correct loading allows water and detergent to circulate and reduces garments grinding against one another. Basket fullness should be judged by movement and the machine’s stated capacity.
Leave movement space
Place garments loosely rather than pushing them down. Dense jeans and hoodies can consume usable capacity before the drum looks full. Split the load when items move as one heavy mass or cannot tumble freely.
Avoid heavy rough items with lightweight dark clothing
Denim, canvas, towels, and hardware-heavy garments can abrade thin T-shirts, leggings, blouses, and smooth synthetics. Separate them when fabric weight or construction differs, even if every item is black.
Prevent load imbalance
Distribute jeans, hoodies, and other heavy pieces around the basket. Do not wash one water-absorbing item by itself unless the manual permits it. An unbalanced load can spin poorly, leave excess water, and increase drying time.
Keep lint-heavy textiles out
Do not add a dark towel merely to fill space around dark shirts. Color compatibility does not solve lint transfer. Create a smaller compatible load or wait for similar items instead.
Step 7: Inspect Before Drying
Wet fabric can hide or exaggerate color changes, so inspect under bright neutral light and compare several areas. Do not move automatically from washer to dryer.
Distinguish lint, residue, transfer, and fading
Loose fibers often lift with a damp hand or fabric-safe lint tool. Residue may feel slick, gritty, stiff, or chalky. Transfer adds a new patch of color. True fading remains part of the fabric and often follows wear or friction zones.
When an extra rinse may be appropriate
Use a label-compatible extra rinse when visible detergent remains and the washer offers the option. First correct the dose, product placement, load size, and cycle. Repeated rinsing should not replace fixing the reason residue formed.
Why heat should wait
Set aside any garment with a possible stain, dye transfer, or concentrated product mark. The American Cleaning Institute laundering-problems reference separates fading, lint, dye transfer, and detergent streaks because each requires a different response. Identify the problem before applying dryer heat.
Step 8: Dry Dark Clothes with Heat and Light in Mind
Drying can add tumble friction, heat stress, stretching, or light exposure. Choose the method that protects both the color and the garment’s construction.
Tumble-drying limits
Follow the stated heat and tumble setting. Remove clothing when dry rather than extending the cycle for convenience. Overdrying can increase friction, static, shrinkage risk, and wear on prints, elastics, and finishes.
Indoor air-drying with airflow
Space garments so sleeves, legs, pockets, and waistbands are open to moving air. Hang only when the item can support its wet weight. Lay shape-sensitive knits flat and reshape them to their original dimensions.
Direct-light exposure and label limits
Bright sunlight may accelerate color change in some dyes and can affect elastics, prints, and finishes. Use shade or indoor drying when appropriate, but provide enough airflow to prevent slow drying. Do not claim that avoiding sunlight stops all fading.
Reshape knits and check thick areas
Smooth seams, cuffs, collars, and hems before they dry in a distorted position. Check hoods, pockets, waistbands, doubled knees, and heavy seams before folding. A cool thick area may still contain moisture.
Lint-Control Checklist for Dark Laundry
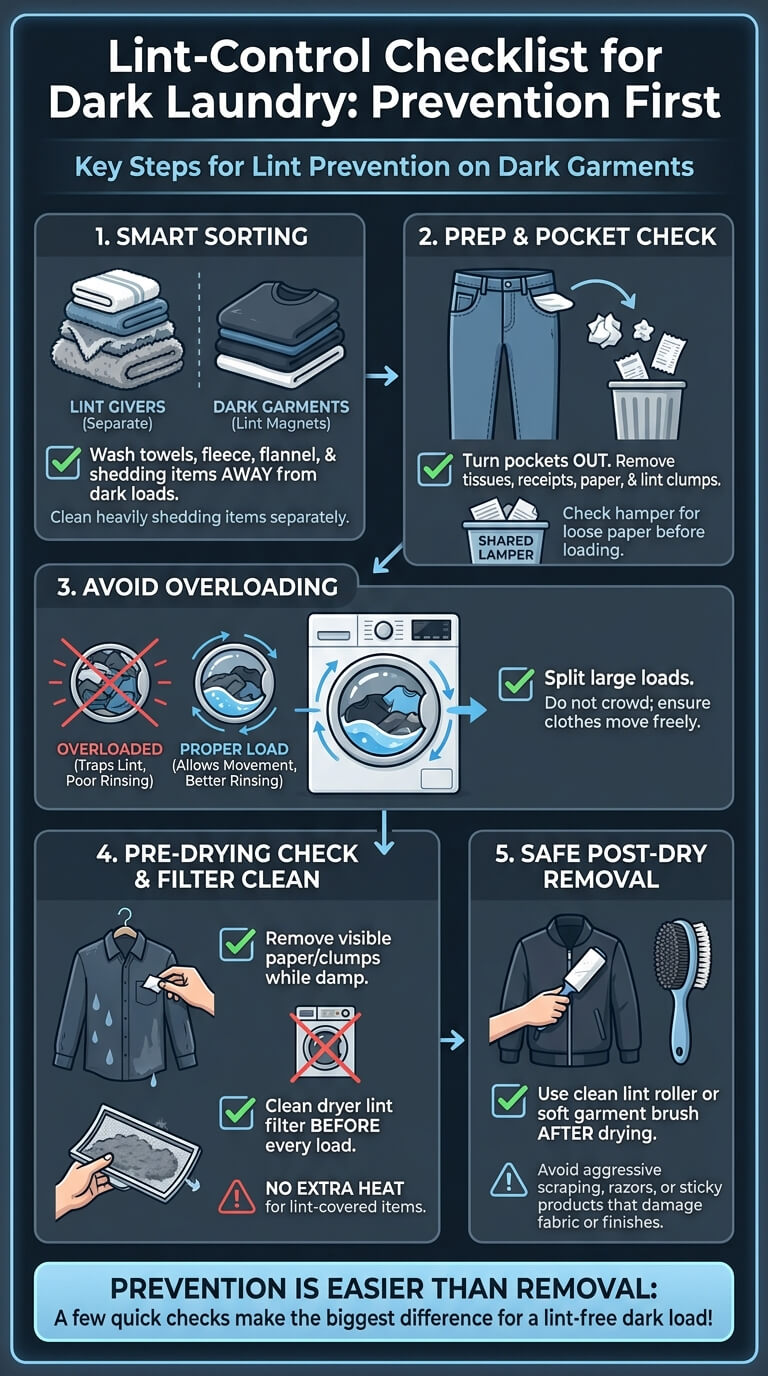
Lint prevention is easier than removing fibers from a full black load. A few checks at sorting, loading, and drying make the largest difference.
Separate lint givers
Wash towels, fleece, flannel, pet bedding, and visibly shedding fabrics away from lint-attracting dark garments. Clean heavily shedding items according to their own labels rather than repeatedly exposing smooth clothing.
Clean pockets and remove paper
Turn pockets out when practical and remove tissues, receipts, paper tags, and lint clumps. Check a shared hamper for loose paper before moving the load to the machine.
Avoid overloaded loads
Crowding traps lint against fabric and limits rinsing. It also increases friction and creasing. Split a load that cannot move freely instead of adding more detergent or an automatic extra rinse.
Check garment surfaces before drying
Remove visible paper or clumps while the fabric is damp. Clean the dryer’s lint filter as the appliance manual directs. Do not tumble-dry a lint-covered garment on extra heat in the hope that every fiber will release.
Use fabric-safe removal methods after drying
Use a clean lint roller, soft garment brush, or another method permitted for the fabric. Support delicate knits and avoid aggressive scraping, razors, or sticky products that can pull fibers, remove finishes, or leave adhesive.
Troubleshooting Dark Clothes After Washing
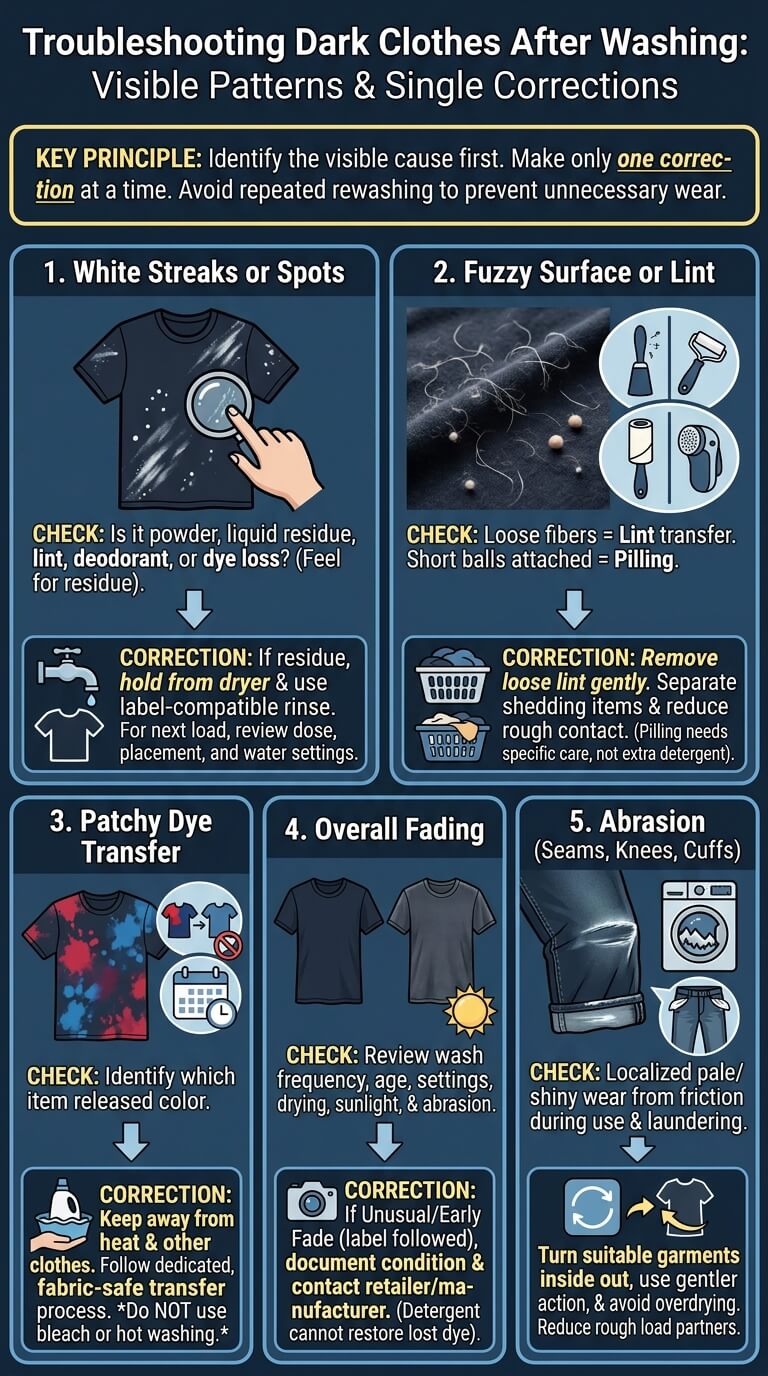
Limit troubleshooting to the visible pattern and make one correction at a time. Rewashing repeatedly without identifying the cause can add wear without improving the garment.
White streaks or spots
Check whether the mark is powder, concentrated liquid, lint, deodorant, or actual dye loss. If it feels like residue, hold the item out of the dryer and use a label-compatible rinse. Review dose, placement, water setting, and basket fullness for the next load.
Fuzzy surface or lint
Loose contrasting fibers point to lint transfer. Short balls attached to the fabric may be pilling. Remove loose lint gently, then separate shedding textiles and reduce rough contact. Pilling may require fabric-specific care and is not corrected by extra detergent.
Patchy dye transfer
Keep the affected garment away from heat and from other clothing. Identify which item released color and follow a dedicated, fabric-safe transfer process. Do not improvise with bleach, solvents, or repeated hot washing on dark fabric.
Overall fading
Review wash frequency, garment age, care settings, drying, sunlight, and daily abrasion. If the label was followed and the item faded unusually after an early wash, document the condition and contact the retailer or manufacturer. Routine detergent cannot restore lost dye.
Abrasion at seams, knees, cuffs, or high-contact areas
Localized pale or shiny wear often comes from friction during use and laundering. Reduce rough load partners, turn suitable garments inside out, use compatible gentler action, and avoid overdrying. Replace or repair the garment when fibers have thinned.
Common Dark-Laundry Mistakes
Dark loads go wrong when color is treated as the only sorting rule or when more product and stronger action are used to solve every appearance problem.
Washing new saturated garments with established darks
A new indigo or black item may release more dye than older clothing. Keep it separate or with very similar items until its behavior is known. Inspect contrast stitching and light-colored trim after washing.
Using extra detergent
A larger dose does not lock in color. It can increase residue, poor rinsing, stiffness, and visible streaks. Measure the exact product and correct soil treatment, loading, and settings instead.
Combining darks with towels or rough heavy items
Matching color does not prevent lint or abrasion. Separate smooth shirts, leggings, and fine knits from towels, canvas, denim, and hardware-heavy garments when weight and surface texture differ.
Overloading
A compressed drum limits movement and rinsing while increasing garment-to-garment rubbing. Split the load when it cannot circulate. Do not compensate with extra product or a longer cycle.
Expecting inside-out washing or cooler water to prevent all fading
These choices can reduce some direct friction and dye movement, but they cannot control unstable dyes, sunlight, body wear, manufacturing quality, or endless wash cycles. Set a realistic goal of reducing avoidable change.
When to Stop DIY
Some garments and problems carry more risk than routine home washing can justify. Stop when labels, construction, or damage make the next step uncertain.
Unstable dye, valuable garment, or complex construction
Seek professional textile care for expensive or sentimental pieces, structured jackets, leather or suede trim, heavy embellishment, bonded layers, unknown fibers, and professional-clean-only labels. A reversible conservative choice is safer than an aggressive experiment.
Significant color transfer or fabric damage
Stop repeated washing if color spreads, seams distort, a coating peels, fibers thin, or trim loosens. Keep the garment away from heat and document what happened. Professional assessment may offer more options than repeated home treatment.
Problems that need a different process
A set stain, persistent smoke or musty odor, damaged washer, chemical spill, or dye-restoration request is not solved by changing the dark-load routine alone. Address the actual problem with suitable instructions and safety limits.
Washing Dark Clothes FAQ
These answers cover common decisions, but the care label, product directions, and washer manual remain the final limits.
Should black clothes be washed separately?
New, unstable, delicate, heavily soiled, lint-attracting, or unusually heavy black items may need separate loads. Established black garments can wash with compatible dark colors when fabric, soil, cycle, and drying needs align.
Does turning clothes inside out prevent fading?
It can reduce direct friction and exposure on the visible surface of suitable garments, especially denim and printed basics. It cannot prevent every dye change, and it should not be used when construction or care instructions make it unsuitable.
Why do black clothes have white streaks?
Common possibilities include detergent residue, undissolved powder, lint, tissue, deodorant, product contact, or actual fiber damage. Inspect the feel and pattern before choosing a rinse, lint removal, stain process, or replacement.
Can dark clothes be air-dried in sunlight?
Follow the care label. Some dark dyes, elastics, prints, and finishes may change with prolonged direct light. Shade or indoor airflow may reduce that exposure, but clothes still need enough ventilation to dry fully.
Is fading reversible?
Routine washing cannot restore dye or a finish that has been lost. Surface lint and detergent film may be removable, which is why diagnosis matters. True fading may require professional dye work, repair, or replacement.
Final Thoughts
Dark clothing lasts longer when each load is built by dye stability, fabric, weight, soil, and care limits rather than by color alone. Measure detergent, reduce crowding and rough contact, then choose the least aggressive settings that can clean the garments.
Inspect before heat and identify whether a visible change is residue, lint, transfer, abrasion, or true fading. Correct only the cause you can support, and stop when the garment is valuable, structurally complex, or already damaged.

Ethan Carter is the Founder & Editor of HomeCleanSecrets. Based in the United States, he has 5 years of experience creating practical home cleaning, laundry care, stain removal, decluttering, and home organization content. His goal is to help everyday households clean smarter and build simple routines that are easier to maintain.
Read more about Ethan Carter on his author page: https://homecleansecrets.com/ethan-carter/