
White clothes stay brighter when they are sorted by fabric and soil, washed with a measured amount of detergent, and dried only after a careful inspection. Color alone does not tell you which cycle, temperature, or whitening product is safe.

The most reliable routine begins with the garment care label. Check the whole item, including trim, prints, elastic, lining, and embellishments, then choose the least aggressive method that can clean the load.
Quick Answer: A Care-Label-First White Laundry Routine

A good white-laundry routine has four checkpoints before the washer starts and one more before heat. These checks prevent many cases of dullness, residue, dye transfer, and avoidable fabric damage.
Sort by fabric and soil, not color alone
Separate sturdy white cottons from delicate blouses, stretch garments, lint-heavy towels, and heavily soiled pieces. Two white items may need completely different wash action, detergent amounts, and drying methods.
Measure detergent and choose compatible settings
Read the detergent label, estimate the actual load size, and consider soil level, water conditions, and washer type. Choose the cycle, water setting, and spin from the strictest garment label in the load, not from the fact that the clothing is white.
Use whitening products only when both labels allow
The garment label must permit the product category, and the laundry product label must permit the fabric, washer, dose, and placement. The Federal Trade Commission care-label guidance explains that labels may allow non-chlorine bleach while warning against chlorine bleach, or prohibit bleach entirely.
Inspect before heat
When the cycle ends, look at collars, cuffs, underarms, seams, and any previously marked areas. Do not apply dryer heat to a stain or transfer mark that still needs attention. Check for residue and damp clumps as well.
Why White Clothes Turn Yellow, Gray, or Dingy

Discoloration has several possible causes. Correcting the wrong cause can waste a wash or damage the garment, so identify the pattern before adding more detergent, stronger products, or hotter water.
Retained body soil and incomplete cleaning
Collars, cuffs, underarms, waistbands, and socks collect skin oils, perspiration, dust, and product residue. If the load is crowded or the wash action is too mild for the soil, some material may remain and gradually look yellow or gray.
Too much product or poor rinsing
Excess detergent, an undissolved powder, or a whitening product used incorrectly can leave a film. Fabric may feel stiff, slick, waxy, or unusually heavy. A good test is to compare an affected area with a well-rinsed section after the garment is dry.
Dye transfer and mixed loads
Pastels, colored trim, printed pieces, or a new garment can release dye even when the load looks mostly white. Transfer may create a gray, blue, pink, or uneven cast. Repeated washing with unstable colors can make the change appear gradual.
Heat, storage, aging, and fiber changes
High heat can set some marks and can stress elastics, finishes, or blended fibers. Long storage with remaining body soil, dampness, or contact with unsuitable materials may also alter appearance. Some synthetic fibers and finishes change color as they age.
When discoloration may not be removable soil
Oxidized fibers, damaged finishes, scorched areas, chemical spots, and worn fabric will not behave like ordinary dirt. Stop if the material feels brittle, thin, rough, or distorted. Stronger treatment can make permanent damage more visible.
The White-Laundry Decision Framework
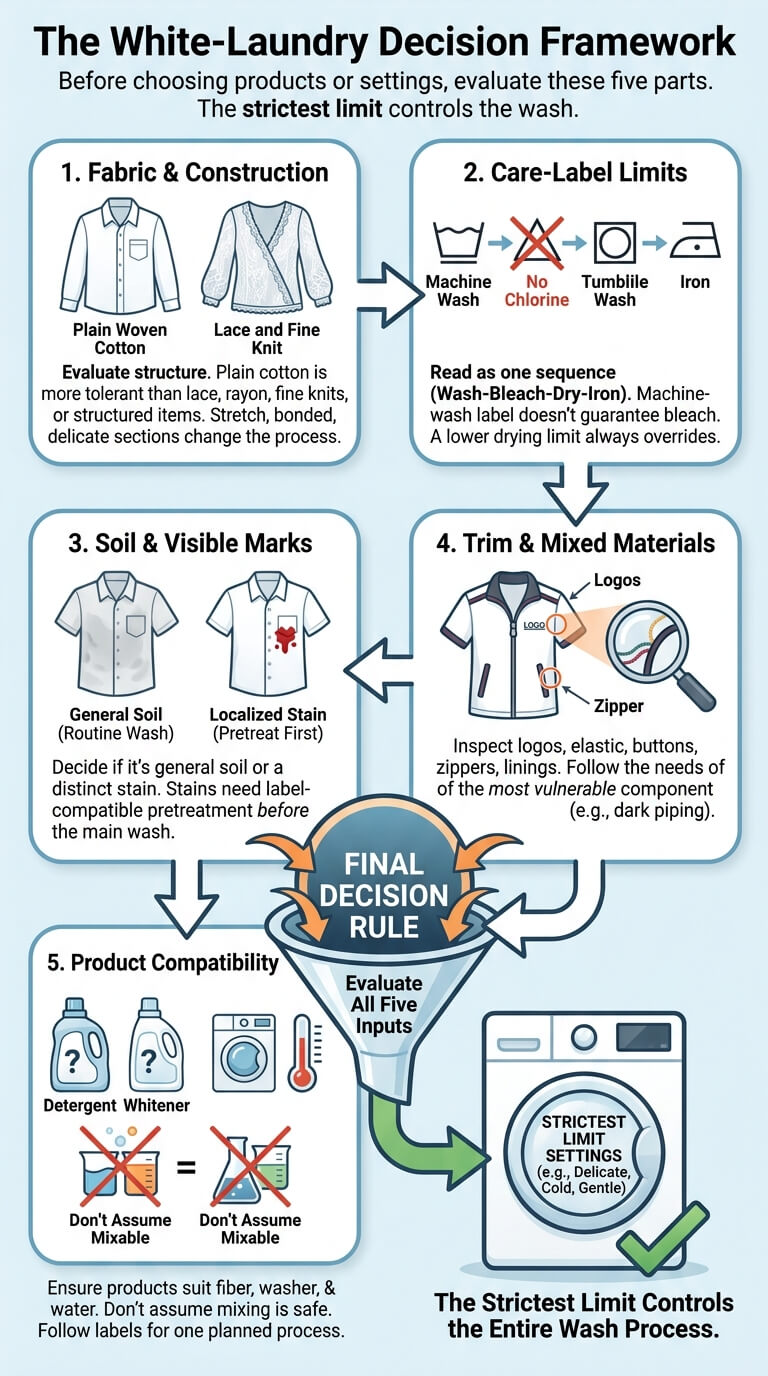
Before choosing products or settings, evaluate five parts of the garment and load. The strictest limit should control the wash.
Fabric and construction
Plain woven cotton is usually more tolerant of movement than lace, rayon, fine knitwear, or a structured shirt with interfacing. Stretch fibers, bonded layers, padded sections, and delicate seams can change the safe process.
Care-label washing and bleaching limits
Read the instructions for washing, bleaching, drying, and ironing as one sequence. A machine-wash label does not automatically allow chlorine bleach, and a bleach symbol does not override a lower drying-temperature limit.
Soil and visible marks
Decide whether the item has general body soil, a localized stain, dye transfer, or product residue. Routine washing can address general soil. A distinct stain may require a separate label-compatible pretreatment before it joins the load.
Trim, print, elastic, lining, and mixed materials
Inspect logos, colored thread, elastic bands, buttons, zippers, lace panels, linings, and decorative coatings. Follow the needs of the most vulnerable component. A white garment with dark piping is not the same as plain white cotton.
Product compatibility
Check whether the detergent and any whitening product suit the fiber, washer, and water setting. Do not assume that two products can be combined because each is sold for laundry. Follow the labels and use one planned process.
Step 1: Sort Whites by Fabric, Soil, and Construction
Sorting reduces the need to use one harsh setting for a mixed load. Build groups that can share the same care limits and wash action.
Durable cottons versus synthetics and blends
Plain cotton socks, undershirts, and sturdy basics may tolerate a normal cycle when their labels allow it. Polyester blends, stretch garments, and wrinkle-prone shirts may need lower heat, gentler action, or prompt removal.
White garments with colored trim or prints
Wash these according to the trim and print, not the white background. New colored decoration may transfer. Stop if a hidden area releases color during a manufacturer-approved colorfastness check.
Towels, socks, shirts, and delicate whites
Towels are heavy and often shed lint. Socks may carry more soil. Shirts wrinkle, while delicate whites can snag or stretch. Separate them when weight, lint, soil, or cycle requirements differ.
Heavily soiled pieces and lint transfer
Keep cleaning cloths, muddy workwear, and heavily soiled household textiles away from lightly worn garments. Separate lint givers from smooth shirts and synthetic fabrics that show fuzz. Removing loose debris before washing also helps.
Step 2: Read the Care Label and Inspect the Entire Garment
Complete this check under good light before adding products. It is easier to make a safe decision while the garment is dry and its construction is visible.
Wash, bleach, tumble-dry, and iron limits
Read every care stage, not only the wash symbol. A white item may allow machine washing but prohibit bleach or tumble drying. If the label is missing or unreadable, choose a conservative method or contact the manufacturer.
Checking underarms, collars, cuffs, seams, and hidden areas
Turn the item so high-soil zones and concealed discoloration are visible. Look inside cuffs, around pocket edges, beneath collars, and along folded seams. Note whether the change is local, overall, or concentrated around elastic and trim.
Pretreatment as a separate stain decision
Do not cover the garment with extra detergent merely because one spot is dark. Follow the treatment product label and the garment limit. Blot or apply only as directed, and keep the full stain-removal method separate from the routine wash.
Expensive, structured, embellished, or professional-care garments
Stop DIY when the label requires professional care or when the garment has tailoring, padding, leather, suede, glued decoration, heavy beading, or sentimental value. Experimenting with bleach or soaking can alter several components at once.
Step 3: Measure Detergent for the Load
Detergent should match the product concentration and the real wash conditions. More detergent does not automatically make white fabric brighter.
Product concentration, load size, soil, water, and washer type
Read the dose chart for the exact product. Estimate whether the load is small, normal, or large using the label’s definitions, then adjust only within its instructions for heavier soil or water conditions. Confirm that the product suits an HE washer when required.
Why extra detergent can make whites look dull
An oversized dose may be harder to disperse and rinse, especially in a crowded or low-water cycle. Residue attracts soil, stiffens fibers, and changes the way light reflects from the fabric, making clean clothing look gray.
Avoiding product buildup and incomplete rinsing
Use the correct dispenser or placement described by the washer and product labels. Keep powder dry until use, place packs where instructed, and do not pour concentrated liquid directly onto clothing unless the label specifically permits it.
Step 4: Choose the Washer Cycle, Water Setting, and Spin
Match the controls to fabric strength, construction, soil, and label limits. Do not select a setting by color alone.
Durable everyday whites
A normal or manufacturer-designated whites cycle may suit sturdy, similarly soiled items when all labels allow it. Leave enough drum space for movement. A stronger program cannot compensate for a severely overloaded basket.
Synthetics, blends, and wrinkle-prone whites
These garments may benefit from a permanent-press or lower-wrinkle program, moderate spin, and prompt removal. Excess heat can set wrinkles or stress elastic and finishes, so confirm both washer and dryer settings.
Delicate white garments
Machine wash only when the label allows it. Protect straps, hooks, and lace, use a small compatible load, and reduce agitation and spin as directed. Hand washing or professional care may be safer.
Why the label and machine manual override color-based rules
White does not mean hot-water-safe, high-spin-safe, or bleach-safe. Washer temperature labels also vary by model. Follow the garment limit first and use the manual to understand what the selected program actually does.
Step 5: Decide Whether a Whitening Product Is Appropriate
Whitening is optional. A correctly sorted, measured, and rinsed detergent wash may be the safest choice for many garments.
No whitening product
Choose detergent alone when the label prohibits bleach, the fabric is uncertain, the garment has vulnerable trim, or the discoloration may be damage rather than soil. This is also the sensible first wash for new or sentimental items.
Oxygen-based product when label-compatible
Some garments allow non-chlorine bleach when needed. Follow the exact product label for dose, water conditions, placement, and contact time. Do not treat the word oxygen as proof that the product is harmless to every fiber or finish.
Chlorine-based product only when explicitly compatible
Use it only when the garment label, fiber content, product directions, and washer instructions all permit it. The American Cleaning Institute bleach guidance emphasizes reading both the garment and bleach labels before use.
Other whitening products according to their labels
Laundry boosters and whiteners can have different ingredients and operating conditions. Treat each one as a separate product. Check fiber restrictions, washer placement, water recommendations, and whether it is intended for soaking or the main wash.
Never mix laundry chemicals
Never combine bleach with ammonia, acids, vinegar, or other cleaners. Dangerous gases can form. Poison Control’s chlorine-gas safety information advises reading labels, keeping products away from children, using ventilation, and avoiding chemical mixtures.
Bleach Compatibility Checklist
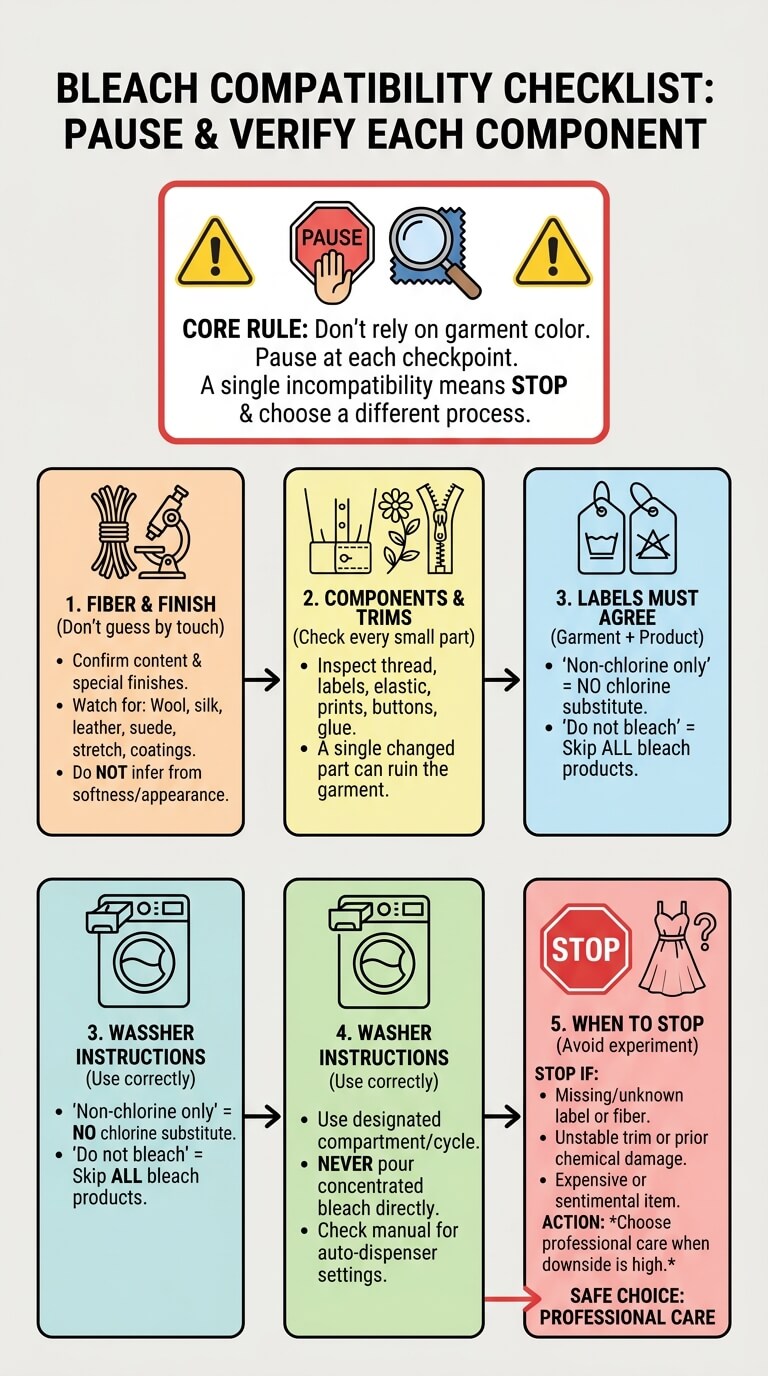
Pause at each checkpoint rather than relying on a garment’s color. One incompatible component is enough reason to choose a different process.
Fiber and fabric finish
Confirm the fiber content and any special finish. Wool, silk, leather, suede, stretch fibers, coatings, and resin-treated fabrics can have restrictions. Do not infer compatibility from appearance or softness.
Colored trim, prints, elastics, coatings, and embellishments
Check thread, labels, piping, elastic, screen printing, embroidery, buttons, and glued details. A product that changes one small component can ruin an otherwise washable garment.
Garment label and product label
Both must agree. If the garment says non-chlorine bleach only, do not substitute chlorine bleach. If it says do not bleach, skip all products categorized as bleach unless the manufacturer provides updated care instructions.
Washer dispenser and cycle instructions
Use only the designated compartment or timing method. Do not pour concentrated bleach onto fabric. Automatic dispensers may require a setting or cleaning procedure described in the owner’s manual.
When to stop rather than experiment
Stop if the label is missing, the fiber is unknown, trim is unstable, the garment has previous chemical damage, or the item is expensive or sentimental. Professional textile care is a reasonable choice when the downside is high.
Step 6: Load and Wash Without Creating New Problems
Correct loading gives water and products room to reach the fabric and leave during rinsing. It also reduces abrasion and transfer between incompatible items.
Avoiding an overfilled drum
Place items loosely rather than compressing them. Follow the washer’s stated capacity and load guidance. Bulky towels can consume movement space even when the basket is not filled to the top.
Allowing water and detergent movement
Garments need to circulate or tumble. When a load moves as one solid mass, soil and product may redistribute instead of rinsing away. Split dense loads rather than increasing detergent.
Correct product placement
Put detergent, packs, powder, and whitening products in the location specified by both the product and machine instructions. Incorrect placement can create concentrated spots, incomplete dissolving, or early contact with fabric.
Keeping incompatible items out of the load
Remove unstable colors, lint-heavy textiles, delicate pieces, and items with different temperature or cycle limits. A nearly full compatible load is better than a larger mixed load that requires compromise.
Step 7: Rinse, Inspect, and Decide Before Drying
The end of the wash is a decision point, not an automatic transfer to the dryer. Inspect while the fabric is still damp and before heat changes the mark.
Checking residue, remaining soil, dye transfer, and discoloration
Look for powder, slick patches, white clumps, gray cast, colored transfer, and unchanged stains. Smell alone is not enough because fragrance, dampness, retained soil, and washer odor can be confused.
When an additional rinse may be appropriate
An extra rinse can help when the garment label and washer allow it and residue is visible. First correct detergent amount, product placement, and basket fullness. Repeated extra rinsing should not become a substitute for fixing the cause.
Why unresolved marks should be checked before dryer heat
Heat can make some stains and transfers harder to address. Set the affected item aside, identify the mark, and follow a suitable treatment process. The American Cleaning Institute laundering-problems reference also recommends avoiding drying in several discoloration situations until the cause is addressed.
Step 8: Dry White Clothes According to Fabric Limits
Drying should protect the garment’s shape, finish, elastic, and remaining color details. The white background does not remove heat or tumble restrictions.
Machine-drying heat and tumble limits
Choose the dryer cycle from the care label. Use lower heat for stretch fibers, synthetics, prints, and delicate construction when required. Remove wrinkle-prone garments promptly and stop if trim begins to curl, crack, or distort.
Indoor or line drying
Hang or lay garments in the position their labels and construction support. Give items space and airflow. Heavy knits may stretch on a hanger, while folded-over towels may remain damp inside.
Light exposure and mixed-material considerations
Outdoor light and heat affect fibers, dyes, prints, and elastic differently. Do not assume sunlight is suitable for every white item. Follow the care instructions and keep vulnerable decoration from prolonged direct exposure.
Ensuring thick areas are fully dry before storage
Check waistbands, cuffs, collars, pockets, layered seams, hoods, and elastic. A cool thick section can still be damp. Do not fold an item into a drawer until every area is dry.
Troubleshooting White Clothes After Washing

Identify the pattern, feel, and location before rewashing. The actions below address different causes and should not be combined indiscriminately.
Yellow cast
Check whether yellowing is concentrated around body-soil zones, elastic, storage folds, or the whole garment. Rewash only with label-compatible products and settings. Stop if the fabric feels damaged or the color change follows a chemical splash.
Gray or dingy appearance
Review sorting, load size, detergent dose, rinse performance, and dye transfer. Separate whites more carefully on the next wash and change one variable at a time. Stronger bleach will not correct every gray cast.
Chalky, powdery, or oily residue
Do not dry the item. Check product placement, dose, dissolving conditions, and basket fullness. A label-compatible rinse may help. Persistent residue across many loads can indicate a separate washer or water-condition issue.
Localized stain versus overall discoloration
A defined mark needs stain identification, while an even cast points toward sorting, residue, aging, or repeated soil buildup. Treating the entire garment for one spot can expose clean fabric to unnecessary chemicals.
Fiber damage, aging, or irreversible color change
Brittleness, thinning, shiny patches, melted fibers, scorched areas, and permanent yellowing around failed elastic are not normal soil. Stop repeated treatment and consider repair, replacement, or professional assessment.
Common White-Laundry Mistakes
Most errors come from assuming that white clothing is a single fabric category. The safer approach is to check the actual garment and load every time.
Treating every white fabric as bleach-safe
White silk, wool, spandex blends, decorated garments, and coated fabrics can have strict limits. Read the label and fiber content before choosing any whitening product.
Using more detergent to force brightness
Excess product can make rinsing harder and may leave a dull film. Correct the load size, dose, soil treatment, and washer setting instead of automatically adding more.
Mixing whites with unstable colors or heavy lint
A pale item, printed garment, or colored trim can still transfer dye. Towels and fleece can cover smooth white clothing with lint. Build the load by compatibility, not appearance from a distance.
Applying heat before inspection
Move each item through good light before tumble drying or ironing. Set aside remaining stains, transfers, and concentrated product marks. Heat can reduce later treatment options.
Ignoring trim and construction
Elastic, interfacing, padding, glued decoration, metal hardware, and contrasting thread may fail before the main fabric. The most vulnerable part determines the safe process.
When to Stop DIY
Routine laundry has limits. Stop when the garment, chemical, or appliance condition creates uncertainty that cannot be resolved from the labels and manuals.
Unknown fabric, missing label, structured garment, or sentimental item
Choose professional care when the item has unknown fiber content, tailoring, leather or suede trim, heavy embellishment, bonded layers, or high personal value. A small cleaning improvement is not worth permanent construction damage.
Chemical exposure or damaged fabric
If products were mixed, fumes are present, or bleach contacted skin or eyes, move away from exposure and seek current Poison Control or emergency guidance. Do not continue handling the load as an ordinary laundry problem.
Discoloration that does not respond to label-safe routine washing
Repeated aggressive washing can weaken fabric without restoring color. When a carefully sorted, correctly dosed, label-compatible process does not improve the garment, consider professional assessment or replacement.
Washing White Clothes FAQ
These answers cover common decisions, but the garment label and product instructions remain the final limits.
Should all white clothes be washed together?
No. Separate by fabric strength, construction, soil, lint, and care requirements. Durable white towels, stretch shirts, delicate blouses, and garments with colored trim may all require different loads.
Does hot water keep whites brighter?
Not automatically. Hotter water can help in some label-compatible processes, but it may damage fibers, finishes, elastic, prints, or stains that react poorly to heat. Choose within the garment and product limits.
Can chlorine bleach be used on every white garment?
No. White color does not establish chlorine-bleach compatibility. The care label may prohibit bleach or allow only non-chlorine bleach. Fiber, trim, product directions, and washer instructions must also agree.
Why do white clothes turn yellow in storage?
Possible causes include remaining body soil, product residue, damp storage, aging finishes, contact with unsuitable materials, or fiber changes. Wash and fully dry garments before storage, but do not promise that every existing yellow area is reversible.
Should dingy whites be dried before rechecking?
Inspect them while damp first. If a stain, dye transfer, or concentrated product mark remains, hold the item out of the dryer. Dry only when the garment is clean enough and the label permits the chosen method.
Final Thoughts
Keeping whites bright depends on a sequence of compatible decisions: sort by fabric and soil, read every care limit, measure detergent, choose suitable washer settings, and use whitening products only when both labels allow them.
Inspect before heat and change one variable at a time when results are poor. Stop when discoloration appears permanent, the garment has vulnerable construction, or chemical and appliance instructions do not provide a clearly safe path.

Ethan Carter is the Founder & Editor of HomeCleanSecrets. Based in the United States, he has 5 years of experience creating practical home cleaning, laundry care, stain removal, decluttering, and home organization content. His goal is to help everyday households clean smarter and build simple routines that are easier to maintain.
Read more about Ethan Carter on his author page: https://homecleansecrets.com/ethan-carter/