
Doing laundry well is less about memorizing one perfect setting and more about making a series of small decisions in the right order. Color, fabric, soil level, care instructions, detergent amount, washer movement, water temperature, spin speed, and drying method all affect the final result. A routine that works for a cotton T-shirt may be too rough for a lace top, too mild for heavily soiled workwear, or too hot for a dark garment with unstable dye.
The safest approach is to inspect first, choose the least aggressive method that can do the job, and check the result before adding heat. Keep a small measuring cup near the detergent, empty pockets while sorting, and place questionable garments aside instead of making a rushed choice at the machine. These habits make the process faster because they prevent rewashing, extra rinses, and last-minute searches for care instructions.
The American Cleaning Institute’s laundry basics follow the same practical sequence: sort, treat visible stains, select products and settings, wash, dry, fold, and put items away.
Quick Laundry Workflow from Hamper to Storage
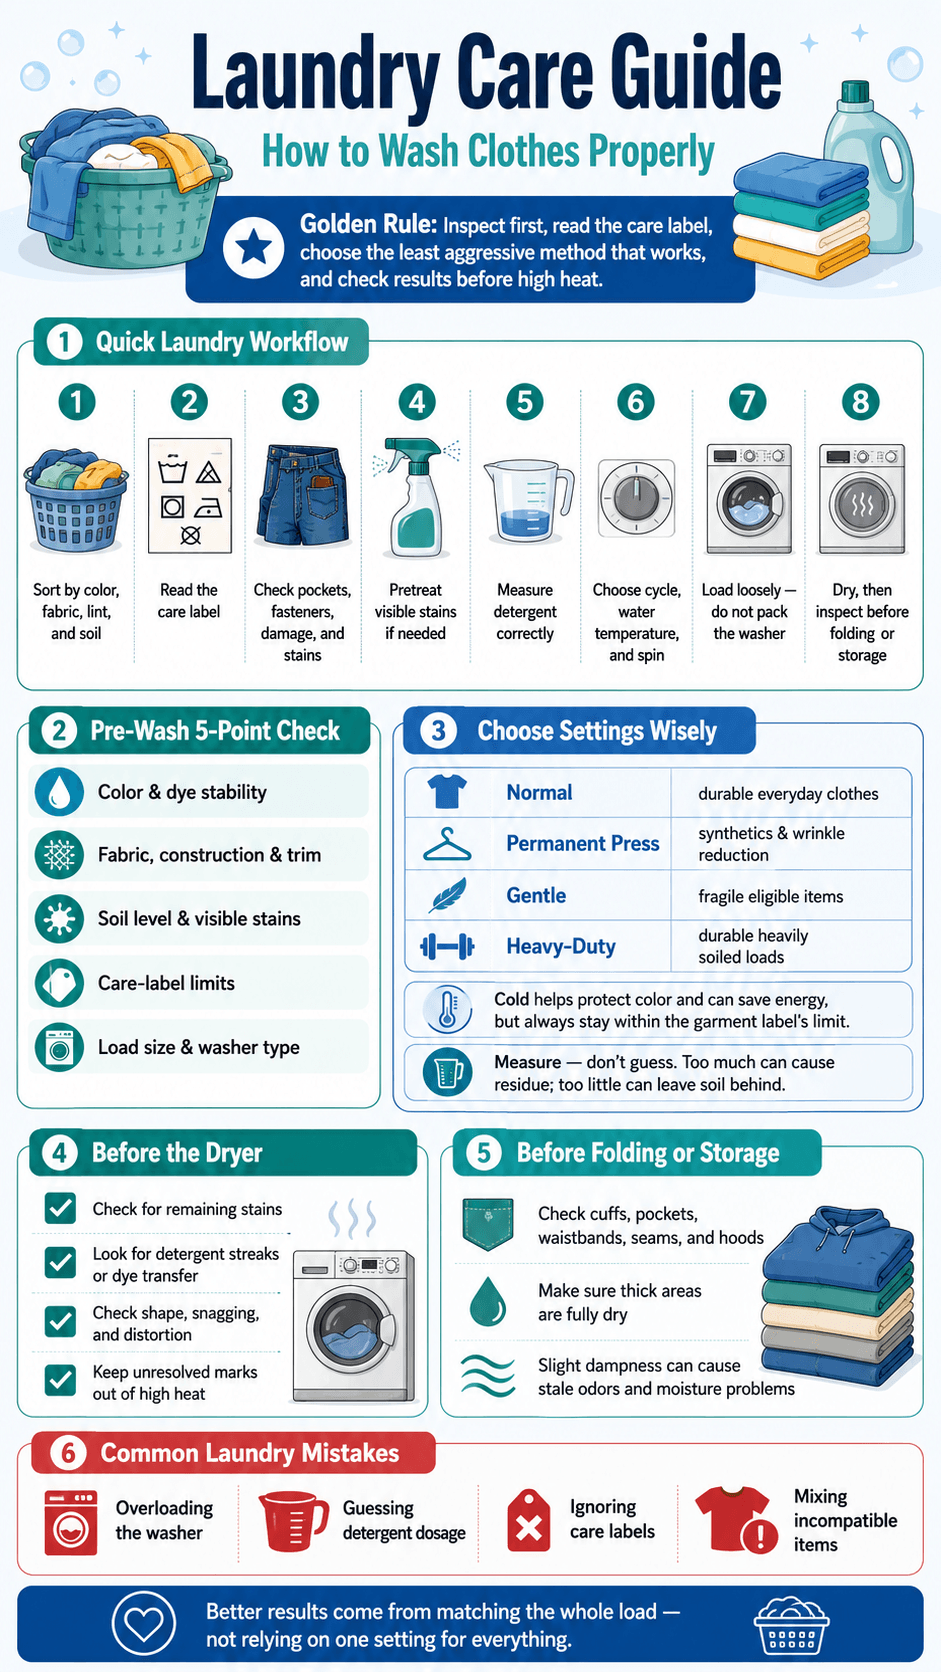

Use this sequence as the default path for ordinary household clothing, then slow down whenever a label, stain, fabric, or appliance instruction changes the risk.
The nine decisions in a complete laundry cycle
- Sort by care limits, color stability, fabric weight, lint behavior, and soil level.
- Read the full care label, including drying and ironing instructions.
- Inspect pockets, fasteners, trims, damage, and visible stains.
- Decide whether a stain needs pretreatment before washing.
- Measure detergent for the product concentration, load size, soil level, water conditions, and washer type.
- Select a cycle, water setting, spin speed, and any rinse option.
- Load the washer without packing items tightly.
- Dry according to fabric, shape, heat, and tumble limits.
- Inspect again before high heat, folding, wearing, or storage.
What must be checked before heat, folding, or storage
Before a garment enters the dryer, look for remaining stains, detergent streaks, dye transfer, snagging, or distortion. Before folding, check cuffs, pockets, waistbands, hoods, seams, and layered areas for hidden dampness. Heat can make some marks harder to remove, while storing slightly damp clothing can encourage stale odors and moisture problems.
Why Laundry Decisions Work as a System
Each choice affects the next one, so better results come from matching the whole load rather than relying on a single favorite setting.
How color, fabric, soil, chemistry, movement, heat, and drying interact
A washer cleans through water, detergent chemistry, time, and mechanical action. Changing one factor can change what the others need to do. A heavily soiled cotton load may tolerate stronger movement than a lightly worn rayon blouse. A concentrated detergent may require a much smaller measured amount than a standard liquid. A dark, loosely dyed garment may need separation even when its fabric is otherwise durable.
Why one-size-fits-all rules cause problems
Rules such as “always wash cold,” “always fill the cap,” or “all whites can take bleach” ignore garment construction and product differences. The result can be residue, fading, stretching, shrinkage, lint transfer, incomplete cleaning, or slow drying. A good test is to ask which instruction is most specific to the item in your hand. The garment label and appliance manual usually outrank a generic household tip.
The Pre-Wash Five-Point Framework

Before opening the washer, review these five factors. They quickly reveal which garments can share a load and which need separate handling.
Color and dye stability
Separate whites, lights, darks, and highly saturated colors when there is a realistic transfer risk. New black, navy, red, and vivid garments deserve extra caution during their first washes. Mixed-color pieces with contrast trim should follow the most restrictive color or care limitation, not simply the dominant color.
Fabric, construction, and trim
Fabric strength is only part of the decision. Heavy jeans can abrade lightweight shirts. Hooks can catch lace. Beads, bonded layers, shoulder structure, elastic, coatings, and printed finishes may need gentler handling than the fiber name suggests. Stop if seams are opening, trim is loose, or the garment is structured in a way that could lose shape when wet.
Soil level and stain check
Lightly worn clothing, everyday soil, workout wear, and heavily soiled textiles may need different loads. Inspect collars, cuffs, underarms, pockets, knees, and food-contact areas. Pretreatment is a separate decision from routine washing. Do not add extra detergent automatically to compensate for a stain that needs a targeted, label-compatible treatment.
Care-label limits
Read washing, bleaching, drying, ironing, and professional-care instructions together. In the United States, the Federal Trade Commission care-labeling rule requires manufacturers and importers to provide regular care instructions for covered garments. Labels elsewhere may use different symbols or wording, so follow the instructions attached to the item and local guidance.
Load size and washer type
A load should have enough space for water and movement. Front-loaders, impeller top-loaders, agitator machines, compact washers, and automatic-dosing models do not behave identically. Check the manual for capacity, bulky-item limits, dispenser use, and cycle restrictions. Basket volume alone does not tell you whether a dense or bulky load can move properly.
A Simple Decision Tree Before You Start
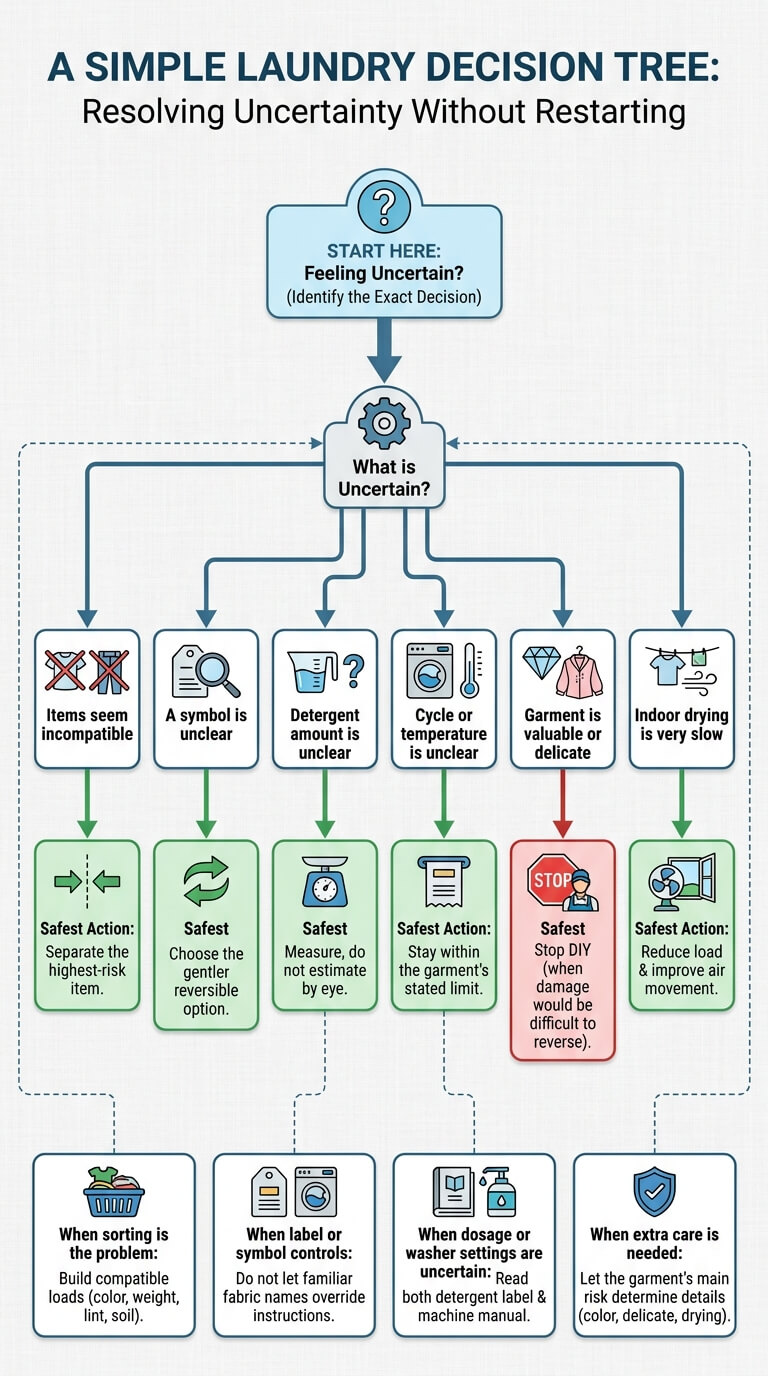
When one part of the process feels uncertain, identify the exact decision instead of restarting the entire routine or choosing a stronger setting.
| What is uncertain? | What to check next | Safest immediate action |
|---|---|---|
| Items seem incompatible | Color stability, fabric weight, lint, soil level | Separate the highest-risk item |
| A symbol is unclear | Full label, manufacturer information, local symbol reference | Choose the gentler reversible option |
| Detergent amount is unclear | Product label, concentration, load size, soil, water, washer type | Measure, do not estimate by eye |
| Cycle or temperature is unclear | Garment label and washer manual | Stay within the garment’s stated limit |
| Garment is valuable or delicate | Structure, trim, lining, fiber, professional-care wording | Stop DIY when damage would be difficult to reverse |
| Indoor drying is very slow | Final spin, spacing, airflow, ventilation, thick areas | Reduce the drying load and improve air movement |
When sorting is the main problem
Concentrate on building compatible loads. Color is only the first filter. Add fabric weight, lint behavior, soil level, and care restrictions before deciding what can share a cycle.
When a label or symbol controls the decision
Do not let a familiar fabric name override a specific instruction. A wool blend may be machine washable, while another wool garment may require professional care because of its structure, lining, or finish.
When dosage or washer settings are uncertain
Read both the detergent label and machine manual. Product concentration, automatic dispensers, low-water washing, and cycle-specific limits can make an old household habit unreliable.
When color protection, delicate handling, or indoor drying needs extra care
New dark dyes, bright whites with mixed trim, fragile construction, and thick garments dried indoors each need a narrower process. Keep the broad laundry sequence, but let the garment’s main risk determine the details.
Step 1: Sort Clothes Before Building a Load
Sorting protects color and fabric while helping the washer clean evenly. The goal is compatible loads, not an excessive number of tiny piles.
The minimum useful sorting categories
For many households, a practical starting point is whites and pale items, stable darks, and a separate group for delicate or high-risk pieces. Add a fourth group for towels, bedding, or heavily soiled durable items when their weight, lint, or soil would make them poor companions for everyday clothing.
New colors, lint transfer, heavy items, and heavily soiled pieces
Wash uncertain dyes separately or with very similar dark colors. Keep lint-giving towels and fleece away from dark synthetics that show every fiber. Avoid mixing heavy denim with thin knits or lingerie. Cleaning cloths, muddy workwear, and other heavily soiled textiles may also need their own label-compatible load.
Small-household decisions when a full load is not available
Do not create an unsafe combination just to fill the drum. Wait for more similar items, use an appropriate small-load setting, or hand wash one eligible garment. When combining is reasonable, choose the gentlest cycle and lowest care limit shared by every item.
Step 2: Read the Care Label and Inspect the Garment
The label sets the boundaries, while a quick physical inspection catches damage, loose objects, and special construction that symbols may not fully explain.
Washing, bleaching, drying, ironing, and professional-care limits
Read the complete sequence, not just the wash symbol. A garment may tolerate machine washing but prohibit tumble drying. Another may allow non-chlorine bleach only. Iron dots and professional-care symbols matter later, so checking them now prevents a rushed decision after the wash ends.
What to do when a label is missing, faded, or unclear
Use fabric content, construction, trim, color stability, and the garment’s history as risk clues. Search the manufacturer’s care information when the exact item can be identified. If uncertainty remains, choose a cool, low-agitation, reversible method or seek professional advice rather than testing an aggressive setting.
When to stop DIY for valuable or structured garments
Pause with leather, suede, tailored jackets, bonded fabrics, heavily embellished clothing, shaped hats, sentimental pieces, and items marked professional clean only. Wet cleaning can affect adhesives, interfacing, padding, dye, and shape even when the visible outer fabric seems washable.
Step 3: Decide Whether Pretreatment Is Needed
Routine washing should not begin until visible marks have been checked, because the dryer is the wrong place to discover that a stain remains.
Inspect visible soil before washing
Check both sides of the fabric and look under folds. A mark may be oil, food, makeup, dye, rust, paint, adhesive, or physical wear, and those problems do not respond to the same treatment. Follow both the garment label and treatment-product label.
Why unresolved marks should be checked before dryer heat
After washing, inspect the area while the garment is still wet. If the mark remains, keep it out of high heat until you know the next safe step. Drying can make some residues or stains more difficult to remove and can hide the difference between remaining soil and permanent damage.
Where routine washing stops
This process only determines whether pretreatment is needed. It does not replace a material-specific stain method. Stop experimenting when the stain is unknown, the fabric is delicate, the color is unstable, or previous treatment has changed the surface.
Step 4: Measure Detergent for the Actual Load
Detergent works best within the range intended for the product, washer, water, soil level, and load size. Visual guesses are often misleading.
Product label, concentration, load size, soil level, and water conditions
Begin with the detergent label. Then match its directions to the actual load, not the maximum basket size. Consider whether the product is concentrated, whether the washer requires high-efficiency detergent, how soiled the clothes are, and whether local water conditions affect performance.
Why too much and too little both create problems
Too much detergent can leave slickness, stiffness, visible streaks, excess suds, or difficult rinsing. Too little can leave soil behind or allow it to settle back on fabrics. When results are poor, change one variable at a time rather than doubling the dose.
Pods, liquid, powder, and sheet formats at a high level
Each format has its own placement and dose instructions. Premeasured products are not automatically correct for every load size. Store all laundry products in their original containers and out of sight and reach of children. Poison Control’s laundry-product guidance explains why concentrated packets require particular care around children.
Step 5: Choose Cycle, Water Temperature, and Spin
Select settings only after sorting and label checks are complete. This keeps the machine choice tied to the fabrics actually inside the drum.
Normal, permanent press, gentle, heavy-duty, and specialty cycles
Normal works for many durable everyday fabrics. Permanent press is often designed for synthetics and wrinkle reduction. Gentle cycles reduce mechanical action for eligible fragile items. Heavy-duty cycles suit durable, heavily soiled loads when labels permit. Bedding, bulky, towel, sanitize, and allergen-named cycles vary greatly by model.
Cold, warm, and hot as care-label-dependent choices
Cold water often reduces energy use and may be helpful for color protection, but it is not suitable for every soil, product, or instruction. Warm or hot settings may improve some cleaning tasks but can increase risks for dyes, finishes, elastic, shrink-prone fibers, and delicate construction. ENERGY STAR advises using cold water when appropriate and matching the load setup to the machine rather than wasting energy or water.
See ENERGY STAR’s low-cost household energy tips for its current laundry efficiency guidance.
When the appliance manual overrides generic advice
Cycle names are not standardized. Two machines may use the same name for different wash times, spin speeds, water levels, or temperature behavior. Consult the manual for waterproof items, bulky bedding, automatic dispensers, extra-rinse options, load sensing, and any cycle that carries a safety warning.
Step 6: Load the Washer Correctly
Even the right detergent and cycle can perform poorly when items cannot move, rinse, or balance as the machine was designed to handle them.
Leaving room for circulation and movement
Place items loosely rather than compressing them into the drum. Clothes need room to move, become evenly wet, release soil, and rinse. A packed load can create residue, uneven cleaning, tangling, poor extraction, and extra stress on fabric and equipment. Watch the first few minutes of a new load type when the machine allows safe observation. If one bulky piece stays pinned in place or the basket repeatedly struggles to rebalance, pause according to the manual and reduce or redistribute the load.
Balancing bulky, heavy, and lightweight items
Distribute weight around the basket. One heavy blanket, bath mat, or absorbent item can become unbalanced when saturated. Follow model-specific instructions for bulky pieces, and do not assume that an item fits safely just because the washer door closes.
Placing detergent and other products correctly
Use the designated dispenser or placement method stated by the product and washer instructions. Do not pour products into an unapproved compartment. Never mix bleach, ammonia, acids, or other household chemicals. If a dispenser is set for a different concentration, correct the setting before running the load.
Step 7: Adjust the Routine for Whites, Darks, and Delicates
Color groups and fragile construction change the main risk, so use the same overall sequence while adjusting the details that protect appearance and shape.
Whites: brightness, residue, and product compatibility
Sort white clothes by fabric and soil, not color alone. Check colored trim, prints, elastic, and finishes before considering a whitening product. A white garment is not automatically chlorine-bleach safe. Dullness may come from soil, dye transfer, excess product, poor rinsing, aging, or fiber change.
Darks: dye stability, lint, abrasion, and visible streaks
Separate new or uncertain dyes, reduce friction, keep lint-heavy textiles away, and avoid overloading. Turning a garment inside out may reduce surface rubbing when construction permits, but it cannot prevent all fading. White streaks on black fabric may be detergent residue or lint rather than dye loss.
Delicates: construction risk and hand-wash-versus-machine decisions
Judge delicacy by structure as well as fiber. Lace, hooks, straps, loose knits, beads, linings, and bonded details can fail before the main fabric does. A mesh bag can reduce snagging, but it does not make a hand-wash-only or professional-care garment safe for a machine.
Step 8: Choose Machine Drying or Air-Drying
Drying is part of garment care, not an automatic final step. Heat, tumble, wet weight, airflow, and shape can each create damage.
Heat, tumble, shape, and label limits
Machine drying adds heat and mechanical action. Air-drying removes tumble but may put wet weight on seams or shoulders. Follow the label’s heat and drying-position instructions. Lower heat is not a substitute for “do not tumble dry,” and hanging is not safe for every knit or shape-sensitive garment.
Indoor spacing, airflow, and moisture awareness
Use the final spin allowed by the garment, shake out folds, and leave gaps between items. Dry smaller batches when the room is humid or poorly ventilated. Keep wet laundry away from heaters, open flames, and electrical equipment. Move the rack if windows, walls, or nearby surfaces stay damp.
Checking thick seams, waistbands, pockets, and layered areas
Drying time is not fixed. Jeans may feel dry on the leg while the waistband and pockets remain damp. Hoodies can hold moisture in the hood, cuffs, and pocket. Check by touch and weight, and turn or reposition thick areas when needed.
Final Inspection Before Heat, Folding, or Storage
A two-minute inspection can prevent a small residue, stain, damp area, or shape change from becoming harder to correct later.
Check stains, residue, odor, dampness, shrinkage, and distortion
Look at the garment in good light. Feel for slickness, stiffness, powder, oily streaks, or cool damp patches. Compare seams and shape to the pre-wash condition. A sudden odor may come from retained soil, slow drying, excess product, or a washer issue, so identify the pattern before repeating the same cycle. Check more than one item from the load. A problem on every piece suggests a load-level cause, while a problem limited to one garment is more likely connected to that fabric, stain, trim, or care restriction.
Rewash, rinse, reshape, or seek professional care
Use an extra rinse only when the label and machine allow it and residue is the likely issue. Rewash when soil remains and the garment can tolerate another cycle. Reshape knits while damp. Stop when dye is bleeding, seams are failing, trim is loosening, or the garment has changed shape significantly.
Why fully dry clothing matters before storage
Closets, drawers, and bins restrict airflow. Clothing that is even slightly damp in a thick area can develop a stale smell and transfer moisture to nearby items. Let garments finish drying in open air before stacking or placing them in enclosed storage.
Common Laundry Mistakes and Better Decisions
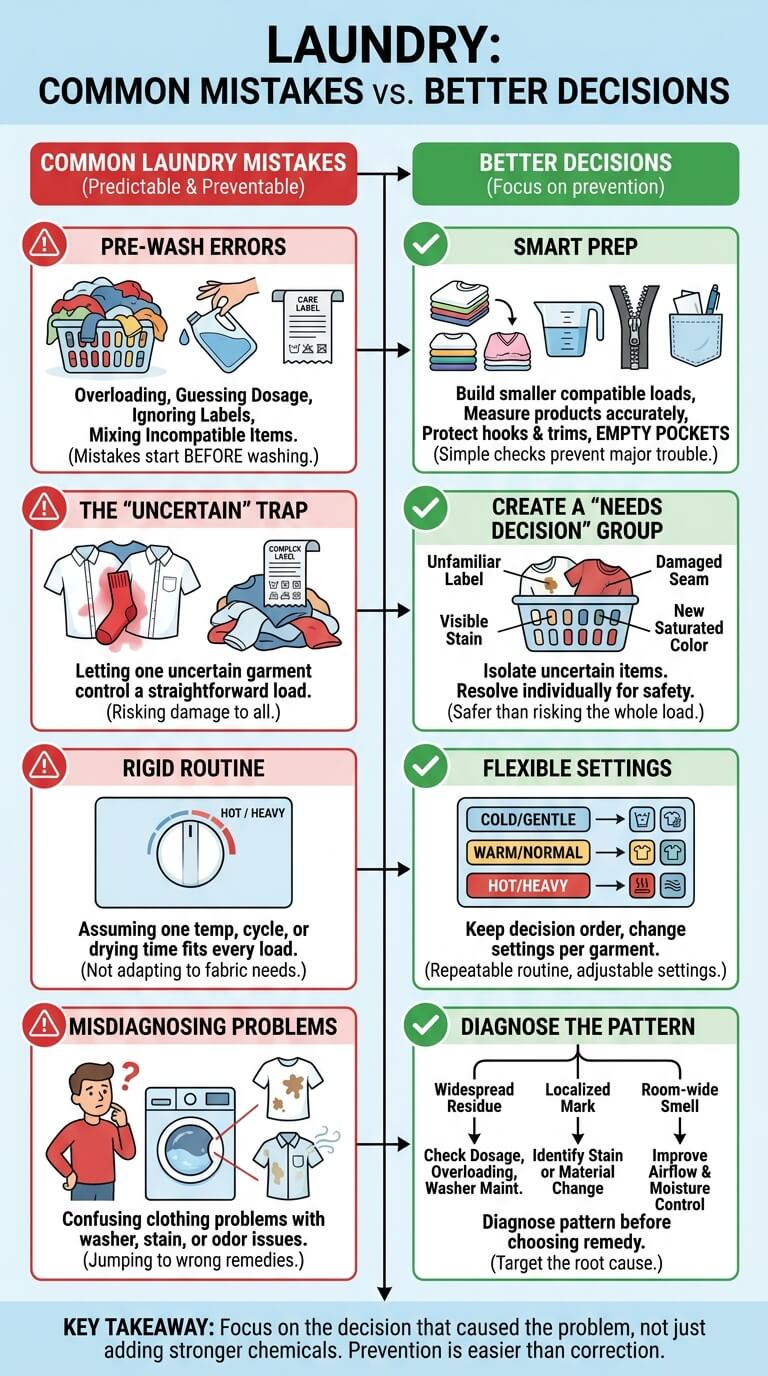
Most mistakes are predictable and preventable. Focus on the decision that caused the problem rather than immediately adding more product or stronger treatment.
Overloading, guessing dosage, ignoring labels, and mixing incompatible items
Most recurring problems begin before the washer starts. Build smaller compatible loads, measure products, protect hooks and trims, and remove tissues or pens from pockets. These simple checks prevent more trouble than adding stronger chemicals later. Set aside a small “needs a decision” group for unfamiliar labels, visible stains, damaged seams, and new saturated colors. Resolving those pieces individually is safer than letting one uncertain garment control an otherwise straightforward load.
Assuming one temperature, cycle, or drying time fits every load
A household routine should be repeatable, not rigid. Keep the decision order the same while changing the settings for the garment. A cold gentle wash may suit one load, while a durable heavily soiled load may need a different label-compatible choice.
Confusing clothing problems with washer, stain, or odor problems
Residue on several unrelated loads may point to dosage, overloading, product placement, or washer maintenance. One localized mark is more likely a stain or material change. A room-wide damp smell during indoor drying points toward airflow and moisture. Diagnose the pattern before choosing a remedy.
When to Stop and Check a Label, Manual, or Professional
Some items and situations carry a higher cost of failure. Pausing is the correct action when the next step is unclear or difficult to reverse.
Expensive, sentimental, structured, embellished, leather, or suede items
The cost of a cautious pause is small compared with irreversible damage. Professional help is sensible when an item contains leather or suede, complex tailoring, bonded layers, heavy decoration, unstable dye, unknown fiber, or strong sentimental value.
Chemical, appliance, or fabric risks outside routine home washing
Stop if a product has been mixed incorrectly, fumes are present, a packet has been swallowed, or chemicals contact the eyes. Follow the product label and contact the appropriate emergency or poison service. Appliance error codes, burning smells, leaks, and abnormal mechanical noise also need model-specific service guidance.
Model-specific and region-specific instructions
Water temperatures, symbol systems, electrical standards, detergent concentrations, and cycle names differ. Use local labels and the exact machine manual. Avoid copying a dose, temperature, or cycle from another household unless the product, garment, and equipment instructions match.
Laundry Care FAQ
These answers cover the decisions beginners encounter most often while keeping garment labels and appliance instructions in control.
What is the correct order for doing laundry?
Sort, read labels, inspect and pretreat when needed, measure detergent, choose settings, load loosely, wash, inspect before heat, dry according to the label, and confirm that every area is dry before folding or storage.
Can all clothes be washed together in cold water?
No. Cold water does not remove the need to separate unstable colors, lint givers, heavy abrasive items, delicate construction, or heavily soiled textiles. It also does not override a garment or product instruction.
How full should a washer be?
Clothes should sit loosely enough to move during the cycle. The exact limit depends on the washer and load type. Bulky, dense, or absorbent items may require much more space than lightweight everyday clothing.
Should clothes be checked before the dryer?
Yes. Check for remaining stains, dye transfer, residue, snagging, and shape changes. Keep unresolved marks and heat-sensitive items out of the dryer until you know the safest next step.
What should a beginner do when instructions conflict?
Follow the most specific and restrictive instruction: first the garment label, then the appliance and product labels. When uncertainty remains, choose the gentler reversible method or ask the garment manufacturer or a qualified cleaner.
Final Thoughts
The strongest routine is simple enough to repeat but flexible enough to change when the fabric, soil, product, washer, or drying conditions change.
Consistency becomes easier when the supplies support the sequence. Keep detergent in its original container, use a dedicated measuring tool, and leave care products where children and pets cannot reach them. Keep a mesh bag available for eligible fragile pieces and a clean drying surface for items that need to lie flat.
A reliable laundry routine is built on sequence, not shortcuts. Sort for compatibility, respect the care label, inspect before and after washing, measure products rather than guessing, choose settings that fit the actual load, leave room for movement, and dry according to both fabric and shape. When a garment, product, or appliance falls outside routine conditions, pause and check the instructions. That habit prevents more fading, residue, distortion, and avoidable damage than any single “perfect” laundry setting.

Ethan Carter is the Founder & Editor of HomeCleanSecrets. Based in the United States, he has 5 years of experience creating practical home cleaning, laundry care, stain removal, decluttering, and home organization content. His goal is to help everyday households clean smarter and build simple routines that are easier to maintain.
Read more about Ethan Carter on his author page: https://homecleansecrets.com/ethan-carter/