
The right detergent amount is not one fixed tablespoon, cap line, or pod count. It changes with product concentration, load size, soil, washer design, and water conditions. A dose suitable for lightly worn clothes may fail on muddy workwear or overwhelm a small load in soft water.

Begin with the detergent label and washer manual. Measure the load you actually have. When results are poor, change one factor at a time so you can separate dosing problems from overloading, unsuitable settings, or incorrect placement.
The American Cleaning Institute detergent guide also emphasizes reading the label because both excessive and insufficient detergent can leave clothes less clean than an appropriate amount.
Quick Answer: Start with the Product Label, Then Adjust
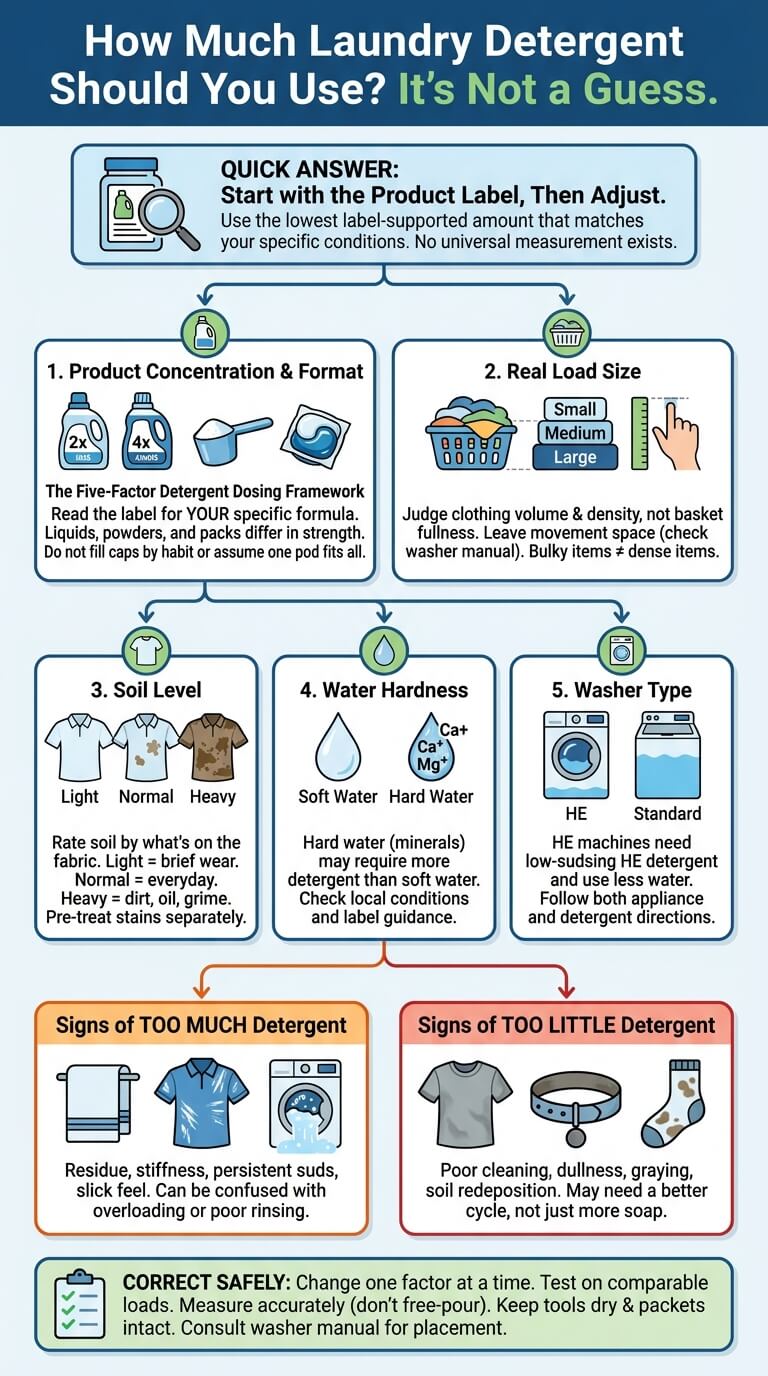
Use the lowest label-supported amount that matches the product concentration, washer type, load size, soil level, and water conditions. Do not copy a measurement from a different bottle or assume a full cap equals a normal dose.
Why there is no universal tablespoon or cap amount
Detergents come in different strengths, and caps differ in size and markings. Similar-looking liquids may require very different volumes, especially when one is concentrated or intended for automatic dispensing.
Washer capacities differ, so a compact front loader and a large top loader do not define a medium load alike. A universal measurement ignores this difference.
The five variables that change a dose
- Product concentration: The label tells you how much of that specific formula to use.
- Load size: A small load needs less cleaning solution than a large one, but volume and density both matter.
- Soil level: Lightly worn shirts differ from oily workwear, muddy clothing, or heavily used household textiles.
- Water hardness: Dissolved minerals can change how cleaning products perform.
- Washer type: HE machines are designed for low-sudsing HE detergent and usually use less water than traditional designs.
What not to guess
Do not infer concentration from bottle size, fragrance, or visible suds. Extra detergent cannot correct an overfilled basket. Check the product, appliance, and garment instructions before changing the routine.
Why Detergent Amount Matters
Detergent must contact the wash water and circulate through the load. The amount needs to be sufficient for the soil present, but still compatible with the washer’s water use and rinsing process.
Soil suspension and rinsing
Detergent loosens and carries away body oils and particles, then must drain and rinse away. Too little may leave soil behind; too much may make complete rinsing harder.
Residue, stiffness, visible streaks, and oversudsing
Excess product may leave powdery marks, slick patches, stiffness, pale streaks, or persistent suds. These are clues rather than proof because overloading, poor dissolving, or incorrect placement can look similar.
Poor cleaning and redeposition when the dose is insufficient
Too little detergent may leave collars, cuffs, socks, or work clothes dull and soiled. Before increasing it, confirm that the basket had movement space and the cycle matched the fabric and soil.
Why odor alone does not identify the cause
Lingering odor can result from retained soil, slow drying, dosing errors, overloading, or a washer problem. Check for residue, visible soil, damp seams, and normal draining and spinning before blaming the dose.
The Five-Factor Detergent Dosing Framework

A repeatable decision is easier when the variables are checked in the same order. Begin with the product, then evaluate the load, soil, water, and washer.
Product concentration and label directions
Read the usage panel for load, soil, machine, and pretreatment directions. Recheck it after any packaging or formula change instead of carrying over an old measurement.
Actual load size
Judge the load after sorting. Bulky sweatshirts fill space differently from dense towels, so leave the movement room specified in the washer manual.
Soil level
Light soil means brief wear without visible dirt or heavy body oil. Normal soil covers everyday wear; heavy soil includes substantial dirt, oil, sweat, food, or outdoor grime. Match the corresponding label direction.
Water hardness
Water hardness reflects dissolved minerals, mainly calcium and magnesium. The U.S. Geological Survey explanation of water hardness notes that hard water can require more detergent than soft water. Check local conditions, then use only the adjustment allowed by the product and appliance instructions.
HE versus standard washer design
An HE symbol identifies a low-sudsing formula for high-efficiency machines. Standard washers may use different water patterns and placement. The appliance manual therefore matters as much as the cap markings.
Step 1: Identify the Detergent Format and Concentration
Before measuring, identify what you are holding. Liquid, powder, packets, and sheets are not interchangeable measurements, and concentration can vary within the same format.
Standard and concentrated liquids
Read the concentration statement and cap lines. A small volume may be correct for a concentrated liquid. Never top up to an old familiar level. Inspect faint markings under bright light and mark the exterior only when permitted.
Powders
Use the supplied scoop or a dry dedicated measure in the stated units. Level rather than pack the powder, keep moisture out, and follow the washer directions for basket or dispenser placement.
Pods or packs
Packets are premeasured, but that does not make one packet correct for every load. Check the package for small, medium, large, heavily soiled, or oversized-load directions. Never cut, squeeze, or puncture a packet to create a smaller dose.
Sheets and other premeasured formats
Check how the maker defines a half or full sheet and whether it suits the washer and water setting. Repeated residue calls for reviewing placement, load size, and cycle, not adding another sheet.
Why format does not eliminate label checks
Convenience does not remove variables. A premeasured unit can still be mismatched to a tiny load, a very large load, unusual water conditions, or an automatic-dosing machine. The product and appliance directions decide where it goes and whether the dose can be changed.
Step 2: Estimate the Real Load Size

Load size should reflect the washer basket and the clothing inside it, not the number of people in the household. Check the machine manual for capacity and loading examples.
Small, medium, large, and extra-large are product-specific terms
Small, medium, and large are not standardized units. Match the detergent’s load diagram or weight description to the washer’s loading instructions instead of relying on another product’s definitions.
Bulky versus dense loads
A comforter fills space differently from wet towels. Dense fabrics hold more water, while bulky pieces need room to unfold. Follow appliance limits because extra detergent cannot correct poor circulation.
Leaving space for movement
Clothing needs enough room to circulate or tumble. A good test is to stop adding items before they are compressed into the basket. If you must push the load down to close the door or lid, remove pieces and wash them separately.
Why basket fullness is not the same as clothing weight
Fabric density, absorbency, and item construction change how a load behaves. Jeans, towels, and hoodies become much heavier when wet. Use both the manufacturer’s fullness guidance and common sense about balance instead of relying on a single visual line.
Step 3: Rate the Soil Level
Soil level is about what the fabric contains, not whether the garment is dark or light. Inspect collars, cuffs, underarms, knees, hems, and areas that contact skin or work surfaces.
Lightly worn clothing
Items worn briefly in a clean setting may fit the label’s lowest suggested dose. Keep fabric type and color stability in mind. A lightly worn delicate garment still needs its gentlest allowed wash method.
Normal household soil
Everyday shirts, pajamas, underwear, and casual clothing usually fit the normal-soil direction when they have no heavy marks. Sort incompatible colors and fabrics first, then use the dose corresponding to the actual load size.
Heavily soiled workwear or textiles
Muddy pants, greasy uniforms, sports clothing, and heavily used cleaning textiles may need the higher label-supported amount, a suitable cycle, or pretreatment. Keep contaminated or chemically exposed items out of routine household loads when official handling instructions require separate care.
Pretreatment is a separate decision
A concentrated spot treatment is not the same as increasing the wash dose. Follow both the garment label and the treatment label. Test color-sensitive items as directed, and do not send an unresolved mark through dryer heat until it has been checked.
More detergent cannot replace the right cycle or pretreatment
If water movement, wash time, or fabric-safe temperature is inadequate for the soil, extra detergent may remain behind without solving the problem. Correct the load size, cycle, and pretreatment decision before assuming dosage is the only weak point.
Step 4: Account for Water Hardness
Water conditions vary by location and by household treatment equipment. Avoid diagnosing hardness from suds alone because detergent formula, washer movement, and load soil also affect what you see.
How minerals can affect cleaning and rinsing
Calcium and magnesium can interact with cleaning chemistry and contribute to dullness or deposits under some conditions. Very soft water can also make a familiar dose feel overly sudsy or harder to rinse. Follow product directions that specifically address hard or soft water.
Finding reliable local information
Check a municipal water-quality report, contact the local water utility, or use information from a properly maintained household water system. A simple test strip may provide context, but interpret it according to its instructions rather than treating one reading as a permanent value.
Following product guidance rather than inventing a correction
If the detergent label gives a water-hardness adjustment, stay within that range. If it does not, contact the product maker or follow the washer manual. Do not add unrelated cleaners, acids, alkalis, or homemade mixtures to compensate for minerals.
When water conditions need separate troubleshooting
Persistent mineral film on fixtures, repeated scaling, or major changes after plumbing work may justify checking the household water system. Keep that diagnosis separate from garment dosing so you do not continually increase detergent for a problem that needs a different remedy.
Step 5: Match the Dose to the Washer
The washer determines how much water, movement, and rinsing the load receives. Read its detergent section before relying on general habits.
HE-compatible detergent and low-water operation
High-efficiency machines require HE detergent when the manual specifies it. The Whirlpool guidance on HE detergent explains that concentration changes the required volume and that more than the recommended amount can create excessive suds. Use your own model’s manual for final instructions.
Standard top-load machines
Traditional top loaders may use more water, but that does not justify filling the cap automatically. Follow the detergent’s standard-washer line and the machine’s placement directions. Some models require product in the basket before clothing, while others have a dedicated dispenser.
Automatic dispensers and concentration settings
Bulk dispensers may ask for the detergent concentration, dose level, water hardness, or soil setting. Entering the wrong concentration can cause repeated over- or under-dosing across many loads. Record the product strength when filling the tank and update the setting whenever the formula changes.
Read the washer manual before changing dispenser configuration
Do not place powder, packets, bleach, or softener in a bulk liquid-detergent tank unless allowed. Disable automatic dosing as directed for a manual dose, and stop if the dispenser leaks, clogs, or releases product incorrectly.
Measure Liquid and Powder Accurately
Accurate measuring makes troubleshooting possible. If every dose is a visual guess, you cannot tell whether a smaller or larger amount improved the next load.
Read cap lines and tiny markings
Hold a liquid cap at eye level under strong light. Confirm whether the numbered line refers to load size, soil, or both. Pour slowly because concentrated liquid can coat the sides and appear lower than it is.
Use a dedicated measuring tool when permitted
A marked cup or spoon can replace an unclear cap when its units match the label and it is reserved for laundry. Do not return product that may have contacted water or another chemical.
Avoid visual estimates
Free-pouring into the drawer or basket tends to vary from load to load. It is especially unreliable with large bottles and narrow spouts. Measure first, then place the product where the washer directs.
Keep measuring tools dry and store products as directed
Dry tools help prevent powder clumps and packet damage. Close containers after use, wipe spills promptly, wash hands, and keep every product in its original labeled package away from children and pets.
Premeasured Pods, Packs, and Sheets
Premeasured formats simplify pouring, but correct placement and safe storage still matter. Follow both the packet and washer directions.
Load-size limitations
Check whether the package calls for a different number of units for oversized or heavily soiled loads. A large basket does not automatically need more packets if it contains a light, loosely filled load. Do not split a liquid packet to reduce a dose.
Placement according to product and washer instructions
Many washer manuals direct packets into the empty basket before clothes, not into a dispenser drawer. Sheets may have different placement rules. Stop and verify when a shared machine has an unfamiliar drawer or an automatic dispensing system.
Dissolving and residue considerations
Residue can result from crowding, incorrect placement, an unsuitable cycle, low water exposure, or a product that did not dissolve fully. Remove some items, verify the permitted water setting, and follow the product troubleshooting directions before adding an extra unit.
Child and pet safety
Concentrated packets can injure the mouth, eyes, skin, or airways. Follow Poison Control guidance on laundry packets: keep them closed, in their original container, and out of children’s reach and sight. Seek guidance promptly after suspected exposure.
Detergent Dosing Decision Table
This table is a decision sequence, not a substitute for the product label. It shows what to check before choosing the matching labeled dose.
| Load condition | Start with | Check before adjusting | Do not do |
|---|---|---|---|
| Normal load, normal soil | The product’s normal-load direction | Washer type, concentration, basket space, and water conditions | Fill the cap by habit |
| Small or lightly soiled load | The lowest suitable labeled dose | Whether a premeasured unit can be reduced safely | Cut or puncture a packet |
| Large or heavily soiled load | The label’s large-load or heavy-soil direction | Overloading, pretreatment, cycle, and fabric limits | Add product beyond the stated range |
| Hard or soft water | The water-specific instruction when provided | Local hardness information and household treatment equipment | Invent an additive mixture |
| Automatic dosing | The washer’s programmed setting | Product concentration, tank type, soil selection, and calibration | Assume the factory setting fits every formula |
Normal load with normal soil
Use the label’s baseline amount after confirming that the basket is not packed and the machine type matches the product. This becomes your household comparison load for later adjustments.
Small or lightly soiled load
Select the label’s lower amount when available. With a packet that cannot be divided, confirm whether the package permits it for the load or wait to build a compatible larger load.
Large or heavily soiled load
Move to the stated higher dose only after separating incompatible fabrics and confirming that the washer can handle the load. Split an overloaded load rather than trying to compensate with chemistry.
Hard-water or soft-water adjustment
Make this change only when the detergent directions, washer guidance, or product support information provides a method. Record what changed so you can compare rinsing and cleaning in the next similar load.
Automatic-dosing washer scenario
Confirm the concentration entered in the machine, then use its normal, less, or more setting as described by the manual. If the tank contains an unknown product, empty and handle it only as the manufacturer directs before recalibrating.
Signs You May Be Using Too Much Detergent

Look for a pattern across similar loads rather than reacting to one mark. A single streak may come from a folded garment or undissolved powder, while repeated residue across the basket points to a routine issue.
Persistent suds, slick feel, stiffness, or visible marks
Excess suds during late rinses, a slippery feel after washing, stiff fabric, white powder, oily spots, or streaks on black clothing can justify reviewing the dose. Also inspect dispenser placement, basket fullness, and whether the machine completed the cycle.
An extra rinse as a load-level correction
If garment labels and the washer permit it, an extra rinse may help remove remaining product from the current load. It should not become a permanent substitute for correcting the amount. Recheck the fabric before drying.
Repeated residue may have another cause
Overloading, low water exposure, a short or inappropriate cycle, powder in the wrong compartment, a blocked dispenser, or internal buildup can mimic over-dosing. If normal measurement and loading do not solve the pattern, inspect the manual’s troubleshooting section rather than continually reducing product.
Signs You May Be Using Too Little Detergent

Insufficient detergent is more likely when soil remains across a properly loaded load and the same routine fails repeatedly.
Remaining soil, dinginess, redeposition, or poor results
Collars may stay dark, body oils may remain, or light fabrics may look dull. Check whether stains needed separate treatment and whether the product was compatible with the water and washer.
Separate dosage from overloading or unsuitable settings
A packed basket prevents cleaning solution from reaching surfaces evenly. A cycle that is too gentle for durable heavily soiled workwear may also leave soil. Correct these conditions before increasing the amount.
Increase only within product-label guidance
Move to the next stated load or soil level, then compare a similar load. Stop if higher dosing creates suds, residue, skin contact with concentrated product, or poor draining. A persistent problem may need appliance or water troubleshooting.
How to Correct the Next Load Safely
Troubleshooting works best when one deliberate change is tested on a comparable load. Keep notes for two or three washes instead of changing product, amount, cycle, and water setting at once.
Change one variable at a time
Choose the most likely issue based on the evidence. Reduce the dose for repeated suds or residue. Increase within the label range for properly loaded clothing that remains uniformly soiled. Split the load when movement was restricted.
Reduce or increase within label ranges
Use the next clear cap line, scoop line, packet instruction, or automatic-dispenser setting. Do not create an unmarked fraction that you cannot repeat. Consistent measurements make the result meaningful.
Reassess load size, soil, water, cycle, and rinse
After the wash, inspect the same areas each time: collars, dark smooth fabric, towel texture, visible suds, and remaining soil. Confirm that the load spun normally and that thick items are not simply still damp.
When to inspect the washer
Check the appliance instructions when correct dosing still leaves residue, the dispenser fails to empty, the machine reports an error, or clothes exit unusually wet. Follow the model procedure rather than improvising internal cleaning.
Common Detergent-Dosing Mistakes
Most recurring errors come from treating a changing product and load as though they were always the same.
Filling the cap automatically
A cap is a measuring device, not a signal to fill it. Locate the correct line for the current load. Rinse or wipe the cap only as directed and return it without dripping concentrated product onto nearby surfaces.
Treating all products as the same concentration
Recheck directions when changing brand, formula, scent, package size, or product format. Automatic dispensers need the new concentration entered before the first load.
Using extra detergent to compensate for stains or odor
Visible stains may need targeted treatment, while odor may involve soil, drying, or the washer. More detergent can add residue without addressing the actual cause.
Mixing products or adding unauthorized chemicals
Never mix detergent with ammonia or household cleaners. Combine products only when every label and the washer manual allow it. Leave and ventilate the area after fumes, heat, or an unexpected reaction, then seek appropriate help.
Laundry Detergent Amount FAQ
These answers address common dosing decisions while keeping the product label and washer manual as the final limits.
Is one pod enough for every load?
No. Packet directions vary by load size, soil, and concentration. Never cut a packet. Build a compatible load or choose a measurable format when one intact unit does not fit the labeled conditions.
Do HE washers need less detergent?
They require HE detergent when specified, but the amount still depends on the product, load, soil, water, and model. Read both labels rather than applying one reduction percentage to every machine.
Can too much detergent make clothes smell?
It can contribute if product and soil do not rinse away well, but odor does not prove over-dosing. Check residue, basket fullness, drying speed, remaining soil, and machine condition before changing the amount.
Why is residue more visible on dark clothes?
Pale powder, dried liquid, lint, and mineral deposits contrast strongly with black or navy surfaces. Confirm whether the mark brushes away, feels slick, or follows a fold. Then review dosage, dissolving, product placement, load movement, and rinsing.
Should detergent amount change for delicate garments?
It may, but the care label controls the method first. Use a product and amount allowed for the garment and basin or machine. Extra detergent can make fragile fabric harder to rinse.
Final Thoughts
Reliable dosing comes from a sequence: identify the formula, estimate the real load, rate the soil, account for water, and match the washer. Measure rather than free-pour, keep packets intact, and make only one troubleshooting change at a time.
When results are poor, inspect before adding product. Overloading, settings, placement, stains, slow drying, or appliance faults can resemble a dosing problem. Stay within the detergent label and your washer manual.

Ethan Carter is the Founder & Editor of HomeCleanSecrets. Based in the United States, he has 5 years of experience creating practical home cleaning, laundry care, stain removal, decluttering, and home organization content. His goal is to help everyday households clean smarter and build simple routines that are easier to maintain.
Read more about Ethan Carter on his author page: https://homecleansecrets.com/ethan-carter/