
A trash can that smells after the bag is gone usually has liquid, food film, or damp residue below the liner or around the lid. Empty it, remove dry debris, wash compatible surfaces, rinse, and let the bin dry fully before adding a fresh liner.
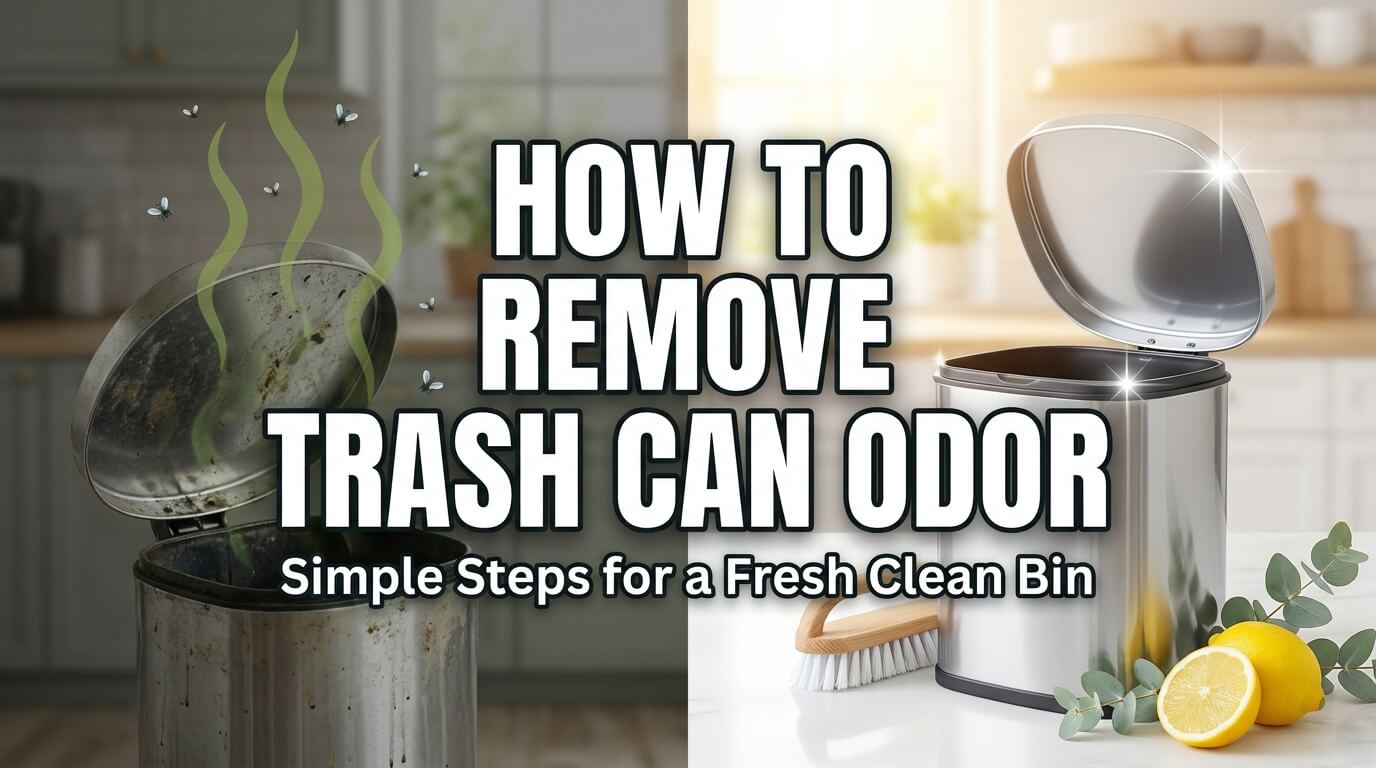
Do not begin with fragrance, powder, bleach, or another strong product. First identify the container type, protect electronic parts, and choose a washing area where dirty water can be handled responsibly.
Quick Answer: Empty, Remove Residue, Wash, Dry, and Recheck
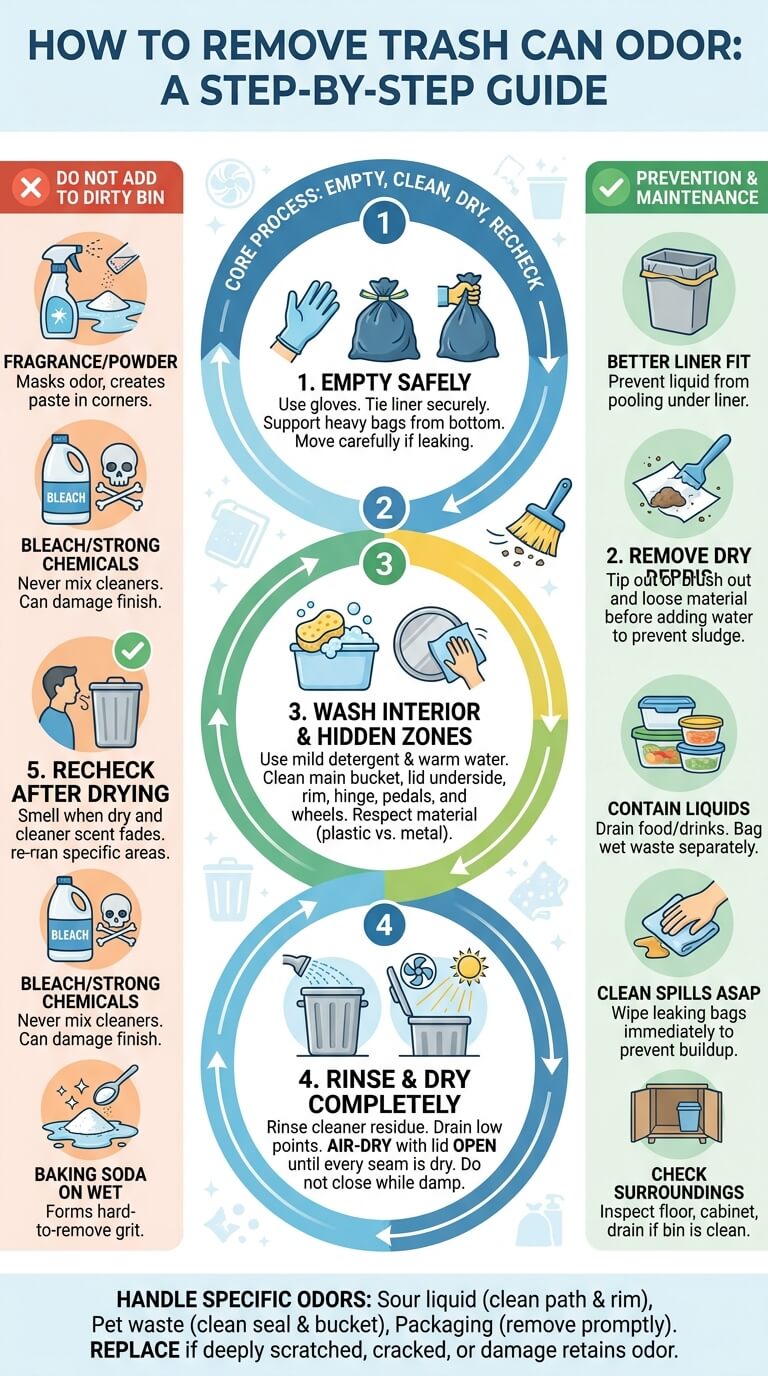
Work in a simple order: remove the waste, pick up dry debris, wash with a mild product suitable for the material, clean the lid and seams, rinse, drain, and dry with the lid open. Recheck only after the cleaner scent has faded.
What to do first
Put on suitable gloves, move children and pets away, and tie the liner without compressing it against your body. If liquid has leaked, keep the bin upright while moving it. Place paper towels or an absorbent cloth beneath an indoor bin to protect the floor.
What not to add to a dirty bin
Do not scatter baking soda over wet food liquid or add fragrance before cleaning. Powder can form a paste in corners and make residue harder to remove. Never combine bleach, ammonia, vinegar, drain products, or cleaners left from an earlier attempt.
When odor may come from another source
Remove the bin from its usual location and close the empty cabinet or room briefly. If the smell stays behind, inspect the floor, cabinet base, wall, nearby drain, appliance drip area, or stored cleaning tools. Cleaning the bin repeatedly will not correct odor outside it.
Why Trash Cans Keep Smelling
Persistent trash odors usually come from small amounts of residue. Warmth, moisture, closed lids, and rough surfaces let that residue keep releasing odor after collection day.
Leaked liquid under the liner
A small hole or loose liner can let coffee, food juices, melted ice, or bathroom waste liquid collect at the lowest point. The bag may hide the spill until it is removed. Check the bottom with good light before adding water or another liner.
Food film and packaging residue
Greasy wrappers, sauce containers, dairy packaging, fish trays, and takeout boxes can touch the wall or rim as they are discarded. A nearly invisible film can smell stronger as the bin warms. Focus on splash height, not only the bottom.
Lid, hinge, rim, and wheel buildup
Hands and bags transfer residue to the lid edge, liner ring, pedal, handle, hinges, and wheels. These areas are often skipped because the interior looks dirtier. A good test is to smell near the dry lid after the main bucket has been washed.
Damp liners and incomplete drying
A liner placed into a wet bin traps moisture between plastic layers. Closing the lid while seams are damp creates the same problem. The container may smell clean at first, then turn sour after several hours. Dry the bottom, rim, hinge area, and lid separately.
Porous scratches or damaged plastic
Deep scratches, roughened plastic, cracked inserts, and worn seals hold residue beyond an easy wipe. Repeated scrubbing may clean the surface without reaching damaged areas. If odor returns quickly in the same spot, replacement may be more practical than stronger chemicals.
Identify the Trash-Can Type and Odor Source

Match the cleaning method to the material and waste. Before washing, look for a removable bucket, battery compartment, sensor, soft-close mechanism, coated finish, drainage opening, or manufacturer warning.
Indoor kitchen bin
Kitchen bins commonly hold food liquid, grease, packaging film, and residue around the liner ring. Remove the bin from cabinetry before washing. Check the cabinet floor and wall for spills, and keep clean dishes, food, and towels away from the work area.
Bathroom or diaper bin
These containers may have compact lids, seals, cartridges, or narrow hinges that retain residue. Follow the product instructions before removing parts. Keep the task focused on the bin, and wash hands after cleaning even when gloves were used.
Pet-waste bin
Pet-waste containers need careful bag handling and complete surface cleaning, but they do not require improvised chemical mixtures. Avoid shaking loose material. Keep dedicated tools away from food areas, and stop if sharps, medication waste, or an unknown substance is present.
Outdoor wheeled bin
Outdoor carts may collect rainwater, loose debris, grass, damaged bags, and residue around wheels or axle recesses. Work after collection when the cart is empty. Choose level ground, control the rinse water, and avoid directing contaminated water into a storm drain.
Metal versus plastic containers
Plastic usually tolerates mild detergent and water, but it can scratch. Stainless steel and coated metal need softer tools and careful drying to prevent marks or corrosion. Painted, plated, or fingerprint-resistant finishes may have stricter product limits than the inner bucket.
Step 1: Empty the Bin Safely
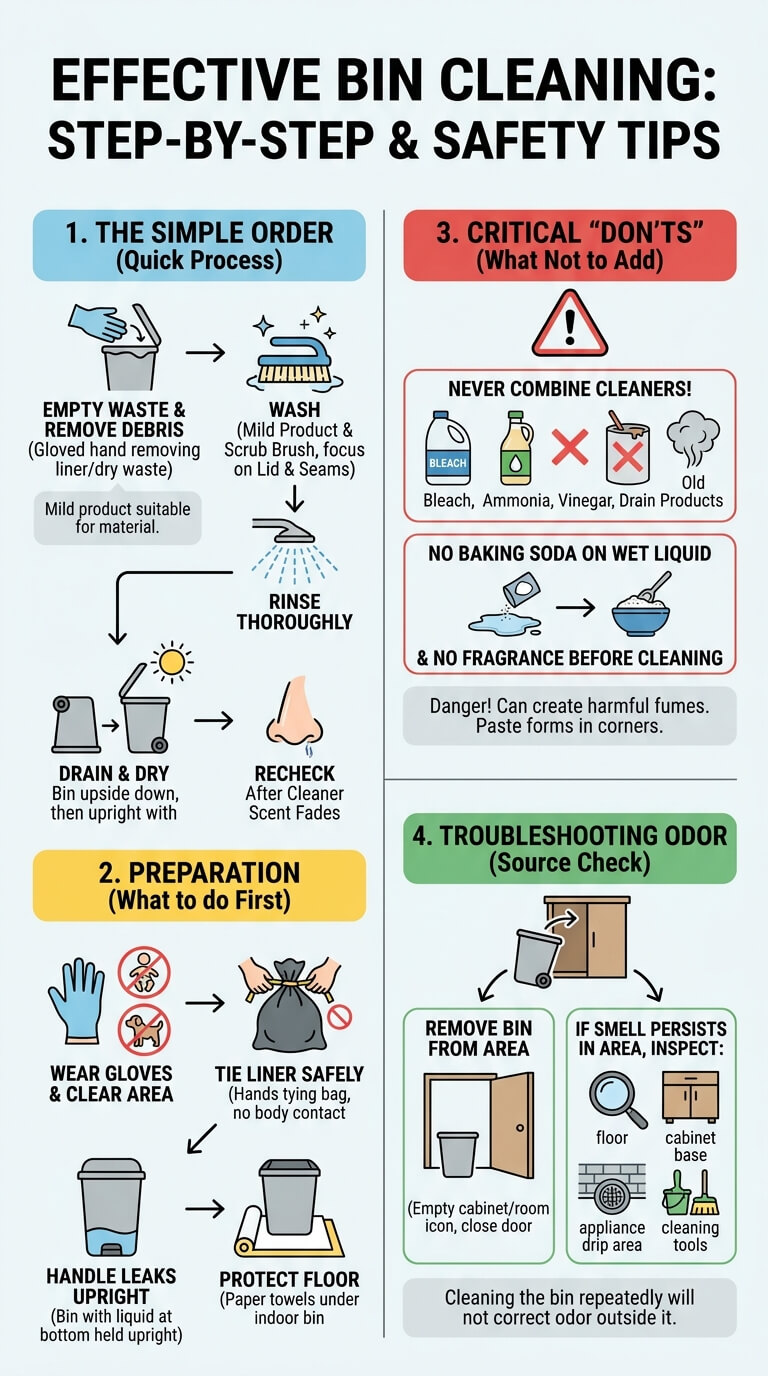
Removing waste without spreading it makes every later step easier. Do as much dry cleanup as possible before introducing water, especially when the bin contains loose crumbs, paper, grit, or unknown debris.
Tie and remove the liner
Draw the liner upward without dragging it across your clothing. Tie it before lifting when possible. If it is stuck by suction, release the edge slowly rather than jerking. Support a heavy bag from the bottom only when there are no sharp or leaking items.
Separate sharp or leaking waste
Do not press down with your hands or reach blindly into a container. Use appropriate tools for visible ordinary debris, and place leaking household waste inside another compatible bag. Follow local rules for needles, broken glass, batteries, chemicals, or other restricted items.
Remove dry debris before adding water
Tip crumbs and loose dry material into a new waste bag, or lift them with disposable towels or a dedicated brush. Do not create airborne dust from questionable material. Removing debris first prevents soggy clumps from lodging in hinges, wheel pockets, and seams.
Choose a safe cleaning location
For a small removable bucket, a utility sink or other washable area may be suitable if the manufacturer allows it. For a large cart, use an outdoor area where runoff will not enter a street drain. Protect nearby food, fabrics, plants, and electrical equipment.
Step 2: Clean the Interior by Material
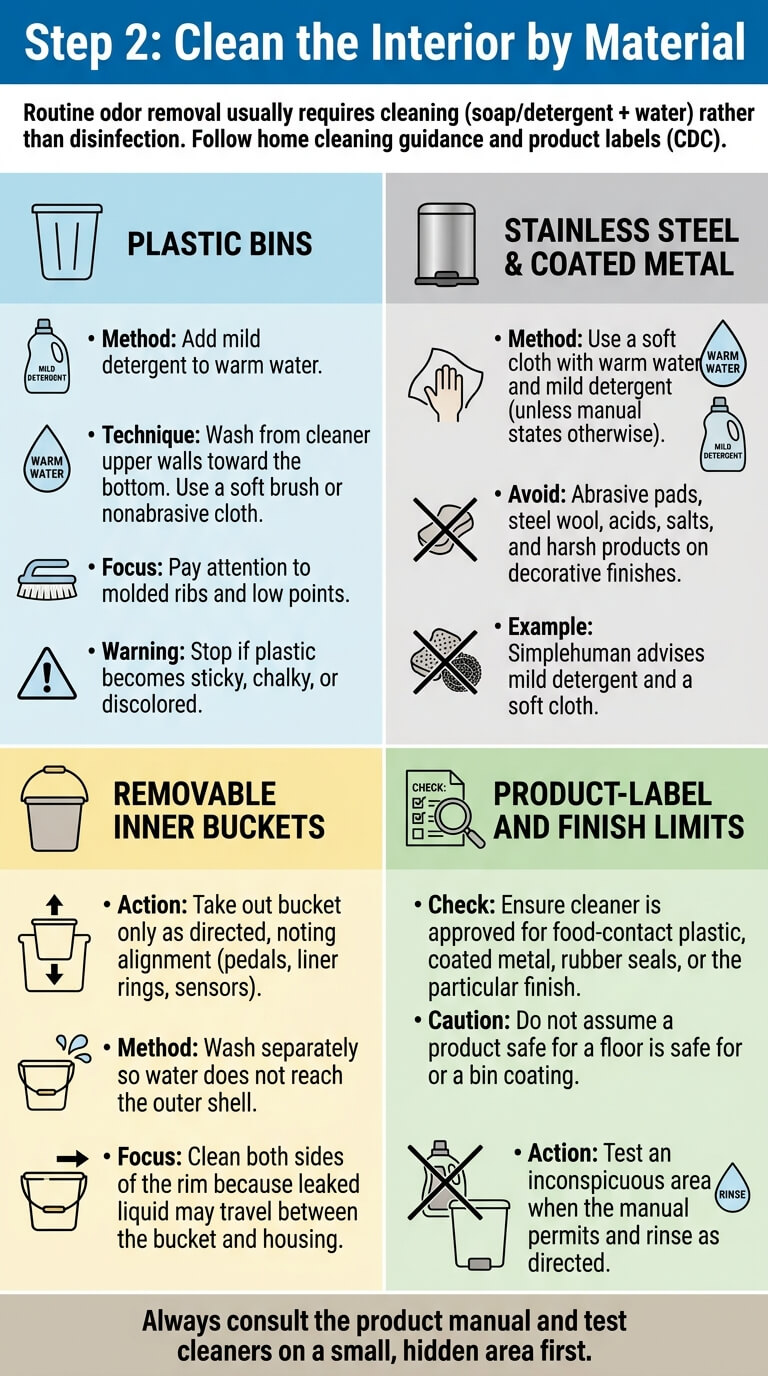
Routine odor removal usually requires cleaning rather than disinfection. The CDC notes that soap or detergent and water are sufficient for many ordinary household surfaces. Follow its home cleaning guidance and the product label.
Plastic bins
Add a small amount of mild detergent to warm water, then wash from the cleaner upper walls toward the bottom. Use a soft brush or nonabrasive cloth. Pay attention to molded ribs and low points. Stop if the plastic becomes sticky, chalky, or discolored.
Stainless steel and coated metal
Use a soft cloth with warm water and mild detergent unless the manual says otherwise. Keep abrasive pads, steel wool, acids, salts, and harsh products away from decorative finishes. Simplehuman, for example, advises mild detergent and a soft cloth for its stainless steel cans in its trash-can care instructions.
Removable inner buckets
Take out the bucket only as directed, noting how it aligns with pedals, liner rings, or sensor housings. Wash it separately so water does not reach the outer shell. Clean both sides of the rim because leaked liquid may travel between the bucket and housing.
Product-label and finish limits
Check whether the cleaner is approved for food-contact plastic, coated metal, rubber seals, or the particular finish. Do not assume a product safe for a floor is safe for a bin coating. Test an inconspicuous area when the manual permits and rinse as directed.
Step 3: Clean Hidden Odor Zones
After the bucket is clean, address touch points and crevices where bags rub. Control moisture around mechanisms, and never spray into a battery compartment, motor, sensor, or electronic lid.
Lid and underside
Open the lid and inspect the underside for splash marks and residue around the edge. Wipe rather than soak it when electronics or dampers are present. Support a removable lid on a towel so the finish does not scratch while you clean both sides.
Rim and liner ring
Remove the liner ring only if the design allows it. Wipe the top, underside, channels, and contact points where a bag folds over. Food liquid can wick along the liner and collect beneath the ring while the visible edge remains clean.
Hinges, pedals, and handles
Use a small soft brush, cotton swab, or folded cloth to reach accessible gaps without forcing the mechanism. Keep fingers clear of pinch points. Operate the pedal after drying to confirm smooth movement, and stop if the lid feels loose or misaligned.
Wheels and lower exterior
Outdoor bins can carry residue onto wheels and the lower rear wall. Brush off dry grit, then wipe or wash compatible surfaces. Do not tip a heavy cart onto yourself. Ask for help when the size, slope, or weight makes the task unstable.
Floor area beneath the bin
Move the clean bin aside and inspect the floor or cabinet base. Pick up dry debris, then clean according to the flooring material. Check seams, baseboards, and cabinet edges for leaked liquid. Let the area dry before returning the container.
Step 4: Rinse and Dry Completely
Cleaner residue can hold dirt, affect a finish, or create its own smell. Rinsing and drying are separate steps, and both matter before the next liner goes in.
Remove cleaner residue
Use the amount of clean water recommended by the product and material instructions. Wipe small indoor bins with a clean damp cloth until suds are gone. Do not flood electronic shells or pour water through pedal mechanisms. Repeat with fresh water if the cloth still feels soapy.
Drain low points
Tilt an empty bucket carefully so water leaves molded corners and ribs. Large carts may have channels that retain a shallow pool even when they look empty. Use a dedicated towel for accessible remaining water, then place the bin in a stable drying position.
Air-dry with the lid open
Leave the lid and removable bucket open or separated until every seam feels dry. Sunlight and airflow can help outdoor bins when the material instructions allow, but excessive heat may affect some plastics. Do not close a sensor lid around a wet inner bucket.
Recheck after product scent fades
Smell the dry bottom, lid underside, rim, pedal area, and floor beneath the bin. Cleaner perfume can hide remaining residue for a short time. When one zone still smells, clean that area again rather than coating the whole container with another product.
Handle Specific Trash-Can Odors
The same wash sequence works for many bins, but the strongest zone changes with the waste. Use the smallest response that removes residue without damaging the container.
Sour food liquid
Look beneath the liner and along the lower sidewall for dried drips. Wash the liquid path, not only the pool at the bottom. Clean the rim where the bag may have leaked while being removed. Replace a swollen cabinet liner or damaged insert if it stays odorous.
Diaper or pet-waste odor
Clean the bucket, lid seal, rim, and any approved cartridge holder according to the manual. Do not add incompatible fragrance or disinfectant to a closed mechanism. Wash your hands afterward, and keep the dedicated brush or cloth separate from kitchen-cleaning tools.
Fish, meat, or dairy packaging
These odors often come from a small amount of protein-rich liquid at the bottom or under the rim. Remove the residue promptly with detergent and water, rinse, and dry. If packaging is still indoors before collection, contain it securely according to local waste rules.
Outdoor heat and rainwater
Warmth speeds odor release, while rainwater spreads residue across a larger area. Empty standing water without sending it to a storm drain, remove solids, then wash and dry the cart. The City of San Diego advises brushing out residue and keeping dirty cart water out of the street drainage system in its clean-bin guidance.
Odor absorbed by a damaged bin
Deep scratches, cracked plastic, damaged seals, and rough porous areas can retain odor after repeated washing. Mark the strongest spot and recheck when dry. Replace an inner bucket, seal, or entire container when the damaged area cannot be cleaned or safely dried.
Use Odor Absorbers Only After Cleaning
An absorber can help with faint residual odor in a clean, dry bin. It cannot remove food film, leaked liquid, dampness, or contaminated waste, and it should not interfere with moving parts or liner fit.
Dry absorbent options and placement
A contained product intended for trash cans may be placed where the manufacturer directs. Keep loose material away from pedal channels, sensors, pets, and children. Check that it stays dry and does not spill when the bag is removed.
Avoiding loose powder in wet bins
Loose baking soda or commercial powder turns into paste when it contacts liquid. That paste can lodge in seams and create another cleaning job. If you use an absorber, wait until the bin is fully dry and keep it in a removable, controlled form.
Why fragrance does not replace residue removal
Scent may make the first few minutes more pleasant, but it provides no proof that residue is gone. A combined perfume and garbage smell can also make diagnosis harder. Recheck the unscented, dry container before deciding whether any deodorizing product is useful.
When replacing a damaged insert is more practical
A removable bucket or lid seal may be replaceable even when the outer shell is still sound. Compare replacement cost, fit, and availability with repeated cleaning. Do not keep a cracked insert that leaks into cabinetry or exposes sharp edges.
Prevent Trash Can Odor
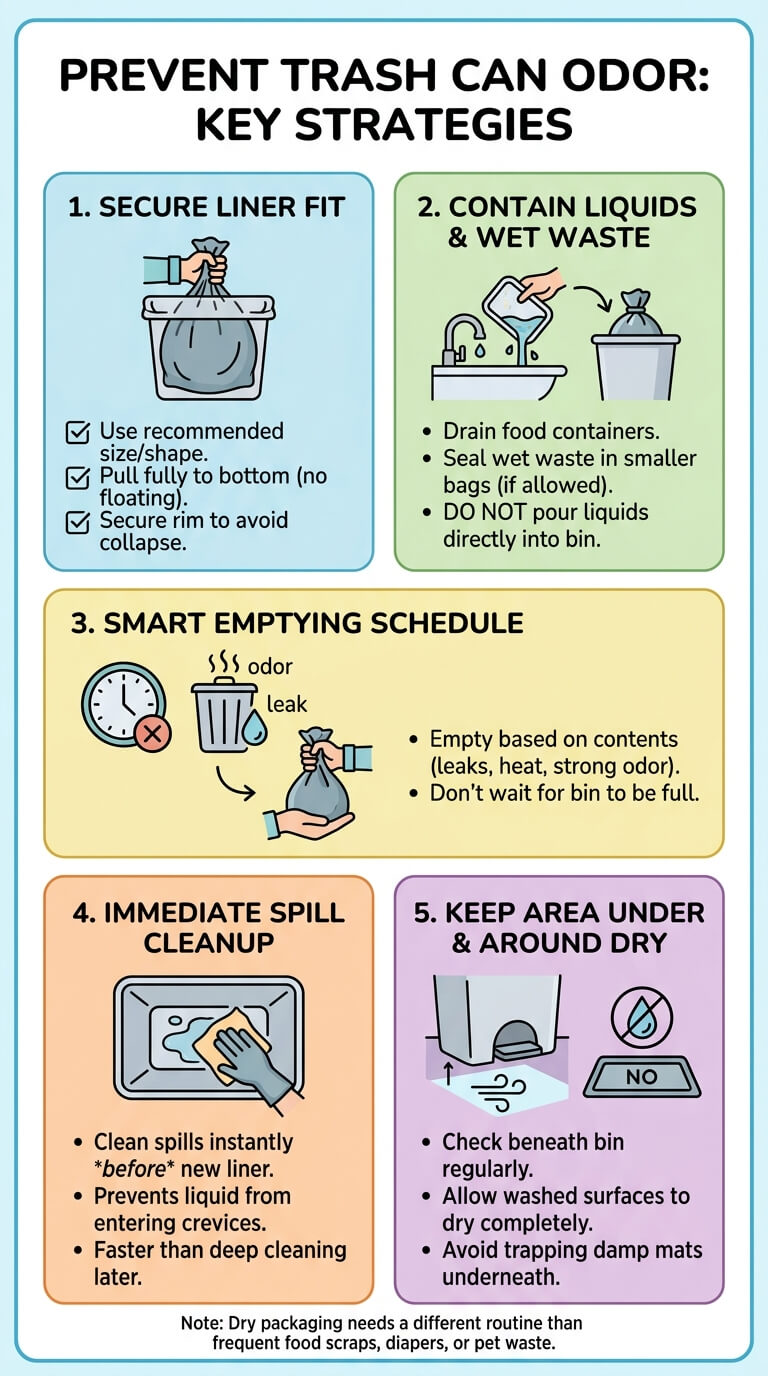
Prevention depends on what enters the bin and whether it leaks. Mostly dry packaging needs a different routine from frequent food scraps, diapers, or pet waste.
Better liner fit
Use the size and shape recommended for the container. Pull the liner fully into the bottom without stretching it thin, and secure the rim so it does not collapse. A bag that floats above the base is more likely to tear when heavy waste lands.
Containing liquids and high-odor waste
Drain ordinary food containers when appropriate, close leaking packaging, and use a smaller sealed bag for especially wet household waste when local rules allow. Do not pour liquids directly into the bin. Keep hazardous chemicals, batteries, and sharps in their required disposal streams.
Emptying based on contents rather than a fixed schedule
Remove a bag when it contains leaking, warm, or strongly odorous waste even if it is not full. A dry office bin may need less frequent attention. Let the contents, temperature, liner condition, and available collection arrangements determine timing.
Cleaning spills immediately
When a bag leaks, remove it and wipe the spill before adding a replacement. Waiting allows liquid to enter scratches, pedal recesses, and cabinet joints. A small immediate cleanup is usually faster than washing the entire bin after odor develops.
Keeping the cabinet or floor area dry
Check beneath an indoor bin after removing a heavy or leaking bag. Allow a washed container and floor to dry separately. Do not trap a damp mat beneath the bin. Investigate recurring moisture that appears even when the liner has not leaked.
Trash-Can Cleaning Mistakes
Failed cleanups often spread residue, leave water behind, or damage the material. Slow down during emptying, detail cleaning, and drying instead of using stronger chemicals.
Washing before removing dry debris
Water turns crumbs, labels, paper, and grit into sludge that settles in corners. Remove ordinary loose material first with a dedicated brush or disposable towel. Avoid dry sweeping when the material is dusty, contaminated, or unknown.
Closing the lid while damp
A dry-looking wall does not mean the hinge, bottom rib, seal, or rim channel is dry. Leave the components open until low points have drained. When this happens repeatedly, dry the bucket outside the shell before reassembly.
Mixing cleaners
Never combine products or add bleach to an unknown residue. Poison Control warns that bleach mixed with ammonia or acids can release dangerous gases. Review its chlorine-gas prevention guidance, leave the area for strong fumes, and seek help for symptoms.
Ignoring the lid and pedal
The main bucket may be clean while the lid underside, hinge, pedal, handle, or liner ring still holds residue. Work through each touch point in order. Keep water controlled so cleaning one missed area does not damage a nearby mechanism.
Sprinkling powder over leaked liquid
Powder may reduce the smell briefly while leaving the liquid in place. It can also form a gritty paste that scratches finishes. Absorb and remove the spill, wash the material safely, rinse, and dry before considering any contained deodorizer.
Assuming the bin is the source when a drain or cabinet smells
Move the cleaned bin elsewhere and recheck the original location after the room has been closed briefly. Persistent odor may come from a wet cabinet, flooring seam, appliance drip, plumbing area, or dirty tool. Follow the strongest point instead of recleaning the container.
When Cleaning May Not Be Enough
Stop routine cleaning when the container is damaged, the waste is hazardous, pests are active, or the odor indicates a problem outside normal household residue removal.
Cracked or deeply scratched plastic
Replace the bucket or bin when cracks leak, edges are sharp, or deep damage stays odorous after careful washing and drying. Do not try to seal a food-waste bin with an unapproved coating. A sound liner cannot reliably protect a structurally damaged base.
Persistent pest activity
Repeated insects, larvae, or animal damage may indicate accessible waste, a broken lid, missed residue, or a broader property problem. Remove ordinary waste and clean safely, but do not handle nests, infestations, or unknown animal contamination without appropriate professional guidance.
Sewage-like or chemical odor
A sewage-like smell that remains after the bin is removed may come from drainage or wastewater. A solvent, fuel, pesticide, battery, or unknown chemical smell requires distance and careful identification, not detergent. Ventilate only when safe and contact the responsible service.
Large outdoor contamination
Do not climb into a cart or enter a dumpster. Large spills, medical waste, chemicals, dead animals, or heavy contamination may require the waste collector, property manager, municipality, or specialist. Keep other people away and describe what is visible without touching it.
Odor from the cabinet, floor, or nearby appliance
If a clean, dry bin smells normal outside its usual location, inspect the surrounding area. Recurring moisture, swollen cabinetry, damaged flooring, appliance leakage, or drain odor requires the relevant repair. Replace the bin only when it actually retains the smell.
Frequently Asked Questions
Use the material, waste type, hidden residue, and drying time to decide what to do next. Stronger products are rarely the first answer.
Why does my trash can smell after I remove the bag?
Liquid may have leaked beneath the liner or food film may remain on the wall, rim, lid, hinge, pedal, or wheel area. Empty the bin fully, remove dry debris, wash every compatible surface, rinse, and dry it open. Recheck the floor or cabinet separately.
What is the safest way to wash a kitchen trash can?
Read the manufacturer instructions, remove the liner and loose debris, then use mild detergent and warm water on compatible surfaces. Keep electronics and mechanisms dry, clean the lid and rim, rinse away residue, and let the bucket dry completely before relining it.
Can baking soda help with trash can odor?
It can help absorb a faint remaining smell in a clean, completely dry bin when kept in a controlled location. It should not be sprinkled onto leaked liquid or used instead of washing. Keep loose powder away from moving parts, children, and pets.
How do I clean a stainless steel trash can without damaging it?
Use a soft cloth, warm water, and mild detergent unless the product manual specifies another method. Wipe in the direction recommended for the finish, rinse with a clean damp cloth, and dry promptly. Avoid abrasive pads and unapproved bleach, acids, salts, or polish.
How do I remove odor from an outdoor garbage bin?
Clean it after collection while empty. Remove dry debris, wash compatible surfaces with mild detergent, clean the lid and wheel area, control dirty water so it does not enter a storm drain, then drain and air-dry the cart with the lid open.
How do I stop liquid from collecting under the liner?
Use the correct liner size, seat it fully in the bottom, secure the rim, and avoid pouring liquids into the bin. Contain leaking packaging according to local rules. Check for sharp edges or cracks that repeatedly puncture the bag, and clean spills immediately.
When should a smelly trash can be replaced?
Replace it when cracks leak, deep scratches stay odorous after repeated safe cleaning, seals or inserts cannot be restored, electronics are damaged, or sharp edges make use unsafe. First confirm that the odor is not actually in the floor, cabinet, drain, or nearby appliance.
Final Thoughts
Trash can odor removal is mostly a residue and drying problem. Empty the waste safely, pick up dry debris, identify the material, wash the bucket and hidden zones, rinse away cleaner, drain every low point, and leave the lid open until the container is fully dry.
Use an absorber only after the bin passes a dry recheck. Replace damaged parts when they cannot be cleaned, and get help for hazardous waste, strong chemical or sewage-like odors, infestations, or large outdoor contamination. A clean liner cannot compensate for liquid, damage, or moisture left underneath it.

Ethan Carter is the Founder & Editor of HomeCleanSecrets. Based in the United States, he has 5 years of experience creating practical home cleaning, laundry care, stain removal, decluttering, and home organization content. His goal is to help everyday households clean smarter and build simple routines that are easier to maintain.
Read more about Ethan Carter on his author page: https://homecleansecrets.com/ethan-carter/