
Quick Answer: The Best Way to Clean a Bathroom Sink
Basic Cleaning Order
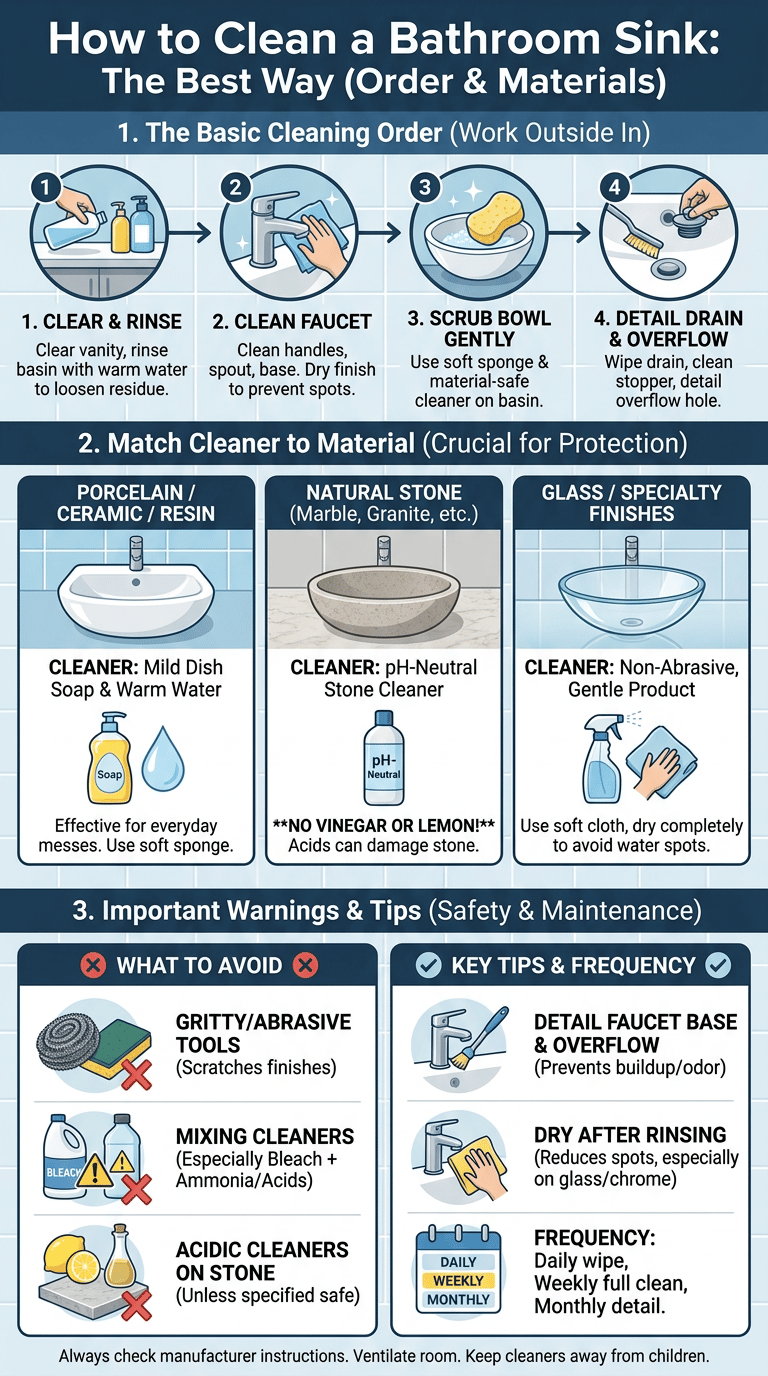
The best way to clean a bathroom sink is to work from the outside in: clear the vanity, rinse the basin, clean the faucet, scrub the sink bowl, then wipe the drain and overflow hole. This order keeps dust, toothpaste, soap film, hair, and product residue from being moved back onto areas you already cleaned.

- Clear the counter by removing soap dispensers, toothbrush holders, skincare bottles, razors, makeup, and grooming tools.
- Rinse the basin with warm water to loosen toothpaste residue, shaving cream, loose hair, and dried soap.
- Clean the faucet, including handles, spout, aerator edge, and faucet base.
- Clean the sink bowl with the right cleaner for your sink material and scrub gently with a soft sponge or microfiber cloth.
- Wipe the drain and overflow hole, remove visible buildup around the drain, clean the stopper, and detail the overflow hole with a small brush or swab.
What Cleaner to Use
For most bathroom sinks, a mild cleaner is enough. A small amount of dish soap in warm water can remove everyday toothpaste film, hand soap residue, and light grime without being overly harsh. If you prefer a ready-made product, choose a bathroom cleaner labeled safe for your sink material.
For a related walkthrough, see our guide to how to clean a toilet properly.
For a related walkthrough, see our guide to how to clean bathroom mold safely.
For a related walkthrough, see our guide to how to clean a bathtub.
For a related walkthrough, see our guide to bathroom cleaning guide.
Porcelain, ceramic, many resin sinks, and many solid surface vanity basins usually respond well to mild dish soap and warm water.
Natural stone sinks, including marble, travertine, limestone, and some granite, should be cleaned with a pH-neutral stone cleaner unless the manufacturer says otherwise.
Glass sinks, specialty faucet finishes, and glossy solid surface basins need non-abrasive products and soft tools to avoid dull spots and scratches.
If you are choosing a household cleaning product, the EPA’s Safer Choice program is a helpful place to learn about products designed with safer chemical ingredients.
What to Avoid
Avoid gritty powders, steel wool, rough scouring pads, and aggressive scraping unless your sink manufacturer specifically allows them. These can dull glossy porcelain, scratch glass, and mark faucet finishes.
Do not use vinegar, lemon juice, or acidic descalers on natural stone unless the product label and sink manufacturer clearly say it is safe. Acidic cleaners can damage some stone surfaces and may affect sealers.
Do not leave cleaner sitting on faucet finishes for longer than the label recommends. This is especially important for brushed, matte, oil-rubbed, unlacquered, or specialty finishes.
Safety note: Never mix cleaning products, especially bleach with ammonia or acidic cleaners. Follow product labels, ventilate the room, and keep cleaners away from children and pets. Poison Control offers practical guidance on household cleaning product safety.
Identify Your Bathroom Sink Material

Porcelain or Ceramic Sink
Porcelain and ceramic are common bathroom sink materials because they are smooth, glossy, and relatively easy to clean. They handle regular bathroom messes well, but they can still be dulled or scratched by rough tools.
Use a soft sponge, microfiber cloth, or non-scratch scrub pad for routine cleaning. Bathroom sink stains on porcelain and ceramic often come from toothpaste, makeup, soap film, hard water spots, rust from metal cans or tools, and residue around the drain.
Glass Sink
Glass vessel sinks and glass vanity basins can look beautiful when clean, but they show water spots, fingerprints, toothpaste flecks, and streaks quickly.
Use a gentle cleaner and a soft cloth for routine cleaning. After rinsing, dry the bowl, faucet, and outer rim with a clean microfiber cloth to reduce visible spots.
Stone Sink
Stone sinks need more care than standard ceramic basins. Marble, travertine, limestone, granite, onyx, and other natural stone materials can react differently to cleaners, so follow the sink manufacturer’s care instructions.
Use a pH-neutral stone cleaner for routine cleaning. Avoid vinegar, lemon juice, harsh descalers, and abrasive powders unless the product is specifically labeled safe for your exact stone.
Some stone sinks are sealed to reduce staining. Harsh cleaners, acidic products, and abrasive scrubbing may affect the finish or sealer. If water no longer beads or the surface darkens easily when wet, check the manufacturer’s care guide or contact a stone professional before using stronger products.
Resin or Solid Surface Sink
Resin and solid surface sinks are often used in modern vanities because they can have smooth shapes and seamless designs. They are generally easy to wipe down, but they can be sensitive to heat, dyes, and rough tools.
Do not place hot hair tools directly in the basin, and avoid harsh scrubbers that could dull the surface. Rinse away hair dye, tinted skincare, and makeup residue promptly. A soft sponge, microfiber cloth, or non-scratch pad is usually enough for toothpaste buildup, soap film, and everyday bathroom grime.
Supplies You Need
Basic Tools
- Microfiber cloths for cleaning, drying, and polishing the faucet.
- A soft, non-scratch sponge for the basin.
- A detail brush for the faucet base, drain rim, handle seams, and overflow opening.
- Gloves for cleaning buildup from the stopper, drain area, or overflow hole, or when using stronger bathroom cleaners.
Cleaner Options
- Mild dish soap for routine cleaning, toothpaste residue, and light soap film on most non-stone bathroom sinks.
- A bathroom cleaner labeled safe for your basin and faucet finish.
- A pH-neutral stone cleaner for marble, travertine, limestone, granite, and other stone sinks.
Optional Tools
- An old toothbrush used only for cleaning the faucet base and tight seams.
- Cotton swabs for cleaning the visible edge of the overflow hole.
- A plastic scraper for dried toothpaste after softening. Do not use metal blades on sink surfaces.
Step 1: Clear and Rinse the Sink Area
Remove Items from the Counter
Start by removing everything around the sink. Cleaning around bottles and toothbrush cups leaves grime behind and makes it easier to miss sticky spots near the faucet and backsplash.
Lift soap dispensers and wipe underneath them. Move toothbrush holders, rinse or wipe their bases, and clean the area underneath. Remove makeup brushes, razors, tweezers, contact lens items, hair products, and skincare bottles before cleaning the counter and sink.
Rinse the Basin
Turn on warm water and rinse the bowl. This removes loose debris and softens residue so you do not have to scrub as hard.
Pick up visible hair with a tissue, gloved hand, or drain tool before rinsing. Try not to wash clumps of hair into the drain. If toothpaste has dried on the basin, let warm water sit on the residue briefly, then wipe it with a damp cloth before applying cleaner.
Wipe the Counter Edge
The edge where the counter meets the sink often collects splashes, powder, shaved hair, soap drips, and skincare residue. Focus on the faucet ledge, backsplash seam, under soap pumps, and the narrow rim around drop-in sinks.
Wipe the counter edge before deep-cleaning the bowl so loose debris does not slide into the freshly cleaned basin.
Step 2: Clean the Faucet and Handles
Remove Fingerprints and Water Spots
Bathroom faucets collect fingerprints, soap residue, toothpaste spray, and water spots. Clean the faucet before scrubbing the basin so any drips fall into an area that still needs to be rinsed.
Use a damp microfiber cloth to wipe the spout, handles, drain lift rod, and the area behind the faucet. For routine cleaning, warm water with a drop of mild dish soap is often enough.
After wiping, buff the faucet with a dry microfiber cloth. Drying helps reduce visible water spots and gives chrome, nickel, stainless, and many other finishes a cleaner look.
Clean Around the Faucet Base
The faucet base is one of the easiest places to miss. It can hold soap film, toothpaste mist, minerals, and dust in a tight ring.
Dip a small brush in your cleaning solution and gently work around the base of the faucet, handles, and drain lift rod. Avoid grinding the brush into the finish.
If you see a pale ring, clean it gradually with a material-safe cleaner. For specialty finishes or stone counters, avoid acidic products unless the label clearly says they are safe for that surface.
Protect the Faucet Finish
Faucet finishes can vary widely. Chrome is usually forgiving, while matte black, brass, bronze, brushed gold, and oil-rubbed finishes may need gentler care.
Do not assume a descaling method that works on one faucet is safe for another. Check the faucet care instructions and test gently in an inconspicuous area if the manufacturer allows.
Spray cleaner onto a cloth instead of soaking the faucet directly, especially near seams and handles. Rinse or wipe away residue, then dry the finish.
Step 3: Clean the Sink Basin
Apply Cleaner Evenly
Once the faucet and counter edge are addressed, apply your cleaner to the basin. The right cleaner depends on the sink material, but the method is similar: spread it evenly, give it a short moment to loosen residue if the label allows, and scrub gently.
Apply cleaner to the back wall, side curves, front inner curve, and flat area around the drain. Toothpaste and soap film can cling to vertical surfaces, not just the bottom.
The ring around the drain often collects soap residue, toothpaste, shaving cream, and mineral discoloration. Use a soft sponge or cloth first, then a detail brush if needed.
Scrub Gently
Bathroom sinks do not usually need aggressive scrubbing. A gentle approach protects the finish and still removes most daily buildup.
Choose microfiber, a soft sponge, or a non-scratch pad. Avoid steel wool, hard-bristle brushes, and gritty powders unless your sink manufacturer specifically approves them.
Clean the front inner curve where toothpaste, face wash, and shaving residue tend to collect, then work toward the drain.
Rinse Completely
After scrubbing, rinse the entire basin with warm water. Cleaning residue left behind can attract film, create streaks, or leave the surface feeling tacky.
Rinse the back ledge, bowl sides, and drain area thoroughly. Run a clean damp cloth over the basin. If it drags or feels slippery, rinse again. Finish by drying the sink with a clean microfiber cloth, especially if water spots are a problem.
Step 4: Clean the Drain and Stopper

Remove Visible Hair and Buildup
The bathroom sink drain area often smells or looks dirty because it catches hair, toothpaste, soap, shaving residue, and skincare oils. Start with what you can see and reach safely.
Put on gloves and remove hair from the drain opening. If the drain has a removable stopper, lift it out according to the sink design. Pull hair and buildup upward rather than forcing it down, since pushing debris into the pipe can contribute to slow drainage.
Clean the Stopper
The stopper is a common source of grime because it sits directly in the path of toothpaste, soap, shaving residue, and hair.
Wipe the stopper with a paper towel or cloth, then scrub it with warm soapy water and a small brush. Pay attention to the underside and any grooves.
Rinse the stopper completely and wipe the drain rim before putting it back. If the stopper is difficult to remove, clean the visible parts and refer to the sink or faucet instructions before taking anything apart.
Handle Sink Drain Odor
If your bathroom vanity drain smells musty, focus first on the stopper, drain rim, and overflow hole. Odor often comes from residue that stays damp in these areas.
Run hot tap water briefly if your plumbing and sink material allow it. Avoid boiling water in bathroom sinks, especially with delicate materials, older pipes, or uncertain plumbing.
If odor returns quickly, remove and clean the stopper more frequently. Toothpaste, soap, hair, and grooming products can build up faster than expected.
If the sink drains slowly, gurgles, smells like sewage, leaks, or the odor remains after cleaning the stopper and overflow, contact a plumber. Persistent odor may not be a surface-cleaning problem.
Step 5: Clean the Overflow Hole
Why the Overflow Gets Dirty
The overflow hole is the small opening near the upper inside wall of many bathroom sinks. It helps redirect water if the basin gets too full, but it can also collect residue.
Hand soap, face wash, toothpaste foam, and shaving cream can splash into the overflow opening and dry around the edge. The overflow channel can also stay damp, which may allow musty smells to linger if residue is not cleaned away.
How to Clean It Safely
Use small, gentle tools to clean visible buildup around the sink overflow hole, and avoid forcing anything deep into the channel.
Dip a small detail brush or cotton swab in warm soapy water. Wipe the visible rim and just inside the opening. Replace swabs as they become dirty.
Do not push rigid tools far into the overflow. This can damage parts, lodge debris deeper, or make the area harder to rinse.
How to Reduce Overflow Odor
Overflow odor is easier to prevent when the basin is rinsed after messy use and dried regularly.
If toothpaste foam splashes near the overflow, rinse the upper bowl and overflow edge with warm water. After cleaning, wipe the upper bowl and overflow area with a dry cloth to reduce lingering residue and musty smells.
How to Remove Common Bathroom Sink Problems
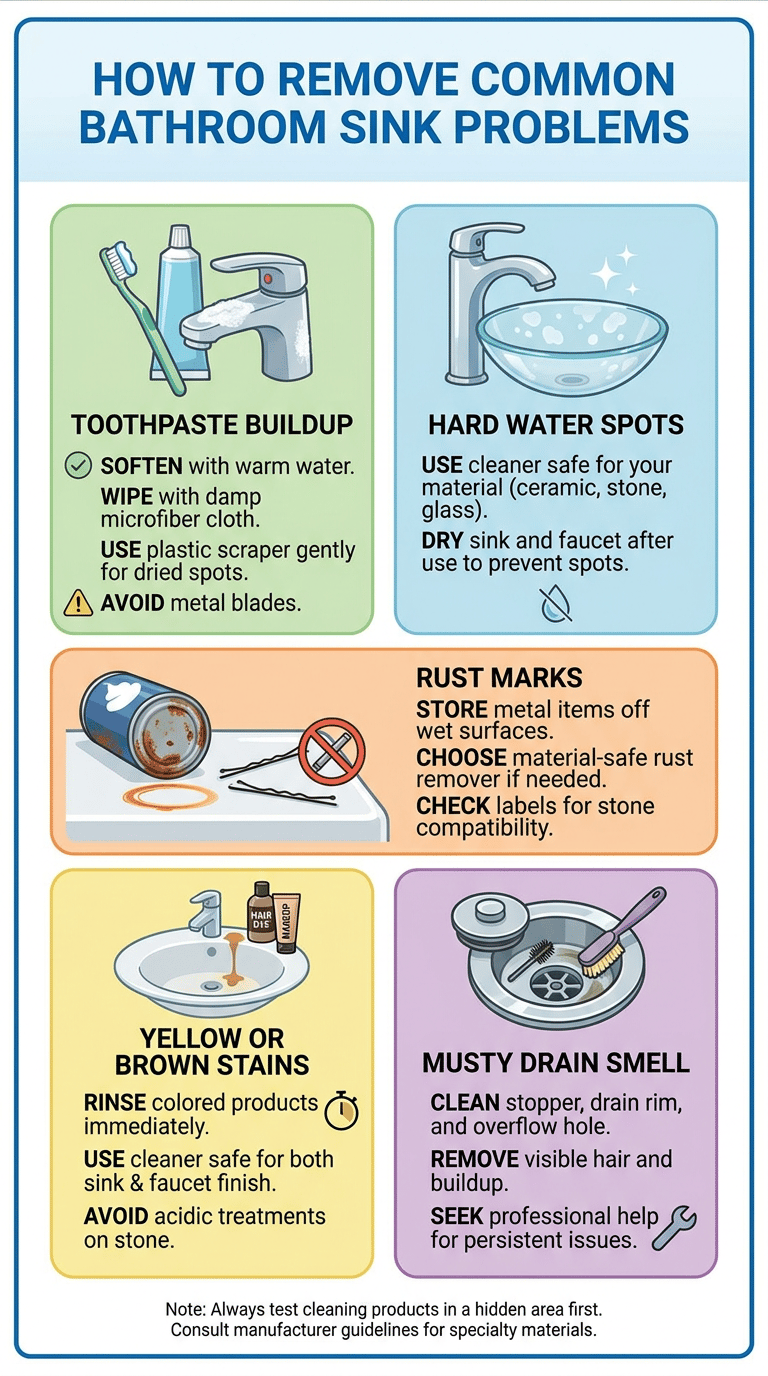
Toothpaste Buildup
Toothpaste residue dries into chalky patches, especially near the front of the bowl, around the drain, and on faucet handles.
Wet the area with warm water and let it soften briefly. Then wipe it with a damp microfiber cloth or soft sponge. If a spot is dried on, use a plastic scraper lightly after softening. Avoid metal blades and aggressive scraping.
Hard Water Spots
Hard water spots often appear as cloudy marks on faucets, glass sinks, and glossy basins. The safest removal method depends on the material.
For standard ceramic or porcelain, use a bathroom product labeled for mineral deposits if mild soap is not enough. For stone, specialty finishes, or glass, choose a product specifically labeled safe for that surface.
Drying the sink and faucet after rinsing is one of the simplest ways to reduce visible spots.
Rust Marks
Rust marks in a bathroom sink often come from metal items left on a wet surface, such as shaving cream cans, hair tools, tweezers, bobby pins, or metal-bottomed containers.
Move metal items off the sink ledge and store them in a dry tray or cabinet. Wipe the bottom of containers before putting them back.
If mild cleaning does not remove the mark, choose a rust remover labeled safe for your sink material. Do not use rust removers on stone or specialty finishes unless the label clearly permits it.
Yellow or Brown Stains
Yellow or brown bathroom sink stains can come from product residue, minerals, old standing water, makeup, self-tanner, hair dye, or metal contact.
Rinse away tinted skincare, makeup, and hair products as soon as possible. If staining appears where water sits or drips, use a cleaner that is safe for both the sink material and faucet finish. For stone, avoid acidic stain treatments unless approved by the manufacturer.
Musty Drain Smell
A musty drain smell usually needs attention at the drain stopper, drain rim, and overflow opening before anything else.
Remove the stopper if possible, scrub away residue, clean the visible drain rim, and wipe the overflow hole with a small brush or swab.
If water drains slowly, residue may be sitting in the drain line. Remove visible hair and buildup. If the problem continues, consider professional plumbing help rather than repeatedly adding stronger chemicals.
How Often to Clean a Bathroom Sink
Daily Quick Wipe
A daily quick wipe keeps toothpaste and soap film from hardening. After brushing teeth or washing your face, rinse visible residue and wipe splashes with a damp cloth. Wipe the handle and spout quickly, then dry them if spots show easily.
Weekly Full Clean
A weekly full clean is enough for many bathroom sinks, especially in guest bathrooms or low-use spaces. Busy family bathrooms may need more frequent attention.
Clean the bowl, faucet, handles, counter edge, and backsplash area with the appropriate cleaner. Scrub around the drain rim and remove visible hair before it collects around the stopper.
Monthly Detail Clean
A monthly detail clean helps with hidden buildup and odor-prone areas. Remove and scrub the stopper if your sink design allows. Clean grooves and the underside. Wipe the visible overflow opening with a swab or small brush, and detail around the faucet base, handles, and drain lift rod.
Bathroom Sink Cleaning Mistakes to Avoid
Using Kitchen Sink Methods on Stone
Bathroom sinks are not all cleaned the same way, and kitchen sink methods can be too harsh for stone vanity basins.
Vinegar and lemon-based methods are often discussed for household cleaning, but they are not a good default for stone sinks. Use pH-neutral stone cleaner instead.
If your stone sink is sealed, use products that are compatible with the sealer. When in doubt, check the manufacturer’s care instructions before trying a stronger cleaner.
Scrubbing Faucet Finishes Aggressively
Faucet finishes can scratch, dull, or discolor when scrubbed with rough tools or exposed to harsh products.
Avoid abrasive pads, stiff brushes, and gritty cleaners on faucets. A damp microfiber cloth and gentle detail brush are usually safer.
Do not let cleaner sit on the faucet longer than the label recommends. Rinse or wipe thoroughly and dry right away.
Ignoring the Overflow Hole
The overflow hole is small, but it can make a clean bathroom sink smell less fresh if residue sits inside it.
Toothpaste foam, soap, and moisture can collect around the opening. Clean the visible rim during your detail clean, then wipe the upper bowl dry so water does not sit near the overflow.
Leaving the Sink Wet
A wet sink may look clean at first, then dry into spots, streaks, and film.
Dry the faucet and basin after cleaning, especially on glass, dark finishes, and shiny chrome. A final dry wipe gives the sink a cleaner finish and makes the next cleaning easier.
Frequently Asked Questions
What Is the Best Cleaner for a Bathroom Sink?
The best cleaner depends on the sink material. For most porcelain, ceramic, resin, and solid surface bathroom sinks, mild dish soap and warm water work well for routine cleaning. For stone sinks, use a pH-neutral stone cleaner. For glass sinks and specialty faucet finishes, choose a non-abrasive cleaner and dry the surface after rinsing.
If you are disinfecting because of illness or a specific hygiene concern, clean the surface first, then follow the disinfectant label directions. The CDC explains the difference between cleaning and disinfecting and recommends following product instructions for safe use.
How Do I Remove Toothpaste Buildup from a Sink?
Soften the toothpaste with warm water first. Then wipe it with a damp microfiber cloth or soft sponge and a small amount of mild cleaner. For dried toothpaste, use a plastic scraper lightly after softening, but avoid metal tools and hard scraping that could scratch or dull the sink.
Why Does My Bathroom Sink Smell?
A bathroom sink can smell because residue is trapped around the stopper, drain rim, or overflow hole. Remove visible hair, scrub the stopper if possible, clean around the drain, and wipe the overflow opening with a small brush or cotton swab. If the sink drains slowly, gurgles, leaks, or smells bad after cleaning, the issue may be in the plumbing and may need professional attention.
How Do I Clean the Overflow Hole in a Bathroom Sink?
Use a small brush or cotton swab dipped in warm soapy water. Clean the visible rim and just inside the opening. Do not force rigid tools deep into the overflow channel. After cleaning, rinse the upper basin gently and dry the area with a clean cloth.
Can I Use Vinegar on a Bathroom Sink?
Vinegar may be used on some non-stone surfaces when the manufacturer allows it, but it is not safe as a universal bathroom sink cleaner. Avoid vinegar on natural stone, many specialty faucet finishes, and any surface where the care instructions warn against acids. If you are unsure, use mild soap and water or a cleaner labeled safe for your sink material.
How Often Should I Clean My Bathroom Sink?
Wipe toothpaste and water spots daily if the sink is used often. Do a fuller clean of the basin, faucet, and drain area weekly. Detail the stopper, overflow hole, and faucet base monthly, or more often if you notice odor, slow drainage, or visible buildup.
Final Thoughts
Learning how to clean a bathroom sink is mostly about using the right order, the right cleaner, and gentle tools. Clear the vanity first, rinse away loose residue, clean the faucet, scrub the basin, then detail the drain, stopper, and overflow hole. This routine targets the areas that make a bathroom sink look dull or smell musty, including toothpaste buildup, soap film, faucet spots, and hidden grime around the drain.
The most important detail is your sink material. Porcelain and ceramic are usually forgiving, glass needs careful drying, stone needs pH-neutral care, and resin or solid surface sinks should be cleaned without heat or harsh abrasives. When you match the method to the material and keep the basin dry after cleaning, your bathroom sink will stay clean and easier to maintain.

Ethan Carter is the Founder & Editor of HomeCleanSecrets. Based in the United States, he has 5 years of experience creating practical home cleaning, laundry care, stain removal, decluttering, and home organization content. His goal is to help everyday households clean smarter and build simple routines that are easier to maintain.
Read more about Ethan Carter on his author page: https://homecleansecrets.com/ethan-carter/