
A reliable how to remove ink stains from clothes starts before the washer runs. Read the stain, protect the fabric, and keep heat away until the mark is gone.
This guide is for Reader with pen or ink marks on clothing who wants to remove ink without smearing it across the fabric or damaging dye. Use it as a calm decision tree for fabric labels, stain type, pretreatment, washing, and dryer checks.
For a related walkthrough, see our guide to how to remove makeup stains from clothes.
For a related walkthrough, see our guide to how to remove food stains from clothes.
For a related walkthrough, see our guide to clothing stain removal guide.
Quick Answer: The Best Way to Remove Ink Stains from Clothes
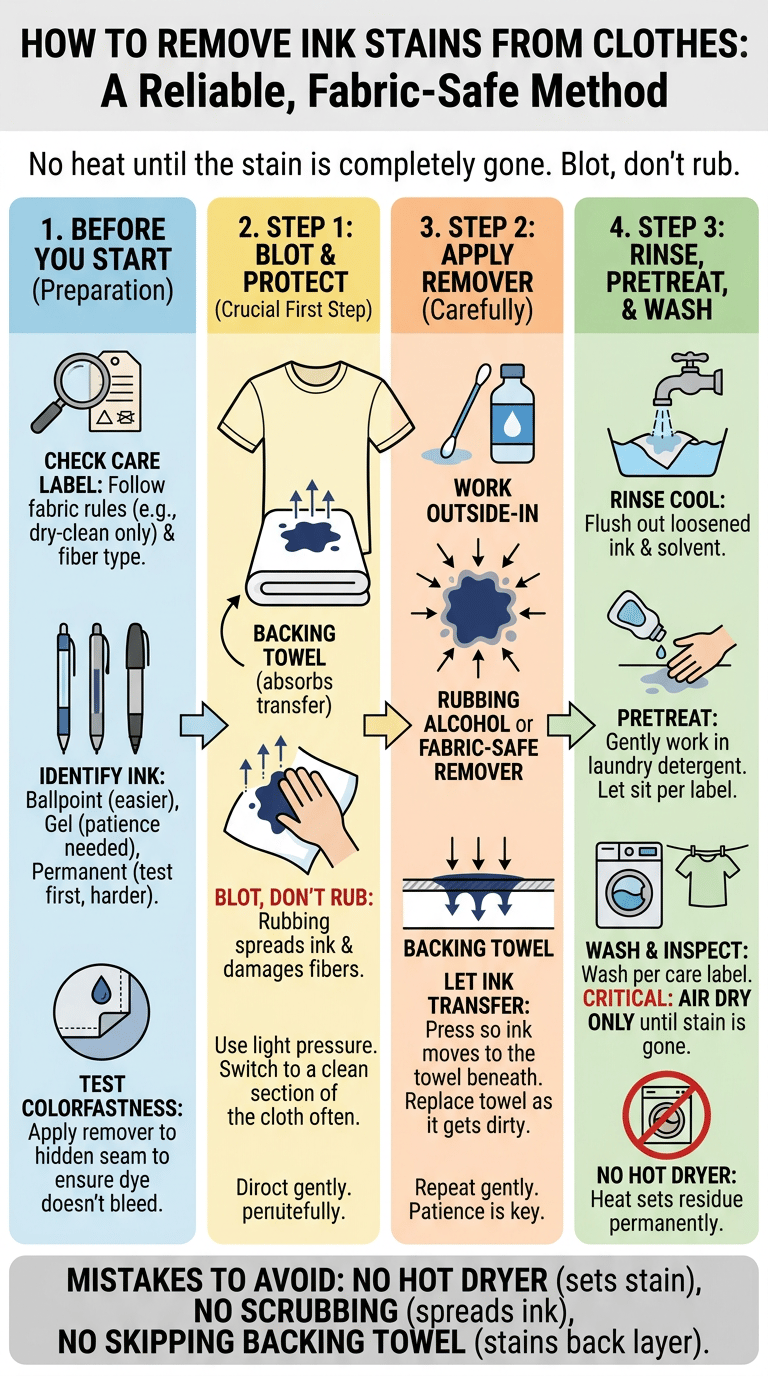
The best way to handle how to remove ink stains from clothes is to identify the mark, remove excess residue, pretreat before washing, and check before drying. This keeps the work practical and reduces the chance you will spread ink.
For messy laundry situations, CDC household cleaning guidance is a helpful safety reference for cleaning basics.
The basic method
The basic method is simple: start with blotting, keep residue from spreading, pretreat, wash, and inspect before heat.
Place a towel behind the stain
Place a towel behind the stain is a checkpoint. Keep tools clean and inspect before moving to the next step.
Blot instead of rub
Blot instead of rub controls spread. Use light pressure and stop if the fabric pills, fuzzes, or transfers dye.
Apply fabric-safe remover
Apply fabric-safe remover should match the stain and fabric. Apply a small amount and follow label dwell time.
Rinse and launder
Rinse and launder helps move residue out. Start cool for unknown marks and protein stains.
Check before drying
Check before drying matters because heat can set residue. Keep the garment out of the dryer until the stain is gone.
Why ink spreads
Stains come back when oil, product film, or color remains below the surface. They can look gone while wet and reappear after drying.
Dye and solvent movement
Dye and solvent movement is a checkpoint. Keep tools clean and inspect before moving to the next step.
Rubbing pushes ink outward
Rubbing pushes ink outward controls spread. Use light pressure and stop if the fabric pills, fuzzes, or transfers dye.
What to avoid
Remove excess residue, pretreat the ink stain, wash by the care label, and check in bright light before drying.
Hot dryer
Hot dryer matters because heat can set residue. Keep the garment out of the dryer until the stain is gone.
Scrubbing hard
Scrubbing hard controls spread. Use light pressure and stop if the fabric pills, fuzzes, or transfers dye.
Treating without a backing towel
Treating without a backing towel is a checkpoint. Keep tools clean and inspect before moving to the next step.
Use the stain as feedback. If a white cloth keeps picking up residue, continue gently; if nothing transfers and the fabric looks stressed, rinse and stop.
Before You Start
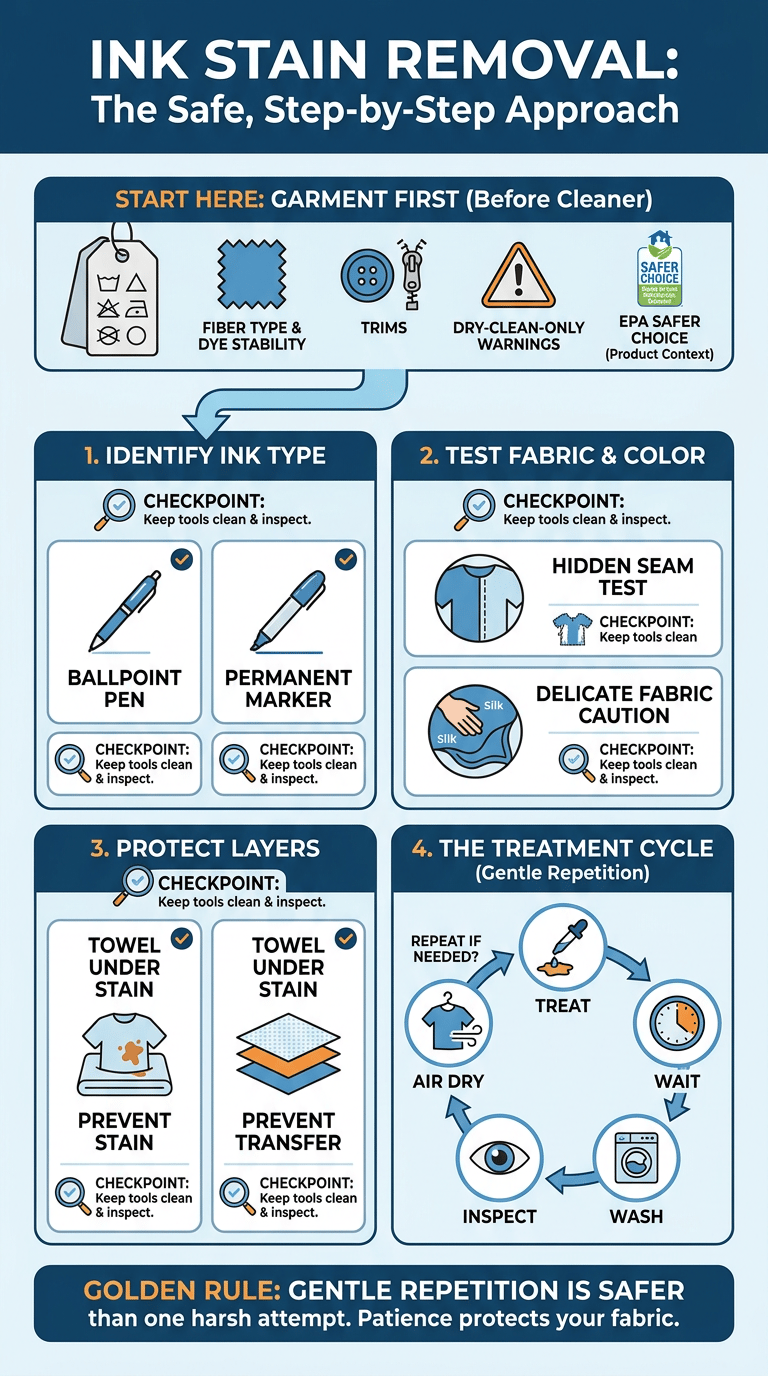
Start with the garment, not the cleaner. Care labels, fiber type, dye stability, trims, and dry-clean-only warnings decide how much treatment the fabric can safely handle.
For choosing routine products, the EPA Safer Choice program gives useful product-selection context.
Identify the ink type
For identify the ink type, work in small stages and check the fabric after each pass.
Ballpoint pen
Ballpoint pen is a checkpoint. Keep tools clean and inspect before moving to the next step.
Gel ink
Gel ink is a checkpoint. Keep tools clean and inspect before moving to the next step.
Permanent marker
Permanent marker is a checkpoint. Keep tools clean and inspect before moving to the next step.
Check fabric and colorfastness
For check fabric and colorfastness, work in small stages and check the fabric after each pass.
Hidden seam test
Hidden seam test is a checkpoint. Keep tools clean and inspect before moving to the next step.
Delicate fabric caution
Delicate fabric caution is a checkpoint. Keep tools clean and inspect before moving to the next step.
Protect the fabric layers
For protect the fabric layers, work in small stages and check the fabric after each pass.
Towel under stain
Towel under stain is a checkpoint. Keep tools clean and inspect before moving to the next step.
Keep ink from transferring
Keep ink from transferring is a checkpoint. Keep tools clean and inspect before moving to the next step.
Gentle repetition is safer than one harsh attempt. Treat, wait, wash, inspect, and air dry before deciding whether another pass is needed.
Supplies You Need
A small kit is enough: white cloths, a dull scraper, a soft brush, a basin, liquid detergent, and a stain remover that fits the fabric label.
Basic tools
The basic method is simple: start with blotting, keep residue from spreading, pretreat, wash, and inspect before heat.
White towels
White towels is a checkpoint. Keep tools clean and inspect before moving to the next step.
Cotton swabs
Cotton swabs is a checkpoint. Keep tools clean and inspect before moving to the next step.
Basin or sink
Basin or sink is a checkpoint. Keep tools clean and inspect before moving to the next step.
Cleaner options
For cleaner options, work in small stages and check the fabric after each pass.
Rubbing alcohol if fabric-safe
Rubbing alcohol if fabric-safe controls spread. Use light pressure and stop if the fabric pills, fuzzes, or transfers dye.
Laundry detergent
Laundry detergent should match the stain and fabric. Apply a small amount and follow label dwell time.
Commercial stain remover
Commercial stain remover should match the stain and fabric. Apply a small amount and follow label dwell time.
What not to use casually
Remove excess residue, pretreat the ink stain, wash by the care label, and check in bright light before drying.
Bleach on colored fabric
Bleach on colored fabric needs caution. Use one product at a time, rinse between methods, and avoid unsafe cleaner combinations.
Harsh solvents on delicate fabric
Harsh solvents on delicate fabric is a checkpoint. Keep tools clean and inspect before moving to the next step.
Heat before removal
Heat before removal matters because heat can set residue. Keep the garment out of the dryer until the stain is gone.
Keep the stained area separate from clean fabric when possible. A backing towel, small basin, or focused pretreatment prevents transfer.
Step 1: Blot and Protect the Fabric
This section treats step 1: blot and protect the fabric as a decision point. Match the method to the dye stain, keep moisture controlled, and let the care label set the boundary.
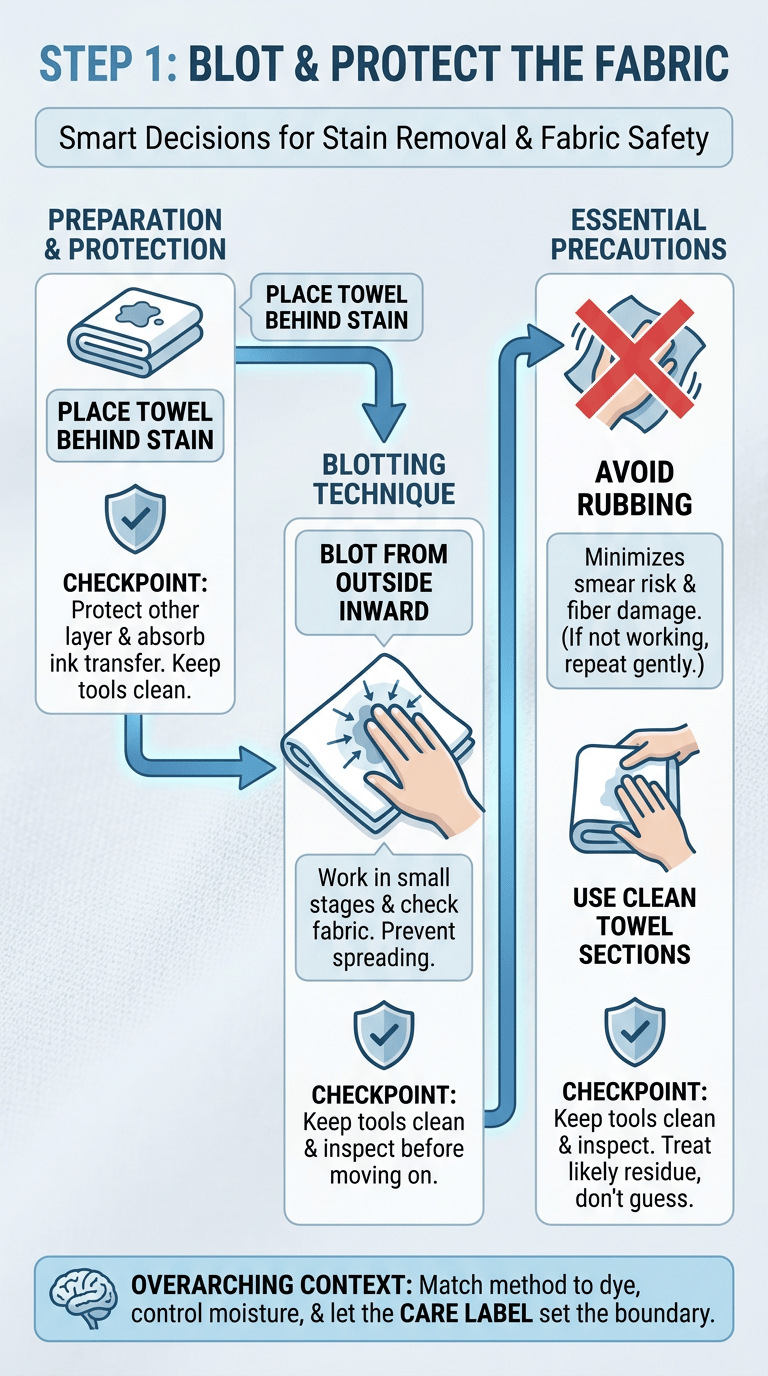
Place towel behind stain
For place towel behind stain, work in small stages and check the fabric after each pass.
Absorb ink transfer
Absorb ink transfer is a checkpoint. Keep tools clean and inspect before moving to the next step.
Protect the other fabric layer
Protect the other fabric layer is a checkpoint. Keep tools clean and inspect before moving to the next step.
Blot from the outside inward
For blot from the outside inward, work in small stages and check the fabric after each pass.
Prevent spreading
Prevent spreading is a checkpoint. Keep tools clean and inspect before moving to the next step.
Use clean towel sections
Use clean towel sections is a checkpoint. Keep tools clean and inspect before moving to the next step.
Avoid rubbing
When a treatment is not working, repeat gently instead of adding more force, heat, or stronger products.
Smear risk
Smear risk is a checkpoint. Keep tools clean and inspect before moving to the next step.
Fiber damage
Fiber damage is a checkpoint. Keep tools clean and inspect before moving to the next step.
The visible mark may include oil, dye, protein, tannin, wax, or product film. Treat the likely residue rather than guessing wildly.
Step 2: Apply Ink Remover Carefully
This section treats step 2: apply ink remover carefully as a decision point. Match the method to the dye stain, keep moisture controlled, and let the care label set the boundary.
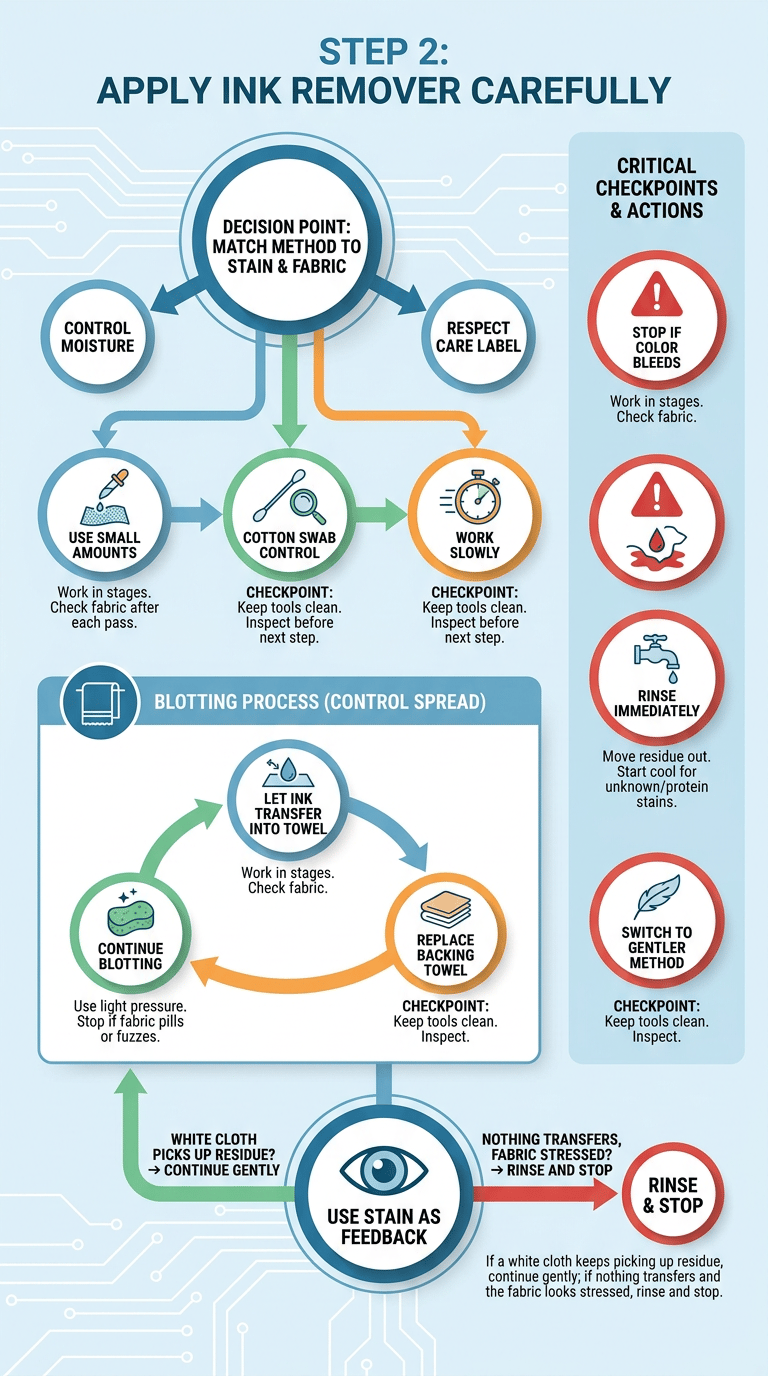
Use small amounts
For use small amounts, work in small stages and check the fabric after each pass.
Cotton swab control
Cotton swab control is a checkpoint. Keep tools clean and inspect before moving to the next step.
Work slowly
Work slowly is a checkpoint. Keep tools clean and inspect before moving to the next step.
Let ink transfer into towel
For let ink transfer into towel, work in small stages and check the fabric after each pass.
Replace backing towel
Replace backing towel is a checkpoint. Keep tools clean and inspect before moving to the next step.
Continue blotting
Continue blotting controls spread. Use light pressure and stop if the fabric pills, fuzzes, or transfers dye.
Stop if color bleeds
For stop if color bleeds, work in small stages and check the fabric after each pass.
Rinse immediately
Rinse immediately helps move residue out. Start cool for unknown marks and protein stains.
Switch to gentler method
Switch to gentler method is a checkpoint. Keep tools clean and inspect before moving to the next step.
Use the stain as feedback. If a white cloth keeps picking up residue, continue gently; if nothing transfers and the fabric looks stressed, rinse and stop.
Step 3: Rinse, Pretreat, and Wash
This section treats step 3: rinse, pretreat, and wash as a decision point. Match the method to the dye stain, keep moisture controlled, and let the care label set the boundary.
Rinse treated area
For rinse treated area, work in small stages and check the fabric after each pass.
Remove solvent and loosened ink
Remove solvent and loosened ink is a checkpoint. Keep tools clean and inspect before moving to the next step.
Avoid spreading
Avoid spreading is a checkpoint. Keep tools clean and inspect before moving to the next step.
Apply detergent
For apply detergent, work in small stages and check the fabric after each pass.
Work gently
Work gently is a checkpoint. Keep tools clean and inspect before moving to the next step.
Let sit as label allows
Let sit as label allows protects the garment. Follow care instructions before using water, enzymes, bleach, or extended soaking.
Wash and inspect
For wash and inspect, work in small stages and check the fabric after each pass.
Use care label settings
Use care label settings protects the garment. Follow care instructions before using water, enzymes, bleach, or extended soaking.
Air dry until stain is gone
Air dry until stain is gone is a checkpoint. Keep tools clean and inspect before moving to the next step.
Gentle repetition is safer than one harsh attempt. Treat, wait, wash, inspect, and air dry before deciding whether another pass is needed.
How to Handle Different Ink Stains
This section treats how to handle different ink stains as a decision point. Match the method to the dye stain, keep moisture controlled, and let the care label set the boundary.
Ballpoint ink
For ballpoint ink, work in small stages and check the fabric after each pass.
Often responds to alcohol-based treatment
Often responds to alcohol-based treatment is a checkpoint. Keep tools clean and inspect before moving to the next step.
Blot patiently
Blot patiently controls spread. Use light pressure and stop if the fabric pills, fuzzes, or transfers dye.
Gel ink
For gel ink, work in small stages and check the fabric after each pass.
More pigment
More pigment is a checkpoint. Keep tools clean and inspect before moving to the next step.
Repeat treatment may be needed
Repeat treatment may be needed is a checkpoint. Keep tools clean and inspect before moving to the next step.
Permanent marker
For permanent marker, work in small stages and check the fabric after each pass.
Harder to remove
Harder to remove is a checkpoint. Keep tools clean and inspect before moving to the next step.
Test before stronger products
Test before stronger products should match the stain and fabric. Apply a small amount and follow label dwell time.
Dried ink
For dried ink, work in small stages and check the fabric after each pass.
Treat in layers
Treat in layers is a checkpoint. Keep tools clean and inspect before moving to the next step.
Avoid heat
Avoid heat matters because heat can set residue. Keep the garment out of the dryer until the stain is gone.
Keep the stained area separate from clean fabric when possible. A backing towel, small basin, or focused pretreatment prevents transfer.
Ink Stain Mistakes to Avoid
Most mistakes come from rushing, rubbing, using heat too soon, or changing products without rinsing. If fumes, irritation, or accidental mixing happens, use Poison Control cleaning product advice for guidance.
Rubbing the stain
For rubbing the stain, work in small stages and check the fabric after each pass.
Spreads ink
Spreads ink is a checkpoint. Keep tools clean and inspect before moving to the next step.
Pushes dye deeper
Pushes dye deeper is a checkpoint. Keep tools clean and inspect before moving to the next step.
Skipping the backing towel
For skipping the backing towel, work in small stages and check the fabric after each pass.
Ink transfers to back layer
Ink transfers to back layer is a checkpoint. Keep tools clean and inspect before moving to the next step.
Larger stain area
Larger stain area is a checkpoint. Keep tools clean and inspect before moving to the next step.
Using bleach first
For using bleach first, work in small stages and check the fabric after each pass.
Color damage risk
Color damage risk is a checkpoint. Keep tools clean and inspect before moving to the next step.
Not effective for all ink
Not effective for all ink is a checkpoint. Keep tools clean and inspect before moving to the next step.
Drying before checking
For drying before checking, work in small stages and check the fabric after each pass.
Heat sets remaining ink
Heat sets remaining ink matters because heat can set residue. Keep the garment out of the dryer until the stain is gone.
Repeat first
Repeat first is a checkpoint. Keep tools clean and inspect before moving to the next step.
The visible mark may include oil, dye, protein, tannin, wax, or product film. Treat the likely residue rather than guessing wildly.
Frequently Asked Questions
These answers cover the common sink-side decisions. For delicate, expensive, lined, or dry-clean-only garments, choose the gentlest limit.
What removes ink stains from clothes?
Remove excess residue, pretreat the ink stain, wash by the care label, and check in bright light before drying.
Can dried ink stains be removed?
A dried stain can sometimes improve, but heat-set residue is harder. Pretreat again, air dry, and inspect before trying more dryer heat.
Does rubbing alcohol remove ink from fabric?
Remove excess residue, pretreat the ink stain, wash by the care label, and check in bright light before drying.
Can I use hairspray on ink stains?
Hairspray is unreliable because formulas vary and may leave residue. Test a fabric-safe alcohol method in tiny amounts instead.
Can ink stains come out after drying?
A dried stain can sometimes improve, but heat-set residue is harder. Pretreat again, air dry, and inspect before trying more dryer heat.
How do I remove ink from delicate clothes?
Remove excess residue, pretreat the ink stain, wash by the care label, and check in bright light before drying.
Final Thoughts
A calm stain routine protects clothes: remove excess, pretreat the ink stain, wash by the label, inspect, and air dry until the mark is gone.

Ethan Carter is the Founder & Editor of HomeCleanSecrets. Based in the United States, he has 5 years of experience creating practical home cleaning, laundry care, stain removal, decluttering, and home organization content. His goal is to help everyday households clean smarter and build simple routines that are easier to maintain.
Read more about Ethan Carter on his author page: https://homecleansecrets.com/ethan-carter/