
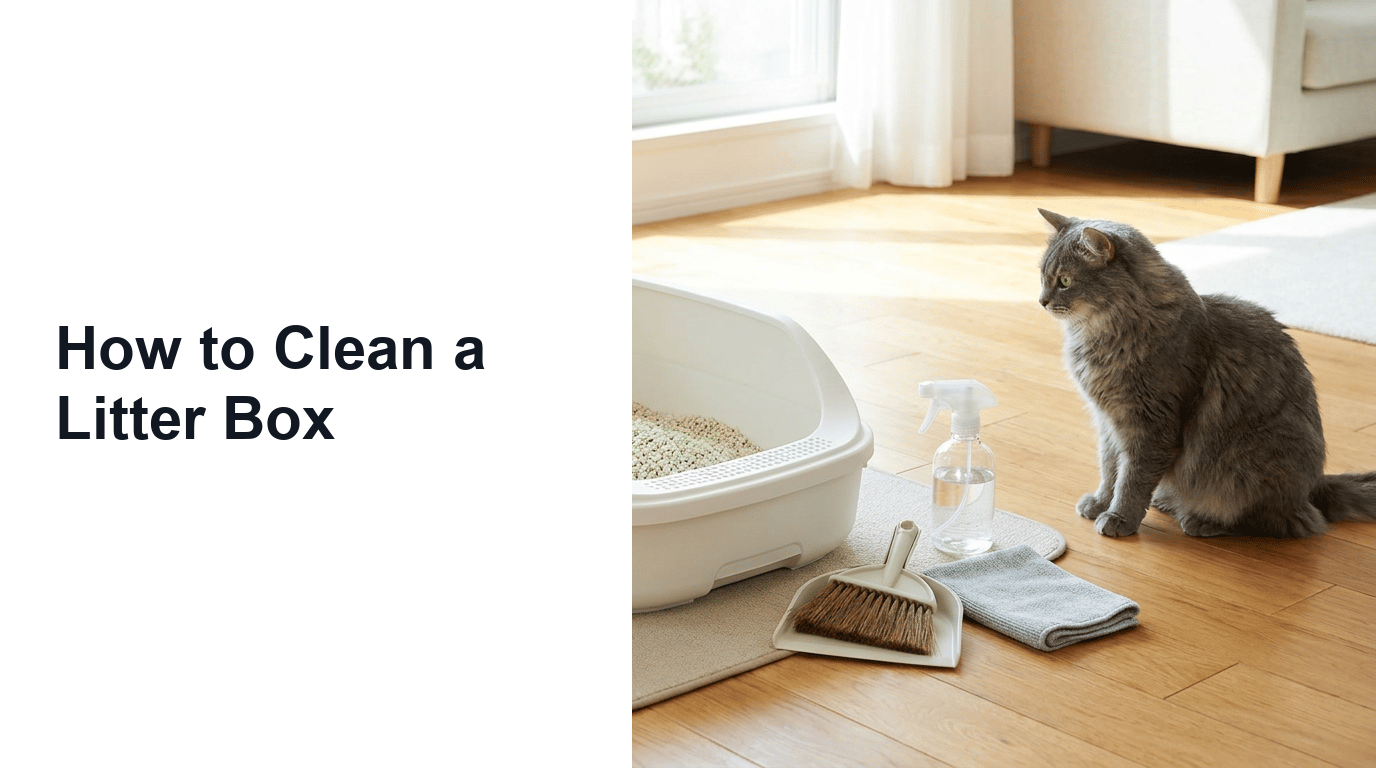
A clean litter box is easier to maintain when you treat it as a small routine instead of a rescue job. The basic rhythm is simple: scoop every day, keep enough clean litter in the box, wash the box on a regular schedule, dry it completely, and clean the floor area before tracked litter spreads through the room. That routine controls the normal mess of cat care without turning the whole home into a cleaning project.
This guide stays focused on the litter box system itself. It covers scooping, litter depth, full cleanouts, odor control, tracking, box type, mat cleanup, and the point where an old box should be replaced. It does not replace a full guide to cleaning hard-floor accidents, carpet stains, couch odor, dog bowls, pet bedding, or whole-house pet cleaning. Those problems can happen near a litter area, but the steps below are for expected litter box maintenance.
Quick Answer: A Simple Litter Box Cleaning Routine
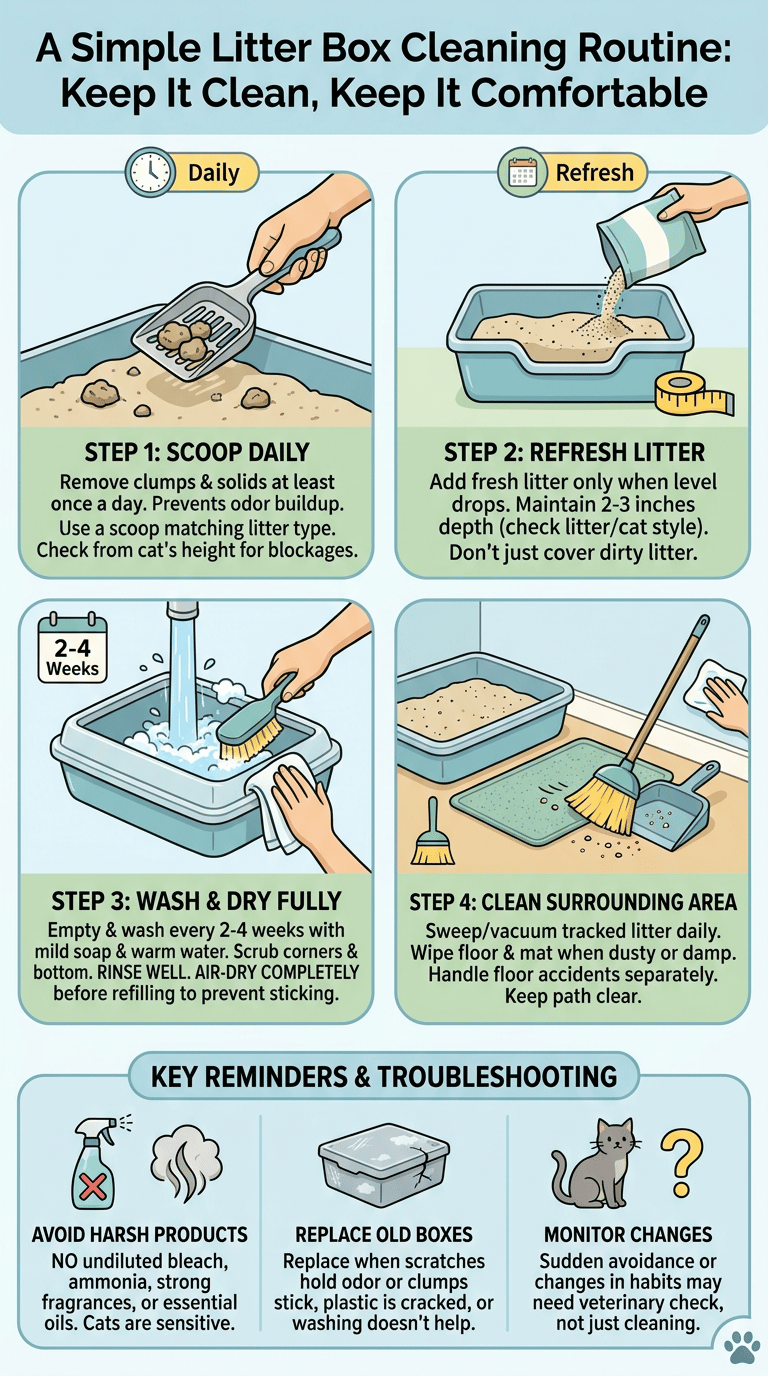
The easiest routine is daily scooping, small litter refreshes when the level drops, a complete wash on a planned schedule, and a quick floor reset around the box. Keep the routine boring and consistent. A box that is cleaned before it smells bad is easier for you and more comfortable for your cat.
Scoop daily
Remove clumps and solid waste at least once a day. In a busy household, a morning and evening scoop may work better, especially with multiple cats or a small apartment. Use a scoop that matches the litter type so clean litter can fall back into the box while waste goes into a sealed bag.
A good test is to look at the box from the cat’s height. If clumps are blocking the entry area, sitting in the favorite corner, or breaking apart when touched, the box needs attention before the next refill.
Refresh litter as needed
After scooping, level the remaining litter with the scoop. Add fresh litter only when the depth has dropped or the surface looks thin. Dumping fresh litter over a dirty base hides the problem for a short time, but it does not clean the box. If the bottom smells sour or sticky, it is time for a full empty and wash.
Wash the box on a routine schedule
Plan a complete cleanout before the plastic holds odor. Many homes do well with a full empty and wash every two to four weeks, but the real timing depends on litter type, box size, number of cats, and odor. Texas A&M Veterinary Medicine notes that boxes should be scooped daily and washed with old litter dumped and replaced on a regular schedule in its litter box etiquette guidance.
Keep the surrounding floor clean
Tracked litter is part of the litter box job, not a separate mystery mess. Sweep or vacuum the nearby floor daily if litter spreads into walkways. Wipe the area when dust or damp residue appears. If urine, feces, or vomit lands outside the box, handle that as a floor accident, not normal tracking.
Why Litter Box Cleaning Matters
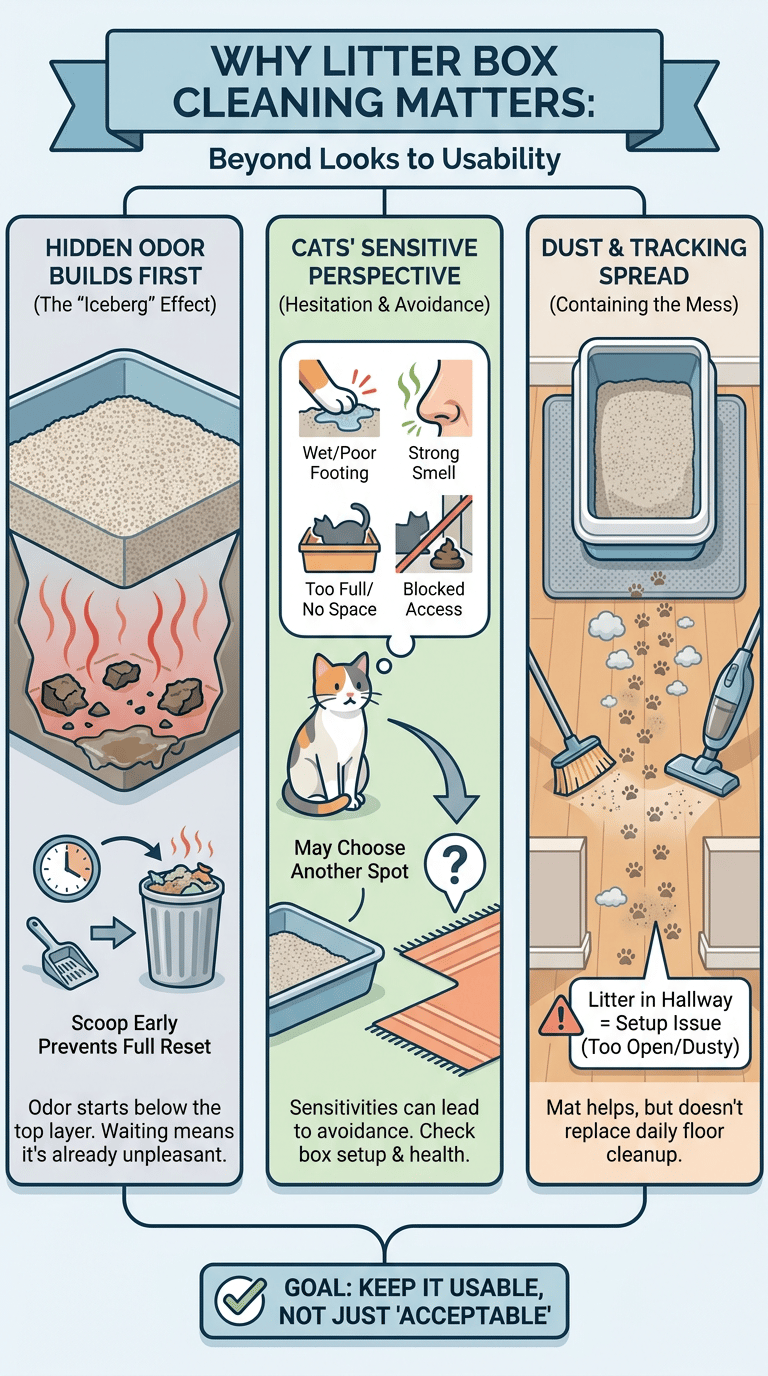
A litter box can look acceptable from across the room and still feel unpleasant to a cat. Odor, wet litter, dust, stuck clumps, and a dirty entry path all change how the box functions. Cleaning is partly about smell, but it is also about keeping the box usable.
Odor builds before the box looks dirty
Odor often starts below the top layer. Clumps can break apart, wet litter can stick to scratched plastic, and solids can sit under clean-looking granules. Waiting until the room smells bad means the box has already been unpleasant for a while. Scooping early prevents small waste from becoming a full box reset.
Cats may avoid a box that feels unpleasant
Cats are sensitive to footing, smell, space, noise, and access. A box that is too full, too wet, too scented, or blocked by waste may lead a cat to hesitate, rush, or choose another spot. Do not diagnose a behavior problem from one messy box, but do treat sudden avoidance as a sign to check both the box setup and your cat’s health.
Dust and tracking spread beyond the box area
Litter dust lands on baseboards, mats, nearby floors, and sometimes on furniture if the box is near a living area. Granules also ride out on paws. A mat helps, but it does not replace daily floor cleanup. If litter reaches the hallway, the box zone is too open, the mat is too small, or the litter is too dusty for that location.
Supplies to Use and Avoid
You do not need harsh products to clean most litter boxes. The core supplies are a sturdy scoop, waste bags, gloves, mild soap, water, cleaning cloths, and a place to dry the box fully. Strong fragrance is not a cleaning shortcut, and unsafe product use can create bigger problems than the litter.
Scoop and waste bags
Choose a scoop with slots that fit your litter. Fine clumping litter needs narrower slots than large pellets. Keep waste bags near the box so scooping is not delayed. Tie the bag before placing it in the trash, especially in small apartments where odor can spread quickly.
Mild soap and water
For regular wash days, warm water and mild soap are usually enough after the box is emptied. Scrub corners, the entry lip, and the bottom where clumps stick. Rinse until the box no longer feels slippery. Soap residue can hold smell and may bother a cat’s paws or nose.
Gloves and ventilation
Wear disposable or washable gloves when emptying and scrubbing the box. Open a window or use a fan for airflow if you are cleaning in a bathroom, laundry room, or enclosed utility space. Wash your hands afterward even if you wore gloves.
Cleaners to avoid around cats
Avoid using strong fragrance, undiluted bleach, ammonia-heavy products, essential oil cleaners, or mixed cleaning products in a litter box. The ASPCA explains that household products should be used only as directed around pets in its household product safety guidance. Cats can be especially sensitive to strong smells, so a box that smells powerful to you may feel overwhelming to them.
When to read product labels carefully
Read the label before using any disinfectant, deodorizer, litter additive, or enzyme cleaner. Check whether the product is meant for surfaces that contact pets, whether rinsing is required, and how long the surface must dry before use. Self-cleaning boxes also have manufacturer rules for trays, sensors, rakes, waste drawers, and power components.
Daily Litter Box Routine
The daily routine should take only a few minutes. Do it in the same order each time: scoop, inspect, level litter, handle obvious residue, and reset the floor. A consistent order helps you notice changes instead of cleaning on autopilot.
Scoop clumps and solids
Start with visible solids, then remove urine clumps. Slide the scoop under the clump instead of chopping down through it. If a clump breaks apart, remove the wet pieces rather than stirring them into the clean litter. Tap the scoop gently over the box so dry litter falls back.
Check litter depth
Most clumping litters work best when the box has enough depth for urine to form a clump before reaching the bottom. Around two to three inches is a common practical range, but the bag directions and your cat’s digging style matter. Too little litter causes sticking. Too much litter can spill over the edge and increase tracking.
Wipe obvious residue
If a small smear is on the inside wall or entry lip, wipe it during the daily routine before it dries hard. Use a damp paper towel or cloth, then dry the spot. Do not spray cleaner into a full box of litter. Wet cleaning product can mix into the litter and create a smell your cat avoids.
Sweep or vacuum tracked litter nearby
Clean the floor immediately around the box, the mat, and the path your cat uses after leaving. Use a small broom, handheld vacuum, or vacuum attachment suited to the floor. If your vacuum manual warns against certain debris, follow that limit. Litter can be heavy, dusty, or abrasive depending on the type.
Weekly or Regular Deep-Clean Method

Deep cleaning means the box is emptied completely, washed, rinsed, dried, and refilled with fresh litter. Do not wait until the box is saturated. A planned cleanout is faster than trying to rescue a plastic box that has absorbed odor for weeks.
Empty the box fully
Scoop out large waste first, then pour the remaining litter into a trash bag slowly to reduce dust. Do this close to the bag opening so litter does not scatter. Tie the bag securely. Avoid flushing litter unless the product and local plumbing guidance clearly allow it, which many products do not.
Wash with appropriate cleaner
Scrub the empty box with warm water and mild soap. Work around corners, scratches, and the underside of the rim. The CDC explains that cleaning removes dirt and many germs from surfaces before disinfecting is considered in its cleaning and disinfecting guidance. In everyday litter box care, cleaning well is the main step unless a specific reason calls for disinfection.
Rinse and dry completely
Rinse until the water runs clear and the surface does not feel slick. Dry with a towel, then air-dry if any seams, corners, or textured areas remain damp. Stop before refilling if you see water beads in the corners. Damp plastic can make fresh litter clump immediately and stick to the bottom.
Refill with fresh litter
Add fresh litter to the depth recommended by the litter product and tolerated by your cat. Level the surface with the scoop. Do not mix old litter back in to preserve scent. A clean box can still smell familiar if it is placed in the same location and filled with the same litter type.
Clean the mat and surrounding floor
Shake the mat outdoors or into a trash bag, then vacuum or wash it according to the material. Wipe the floor under and around the box. If the box sits on hardwood, laminate, tile, vinyl, or sealed concrete, use a cleaner appropriate for that floor type and dry the area before returning the box.
Litter Box Cleaning Schedule by Household
The right schedule depends on how much use the box gets and how contained the litter area is. Use these scenarios as starting points, then adjust when the box smells, clumps stick, litter tracks heavily, or your cat changes habits.
One cat and one box
Scoop daily and check the litter level every time. A full cleanout every two to four weeks may be enough when the cat is healthy, the box is large, and the litter clumps cleanly. If the bottom is sticky before then, shorten the wash schedule.
Multiple cats
Multiple cats usually need more boxes and more frequent scooping. A helpful planning rule is one box per cat plus one extra, with boxes placed in different areas. Humane World gives that guidance in its cat litter training guidance. More boxes do not remove the need to clean, but they reduce crowding and give cats cleaner options.
Small apartment
In a small apartment, odor and tracking become noticeable faster because the box is closer to living space. Scoop at least once daily, keep the waste bag sealed, and clean the floor path before litter reaches rugs or furniture. A larger mat can matter more than a covered box if tracking is the main issue.
Senior cat or kitten considerations
Senior cats and kittens may need a lower entry, shallower litter, and easier access. Cleanliness still matters, but do not make the box harder to use by adding a high cover, narrow doorway, or unstable mat. If a cat starts missing the box, straining, crying, or producing unusual urine or stool, contact a veterinarian.
High-odor or high-tracking situations
High odor usually means the box needs more frequent scooping, a full wash, better ventilation, a different litter depth, or replacement. High tracking usually points to litter texture, mat size, exit path, or box location. Change one variable at a time so you can tell what helped.
Box Type and Material Differences
The cleaning method changes with the box design. Open plastic boxes, covered boxes, self-cleaning units, and mats all collect residue in different places. Clean the part that actually holds waste, but also check the surrounding parts that trap dust and odor.
Plastic open boxes
Open plastic boxes are easiest to inspect and wash. Check the bottom for scratches, cloudy patches, and rough spots where wet litter sticks. Plastic is convenient, but it is not permanent. Once odor stays after washing, the surface may be too scratched to clean well.
Covered boxes
Covered boxes can hide the smell from people while trapping it near the cat. Remove and wash the lid, doorway, filter area, hinges, and clips. Check whether the cover makes the inside too cramped or dark. If the cat hesitates at the entrance, the cover may be part of the problem.
Self-cleaning boxes
Self-cleaning boxes still need emptying, wiping, sensor checks, waste drawer cleaning, and full maintenance. Unplug the unit before manual cleaning if the manual requires it. Do not soak motors, sensors, plugs, or control panels. Follow the specific manual rather than treating the unit like a simple plastic tray.
Litter mats
Mats catch granules but can also hold dust, urine drips, and odor. Shake them often and wash only as the material allows. Rubber, silicone, fabric, and layered mats need different drying times. A damp mat under the box can transfer moisture to the floor.
When scratches and absorbed odor mean replacement
Replace the box when washing no longer removes odor, clumps stick to the same rough areas, the plastic is cracked, or the entry lip is damaged. A scratched box can look clean while still holding residue. Replacement is not a failure. It is part of long-term litter hygiene.
Odor and Tracking Troubleshooting
Troubleshooting works best when you separate odor, dust, sticking, and misses. Each problem has a different fix. Avoid changing the box, litter, location, mat, and cleaning product all at once unless there is an urgent safety issue.
Box smells clean but room still smells
Check the mat, floor under the box, trash can, scoop holder, wall behind the box, and nearby baseboards. Odor may be outside the tray. Wash the box, replace the litter, clean the floor, and empty the trash. If the smell stays, look for old accidents nearby rather than adding more deodorizer.
Litter dust on hard floors
Dust can spread when litter is poured too quickly, when the box is in a draft, or when the litter type is very fine. Pour slowly, keep the bag close to the box, and vacuum the area with a tool suited to fine debris. Wipe smooth floors after vacuuming if dust leaves a pale film.
Clumps sticking to the bottom
Sticking usually means too little litter, delayed scooping, a scratched bottom, or a litter that does not clump fast enough for your cat’s habits. Add enough depth, scoop sooner, and wash the bottom fully. If clumps always stick to the same scratched area, replacement may be easier than repeated scrubbing.
Cat misses the box edge
A cat may miss the edge because the box is too small, the sides are too low, mobility is limited, or the preferred corner is crowded with waste. Clean the floor with the right method for that surface, then reassess the box size and entry height. Repeated misses deserve a veterinary conversation, especially when they start suddenly.
Mistakes to Avoid
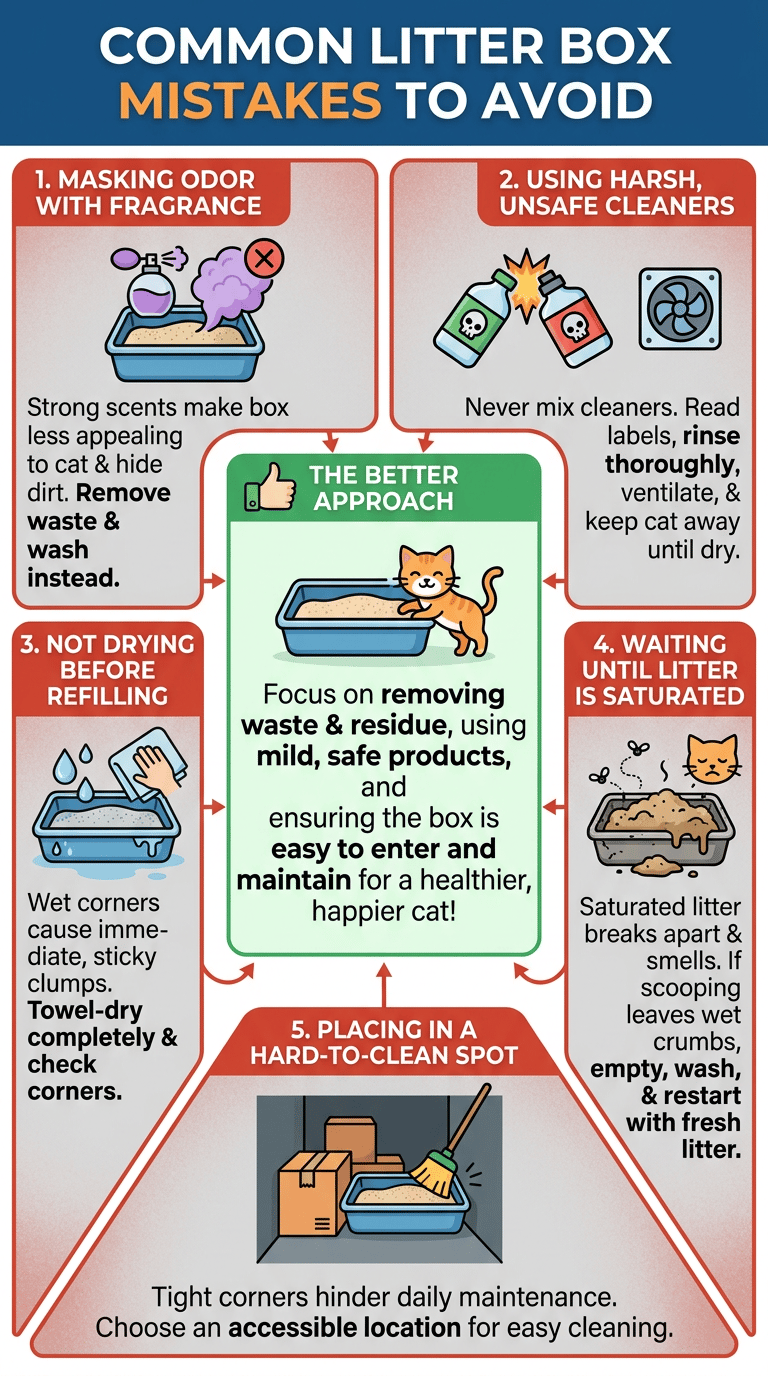
Most litter box mistakes come from trying to hide odor instead of removing waste and residue. A better approach is to clean earlier, use milder products correctly, and keep the box easy for the cat to enter, turn around, and leave.
Masking odor with strong fragrance
Fragrance can make the room smell better to people while making the box less appealing to the cat. Scented litter, sprays, powders, and plug-in fragrances can also make it harder to notice when the box is truly dirty. Remove waste and wash the box before considering any odor product.
Using harsh cleaners without checking safety
Do not mix cleaners, and do not assume that a stronger smell means a safer box. Poison Control warns about household cleaner risks and product misuse in its cleaning products safety information. Read labels, rinse when required, ventilate the area, and keep the cat away until the box is dry and ready.
Not drying the box before refilling
Water left in corners can cause fresh litter to clump immediately. That sticky layer becomes difficult to scoop and can trap odor. Dry the box with a towel, then check corners with your fingertips or a clean paper towel before refilling.
Waiting until the litter is saturated
Saturated litter cannot absorb normally. It breaks apart, smells stronger, sticks to the bottom, and tracks more easily. If scooping leaves wet crumbs throughout the box, do not keep topping it off. Empty, wash, dry, and restart with fresh litter.
Placing the box in a hard-to-clean spot
A tight corner behind storage bins may seem discreet, but it makes daily scooping and floor cleanup harder. Choose a spot where you can pull the box out, sweep the mat, wipe the floor, and notice misses quickly. A cleanable location matters as much as the box itself.
Adjacent Issues Around the Litter Box
The litter box is connected to nearby floor care, whole-house pet cleaning, product storage, and cat behavior. Keep those topics in view without mixing every pet cleaning problem into one routine.
Hard-floor accidents near the box
If urine, feces, or vomit lands on hard flooring outside the box, clean it based on the floor material. Tile, sealed vinyl, laminate, hardwood, and stone have different limits. Do not flood the area. Blot or remove solids first, then use a floor-safe method and dry the surface.
Whole-house pet cleaning routines
A litter box routine works better when the rest of the home has a simple pet cleaning rhythm. Hair control, bedding laundry, bowl cleaning, and floor care all reduce background mess. Keep the litter box task separate, but include it in your daily or weekly household reset.
Pet-safe product storage
Store litter, bags, soap, disinfectants, enzyme cleaners, and deodorizing products where pets and children cannot reach them. Keep products in original containers with readable labels. Do not store a scoop or cleaning cloth directly on the floor where it can pick up litter dust and residue.
When behavior changes may need veterinary guidance
Cleaning can fix a dirty box, but it cannot diagnose pain, urinary issues, digestive trouble, stress, or mobility problems. The AVMA lists signs such as straining, frequent small urination, crying while urinating, and urinating outside the box in its feline lower urinary tract disease guidance. Sudden changes deserve professional advice.
FAQ About Cleaning a Litter Box
These answers focus on normal home maintenance. Adjust for your cat, litter type, box design, household size, and any advice from your veterinarian.
How often should you fully clean a litter box?
Many homes need a full empty, wash, dry, and refill every two to four weeks. Some need it weekly, especially with multiple cats, non-clumping litter, a small box, high odor, or clumps that stick to the bottom. Daily scooping still matters even when the full wash schedule is longer.
What cleaner is safe for a litter box?
Mild soap and water are the safest default for routine washing. If you use a disinfectant or deodorizing product, read the label, confirm it is appropriate for the surface, rinse if directed, ventilate the area, and let the box dry fully before your cat uses it. Avoid strong fragrance and never mix cleaning products.
How do you stop litter from tracking everywhere?
Start with a larger mat, daily sweeping or vacuuming, a better exit path, and a litter texture that does not cling as much to paws. Check whether the box is overfilled or too close to a hallway. If tracking is still heavy, try changing one factor at a time so the fix is clear.
When should you replace a litter box?
Replace the box when scratches hold odor, clumps keep sticking to rough plastic, the box is cracked, the entry is damaged, or the box still smells after a proper wash and dry. A heavily scratched box can keep residue even when it looks clean on the surface.
Final Thoughts
A good litter box routine is not complicated. Scoop daily, keep the litter at a practical depth, wash the box before odor settles into the plastic, clean the nearby floor, and replace the box when scratches or absorbed smell make cleaning less effective. Keep products mild, labels visible, and the box easy for your cat to use. When a problem looks like more than normal litter maintenance, stop treating it as a cleaning failure and check the box setup, the floor area, and your cat’s health needs.

Ethan Carter is the Founder & Editor of HomeCleanSecrets. Based in the United States, he has 5 years of experience creating practical home cleaning, laundry care, stain removal, decluttering, and home organization content. His goal is to help everyday households clean smarter and build simple routines that are easier to maintain.
Read more about Ethan Carter on his author page: https://homecleansecrets.com/ethan-carter/