
Outdoor furniture lasts longer when the cleaning method matches the frame, finish, tabletop, weave, hardware, and joints. Begin by removing cushions and accessories, identifying every material, clearing dry debris, and testing the mildest compatible cleaner on a hidden area.

This process is intended for stable chairs, tables, benches, loungers, and small side pieces with ordinary dust, pollen, food residue, bird droppings, or light sticky marks. Stop before wet cleaning if the furniture rocks unexpectedly, has sharp corrosion, cracked supports, broken glass retainers, loose joints, split wood, or brittle plastic.
Quick Answer: Separate the Parts and Match the Method to the Material

The furniture-cleaning decision path
- Read the care label, manual, or product page for the exact collection when available.
- Test stability and inspect coatings, joints, feet, fasteners, weave, wood, and tabletop supports.
- Remove cushions, covers, umbrellas, glass inserts, and accessories that require separate handling.
- Vacuum, brush, or wipe away dry grit before adding water.
- Identify the most moisture-sensitive or chemical-sensitive component.
- Spot test the cleaner, tool, and water amount in a concealed location.
- Clean from upper surfaces toward legs and feet without flooding joints or hollow frames.
- Rinse or wipe away residue, dry completely, and inspect again before reassembly.
What should be removed or cleaned separately
Take off loose cushions, slipcovers, pillows, detachable slings, table accessories, and any umbrella passing through the tabletop. Outdoor cushions need their own label-based washing and deep-drying process. Umbrella canopies and moving mechanisms also require separate care. Handle outdoor cushions separately because covers, seams, foam, and fill require a different washing and drying process from furniture frames.
Inspect the Furniture Before Adding Water
Find the manufacturer label and care instructions
Look beneath seats, table aprons, arms, and frames for a brand plate, collection name, model number, material code, or care tag. Product-specific instructions matter because similar-looking finishes can react differently to solvents, waxes, abrasives, and pressure. The American Cleaning Institute explains how cleaner directions and caution statements define proper use, including compatible surfaces and required precautions.
Check stability, loose joints, sharp edges, cracks, corrosion, and damaged coatings
Place the item on a level surface and press gently at the arms, back, and corners. A small amount of designed movement is different from a loose joint, cracked weld, failed fastener, or leg that shifts independently. Run a gloved hand near, not across, rust flakes, splinters, broken weave, peeling finish, and chipped glass edges. Do not sit on or move an unstable piece as part of cleaning.
Separate frames, cushions, removable fabrics, glass inserts, and accessories
Photograph the assembled piece before removing parts. Keep fasteners and clips organized, and note which side faces upward. Never force a stuck insert or pry under glass with metal.
Identify the Frame, Finish, and Mixed Materials
Powder-coated and painted metal
Powder coating usually forms an even colored shell over aluminum or steel, while paint may show brush, spray, or layered finish characteristics. Both depend on an intact coating to protect the underlying metal. Chips, bubbling, chalking, or peeling are finish failures rather than ordinary dirt.
Aluminum
Aluminum is often lighter than steel and does not produce iron rust, but it can oxidize, pit, or develop a dull chalky appearance. A magnet may help distinguish some steel parts from aluminum, although fasteners and mixed components can confuse the test.
Steel and iron
Steel and iron are usually heavier and can produce reddish-brown corrosion where coating is chipped or moisture enters seams. Tubular frames may hold water internally if drain openings are blocked.
Plastic and resin
Molded plastic, resin, and high-density polyethylene furniture may have color throughout the material or a surface finish. These materials can scratch, turn brittle with age, or react to solvents and abrasive pads. Product instructions still matter. POLYWOOD provides care directions specifically for its manufactured outdoor lumber, illustrating why a method approved for one resin product should not automatically be transferred to every plastic chair.
Natural wood, teak, and other outdoor hardwoods
Wood shows grain, pores, joints, and end grain that can absorb water. Teak may weather from warm brown to silver gray without being dirty, while other woods may be painted, stained, oiled, or sealed.
Synthetic wicker
Synthetic wicker is usually a plastic or resin strand woven over a metal frame. It tolerates more moisture than natural wicker, but dirty water can remain where strands cross or wrap around rails.
Natural wicker or rattan
Natural wicker and rattan use plant fibers that can swell, soften, split, or deform when soaked. They need minimal moisture, light agitation, and strong airflow.
Glass tabletops
Outdoor glass may be tempered and held by clips, pads, a rim, or a recessed support. Grit under a cloth can scratch the surface, and sudden temperature changes can stress hot glass. Check the edges, supports, and retaining hardware before cleaning.
Mixed-material furniture and the most sensitive-component rule
A teak-and-aluminum chair, glass-and-wicker table, or resin bench with metal fasteners should be cleaned according to the component with the strictest limit. Wipe rather than hose when water could enter wood end grain, natural weave, hollow tubes, bearings, or hardware.
Classify the Soil Before Choosing a Product
Dust, pollen, grit, and cobwebs
Loose debris should come off dry. Vacuum with a brush attachment, use a soft detailing brush, or wipe with a dry microfiber cloth. Pay attention to undersides, seat slats, weave intersections, bolt recesses, glides, and the lower edge of table aprons.
Food, drinks, body soil, and sticky residue
Blot fresh spills and lift solids without spreading them into joints. Sugary drinks and body oils can leave a film that attracts dust, especially on armrests and table edges. Begin with a mild product approved for the finish.
Bird droppings
Wear gloves, avoid dry scraping that sends particles into the air, and keep children and pets away from the work zone. Soften a localized deposit with a damp disposable towel or compatible solution, lift it gently, then clean the affected surface according to its material limit. Bag disposable material and wash your hands afterward.
Tree sap and difficult sticky marks at a decision level
Sap-like residue may need a product stronger than routine soap, but solvents can cloud plastic, soften coatings, stain wood, or damage synthetic strands. First remove any loose material with a plastic edge that cannot scratch.
Organic surface clues versus coating or material damage
A green, gray, or dark film may be soil-supported growth on the surface, but color alone does not identify it. Clean a small test area with a compatible method and improve drying conditions. Peeling coating, deep corrosion, soft wood, recurring wetness, and widespread growth are reasons to stop and address the underlying condition.
Choose Furniture-Safe Tools and Cleaner
Cloths, soft brushes, crevice tools, and nonabrasive pads
Use clean white or colorfast cloths so dye does not transfer. Select soft nylon brushes for textured metal, resin, and synthetic weave, and a smaller brush for crevices.
Mild cleaner selection by material and finish
A mild soap-and-water solution is common in many furniture manuals, but it is not universal permission for every finish. Brown Jordan’s material-specific care information separates frame finishes, woven fibers, rope, vinyl, glass, acrylic, and other components. Read both the furniture instructions and the cleaner label before mixing or applying anything.
Spot testing on hidden areas
Test beneath a seat, inside a rear leg, or under a table rim where the same material and finish are present. Apply the planned dilution, tool pressure, dwell time, and rinse method. Let the area dry fully. Stop if the test becomes dull, sticky, lighter, rougher, softer, or visibly different from the surrounding finish.
Protecting hardware, hollow frames, joints, glides, and mechanisms
Use a damp cloth instead of direct spray around swivels, recliners, folding joints, bearings, lock buttons, and hollow tube openings. Keep drain holes clear, but do not push tools deep into a frame. Dry metal fasteners and foot glides promptly.
Prepare the Work Area
Move furniture without injury or dragging damage
Empty tables and remove loose parts before moving anything. Ask for help with long benches, stone-topped tables, and awkward loungers. Lift from strong frame points rather than arms, slats, decorative weave, or glass.
Remove cushions and textiles for separate care
Brush loose debris from cushions before carrying them through the house. Label their original positions when shapes differ. Keep them away from dirty rinse water and do not reinstall them until both the frames and cushions are completely dry.
Protect the patio, deck, rug, plants, doors, and nearby finishes
Move outdoor rugs out of the splash zone and check the surface beneath for trapped moisture or grit. Close nearby doors and windows. Divert water away from thresholds, electrical fixtures, pools, planting beds, and areas where runoff can leave residue.
Plan controlled rinse water and a drying location
Use the least water that will remove cleaner residue. Work where water can drain without pooling under legs or crossing a walking path. Have absorbent towels ready for joints and hardware.
Step-by-Step Routine Cleaning for Most Outdoor Furniture

Remove loose debris from top to bottom
Vacuum or brush tabletops, backs, arms, seats, braces, undersides, legs, and feet in that order. Clearing upper surfaces first prevents debris from falling onto areas already cleaned.
Clean the least soiled and most sensitive areas first
Begin with a hidden or low-visibility section and progress to open surfaces. Clean natural wicker, unsealed wood, mechanisms, and delicate finishes with minimal moisture before moving to more tolerant resin or coated metal. A patio umbrella also needs separate care because the canopy, ribs, pole, crank, and tilt mechanism have different moisture limits.
Apply compatible solution without flooding joints
Dampen the cloth or brush rather than pouring solution onto the furniture. Work on one rail, panel, or tabletop section at a time.
Agitate crevices, undersides, and contact points carefully
Use light repeated passes rather than force. Clean arm fronts, seat edges, table rims, and hand-contact areas where body soil accumulates. Support loose weave with one hand while brushing gently with the other. Stop if a strand lifts, coating flakes, or a joint begins to move.
Rinse or wipe away residue according to material limits
Use a low-flow hose only when the furniture instructions and condition permit it. Otherwise, wipe with a second cloth dampened in clean water, rinsing the cloth frequently.
Dry hardware, seams, joints, and hollow-frame openings
Wipe visible water immediately, then position the furniture so drainage openings face downward without creating instability. Blot around fasteners, welds, leg caps, woven rails, and glass supports.
Material-Specific Cleaning Limits

Powder-coated and painted metal: protect the coating
Use mild approved cleaner, a soft cloth or brush, and controlled rinsing. Do not scrub chalky or peeling areas aggressively. A coating chip exposes the base metal and may need product-specific touch-up or repair after the piece is dry. Cleaning cannot restore a finish that has separated from the frame.
Aluminum: separate dirt from oxidation clues
Routine soil usually transfers to a cloth and leaves the finish more even after washing. Oxidation or coating chalk may remain as a dull or powdery change. Do not polish automatically, because many aluminum frames are coated.
Steel and iron: control water around corrosion
Clean intact coated areas gently and dry them promptly. Avoid hosing openings that can fill tubular frames. Rust bubbles, flakes, sharp edges, and staining that returns from seams indicate corrosion beneath or inside the coating. Do not sit on the piece until structural areas are assessed.
Plastic and resin: avoid brittleness, scratching, and solvent damage
Use a soft brush or cloth and avoid abrasive eraser pads unless the product maker approves them. Do not apply paint thinner, acetone, fuel, or adhesive remover. Brittle plastic may show pale stress lines, cracks around fasteners, or a dry surface that flakes when flexed. Replace structurally weakened seating rather than scrubbing harder.
Natural wood and teak: limit saturation and follow grain and finish guidance
Brush with the grain, keep water exposure controlled, and dry all sides. Gray teak may be normal weathering, not a stain. The Kingsley Bate teak care guide distinguishes routine cleaning from color-maintenance treatments. Do not turn a cleaning session into sanding, stripping, oiling, or refinishing.
Synthetic wicker: clean weave without trapping water
Vacuum both sides when accessible, then brush along the strand direction with a compatible solution. Use a narrow stream only if the frame can drain and the weave is intact.
Natural wicker or rattan: minimal moisture and careful drying
Vacuum with low suction and a protected brush attachment. Wipe a small section with a barely damp cloth, then dry it with moving air. Do not soak, hose, or leave the piece in harsh direct sun.
Glass tabletops: avoid abrasive grit and thermal stress
Remove grit with a soft brush or damp cloth before using glass cleaner or an approved mild solution. Clean when the glass is cool and shaded. Support removable tops according to the manual, protect edges, and never place hot cookware directly on the surface unless the product is rated for it.
Mixed materials: clean to the most restrictive care limit
Work in controlled sections and shield neighboring components. Wipe the wood frame first, clean the glass separately, and use minimal water near woven panels and hardware.
Handle Common Outdoor-Furniture Residues
Pollen and dusty film
Dry vacuuming or brushing removes most pollen without creating yellow streaks. Follow with a damp compatible wipe when a film remains. Rinse cloths frequently so pollen is lifted rather than redistributed.
Fresh food and drink spills
Blot liquids, lift solids, and clean promptly with the mildest approved method. Avoid rubbing colored drinks into textured resin, wood grain, or wicker.
Bird droppings
Soften the deposit rather than scraping it dry. Use disposable material for the first lift, then clean and rinse the surface according to its finish. Inspect seams, weave, and undersides for splatter. Do not flood a joint simply to reach a small contaminated spot.
Sticky sap-like residue
Cool, firm residue may lift in small pieces with a smooth plastic edge. Stop if the finish begins to scratch or stretch. Contact the furniture maker for an approved remover when routine cleaner does not work.
Light surface growth clues and the stop threshold
Clean a small area, correct the moisture source, and observe whether the condition returns. Widespread or recurring growth, soft wood, failing weave, corrosion, and persistent dampness inside frames are not reasons to use a stronger universal product. They call for condition assessment and possibly professional service.
Rinse, Dry, and Reassemble Safely
When wiping is safer than hosing
Choose wiping for natural wicker, mixed-material pieces, damaged coatings, wood end grain, moving joints, and hollow frames with uncertain drainage. A clean damp cloth gives better control and keeps runoff low. Change the water as soon as it becomes visibly dirty.
Keep water out of joints, hollow tubes, mechanisms, and unfinished end grain
Direct water downward and away from openings. Do not spray into swivel bases, recliner tracks, folding hinges, umbrella holes, or open wood joints.
Dry fully before adding cushions, covers, or storage
Drying depends on material, shade, airflow, temperature, humidity, and how much water entered the piece. Check undersides, wrapped weave, hardware recesses, and contact points.
Check feet and contact surfaces before placing furniture on decks or rugs
Clean glides, caps, wheels, and the bottoms of legs. Remove embedded grit that could scratch wood or composite decking. Replace missing glides with the correct part.
Dirt or Damage? A Furniture Inspection Guide
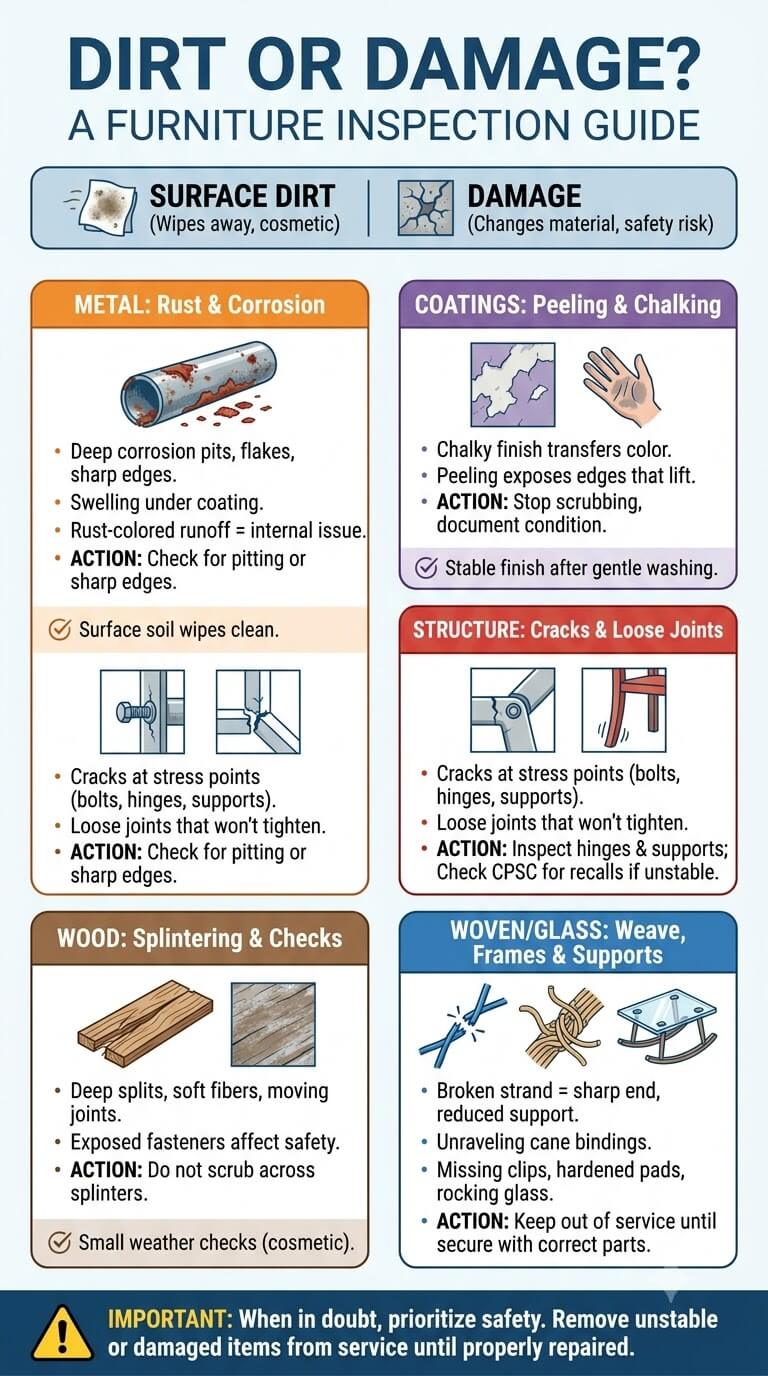
Rust and deep corrosion
Surface soil wipes away; corrosion changes the metal and may create pits, flakes, sharp edges, or swelling beneath coating. Rust-colored runoff from a hollow frame suggests an internal issue.
Peeling or chalking coatings
A chalky finish may transfer color even after gentle washing, while peeling exposes an edge that can lift further. Stop scrubbing and document the condition.
Cracks, loose joints, and brittle plastic
Cracks near bolts, seat supports, hinges, and leg transitions can expand under body weight. Loose joints that cannot be tightened according to the manual are a safety concern. The Consumer Product Safety Commission recall database is worth checking when a product shows unexpected instability or when you suspect a known defect.
Splintering, wood checks, and finish failure
Small weather checks may be cosmetic, while deep splits, soft fibers, moving joints, and exposed fasteners can affect safe use. Splinters should not be scrubbed across.
Broken weave, unstable frames, and damaged glass support
A broken synthetic strand can expose a sharp end or reduce support. Natural cane may unravel after a binding fails. Missing clips, hardened pads, or a rocking glass top require correct replacement parts. Keep the piece out of service until the support system is secure.
Storage, Covers, and Placement After Cleaning

Cover only fully dry furniture
Confirm that frames, joints, weave, tabletops, and feet are dry before covering. Wipe the inside of the cover as well.
Ventilation and condensation under covers
Water can collect beneath a waterproof cover through condensation or wind-driven rain. Use built-in vents, raise low points where appropriate, and inspect after storms.
Furniture feet on concrete, wood, composite, and outdoor rugs
Metal can leave rust marks on concrete, rough feet can scratch decking, and broad bases can hold moisture beneath rugs. Use compatible glides or barriers recommended for both the furniture and supporting surface. Lift pieces periodically to clean underneath and check for trapped dampness. If furniture sits on an outdoor rug, make sure the rug and the floor underneath are dry before restoring the furniture.
Seasonal storage without trapping moisture
Clean before storage, allow complete drying, and choose a dry area with airflow. Stack only pieces designed to stack, and use protective separators that will not transfer color or plasticizer.
Common Outdoor-Furniture Cleaning Mistakes
Using one cleaner on every material
A solution tolerated by resin may dull acrylic, stain wood, or weaken a coating. Identify each material and let the most sensitive component set the limit. Never mix cleaning products to make them stronger.
Soaking natural wicker or unsealed wood
Excess water can swell fibers, open joints, lift finish, and lengthen drying. Use minimal moisture and controlled wiping.
Spraying water into joints and hollow frames
Direct spray can carry dirt into bearings, leave water inside tubing, and start corrosion where you cannot see it. Use a cloth around mechanisms and openings. Clear designed drains gently without enlarging them or dismantling the frame.
Treating oxidation, fading, rust, or peeling as removable dirt
Repeated scrubbing can thin a coating or create an uneven sheen while the original condition remains. Clean a test area, let it dry, and compare texture and color. When no soil transfers, stronger cleaning is unlikely to repair material change.
Reassembling damp cushions or covering wet frames
Damp contact surfaces slow drying and can produce odor, marks, or recurring surface growth. Keep cushions, rugs, and covers separate until every component is dry. Check seams and undersides instead of judging only the top surface.
When Repair, Replacement, or Manufacturer Support Is Needed
Loose joints, unstable frames, broken supports, and sharp corrosion
Stop using furniture that shifts under light pressure, has cracked welds, broken seat supports, missing fasteners, or sharp rust. Do not ask someone to sit on it as a test. A qualified repair service or the manufacturer can determine whether safe parts and procedures are available.
Peeling coatings, brittle plastic, and split wood
Localized cosmetic wear may have a product-specific maintenance option, but broad coating failure, structural plastic cracks, soft wood, and deep splits exceed routine cleaning. Replacement is often more practical when the material can no longer carry normal loads reliably.
Unknown finishes, specialty mechanisms, or warranty-sensitive pieces
Contact support before using a specialty cleaner, polish, wax, solvent, lubricant, or powered spray when the finish is unknown. Provide the collection name, photographs, age, exposure, residue type, and treatments already attempted. This reduces the chance of making a warranty-sensitive condition worse.
Frequently Asked Questions About Cleaning Outdoor Furniture
What should be cleaned first on mixed-material furniture?
Remove dry debris and start with the most sensitive component, such as natural wicker, unsealed wood, acrylic, or a delicate coating. Use a controlled method there before cleaning more tolerant metal or resin. Prevent runoff from one material from reaching another.
Can metal patio furniture be hosed safely?
Only when the care instructions permit it, the coating is intact, the frame drains properly, and there are no sensitive joints or mechanisms. Use low-flow water and dry seams, fasteners, and openings. Wiping is safer when corrosion or internal drainage is uncertain. For a mixed patio setup, a broader outdoor cleaning plan helps coordinate furniture, textiles, floor surfaces, runoff, and drying.
How should natural wicker be cleaned differently from synthetic wicker?
Natural wicker needs minimal moisture, gentle vacuuming, and careful airflow because plant fibers can swell or deform. Synthetic wicker can often tolerate controlled washing, but water can still become trapped in the weave and metal frame. Confirm the material before cleaning.
Is oxidation the same as dirt?
No. Dirt sits on the surface and generally transfers to a cloth or responds to compatible washing. Oxidation is a change in the metal or finish and may remain dull, chalky, or pitted after cleaning. Do not polish a coated frame without approval.
Should furniture covers be installed immediately after cleaning?
No. Wait until frames, joints, weave, tabletops, feet, and the cover interior are fully dry. Covering damp furniture can trap moisture and slow evaporation. Use a fitted ventilated cover and inspect beneath it after wet or windy weather.
Final Thoughts
The safest way to clean outdoor furniture is to treat it as a collection of materials rather than one washable object. Identify the frame and finish, remove textiles, clear grit, test the mildest compatible method, control water around joints, and dry every contact point before reassembly. When you find corrosion, cracks, split wood, broken weave, loose supports, or failing coatings, stop cleaning and move to repair, product support, or replacement.

Ethan Carter is the Founder & Editor of HomeCleanSecrets. Based in the United States, he has 5 years of experience creating practical home cleaning, laundry care, stain removal, decluttering, and home organization content. His goal is to help everyday households clean smarter and build simple routines that are easier to maintain.
Read more about Ethan Carter on his author page: https://homecleansecrets.com/ethan-carter/