
Composite decking needs a gentler and more product-specific approach than many homeowners expect. The safest method is to identify the board line, check its care instructions, remove dry grit first, use an approved cleaner with a nonabrasive brush, and rinse before dirty water can dry into a film.

This method is intended for sound composite or PVC deck boards with ordinary dust, pollen, mud, food residue, grease, leaf marks, or a light surface film. Stop before broad cleaning when boards are loose, deeply gouged, delaminating, melted, or damaged around fasteners and edges.
Quick Answer: Confirm the Product, Then Follow Its Care Limits
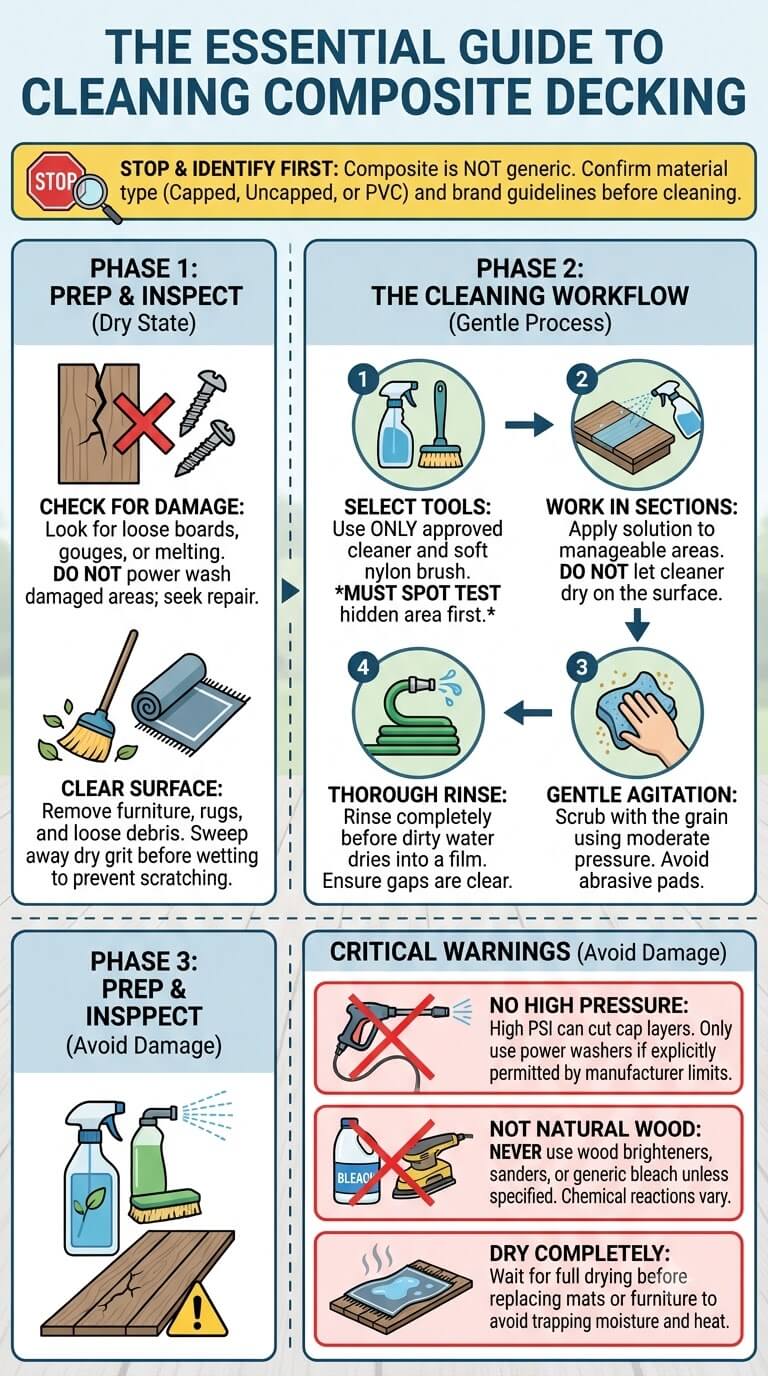
The safest composite-deck sequence at a glance
- Confirm that the surface is composite or PVC rather than natural wood.
- Find the brand, product line, installation records, warranty, or current care guide.
- Inspect the cap layer, board edges, fasteners, gaps, and drainage while the deck is dry.
- Remove furniture, rugs, planters, grit, leaves, and debris between boards.
- Test the approved cleaner and brush in a hidden area.
- Clean manageable sections without letting the solution dry.
- Rinse with controlled water using only the pressure the manufacturer permits.
- Allow complete drying before replacing mats, rugs, furniture, or covers.
Why manufacturer guidance comes before generic cleaning advice
Composite is a broad product category, not one uniform material. Current capped boards, older uncapped composites, and cellular PVC can have different cleaner, brush, and equipment limits. For example, TimberTech care instructions distinguish current capped products from discontinued uncapped collections. A method that is acceptable for one line may dull, scratch, stain, or affect warranty coverage on another.
Identify Composite, PVC, and Natural Wood Correctly
Practical signs of a manufactured board
Look at an exposed board end, stair edge, or hidden underside. Composite often has a dense, uniform core made from plastic and wood-fiber material, while PVC may have a lighter cellular interior. The walking face may carry a molded grain pattern that repeats more regularly than natural wood. Natural wood shows irregular end grain, knots, growth rings, and variation through the board rather than only on the surface.
Capped versus uncapped composite
A capped board has a protective polymer shell over part or all of its composite core. The shell improves resistance to routine staining and moisture, but it can still be scratched, gouged, overheated, or dulled by incompatible products. Uncapped composite exposes the blended core at the surface and may hold stains differently. Do not scrape a board to test it. Use product records, a sample, or manufacturer identification help. If several outdoor surfaces are being cleaned together, start with a material-safe outdoor cleaning framework before choosing the composite-specific steps.
PVC decking and why its instructions may differ
PVC decking is manufactured primarily from plastic rather than a wood-plastic composite core. It may respond differently to heat, solvents, rubber contact, brushes, and specialty cleaners. Visual similarity is not enough to justify treating PVC and composite as interchangeable. Check the exact product line before selecting a chemical or powered tool.
Product name, installation records, warranty, and care documentation
Search purchase receipts, builder documents, leftover board labels, warranty registrations, or markings under a board end. Photograph the grain, color, end profile, and any printed code before contacting support. Trex separates care directions by decking generation and product family, which shows why a brand name alone may not be specific enough.
Inspect the Deck Before Cleaning
Scratches, gouges, cap damage, melted areas, loose boards, and drainage issues
Walk the deck in dry conditions and look from several angles. Mark deep scratches, exposed core material, lifted edges, delamination, melted spots, loose boards, standing-water areas, and damaged fasteners. Cleaning can remove residue around damage, but it cannot rebuild a cap layer or correct movement. Restrict access where footing is uncertain.
Fading, manufacturing variation, and dirty film
Compare a shaded area under movable furniture with the open field of the deck. A color difference may be sun exposure, normal variation, a contact mark, or surface dirt. Wipe a small section with a damp white cloth. Transfer to the cloth suggests removable soil, while a clean cloth and unchanged surface point toward color or material change.
Furniture feet, rubber-backed mats, metal contact, grills, and planters
Inspect beneath every object before moving it far. Rubber or vinyl backing can react with some board surfaces, metal can leave rust-colored transfer, and trapped grit can scratch when furniture shifts. Grill grease can spread beyond the visible drip area. Planters may conceal leaf matter, moisture, mineral rings, and blocked gaps. Lift safely instead of dragging.
Classify the Residue on Composite Boards
Dust, pollen, grit, and mud
Dry dust and pollen often collect in embossed grain, corners, rail bases, and board gaps. Grit should be removed before wet scrubbing because it behaves like an abrasive. Let thick mud dry enough to lift in pieces, then sweep or gently loosen it before applying water.
Food and beverage spills
Blot fresh liquid and collect solids promptly. Sugary drinks, sauces, dairy, and food crumbs can leave sticky films that attract more soil. Use the mildest approved method first, working beyond the visible edge so the cleaned spot blends with the surrounding board.
Grease and grill-adjacent residue
Grease is time-sensitive because it can spread through textured channels and collect dust. Absorb excess without rubbing it across the cap. Do not reach for a strong kitchen degreaser unless the decking manufacturer approves it. Grill mats and drip protection also need compatibility checks because some backings can mark or trap heat.
Leaf marks and tannin-like plant stains
Wet leaves, berries, mulch, and plant pots can leave brown or dark marks that resemble staining seen on wood. Remove the plant material, clean the ordinary soil, and allow the area to dry before judging what remains. Repeated aggressive treatment can damage the finish while doing little for a persistent color change.
Light organic surface film versus widespread recurring growth
A thin film in a shaded, damp location may be supported by pollen, dirt, or debris on top of the boards. Avoid diagnosing it by color alone. Remove dry debris, use a product-compatible method, improve drying conditions, and reassess. Stop when growth is widespread, returns quickly, involves hidden framing, or is linked to persistent drainage problems.
Select Compatible Tools and Cleaner
Soft-brush stiffness and textured-board considerations
Choose a clean nylon brush whose stiffness is allowed for the product. A very soft brush may not reach embossed channels, while a stiff deck brush may scratch or polish the cap. Test both the bristles and your pressure. Replace a brush that contains sand, metal fragments, dried coating, or worn sharp edges.
Mild detergent versus a manufacturer-approved specialty cleaner
Ordinary soil may need only a manufacturer-permitted soap or detergent. Grease, older uncapped boards, or specific stains may require an approved specialty product. The phrase “composite deck cleaner†does not guarantee compatibility with every composite or PVC line. Read the decking instructions and the cleaner label together.
Spot-test signs of dulling, discoloration, or texture change
Test on a hidden board section that has the same color, age, and sun exposure as the affected area. Apply, agitate, dwell, and rinse exactly as planned. Let the test dry fully. Stop if the area becomes lighter, glossier, duller, tacky, rough, softened, or different in texture from the surrounding surface.
Avoid abrasive pads, unapproved solvents, and universal bleach advice
Abrasive pads can alter sheen and leave a permanently visible patch. Solvents may soften plastics or damage the protective shell. Bleach-containing products can affect color and nearby materials and are not a default choice. The American Cleaning Institute explains how directions and caution statements on cleaner labels guide proper use. Never mix products or improvise concentrations.
Prepare the Deck and Surrounding Area
Remove furniture, rugs, mats, and loose objects
Photograph the setup if placement matters, then move objects to a dry location. Ask for help with heavy tables, grills, or planters. Lift rather than drag. Keep cushions and textile items away from spray and runoff. Check the board beneath each rug for trapped grit, moisture, color change, or backing transfer.
Sweep board faces, grooves, corners, and gaps
Use a broom and a nonmetal gap tool that cannot score the board edges. Work leaves and packed debris upward instead of forcing them deeper. Do not damage hidden fasteners or pry at boards. Clearing gaps helps rinse water leave the surface and allows shaded areas to dry.
Protect siding, doors, plants, metal, glass, and electrical fixtures
Close doors and windows, protect low wall finishes, and avoid spraying outdoor receptacles, lighting, switches, or damaged cords. Move metal decor that could drip rusty water. Follow the cleaner label for plant precautions, and rinse accidental contact promptly when the label directs.
Plan drainage and keep runoff controlled
Determine where water will travel before opening a hose. Keep cleaner and greasy residue away from storm drains, ponds, pools, neighboring property, edible gardens, and interior thresholds. Use less water rather than trying to solve drainage with a larger rinse. Collect concentrated oily material separately when practical.
Step-by-Step Composite Deck Cleaning Workflow
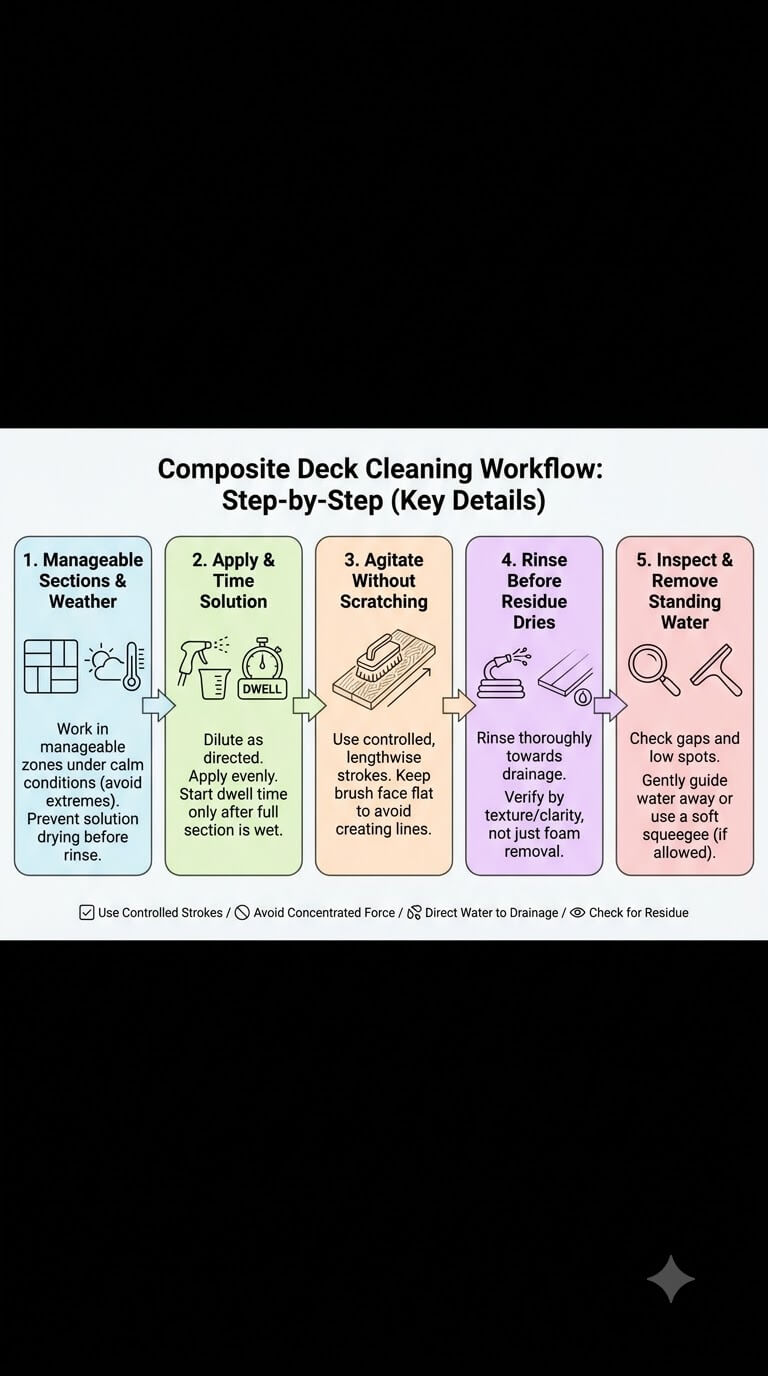
Work in manageable sections under suitable weather conditions
Choose a calm period without lightning, freezing conditions, intense surface heat, or imminent rain. Avoid cleaning a section so large that the solution dries before you can agitate and rinse it. Begin at the cleanest practical area and work toward the dirtier exit route so you do not walk through freshly cleaned boards.
Apply the compatible solution according to its label
Measure and dilute only as directed. Apply evenly with a method approved by both the cleaner and decking manufacturer. Do not flood gaps, rail-post bases, doors, or the underside of nearby furniture. Start the label’s dwell period when the full test section has been wetted, not when the first drop was applied.
Agitate textured boards without scratching the cap
Use controlled strokes that follow the board length and reach the embossed pattern. Keep the brush face flat. Pressing on one corner of the brush can concentrate force and create a polished or scratched line. Rewet the area if the product instructions require the surface to remain damp.
Rinse with controlled water before residue dries
Rinse each section completely, directing water toward the planned drainage route. Work along board channels rather than pushing dirty water back across a clean section. Do not assume that a surface is rinsed because foam has disappeared. A slippery feel, streaks, or cloudy water can indicate remaining cleaner or suspended soil.
Inspect low spots, edges, and gaps for retained dirty water
Look beneath rail bases, around fasteners, near fascia, and at transitions to stairs or a porch. Remove puddles with a clean soft squeegee only if the product permits it, or guide water gently with a rinse. Do not force water into joints, wall assemblies, or door thresholds.
Treat Common Composite-Deck Stains
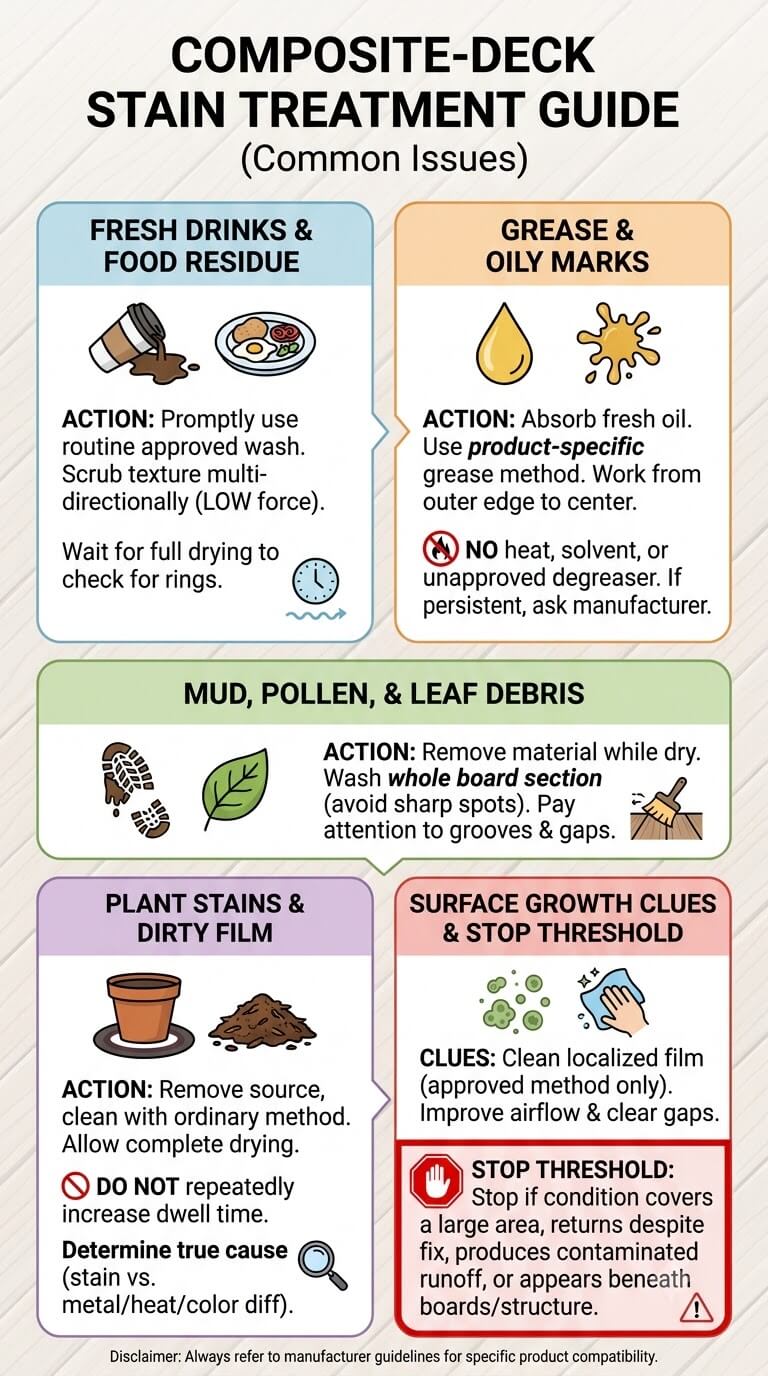
Fresh drinks and food residue
Pick up solids, blot liquid, and use the routine approved wash promptly. Scrub the texture from several directions with low force rather than increasing chemical strength. A ring may remain while wet and disappear after drying, so wait before repeating treatment.
Grease and oily marks
Absorb fresh oil with a clean disposable material, then use the product-specific grease method. Work from the outer edge toward the center to limit spreading. Do not use heat, solvent, or an unapproved degreaser. If the mark remains after the permitted treatment, document it and ask the manufacturer about the next step.
Mud, pollen, and leaf debris
Remove as much material as possible while dry. Wash the whole affected board section rather than creating a sharply defined clean spot. Pay attention to grooves and gaps where pollen can remain and quickly recreate a dull film.
Plant stains and dirty film
First remove the planter, leaf pile, or mulch that caused the contact. Clean the board using its ordinary method and allow complete drying. If a brown or gray mark remains, do not repeatedly increase dwell time. Determine whether it is a persistent stain, metal transfer, heat shadow, or color difference.
Light surface growth clues and the stop threshold
Clean localized surface film only with a method approved for the exact board. Improve airflow, clear gaps, and remove organic debris that holds moisture. Stop if the condition covers a large area, returns despite drainage correction, produces contaminated runoff, or appears beneath boards and around structural components.
Water Pressure and Product-Specific Limits
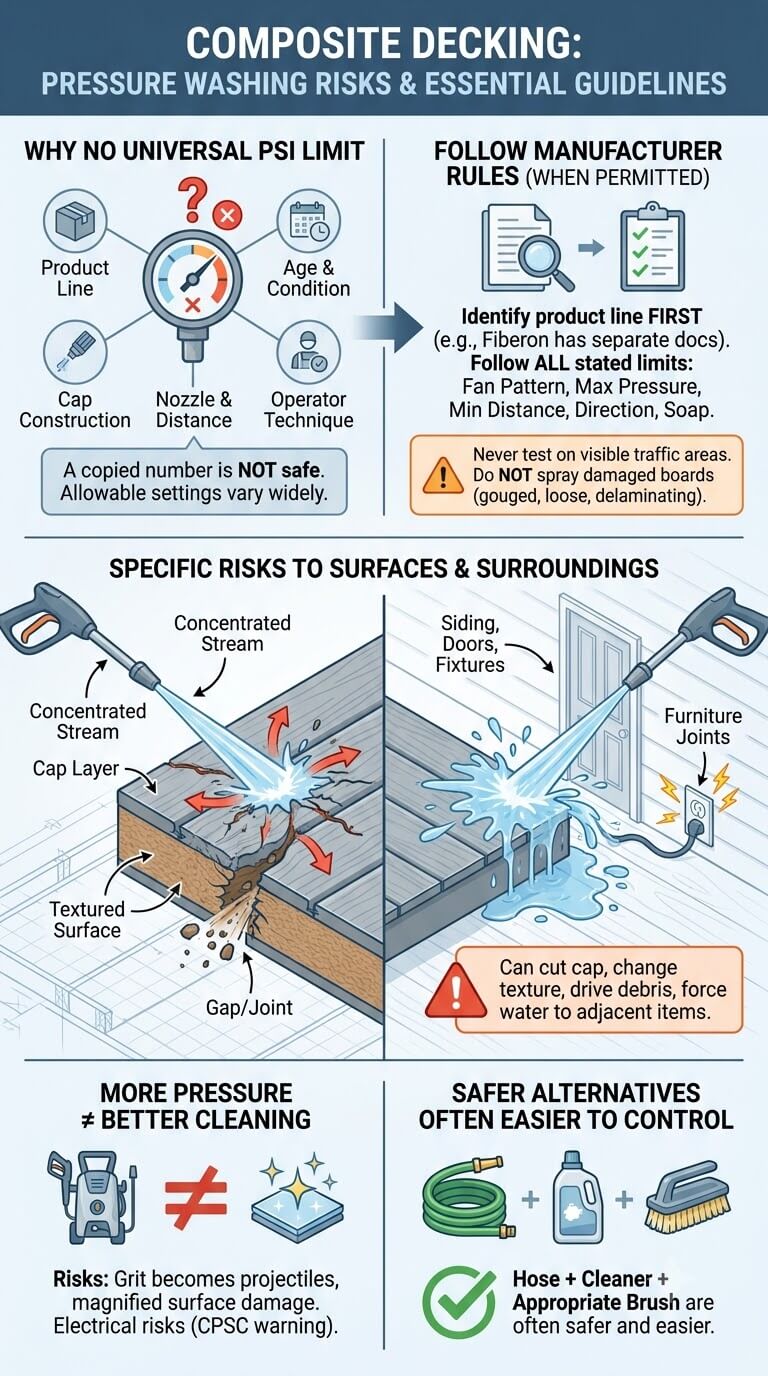
Why there is no universal composite-deck PSI
Allowable equipment settings vary by product line, age, surface condition, cap construction, nozzle, distance, and operator technique. Some manufacturers permit limited pressure washing on selected products, while others restrict it on older or uncapped boards. A number copied from another deck is not a safe substitute for the correct care guide.
Manufacturer rules for equipment, nozzle, distance, and direction
When powered washing is expressly allowed, follow every stated limit, including fan pattern, maximum pressure, minimum distance, cleaning direction, and whether soap application is required. Fiberon provides separate maintenance documents for its decking products, so identify the line before choosing equipment.
Risk to cap layers, textured surfaces, joints, and adjacent items
A concentrated stream can cut a line into the cap, change the embossed texture, drive debris into gaps, or force water toward siding, doors, electrical fixtures, and furniture joints. Never test pressure on a visible traffic area. Do not use powered spray on a gouged, loose, melted, or delaminating board.
More pressure does not equal better cleaning
Pressure can move soil faster, but it can also turn grit into projectiles and magnify surface damage. Electrically powered machines add water-related electrical risks, which are addressed in a Consumer Product Safety Commission pressure-washer warning. A hose, compatible cleaner, and appropriate brush are often easier to control.
Dry the Deck and Reset the Area
Prevent dirty rinse water from drying on boards
Finish rinsing while each section is still workable. Inspect in reflected light for streaks, foam, or cloudy puddles. If the product allows, rinse the affected board again before residue dries. Do not add more cleaner to a streak that may simply be incomplete rinsing.
Check gaps, shaded zones, and beneath rail bases
Shaded edges, stair transitions, and areas beneath rails often remain damp after the open field looks dry. Check with a clean hand and a dry cloth. Standing water points to a drainage or leveling concern that should be addressed rather than hidden under a mat.
Wait for full drying before replacing rugs, mats, furniture, or covers
Drying time depends on shade, airflow, temperature, humidity, board profile, and the space beneath the deck. Replace items only when the boards, gaps, and object feet are dry. Clean furniture feet before resetting them so grit does not return immediately.
Avoid trapping moisture and heat under incompatible backing
Review both the decking instructions and rug or mat information. Some rubber, vinyl, latex, or dark dense backings may hold moisture, transfer compounds, or increase heat. Use a compatible outdoor-rated product, lift it periodically, and keep gaps clear. Never place a damp rug flat on the boards.
Dirt, Fading, Scratches, or Cap Damage?
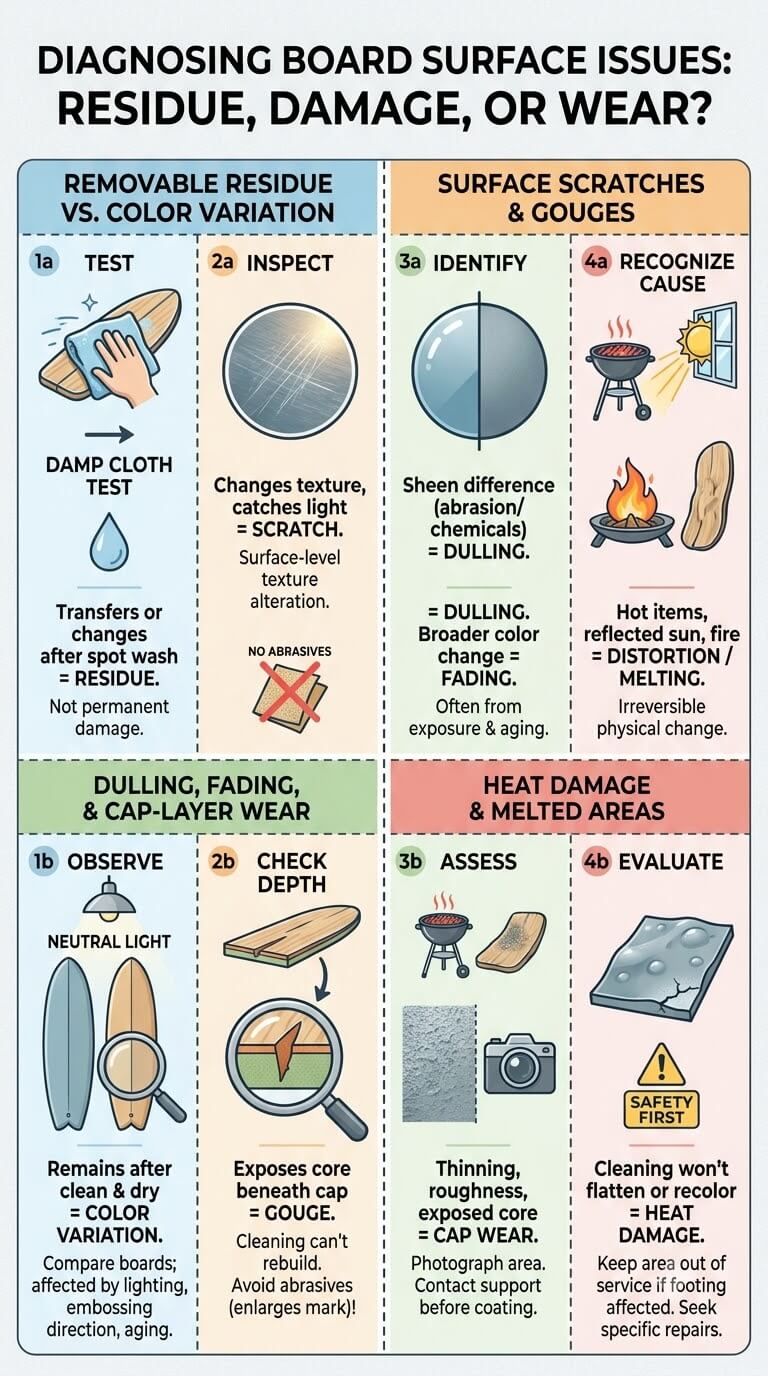
Removable residue versus color variation
A removable residue usually transfers to a damp cloth or changes after an approved spot wash. Color variation remains after the surface is clean and dry. Compare several boards because lighting, embossing direction, and sun exposure can make the same color look different.
Surface scratches and gouges
A scratch changes the surface texture and catches light differently. A gouge may expose the core beneath the cap. Cleaning can remove dirt from the damaged area but cannot rebuild it. Avoid abrasive attempts to blend the mark because they can enlarge the visible patch.
Dulling, fading, and cap-layer wear
Dulling may appear as a sheen difference after abrasion or incompatible chemical use. Fading is a broader color change associated with exposure and material aging. Cap wear may show thinning, roughness, or exposed core. Photograph the area in neutral light and contact product support before trying a restorative coating.
Heat damage, melted areas, and conditions cleaning cannot reverse
Hot equipment, concentrated reflected sunlight, fire features, or grill incidents can distort or melt manufactured boards. Cleaning will not flatten, recolor, or strengthen heat-damaged material. Keep the area out of service if footing is affected, then seek product-specific repair guidance.
Maintenance Based on Exposure and Use
Prompt cleanup of grease and spills
Keep an absorbent material, soft brush, and the approved routine cleaner accessible during outdoor meals. Blot spills before they spread into texture. Clean grill-adjacent areas after use once equipment is cool and safe to move. Do not allow grease mats to become saturated.
Pollen, leaf-drop, and seasonal resets
Base cleaning on conditions rather than one fixed schedule. Tree cover, nearby roads, pets, cooking, storms, and shade can change how quickly debris accumulates. Sweep before pollen and leaves become wet layers. A full wash is useful when dry removal no longer restores a clean, nonslippery surface.
Furniture feet, metal transfer, rubber-backed mats, and rug placement
Fit furniture with manufacturer-compatible glides and inspect them for embedded grit. Keep rusting metal off the boards or use an approved barrier. Lift mats and rugs during routine sweeping, after heavy rain, and before seasonal storage. Reposition heavy objects carefully to avoid concentrated wear.
When to contact the manufacturer or warranty support
Contact support when the product cannot be identified, a cleaner test changes the finish, a stain persists after the approved method, or boards show cap separation, unexpected fading, melting, or manufacturing variation. Gather photographs, installation date, product line, lot information, cleaner name, dilution, tools, weather, and treatments already attempted.
Common Composite-Deck Cleaning Mistakes
Treating composite like natural wood
Wood brighteners, sanding, grain restoration, and coating routines do not automatically belong on composite or PVC. Manufactured surfaces rely on product-specific chemistry and finish limits. Confirm the material before borrowing any wood-deck method.
Using abrasive tools or unapproved solvents
Scouring pads, wire brushes, gritty powders, and solvents can change color, texture, or sheen. Damage may become more visible after the surrounding soil is removed. Use a clean approved brush and stop at the first sign of surface change.
Letting cleaner or dirty rinse water dry on the surface
Dried solution can leave streaks or film that looks like a new stain. Work in smaller sections, control sun exposure, and rinse completely. Do not keep adding product to an area that needs a better rinse.
Applying generic pressure settings
A setting that worked on a driveway, wood fence, or another deck can damage composite boards. Product line and condition matter. When the instructions do not expressly allow powered washing, choose a controlled manual method.
Covering boards before they are fully dry
Replacing a rug, grill cover, storage bin, or planter too soon can trap dampness and heat. Check both the deck and the underside of the object. Restore the area only after airflow has dried the contact surfaces.
When Manufacturer Support or Professional Help Is Needed
Unknown product, warranty questions, or uncertain cap construction
Pause when you cannot identify the boards or determine whether a cleaner is approved. A decking contractor, installer, or manufacturer representative may recognize the profile and surface. Identification is less costly than experimenting on a large visible area.
Deep scratches, melted areas, delamination, or loose boards
These are material or installation concerns, not ordinary cleaning problems. Restrict traffic if an edge catches shoes, a board moves, or the walking surface is uneven. Do not sand, heat, glue, coat, or replace boards without guidance appropriate to the system.
Widespread growth, recurring moisture, or contaminated runoff
Escalate when growth repeatedly covers a large area, drainage keeps the deck wet, runoff cannot be contained, or hidden framing may be involved. The next step may require moisture correction, environmental controls, or repair assessment rather than stronger cleaning.
Frequently Asked Questions About Cleaning Composite Decking
Can composite decking be scrubbed with a stiff brush?
Only when the exact product guidance permits that brush type. Some textured boards need a medium nylon brush, while other cap layers can be marked by stiff bristles. Test a hidden area using the same pressure and let it dry before cleaning the open field.
Is dish detergent acceptable on every composite brand?
No. A mild soap may be permitted for routine dirt on some products, but formulations and decking surfaces vary. Check the board care instructions and detergent label. Avoid products with additives, solvents, bleach, abrasives, or strong degreasers unless specifically approved.
Why do some marks remain after the deck is clean?
The remaining mark may be fading, a scratch, heat change, metal transfer, cap wear, an old absorbed stain, or normal color variation. Let the board dry, compare nearby areas, and stop repeated scrubbing when no soil transfers and the texture begins to change.
Can a rubber-backed outdoor rug discolor composite boards?
Some backings can trap moisture, hold heat, or interact with a manufactured surface. Compatibility depends on both products. Check the decking and rug instructions, test contact in a hidden location, keep gaps open, and lift the rug periodically to inspect and dry the boards. Check the outdoor rug and its backing before placing it back on composite boards, especially when rubber or nonporous pads are involved.
What information should I gather before contacting the manufacturer?
Collect the product name, approximate installation date, board color, profile photographs, warranty records, affected location, stain history, cleaner name, dilution, tools, dwell time, weather, and clear images before and after cleaning. This helps support distinguish residue from product or installation damage.
Final Thoughts
Successful composite-deck cleaning depends less on force and more on identification, compatibility, and control. Remove dry grit, follow the exact board and cleaner instructions, test first, keep sections small, rinse before residue dries, and allow full drying before resetting the space. When a mark is actually fading, cap damage, heat distortion, or a loose board, stop cleaning and move to product support or repair assessment.

Ethan Carter is the Founder & Editor of HomeCleanSecrets. Based in the United States, he has 5 years of experience creating practical home cleaning, laundry care, stain removal, decluttering, and home organization content. His goal is to help everyday households clean smarter and build simple routines that are easier to maintain.
Read more about Ethan Carter on his author page: https://homecleansecrets.com/ethan-carter/