
Outdoor cushions need a different method from furniture frames or rugs because the visible fabric may hide an absorbent insert. Identify the construction, remove dry debris, use the least water needed, remove cleaner residue, and dry every layer before reassembly or storage.

This guide covers ordinary dry debris, spills, body soil, bird residue, and localized marks on stable cushions. Stop when fabric tears, foam crumbles, seams open, dye transfers, prolonged wetness is suspected, or odor and growth appear deep in the insert.
Quick Answer: Clean the Cover Carefully and Dry the Interior Completely
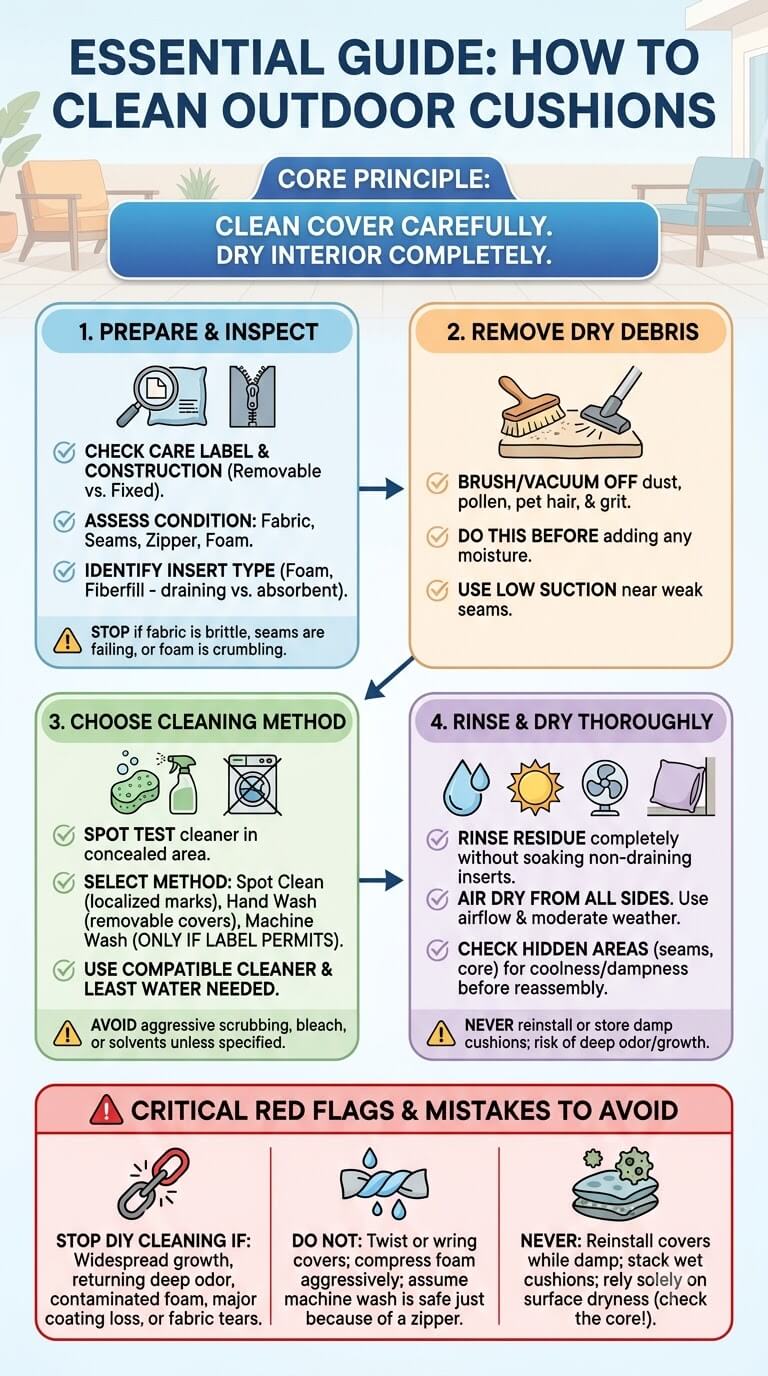
The cushion-cleaning path at a glance
- Read the sewn-in care label and identify the furniture or fabric manufacturer.
- Check whether the cover is removable and whether removal is actually permitted.
- Inspect the fabric, seams, zipper, piping, backing, vents, and insert condition.
- Brush or vacuum away dust, pollen, pet hair, and grit before adding moisture.
- Spot test the planned cleaner and water amount in a concealed area.
- Choose spot treatment, label-approved cover washing, or controlled surface cleaning.
- Remove cleaner residue without soaking an insert that is not designed to drain.
- Dry the cover and insert from all sides, then check hidden areas before reassembly.
Conditions that should stop DIY washing
Stop for widespread growth, returning odor, contaminated foam, brittle fabric, major coating loss, failing seams, or a damaged zipper. Specialty upholstery, attached cushions, and warranty-sensitive pieces may need manufacturer support or an experienced textile cleaner.
Identify the Cushion Construction Before Cleaning
Removable versus non-removable covers
A zipper does not automatically mean a cover is intended for routine removal. Some covers are installed tightly at the factory, contain inner batting, or depend on a specific fit that is difficult to restore. Look for a separate care tag and removal instructions. Sunbrella’s outdoor upholstery guidance notes that cushion construction varies and recommends checking with the furniture maker before removing a casing.
Care labels and water-repellent treatments
Read the entire tag for washing, temperature, drying, and prohibited treatments. Spot clean, hand wash, machine wash, line dry, and do not remove cover have different meanings. Aggressive brushing, heat, or strong products may also alter a water-repellent finish. If cushions are being cleaned as part of a seasonal patio reset, plan the surrounding outdoor cleaning work so the drying area stays clean and dry.
Foam, fiberfill, layered inserts, or unknown fill
Quick-draining foam, conventional foam, fiberfill, wrapped foam, and layered inserts handle water differently. A vented design may tolerate more water than dense foam with batting. Treat unknown fill as moisture-sensitive, and never assume an outdoor label permits soaking.
Seams, zippers, piping, backing, vents, and hidden openings
Check every edge for split stitches, loose piping, corroded zipper parts, torn backing, blocked drain mesh, and hidden openings. A crunchy feel, hard area, uneven compression, or powder near an opening can indicate insert deterioration rather than dirt.
Inspect Soil, Moisture, and Fabric Condition
Dust, pollen, pet hair, and dry debris
Remove dry soil before it becomes muddy. Stand the cushion upright, tap it lightly, and vacuum both faces. Use low suction near weak seams. A soft brush can release pollen, but hard brushing may fuzz yarns or drive grit deeper.
Food, drinks, body soil, and bird residue
Blot fresh spills and lift solids with a spoon or smooth plastic edge. Do not spread colored drinks by scrubbing. Wear gloves for bird residue, soften it before lifting, and keep children and pets away until cleaning and drying are complete.
Retained moisture, musty odor, and localized organic growth clues
A musty smell, cool center, recurring specks, or moisture released by compression suggests retained dampness. Color alone cannot identify the material. Check the underside, zipper tape, piping, and insert center. Widespread or recurring conditions may require replacement.
Fading, coating loss, weakened seams, tears, crumbling foam, and fabric breakdown
Cleaning cannot reverse sun fading, replace a worn finish, rebuild weak yarns, or restore degraded foam. Compare a protected area under a flap with the exposed face. If the fabric becomes powdery, tears under light tension, or sheds coating onto a cloth, stop. Stronger cleaner or more scrubbing will usually make material damage more visible.
Choose Textile-Compatible Tools and Cleaner
Vacuum attachments, soft brushes, cloths, and absorbent towels
Use a clean upholstery attachment, soft brush, colorfast cloths, and absorbent towels. Use a wet vacuum only when the maker permits it and seams will not be stressed. Avoid stiff brushes, abrasives, wire tools, and pressure washers.
Care-label-compatible detergent or fabric cleaner
Choose a product specifically permitted by the cushion or fabric instructions. Read dilution, contact time, rinsing, protective equipment, storage, and disposal directions before use. The American Cleaning Institute’s product-label guide explains where to find use directions and caution statements. Never mix products, and do not increase concentration because a stain looks difficult.
Spot testing color, texture, coating, and water response
Test beneath the cushion, behind a zipper flap, or along a hidden rear edge. Use the same cleaner strength, cloth, brush pressure, and rinse method planned for the main area. Let the test dry completely. Stop if color transfers, the surface becomes sticky or stiff, the weave lightens, the coating beads or flakes, or a visible water ring remains.
Why bleach, solvents, heat, and intense sun are not universal methods
Some performance fabrics permit a specific bleach treatment, while other covers, threads, backings, and inserts do not. Solvents and heat can damage dyes, coatings, foam, adhesives, or fit. Follow the exact care instructions instead of borrowing another fabric’s method.
Prepare the Cushions and Drying Area
Remove cushions from furniture frames
Photograph the arrangement and label cushions when positions differ. Lift rather than drag them. Clean frames separately, and inspect the seat platform for water, rust, splinters, or grit before returning the cushions.
Unzip and separate covers only when construction allows
Open the zipper fully and inspect the inner wrap. Compress the insert evenly rather than pulling one corner. Stop if batting catches, foam tears, or the seam stretches. Keep each cover paired with its original insert.
Shake, brush, or vacuum dry debris from seams and piping
Work outdoors in a dry area. Vacuum the face, then the edges, zipper flap, piping, ties, and underside. Pet hair often gathers where piping meets the main panel. A good test is to wipe the fabric with a dry white cloth after vacuuming. If grit still transfers, repeat dry removal before introducing liquid.
Set up clean support and airflow for drying from all sides
Prepare a clean rack or stable supports that expose the underside. Avoid soil, grass, rusty rails, and damp decking. Choose dry, calm weather and leave enough room to rotate cushions without stacking.
Choose the Correct Cleaning Method

Local spot treatment for minor marks
Use spot treatment for a fresh drink mark, small food spill, body-soil patch, or bird residue on otherwise clean fabric. Keep moisture controlled. To prevent rings, some makers direct cleaning across the full panel from seam to seam.
Machine washing removable covers only when labels allow
Machine washing requires explicit permission for the cover and its construction. Close zippers if instructed, use the approved cycle and temperature, and avoid overloading the washer. Do not assume that a washable fabric means every fitted cover is machine washable. Shrinkage of even a small amount can make reinstallation difficult.
Hand washing removable covers
Hand washing gives better control over agitation and fit. Use the specified temperature and detergent amount, support the wet cover, and rinse until slickness and foam disappear. Press out water without twisting.
Controlled cleaning for non-removable upholstery
Clean fixed covers in small sections with a damp cloth, soft brush, or lightly applied solution. Work across a complete panel where needed for an even result. Remove residue with a separate clean damp cloth. The aim is to release soil at the surface without driving solution into the center.
When the insert should not be saturated
Do not flood a dense, unknown, layered, or slow-draining insert. Avoid soaking with weak seams, poor drainage, or unsuitable drying weather. Outdura’s fabric-care instructions give product-specific steps for its acrylic textiles, but fabric guidance does not automatically define what the insert can tolerate.
Step-by-Step Spot Cleaning
Blot fresh residue before it spreads
Place an absorbent towel beneath a removable cover when practical. Blot from the top with another towel, changing to a clean area as soil transfers. Pick up solids rather than rubbing them. For an oily mark, follow the fabric maker’s instructions before adding water, because the wrong treatment can set or spread the residue.
Apply a small amount of compatible solution
Apply solution to the cloth unless directions require direct application. Use the least amount that wets the mark, observe the stated contact time, and do not let cleaner dry. Protect frames, hardware, plants, rugs, and nearby finishes.
Work from the edge toward the center
Use light dabbing or short strokes from the outer edge inward. This limits spreading and helps preserve the shape of the treated area. Avoid circular scrubbing that raises the nap or creates a bright ring. Check the cloth often so transferred soil is not rubbed back into the fabric.
Remove detergent residue without flooding the fill
Blot with a clean damp cloth, then with a dry towel. Repeat with fresh water until the area no longer feels slick and no foam appears under light pressure. Hold a towel against the underside when accessible. Residue left in the fibers can stiffen the area and attract new dust.
Check the mark again only after drying
Wet fabric often looks darker, so judging too early can lead to unnecessary repeat treatment. Let the area dry fully and compare it in natural light. A second gentle treatment may be reasonable if the material remains stable. Stop when the fabric changes texture, color transfers, or repeated moisture begins reaching the insert.
Step-by-Step Washing for Removable Covers
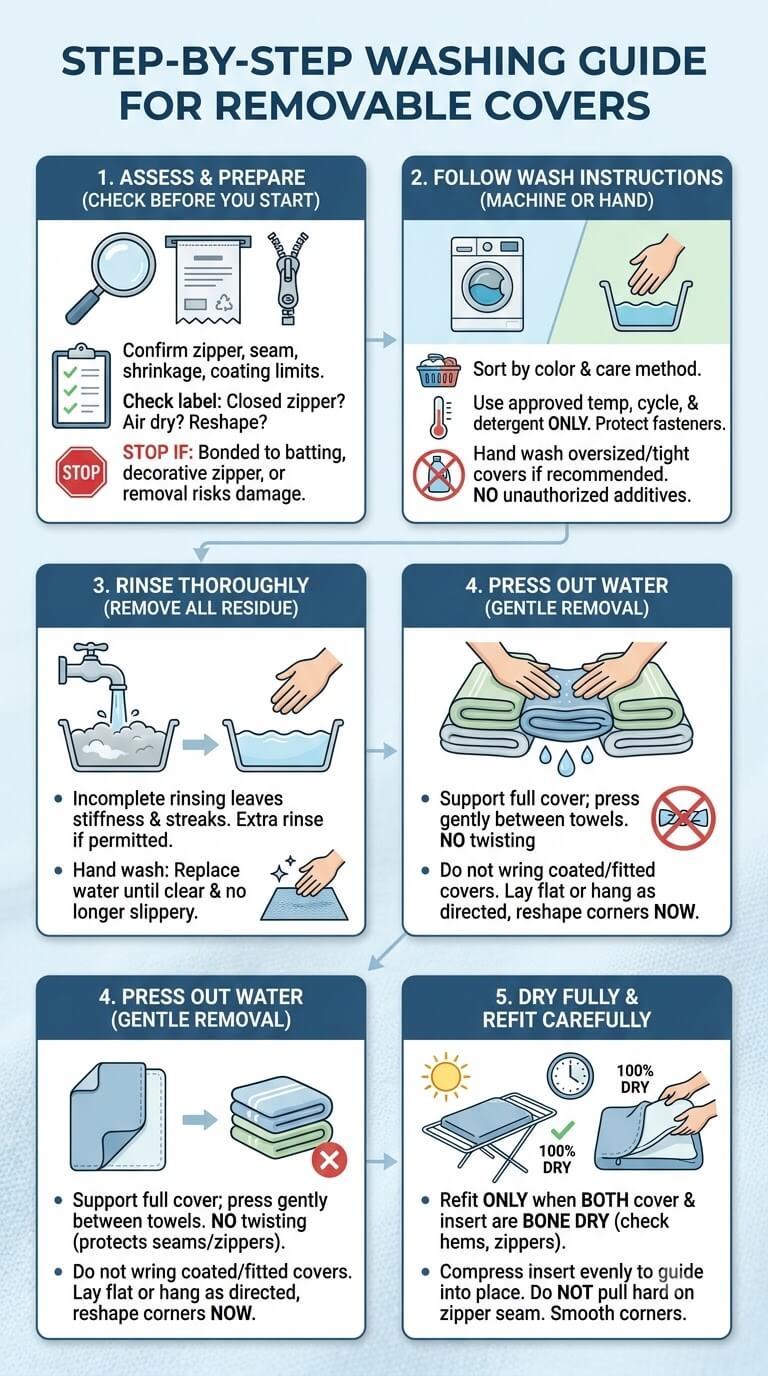
Confirm zipper, seam, shrinkage, and coating limits
Photograph the fit and inspect zipper teeth and stitching. Check whether the label requires a closed zipper, air drying, or reshaping. Stop if the cover is bonded to batting, the zipper is decorative, or removal would damage the insert.
Follow machine or hand-wash instructions
Sort covers by color and care method. Use only the approved temperature, cycle, and detergent. Protect hook-and-loop fasteners so they do not catch the fabric. Hand wash oversized or tightly fitted covers when the maker recommends it. Do not add improvised cleaners, fragrance boosters, or softeners unless permitted.
Rinse detergent thoroughly
Incomplete rinsing can leave stiffness, visible streaks, and a surface that holds soil. Use an extra rinse only when the care instructions and machine capacity allow it. During hand washing, replace cloudy water until it stays clear and the cover no longer feels slippery.
Press out water without twisting
Support the full cover and press it gently between clean towels. Twisting concentrates force at seams, piping, and zipper ends. Do not wring a coated or fitted cover. Lay it flat or hang it exactly as directed, reshaping corners and seams before they dry in a distorted position.
Refit only when both cover and insert are fully dry
A slightly damp cover can trap moisture against otherwise dry foam. Check the cover hem, zipper tape, piping, and folded corners. Check the insert separately. Refit by compressing the insert evenly and guiding it into place, not by pulling hard on the zipper seam. Smooth the corners before closing.
Clean Non-Removable Outdoor Cushions

Work in small sections
Divide the cushion into manageable panels. Begin at the upper edge so dirty moisture does not run across cleaned fabric. Use overlapping strokes for an even appearance, but avoid repeatedly wetting the same section. Keep a dry towel ready to capture moisture at the lower edge.
Control water around seams, piping, and backing
Seams and piping can wick liquid into fill. Use less solution there, blot promptly, and keep backing off wet surfaces. Never direct water into a zipper gap, drain eyelet, or seam merely because the cushion is outdoor-rated.
Lift soil without pushing liquid into the core
Use light brush pressure. Heavy scrubbing compresses fill and pushes dirty liquid inward, making the cushion harder to dry. Stop and blot if moisture pools or drips from an unintended opening.
Remove cleaner residue with minimal moisture
Use a clean damp cloth or the maker’s controlled rinse method. Work with small amounts and press with towels after each pass. Suds rising from a seam under gentle pressure indicate remaining residue.
Support the cushion so air reaches every side
Stand the cushion on an edge or ventilated rack, not flat on a patio, deck, or rug. Rotate it as moisture moves downward. Catch drips without blocking airflow.
Dry Outdoor Cushions All the Way Through
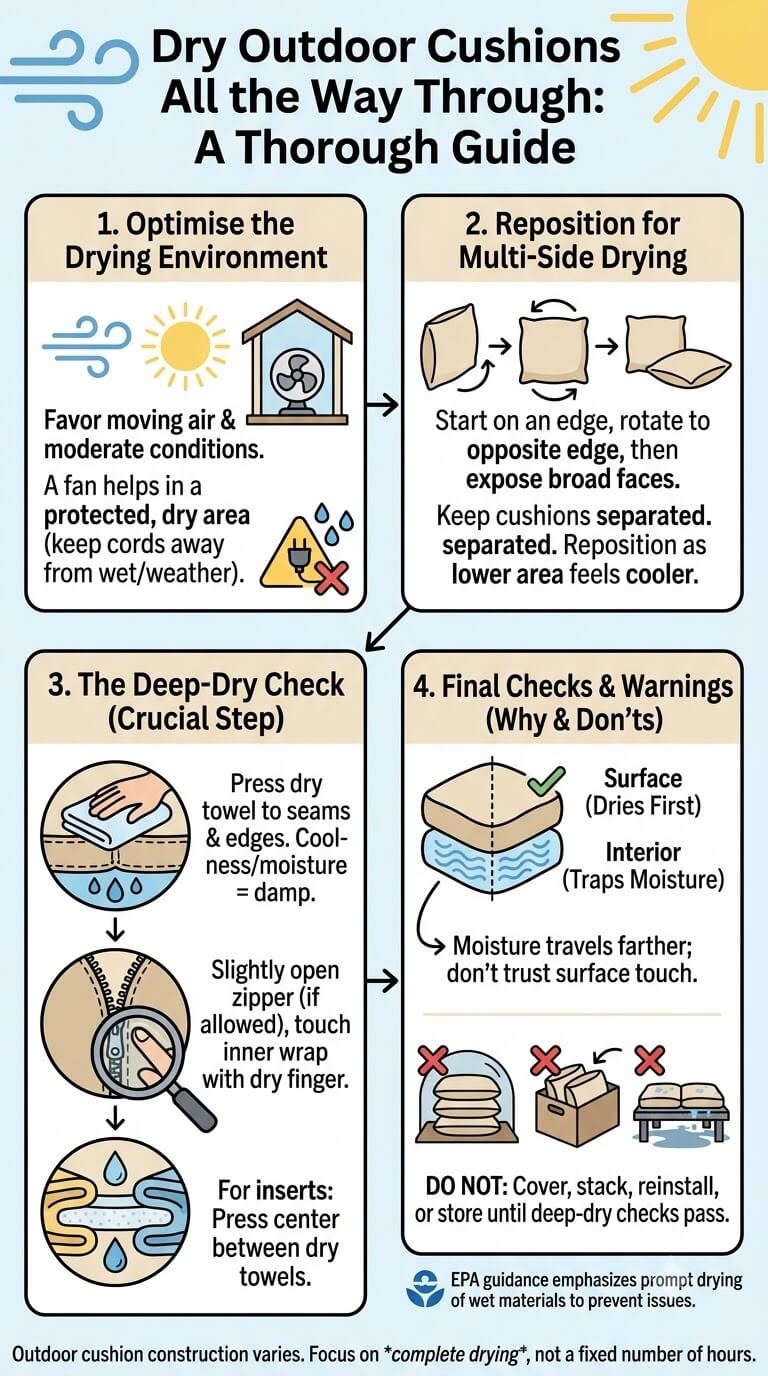
Airflow, shade, temperature, humidity, and cushion thickness
Drying time varies with fill, thickness, airflow, temperature, and humidity. Favor moving air and moderate conditions. A fan may help in a protected dry area, but keep electrical equipment and cords away from wet cushions and weather.
Rotate, stand, and reposition cushions for multi-side drying
Start on an edge, rotate to the opposite edge, then expose both broad faces. Keep cushions separated. Continue drying while the lower area feels cooler or looks darker, and never return a damp cushion to a solid frame. Clean the outdoor furniture frame separately before reinstalling a fully dry cushion, because joints, coatings, wood, resin, and metal have different care limits.
Check seams, piping, zipper areas, and the foam center
Press a dry absorbent towel against several seams and the lowest edge. Open the zipper slightly only when allowed and touch the inner wrap with clean dry fingers. For removable inserts, press the center between two dry towels. Any coolness, moisture transfer, or returning odor means drying is not complete.
Why a dry surface can hide a damp interior
Outer fabric dries first because it contacts the air. Moisture inside foam or batting travels farther and may return to seams during compression. A surface touch alone is not a dependable final check.
Do not cover, stack, reinstall, or store damp cushions
Leave space around every cushion until deep-dry checks pass. The EPA’s moisture guidance emphasizes prompt drying of wet materials and correction of the moisture problem. Outdoor cushions differ in construction, so focus on complete drying rather than relying on a fixed number of hours.
Dirt, Retained Moisture, Mildew Clue, or Fabric Breakdown?
Surface soil that responds to cleaning
Ordinary dirt transfers to a vacuum, brush, cloth, or cleaning solution. The fabric remains structurally sound, and the cleaned test area returns to its normal texture after drying. Continue with the same controlled method only when color, coating, and seams stay stable.
Musty odor and moisture that returns
Odor that returns after stacking or compression often indicates retained moisture or affected inner material. Inspect removable components and improve drying. Replace an insert that remains damp or odorous after the exterior is fully dry.
Localized surface growth clues versus widespread contamination
A few localized marks on sound fabric are different from growth across multiple panels, inside seams, or throughout the foam. Do not diagnose the material by color. Stop DIY cleaning when the condition is widespread, returns quickly, follows prolonged wet storage, or appears inside a degraded insert.
Fading, coating loss, brittle fabric, seam failure, and degrading fill
Fading is usually even across sun-exposed areas, while cleaning marks often follow wiping or runoff patterns. Coating loss may feel tacky, powdery, or uneven. Brittle fabric cracks when folded. Failed foam stays compressed, crumbles, or develops permanent lumps. These conditions need repair or replacement, not repeated cleaning.
Storage and Odor Prevention After Cleaning
Store only after deep drying
Repeat seam, towel, zipper, and center checks before storage. Clean and dry the container or shelf. Do not seal cushions based only on a warm, dry-feeling surface. Other outdoor textiles can share the need for full drying, but a patio umbrella requires separate care for its canopy, ribs, pole, and moving mechanism.
Use breathable, clean, dry storage conditions
Follow the furniture maker’s storage directions. A ventilated storage room, raised shelf, or purpose-made cushion box with suitable airflow may work better than a tightly sealed bag in a humid location. Tropitone’s product-care information stresses following the manufacturer’s instructions for its cushion materials and construction.
Keep cushions off damp floors and away from condensation
Raise cushions above concrete floors and exterior walls that collect condensation. Avoid pressing them against plumbing, masonry, or a cold metal surface. Do not place heavy objects on top. Compression reduces airflow, sets creases, and can keep a hidden damp area from releasing moisture.
Inspect during long storage periods
Check after major weather changes and periodically through the storage season. Look for condensation, pest damage, odor, staining, and changes in the foam. Air the cushions on a dry day if the storage directions permit it. Correct a damp storage condition before returning the cushions.
Common Outdoor-Cushion Cleaning Mistakes
Machine washing without checking the label or construction
A removable-looking cover may shrink, lose finish, distort, or become impossible to refit. Read the tag and confirm that both removal and machine washing are approved. Keep fitted covers with their original inserts and document the shape before washing.
Soaking an unknown insert
Unknown foam and layered fill can retain water for a long time. Saturation also carries soil deeper and increases the amount of rinsing required. Use controlled surface cleaning unless the maker specifically permits a full flush and provides a drainage and drying method.
Twisting covers or compressing foam aggressively
Wringing stresses seams and piping. Forceful compression can tear foam, shift batting, or create permanent folds. Press water out gradually with towels and broad, even hand pressure. Stop if the insert makes cracking sounds or fails to rebound.
Assuming direct intense sun or heat is safe for every fabric
Heat can shrink covers, affect adhesives, and create uneven surface temperatures. Strong sun can fade or weaken some textiles over time. Use the drying method on the care label and rely on air movement, rotation, and open spacing rather than uncontrolled heat.
Reinstalling covers or storing cushions while the interior is damp
Damp layers pressed together dry slowly and can develop odor. The same problem occurs when a cushion is placed on an outdoor rug or solid furniture seat before the bottom is dry. Check hidden areas, not just the most exposed face. Do not set a drying cushion on an outdoor rug, because moisture can become trapped in both materials.
When to Replace an Insert or Seek Professional Help
Contaminated, crumbling, permanently compressed, or persistently damp foam
Replace an insert that crumbles, sheds powder, stays flattened, contains a deep odor, or repeatedly remains damp despite correct drying conditions. A new cover will not fix failed fill. Match replacement dimensions, drainage design, firmness, and outdoor suitability to the furniture maker’s specifications.
Widespread growth, recurring odor, or deep contamination
Stop when growth extends through seams or into the insert, returns after cleaning and drying, or follows sewage, floodwater, animal waste, or another significant contamination event. Do not keep applying stronger products to porous fill. A qualified cleaner can advise whether the cover is salvageable, while the insert may require disposal.
Torn seams, damaged coatings, and specialty fabrics
An upholstery professional may be able to repair a zipper, piping, or limited seam failure before washing. Contact the manufacturer for coated fabrics, bonded layers, unusual trims, warranty-sensitive pieces, or cushions attached to mechanical furniture. Provide clear photos, label information, and a description of previous treatments.
Frequently Asked Questions About Cleaning Outdoor Cushions
Can outdoor cushion covers go in a washing machine?
Only when the care label and cushion construction permit it. Confirm that the cover is intended to be removed, note the required water temperature and cycle, close fasteners as directed, and air dry if required. A zipper alone is not proof that machine washing is safe.
How can I tell whether the foam center is dry?
Check more than the surface. Press the center between dry towels, inspect through an approved zipper opening, and compare the temperature of the center with the edges. Continue drying if a towel picks up moisture, the core feels cool, or odor appears during compression.
Should covers be put back on while slightly damp?
No. A damp cover can transfer moisture to the insert and slow drying at seams and corners. Wait until the cover, zipper tape, piping, and insert are fully dry. Refit carefully so the cover is not stretched across weakened stitching.
Can direct sun damage outdoor cushion fabric?
Outdoor textiles are made for exposure, but resistance varies by fiber, dye, finish, age, and care history. Intense sun and heat are not universal drying instructions. Follow the label, use good airflow, rotate the cushion, and avoid temperatures that could shrink or distort components.
When is replacing the insert more practical than cleaning it?
Replacement is usually more practical when foam is crumbling, permanently compressed, deeply contaminated, persistently damp, or odorous after the cover and insert have been dried correctly. Confirm that the cover remains sound and obtain an insert suited to the original drainage and support design.
Final Thoughts
Outdoor-cushion care depends on construction and deep drying as much as stain removal. Identify the cover and fill, clear debris, test the mildest approved method, control water, rinse carefully, and check the center. Treat damaged fabric, seams, coating, or foam as a repair or replacement issue.

Ethan Carter is the Founder & Editor of HomeCleanSecrets. Based in the United States, he has 5 years of experience creating practical home cleaning, laundry care, stain removal, decluttering, and home organization content. His goal is to help everyday households clean smarter and build simple routines that are easier to maintain.
Read more about Ethan Carter on his author page: https://homecleansecrets.com/ethan-carter/