
A porch and entry route needs a different plan from a broad patio or deck. People cross the area, materials often change within a few feet, and water can reach door seals, wiring, interior flooring, and slippery stair edges. Begin with access control, dry debris removal, and a top-to-bottom sequence. When the entry connects to patios, decks, furniture, or textiles, a broader outdoor cleaning plan helps coordinate work order, runoff, and drying.

Clean only stable surfaces. Stop before adding water if a handrail moves, a tread is cracked, a board feels soft, masonry has a loose edge, paint is peeling in sheets, or the landing shows structural movement. Cleaning can remove ordinary soil, but it cannot make an unsafe entrance sound.
Quick Answer: Control Access, Work From High to Low, and Keep Water Away From the Door
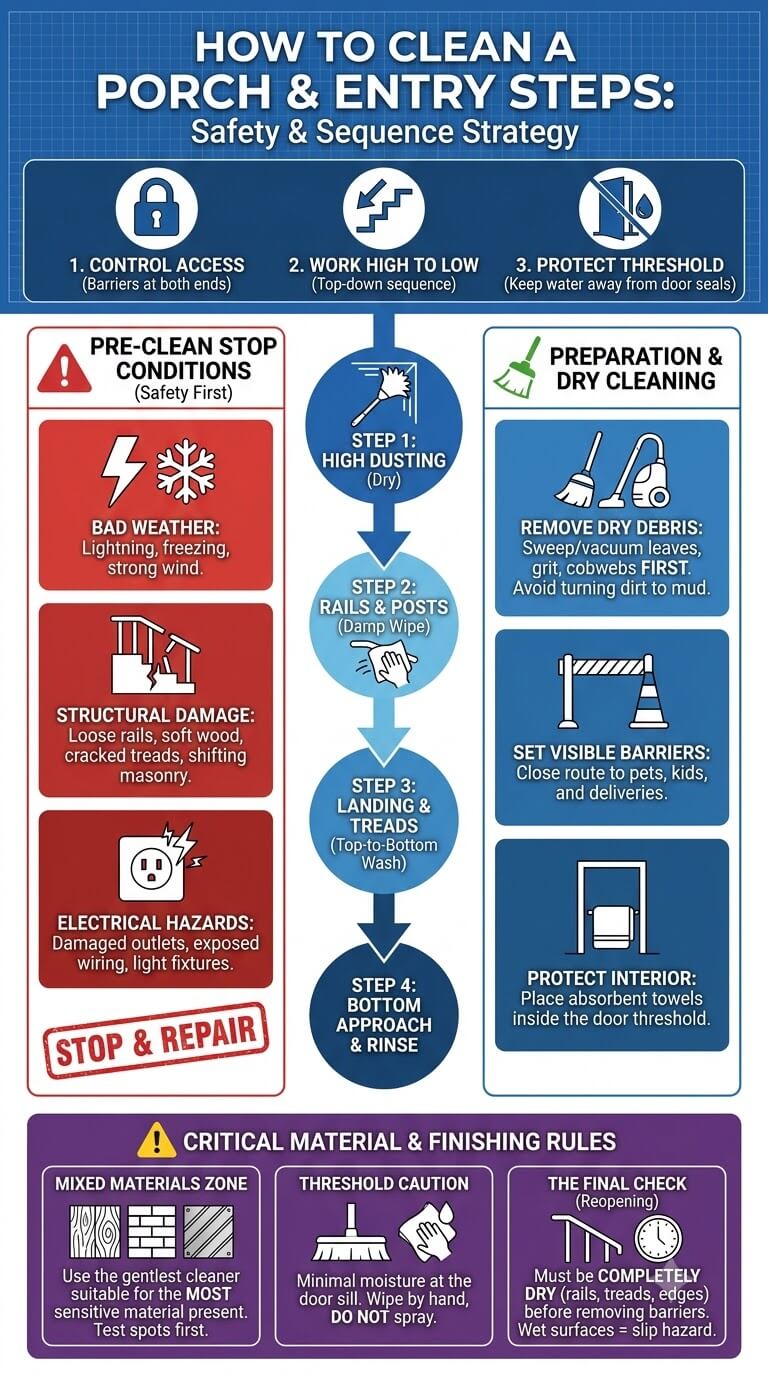
The porch-and-steps sequence at a glance
- Choose dry, mild weather and create another safe route when possible.
- Inspect railings, boards, treads, lighting, outlets, and the threshold.
- Remove mats, planters, furniture, packages, and movable decorations.
- Dust high ledges, posts, rails, corners, risers, and the landing.
- Spot test the cleaner and brush on every material and finish.
- Clean posts and rails, then the landing, then the steps from top to bottom.
- Use minimal moisture at the threshold and collect dirty runoff below.
- Keep the route closed until rails, treads, edges, and low spots are dry.
Conditions that should stop cleaning before it begins
Do not begin wet work during lightning, freezing conditions, strong wind, intense heat, or rain. Stop if the route cannot be closed safely, electrical components are damaged, or reaching an upper area requires unstable furniture.
Define the Porch and Entry Zone
Upper trim and accessible ledges
Include only surfaces that can be reached from the ground with a stable long-handled duster. Door canopies, trim ledges, light housings, and ceiling corners can drop dust and cobwebs onto freshly cleaned steps, so handle these dry areas first.
Handrails, balusters, posts, and high-touch points
Rails need special attention because residue affects grip. Note whether each part is painted wood, stained wood, composite, coated metal, bare metal, vinyl, or a combination. Hardware and joints often tolerate less water than broad surfaces.
Porch floor or landing
The landing is the working platform and the main place where pollen, grit, leaves, and wet footwear collect. Identify seams, deck-board gaps, masonry joints, low areas, and any slope toward the doorway before choosing how much water to use.
Treads, risers, edges, and the bottom approach
Each tread includes the walking surface, front edge, corners, and grooves or texture that provide traction. Risers catch splash and mud. The bottom approach may be concrete, pavers, soil, or an indoor transition, and it determines where debris and rinse water can go.
Threshold, door-adjacent area, and interior transition
The threshold includes the sill, weatherstripping, lower frame, sweep, and nearby interior flooring. Clean it with a damp cloth or tightly controlled solution, not broad rinsing.
Identify Materials Before Choosing a Method
Concrete
Poured concrete can be unsealed, sealed, painted, textured, or already deteriorating. A sound uncoated surface may tolerate a nylon brush and controlled rinsing, while painted or sealed concrete requires a gentler cleaner and a spot test.
Painted or stained wood
Wood absorbs water through end grain, cracks, fastener holes, and failed coatings. Brush with the grain, avoid saturation, and stop if boards are soft, splintering heavily, or separating. A gray color may be weathering rather than removable dirt.
Composite boards
Composite entry boards may be capped or uncapped and can have product-specific limits. Follow the manufacturer’s instructions for cleaner, brush, and any powered equipment. Trex provides material-specific care directions for food residue, dirt, leaf staining, and ordinary cleaning, showing why generic deck advice should not override product guidance.
Brick, tile, or stone at an overview level
Brick, tile, and stone differ in porosity, joint material, finish, and acid sensitivity. Use a pH-appropriate cleaner approved for the exact surface. Loose mortar, hollow tiles, flaking stone, or open joints should be assessed before broad wet cleaning.
Mixed materials and the most sensitive-surface rule
When rinse water from one surface will touch another, choose the method that protects the most sensitive material in the path. A cleaner acceptable on concrete may damage painted trim, metal hardware, natural stone, composite boards, or the door finish.
Inspect Safety and Damage Conditions
Loose rails, unstable boards, cracked treads, settlement, and broken edges
Apply light pressure to each rail without leaning over the steps. Watch for rocking boards, shifting masonry, cracked nosings, settlement, and loose fasteners. Close the route if movement affects footing.
Peeling paint, rot, corrosion, and failed coatings
Cleaning does not reattach paint, rebuild rotten wood, or restore deeply corroded metal. Light surface soil may lift, but bubbling, widespread peeling, soft fibers, deep pitting, and rusted-through hardware require maintenance or repair after the cause is identified.
Lighting, electrical fixtures, door seals, drainage, and trip hazards
Check outdoor-rated outlets, covers, light fixtures, cords, doorbell components, and low-voltage wiring. Keep uncontrolled water away from all of them. Also remove hoses, toys, delivery boxes, and tools that could block the retreat path.
Control access for children, pets, residents, and deliveries
Use a visible barrier at both ends of the route. Tell household members where to enter, move pet bowls and leashes, and reschedule deliveries when practical. A closed door alone may not warn someone approaching from outside.
Identify the Soil and Slip Risk
Leaves, grit, pollen, cobwebs, and insect debris
Remove these materials dry. Fine grit can scratch under a brush, while wet pollen becomes sticky paste. Use a broom, vacuum, or duster before cleaner.
Mud and tracked soil
Let ordinary mud dry enough to crumble unless it contains oil, waste, or another material that needs immediate containment. Break up clumps gently, collect the loose soil, and reserve wet treatment for the thin residue that remains.
Food and drink spills
Remove solids first, then blot liquids. Sugary drinks can leave a tacky film that attracts soil, while cooking grease may require a compatible detergent. Treat a small area and rinse without spreading the residue across treads.
Shaded organic surface film and recurring moisture clues
Green, brown, or dark film in shade may be biological growth, embedded dirt, leaf residue, or a combination. Appearance alone does not identify it. Repeated dampness, musty odor, or rapid return after cleaning points to a moisture or drainage problem.
Dirt versus peeling paint, rot, cracks, or unstable components
A good test is to clean a small sound area and let it dry. Dirt changes with cleaning. A crack remains, soft wood still yields under light pressure, and failed paint continues to lift. Do not scrub harder when the condition is material failure.
Gather Zone-Appropriate Tools and Cleaner
Broom, vacuum, dusting tools, cloths, and material-safe brushes
Prepare a soft broom, crevice tool, cloths, bucket, absorbent towels, and separate brushes for delicate finishes and masonry. Avoid wire brushes on coated metal, wood, composite, brick, and finished stone.
Cleaner selection by the most sensitive material
Choose a mild product allowed by the material and coating maker. Never mix cleaners or increase concentration. Sherwin-Williams recommends testing a mild cleaning solution in an inconspicuous area before washing a painted finish.
Spot testing painted, stained, coated, and masonry surfaces
Test the whole method, including dilution, cloth or brush, contact time, rinse, and drying. Check for color transfer, whitening, gloss change, roughness, softened coating, or darkening. A successful wet test is not complete until the area dries.
Barriers, warning signs, and absorbent materials for access control
Use cones, chairs, a temporary gate, or a clearly written sign. Keep towels or absorbent pads near the threshold and bottom step to catch drips. Do not place a barrier where someone could trip over it in low light.
Prepare the Entry Before Wet Cleaning
Remove mats, planters, furniture, and movable decor
Lift rather than drag items across finished boards or tile. Ask for help with heavy planters or benches. Inspect the area beneath each item for trapped grit, dampness, rust marks, soft wood, or backing residue.
Sweep corners, risers, edges, rail bases, and the landing
Work from upper corners down to the bottom approach. Use a hand brush at rail bases, between balusters, beneath nosings, and in drainage gaps. Collect debris instead of pushing it into garden beds or storm drains.
Protect the door, threshold, weatherstripping, lighting, outlets, and interior flooring
Close windows, cover vulnerable electrical components only as their manufacturer permits, and place absorbent towels inside the door. Do not tape plastic over a hot light or block required ventilation.
Plan drainage away from the doorway and walking route
Identify the lowest point and decide how dirty water will be captured or directed. Use small amounts, work in short sections, and keep runoff away from storm drains, neighboring property, pools, ponds, edible plants, and the indoor floor.
Step-by-Step Porch and Entry Cleaning Order
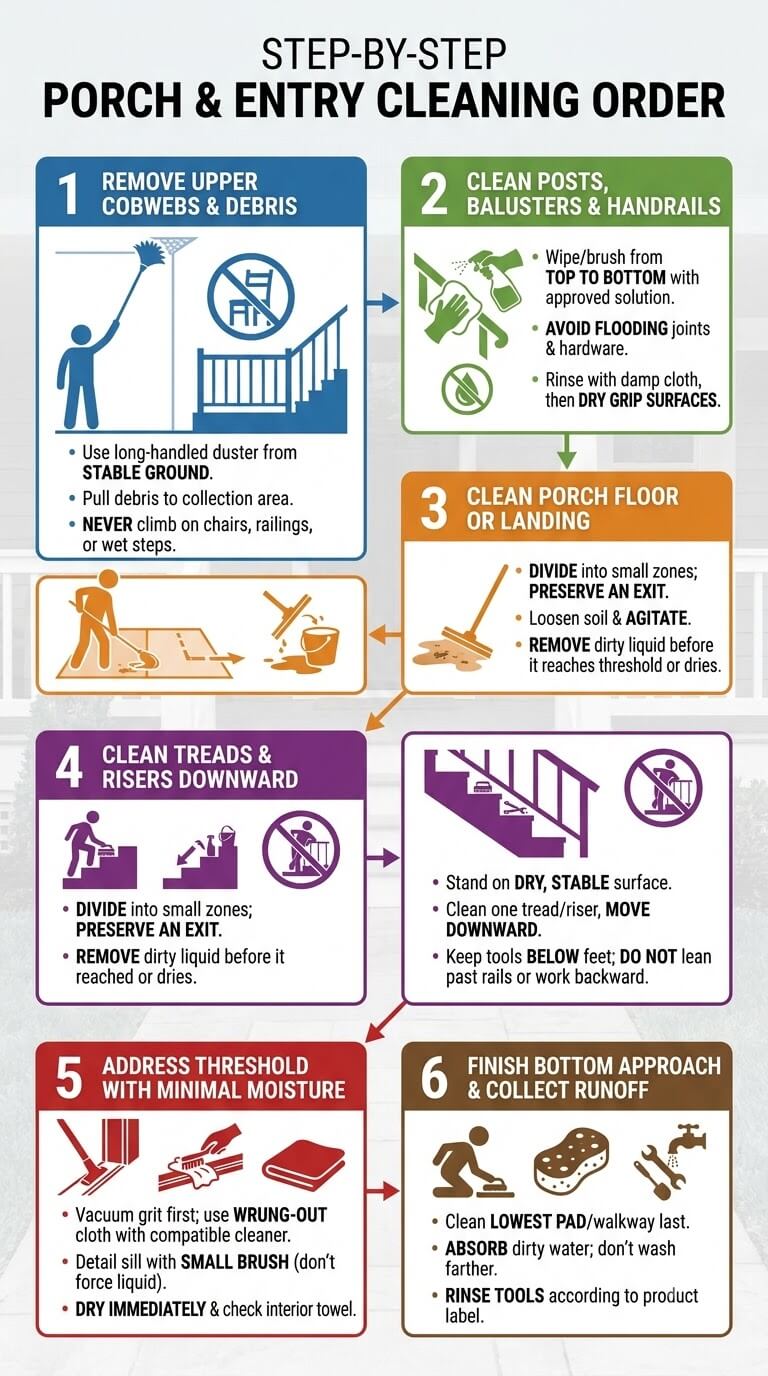
Remove accessible cobwebs and dry debris from upper surfaces
Use a long-handled duster from stable ground and pull debris toward a collection area. Never climb on a chair, railing, or wet step to reach a ceiling corner.
Clean posts, balusters, and handrails
Wipe or brush from top to bottom with the approved solution. Keep joints and hardware from flooding. Follow with a clean damp cloth when rinsing is required, then dry grip surfaces before moving to the landing.
Clean the porch floor or landing
Divide the landing into small zones while preserving an exit. Use enough solution to loosen soil, agitate as the material allows, and remove dirty liquid before it reaches the threshold or dries.
Clean treads and risers from the upper step downward
Stand on a dry, stable surface whenever possible. Clean one tread and its riser, move downward, and keep tools below your feet rather than across the route. Do not lean past a rail or work backward toward an unprotected edge.
Address the threshold with minimal controlled moisture
Vacuum grit from tracks and corners, then use a wrung-out cloth with a compatible cleaner. Detail the sill with a small brush without forcing liquid beneath weatherstripping. Dry the threshold immediately and check the interior towel.
Finish the bottom approach and collect dirty runoff
Clean the lowest pad or walkway last. Pick up loosened debris and absorb dirty water instead of washing it farther across the property. Rinse tools in a suitable location according to the product label.
Material-Specific Limits Within a Mixed Entry Zone
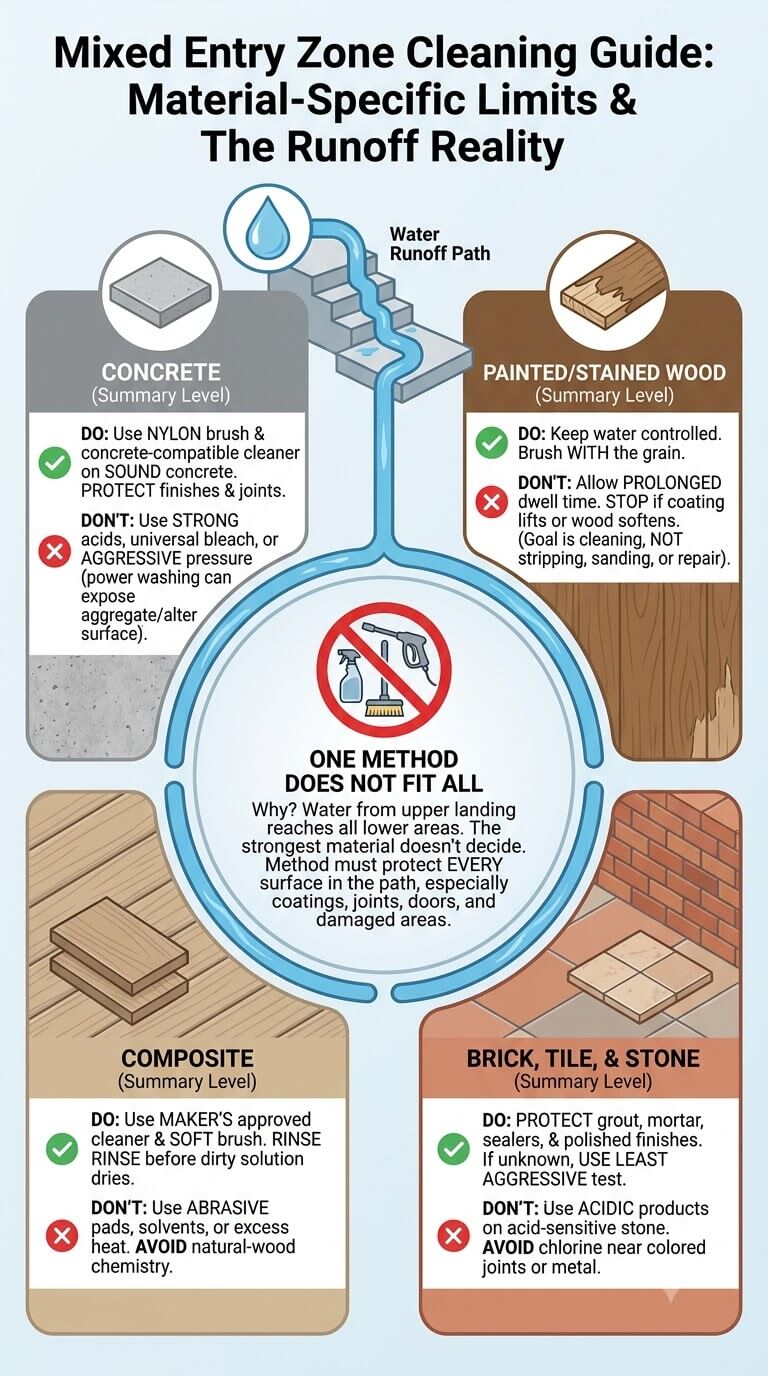
Concrete sections at a summary level
Use a nylon brush and a concrete-compatible cleaner on sound concrete. Avoid strong acids, universal bleach treatment, and aggressive pressure. Belgard’s hardscape maintenance guidance cautions that power washing can expose aggregate or alter a manufactured surface, a useful reminder to protect finishes and joints.
Painted or stained wood sections at a summary level
Keep water controlled, brush with the grain, and avoid prolonged dwell time. Stop if coating lifts or wood fibers soften. Cleaning can prepare a later maintenance decision, but this task should not turn into stripping, sanding, staining, or board repair.
Composite sections at a summary level
Use the board maker’s approved cleaner and soft brush. Rinse before dirty solution dries, and keep abrasive pads, solvents, and excess heat away from the cap. Do not copy natural-wood chemistry onto composite boards. When the entry uses composite boards, follow the product-specific composite-decking limits for cleaner, brush, and water pressure.
Brick, tile, and stone sections at a summary level
Protect grout, mortar, sealers, and polished finishes. Avoid acidic products on acid-sensitive stone and unapproved chlorine products near colored joints or metal. When the exact stone or coating is unknown, use the least aggressive test or consult the installer.
Why one cleaner, brush, or pressure setting cannot serve the whole zone
Water from the upper landing reaches steps, rails, trim, and the bottom approach. The strongest material is not the deciding factor. The method must protect every surface in the runoff path, especially coatings, joints, door components, and damaged areas.
Clean Handrails and High-Touch Areas Without Creating a Slip Hazard
Remove dry grit before wiping
Dust the top, underside, brackets, and baluster connections. Grit beneath a cloth can scratch a painted or clear-coated rail and can remain in grooves where hands grip.
Use material-compatible moisture and cleaner
Apply cleaner to the cloth rather than spraying toward the stairs, door, or wiring. Use a separate cloth for bird residue or greasy marks and wash hands after handling contaminated material.
Dry grip surfaces and hardware
Wipe the rail dry, including brackets, caps, and the underside. Water left on a smooth metal or painted rail can reduce grip and may collect around fasteners.
Keep one safe route available when practical
On a wide entry, clean and dry one side before closing the other. On a narrow route, close it completely and provide another entrance. Never invite someone to step around a wet area while carrying groceries or holding a child.
Handle Mud, Pollen, Leaves, and Localized Spills
Dry or semi-dry mud removal
Scrape thick dried mud with a plastic tool that will not gouge the finish, then sweep. For damp clay, lift rather than smear it. Clean the remaining film with small amounts of solution.
Pollen in corners, rails, and textured treads
Vacuum or sweep heavy pollen first. Use a damp cloth on rails and a soft brush on textured treads. Remove pollen-rich water before it dries.
Leaf residue on shaded steps
Remove leaves early, especially beneath mats and planters. Treat the local mark with a material-approved cleaner and gentle agitation. Repeated leaf staining may call for changing drainage, trimming overhanging growth, or moving items that trap moisture.
Ordinary food or drink spills
Lift solids and blot liquid before adding water. Use a mild detergent only if permitted, then remove residue fully because sugar and soap can both leave a slippery film.
Organic growth clues and the stop threshold
A small surface film on a sound, accessible area may be cleaned with a compatible product. Stop when growth is widespread, returns quickly, extends into soft wood or open joints, or the runoff cannot be controlled. EPA moisture guidance emphasizes drying wet materials promptly and correcting the moisture condition rather than repeatedly treating the visible mark alone.
Water, Drainage, and Threshold Protection

Use the least water needed
A damp cloth, small bucket, controlled hose flow, or wet vacuum often provides better control than broad spraying. More water can drive soil into joints, saturate wood, enter hollow rail parts, and pool near the door.
Keep runoff away from interior flooring and electrical fixtures
Work with the door closed and inspect the interior after each nearby section. Stop immediately if water crosses the sill, reaches an outlet, drips from a fixture, or enters a wall or floor joint.
Prevent pooling on treads and at the threshold
Remove standing water with towels, a squeegee used away from edges, or a suitable wet vacuum. Check grooves, low corners, nosings, and the landing-to-sill joint.
Why pressure washing is not the default in a mixed access zone
Powered spray can damage coatings, roughen wood, disturb joints, force water beneath doors, and cause loss of footing. Manufacturer directions must override generic settings.
Drying and Slip-Risk Inspection Before Reopening
Dry handrails, treads, landings, and the threshold
Remove visible water and allow airflow across the full route. Do not use a fixed drying time. Shade, humidity, temperature, surface texture, thickness, and air movement all change how long the entry remains damp.
Check shaded edges, grooves, nosings, and low spots
Press a dry cloth into joints and textured areas. View the steps from both directions because a glossy wet strip can hide along a nosing. NIOSH slip and fall prevention guidance highlights prompt attention to wet walking surfaces and clear travel paths, principles that are especially important on stairs.
Replace mats and decor only after surfaces are dry
Check the underside of every mat, planter saucer, and furniture foot. Putting items back too early traps moisture, hides debris, and can transfer rust, dye, or rubbery residue onto the cleaned surface.
Reopen traffic gradually and keep alternate access clear when possible
Remove the barrier only after the entire walking path and handrail are ready. Test traction with dry footwear while holding a stable rail. Keep the alternate route open a little longer when shaded areas remain cool or damp.
Quick Reset Versus Seasonal Deep Clean
Routine debris and tracked-soil reset
Sweep leaves, grit, pollen, and dry mud before they are ground into coatings or carried indoors. Wipe high-touch rails and spot-clean fresh spills. This short reset may prevent the need for frequent broad washing.
Post-storm or high-pollen cleanup
Clear drainage paths, remove wet leaves, shake or clean mats separately, and check the threshold. Wait until the steps are stable and weather conditions are safe before adding cleaner.
Seasonal removal of mats, planters, and furniture
At the beginning or end of a high-use season, clear the zone. Inspect hidden areas for moisture, coating wear, soft wood, rust transfer, and blocked gaps before cleaning.
Exposure-based timing rather than a universal schedule
A shaded north-facing porch beneath trees may need debris removal more often than a covered entry in a dry climate. Base maintenance on pollen, storms, foot traffic, drainage, pets, plants, and how quickly the route dries.
Dirt or a Repair Problem?
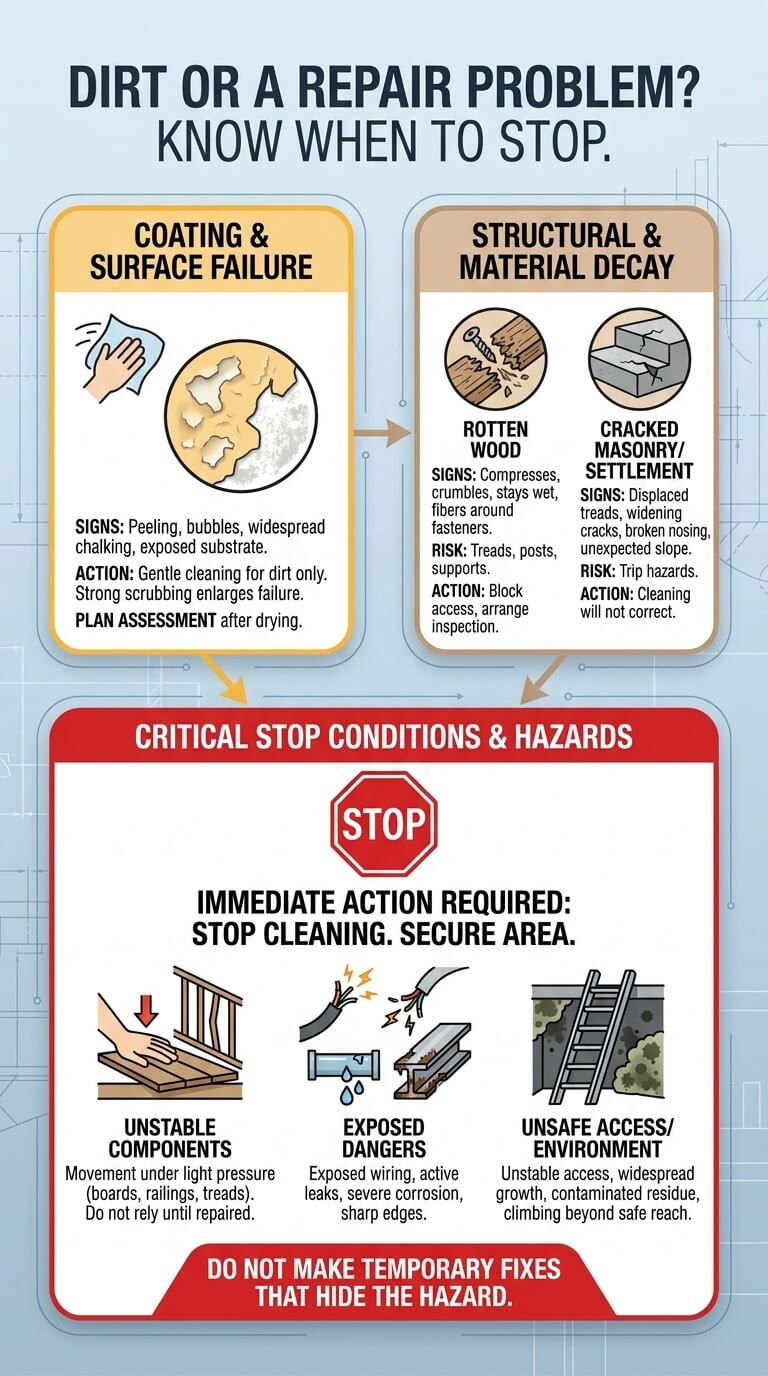
Peeling paint and coating failure
Loose flakes, bubbles, widespread chalking, and exposed substrate are coating problems. Gentle cleaning may remove surface dirt, but stronger scrubbing can enlarge the failure. Plan coating assessment after the area is dry.
Soft or rotten wood
Wood that compresses, crumbles, stays wet, or releases fibers around fasteners should not be treated as dirty wood. Block access and arrange an appropriate inspection, especially when the condition affects a tread, rail post, or support.
Cracked masonry and settlement
Hairline cosmetic cracking differs from a displaced tread, widening crack, broken nosing, or landing that slopes unexpectedly. Movement and broken edges can create trip hazards that cleaning will not correct.
Loose boards, unstable railings, and damaged treads
Movement under light pressure is a stop condition. Do not rely on a wet, freshly cleaned rail or step until the hardware and supporting material have been repaired and the route has been judged safe.
When cleaning must stop
Stop for exposed wiring, unstable access, active leaks, severe corrosion, sharp broken edges, widespread growth, contaminated residue, or any condition that requires climbing beyond safe reach. Secure the area without making temporary fixes that hide the hazard.
Common Porch and Entry-Step Cleaning Mistakes
Starting with water before removing grit
Water turns dust and pollen into slurry and moves grit into joints. Dry cleaning first reduces abrasion, water use, and dirty runoff.
Cleaning lower steps before upper surfaces
Debris and rinse water from the landing will re-soil the lower treads. Work from accessible upper areas downward, while always keeping a dry and stable position.
Flooding thresholds, outlets, or interior flooring
Broad spraying near the door can damage finishes, weatherstripping, walls, and flooring. Switch to a damp cloth and absorbent control as the work approaches the threshold.
Working without controlling access
A person opening the door may step directly onto a wet tread. Place barriers where they are visible from both directions and tell everyone in the household before starting.
Treating loose rails or cracked treads as cleaning problems
No cleaner can stabilize a rail, rebuild a broken edge, or reverse rot. Continuing to scrub can increase exposure to an unsafe area and may hide the warning under wet debris.
When Repair or Professional Help Is Needed
Unstable railings, rotten steps, loose boards, or structural movement
Close the route and contact a qualified repair professional or property manager. Do not keep testing the part or assume a cosmetic patch restores safe capacity.
Cracked masonry, failed coatings, or recurring moisture
Seek material-specific advice when cracks widen, water enters the building, coating repeatedly peels, or the same area stays damp. The cause may involve drainage, flashing, movement, or incompatible previous work.
Widespread growth, inaccessible elevated areas, or uncertain materials
Professional help is appropriate when contamination is extensive, runoff cannot be contained, the work requires unsafe height, or the material and its care limits are uncertain.
Frequently Asked Questions About Cleaning a Porch and Entry Steps
Should handrails be cleaned before the steps?
Yes. Remove dry debris from upper areas first, then clean posts, balusters, and rails before the landing and steps. Dry the grip surface promptly so it is available when the lower route is inspected.
How can the threshold be cleaned without wetting the interior floor?
Vacuum loose grit, place an absorbent towel inside, and use a tightly wrung cloth rather than a hose. Apply cleaner to the cloth, detail small grooves carefully, and dry the sill and weatherstripping immediately.
What is the safest way to keep people off wet steps?
Close the route at both ends with barriers and provide another entrance. Inform residents, supervise pets and children, and keep the barrier in place until treads, edges, low spots, and the handrail are dry.
Can mixed-material porch surfaces share one cleaner?
Only when every material, coating, joint, and nearby finish permits that product. In many entries, separate methods are safer for masonry, painted wood, composite boards, metal rails, and the threshold.
When does a slippery step need repair instead of more cleaning?
Repair assessment is needed when slipperiness comes from a broken nosing, unstable tread, settlement, loose coating, deep surface deterioration, or recurring water that cannot drain. Cleaning is appropriate only when removable residue is the cause.
Final Thoughts
A clean entrance must be dry and stable. Remove debris before water, protect the threshold, work from upper surfaces to the bottom approach, and keep people off the route until every tread and rail is ready. When a rail moves, wood softens, masonry shifts, or moisture returns, stop and address the cause.

Ethan Carter is the Founder & Editor of HomeCleanSecrets. Based in the United States, he has 5 years of experience creating practical home cleaning, laundry care, stain removal, decluttering, and home organization content. His goal is to help everyday households clean smarter and build simple routines that are easier to maintain.
Read more about Ethan Carter on his author page: https://homecleansecrets.com/ethan-carter/