
A patio umbrella combines a fabric canopy with ribs, a pole, a hub, and moving parts. Stabilize the base, remove dry debris, protect the mechanism, use care-approved products, and dry every layer before closing or storing it. When the umbrella is one part of a larger patio cleanup, coordinate it with the rest of the outdoor cleaning plan so rinse water and drying space do not interfere.
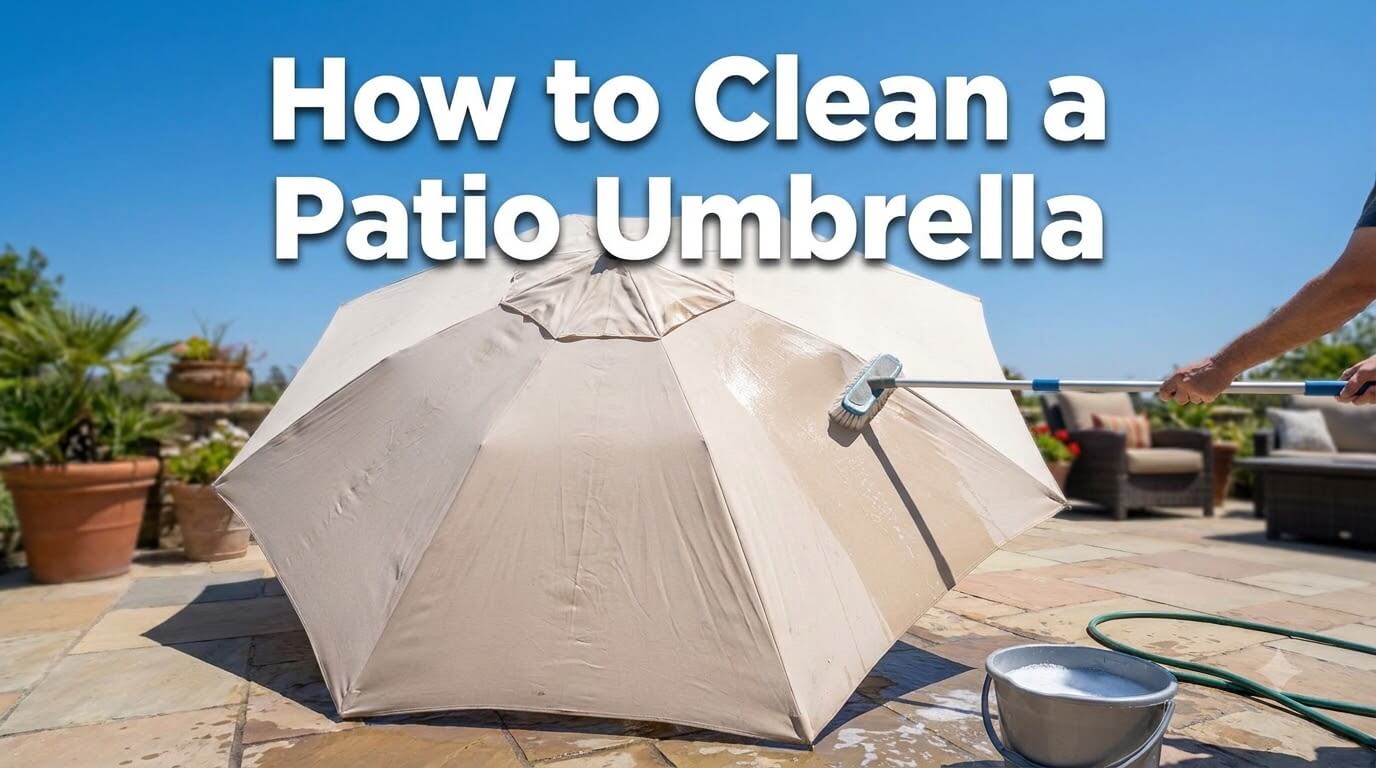
This guide covers routine dust, pollen, insects, bird residue, food splashes, and localized marks on a sound umbrella. Stop for instability, bent ribs, torn seams, a frayed cord, a binding mechanism, or widespread fabric breakdown.
Quick Answer: Stabilize the Umbrella, Protect the Mechanism, and Dry It Fully Open

The safe umbrella-cleaning sequence at a glance
- Choose calm weather with enough time for complete drying.
- Confirm that the base, pole connection, and floor are stable.
- Inspect the canopy, ribs, hub, cord, crank, and tilt.
- Read the umbrella manual and canopy care label.
- Remove nearby cushions, decor, and trip hazards.
- Brush debris from the top, vent, seams, and rib pockets.
- Spot test the cleaner on fabric and frame finish.
- Clean small areas while shielding moving parts.
- Wipe the pole and frame according to their materials.
- Dry hidden folds and pockets before closing the umbrella.
Conditions that should stop the job
Postpone cleaning during strong or gusty wind, lightning, heavy rain, freezing conditions, or extreme heat. Stop immediately if the umbrella shifts in its base, the pole leans unexpectedly, a rib snaps or twists, the crank slips, the cord frays, or opening the canopy requires unusual force.
Inspect the Umbrella Before Opening It
Wind, ground stability, base security, and clearance
Set the umbrella on level, firm ground and check that the base is appropriate for the model. Tighten only the fasteners the manual identifies for routine use. Clear people, pets, hanging lights, branches, and furniture from the opening path. Treasure Garden’s auto-tilt umbrella manual advises closing the umbrella in windy conditions, keeping it secured to its base, and keeping people and objects away while it is adjusted.
Bent ribs, damaged pole, torn seams, frayed cord, and faulty crank or tilt
Inspect while the canopy is closed and relaxed. Look for a bowed pole, displaced rivets, ribs that no longer align, torn rib pockets, stretched seams, loose finial, exposed cable strands, and a crank that turns without moving the canopy. A good test is gentle operation through a small range. If the umbrella stands on a concrete patio, clean and dry the slab separately so runoff and a wet base do not create a slippery work area.
Safe reach limits and why furniture is not a ladder
Plan to work from the ground. Use a long-handled soft brush or lower the umbrella only as the manufacturer permits. Do not stand on a chair, table, planter, cooler, or wet deck rail.
Identify the Canopy and Frame Construction
Removable versus fixed canopy
A canopy may be attached with pockets, screws, clips, hook-and-loop tabs, or a center fitting. Visible fasteners do not prove that homeowner removal is intended. Check the manual before loosening anything, and photograph every approved attachment point before disassembly.
Care labels, coatings, and outdoor-fabric type
Look for a sewn-in tag under a panel or near the center vent. It may identify solution-dyed acrylic, polyester, olefin, vinyl-coated fabric, or another construction. The label also governs water temperature, brushing, washing, stain treatment, and drying.
Aluminum, steel, wood, and painted poles or ribs
Aluminum is light and corrosion resistant but its coating can scratch or dull. Steel needs extra attention at chips, joints, and fasteners where rust can begin. Wood components can swell, split, or lose finish when saturated.
Hub, finial, vent panels, crank, tilt, cord, and moving joints
The hub gathers the ribs and carries significant load. The finial secures or covers the canopy center on many models. Vent panels overlap and can hold pollen and moisture. The crank, tilt, cord, pulley, and sliding collar move the canopy.
Classify the Dirt or Mark
Dry dust, pollen, cobwebs, and insects
Loose debris should come off before water is introduced. Dust and pollen collect along ribs, seams, folded valleys, and the underside of the vent. Cobwebs often wrap around the hub. Brush lightly so grit falls away instead of being rubbed into the weave.
Bird droppings and localized marks
Wear gloves, keep children and pets away, and avoid dry scraping that creates dust or damages the yarns. Moisten the residue with a care-approved solution, allow it to soften, and lift it with a damp cloth or smooth plastic edge.
Food or drink splashes
Blot fresh liquid rather than rubbing it across the canopy. Lift sticky solids first, then use the smallest amount of compatible solution that releases the residue. Colored drinks may look gone while wet and reappear after drying, so postpone a second treatment until the panel is fully dry and its color can be judged accurately.
Light organic growth clues
Scattered specks, a musty smell, or a film that returns in damp folds may indicate persistent moisture and organic residue, but appearance alone cannot identify the growth. Check the top cap, vent overlap, rib pockets, and storage cover. The EPA’s moisture guidance emphasizes drying wet materials and correcting the moisture condition that allows growth to return.
Fading, coating loss, seam failure, corrosion, or mechanism damage
Compare exposed fabric with a protected fold. Uniform lightening is usually sun exposure, not a removable stain. Powdery coating, brittle fabric, split stitching, rust under paint, pitted metal, and bent hardware will not improve with stronger cleaner.
Choose Umbrella-Compatible Tools and Cleaner
Soft brushes, cloths, and stable ground-level reach tools
Use a soft-bristle brush, nonabrasive sponge, white cloths, a bucket, and absorbent towels. A clean extension handle can improve reach without pulling on the canopy. Avoid stiff deck brushes, abrasive pads, wire brushes, and sharp scrapers.
Care-label-compatible canopy cleaner
Select a mild product permitted by the canopy maker, then follow its dilution, dwell time, rinse, and protective-equipment directions. Sunbrella’s umbrella-care instructions begin with brushing off loose dirt, using mild soap and water, rinsing thoroughly, and air drying, but those directions apply to the company’s own fabrics rather than every canopy.
Material-compatible cleaner for pole and ribs
A damp cloth may be enough for routine soil on coated aluminum. Steel, wood, and mixed finishes may require different products. Read both the furniture manual and the cleaner label before applying anything near paint, powder coating, wood finish, plastic collars, or plated hardware.
Spot testing fabric, color, coating, and frame finish
Test an inconspicuous lower panel and a hidden frame area. Let both dry completely, then check for dye transfer, lightening, rings, stiffness, loss of water repellency, dulling, tackiness, or softened paint. A successful wet appearance is not enough.
Prepare a Stable Cleaning Area
Choose calm weather and adequate drying conditions
Choose a calm, dry period with mild surface temperatures and useful airflow. Avoid direct midday heat that can dry cleaner before it is rinsed. Check the near-term forecast, not just the sky overhead.
Secure the base and control access
Confirm that the base rests flat and that the pole is fully seated. Block the work zone so nobody walks beneath a wet canopy or operates the crank. If the umbrella must be repositioned, close it first and get help with a heavy base.
Protect cushions, furniture, decks, patios, plants, and doors
Remove cushions and movable decor. Shift tables only when safe, and cover surfaces that should not receive cleaner. Plan where rinse water will travel so it does not enter a doorway, pool against wood, soak an outdoor rug, or carry residue toward plants or drains.
Keep water away from crank, tilt, cord, hub, and moving joints
Wrap or shield operating areas without trapping water against them. Apply solution with a cloth or controlled sprayer rather than directing a hose into the hub. Keep the crank handle, tilt release, cord openings, pulley channels, and sliding collar as dry as practical.
Remove Dry Debris Before Wet Cleaning
Work from finial and canopy toward lower frame parts
Begin at the highest reachable point so loosened dirt falls onto areas not yet cleaned. Brush around the finial, move across the upper panels, then address the underside, ribs, pole, and base. Keep strokes light and directed away from seams.
Brush folds, seams, vent panels, and rib pockets
Open the canopy only enough for safe access. Separate overlapping vent fabric gently and brush both faces. Use a narrow soft brush along stitched seams and rib pockets. These sheltered areas hold pollen and insect debris, but hard probing can break stitches or detach the pocket that anchors the canopy to a rib.
Remove insects and droppings without grinding residue into fabric
Lift dry insects with a soft brush or low-suction tool. For adhered residue, switch to controlled dampening instead of repeated dry friction. Place a clean towel behind the area when possible so the panel is supported.
Step-by-Step Cleaning With the Canopy Attached

Open only as far as safe and functional
Operate the crank slowly and stop at the first sign of binding, unusual noise, uneven rib movement, or fabric pulling. Full opening is useful only when the frame is sound and conditions are calm.
Support fabric instead of pulling on seams
Place one hand or a padded support behind the panel while brushing the opposite face. Work with the fabric’s natural tension rather than stretching it. Never use a seam, vent edge, or rib pocket as a handhold.
Apply compatible solution in manageable areas
Wet a small section evenly, apply the approved solution, and allow only the label-directed contact time. Clean from the upper panel toward the lower edge so runoff moves predictably. FiberBuilt’s canopy-care instructions describe brushing away loose dirt, cleaning with a soft brush or sponge, rinsing thoroughly, and air drying for the canopy materials it specifies.
Clean localized marks without over-wetting
Blot or brush the mark with short, gentle passes. Expand the damp area slightly beyond its edge to reduce a hard water ring, but do not soak the entire panel for one small spot.
Rinse with controlled water away from mechanisms
Use a low-flow hose, clean sponge, or damp cloth, depending on the label. Direct water toward the outer canopy edge and away from the center hub. Continue until the fabric no longer feels slick and no foam remains.
Wash a Removable Canopy Only When Approved
Document attachment points before removal
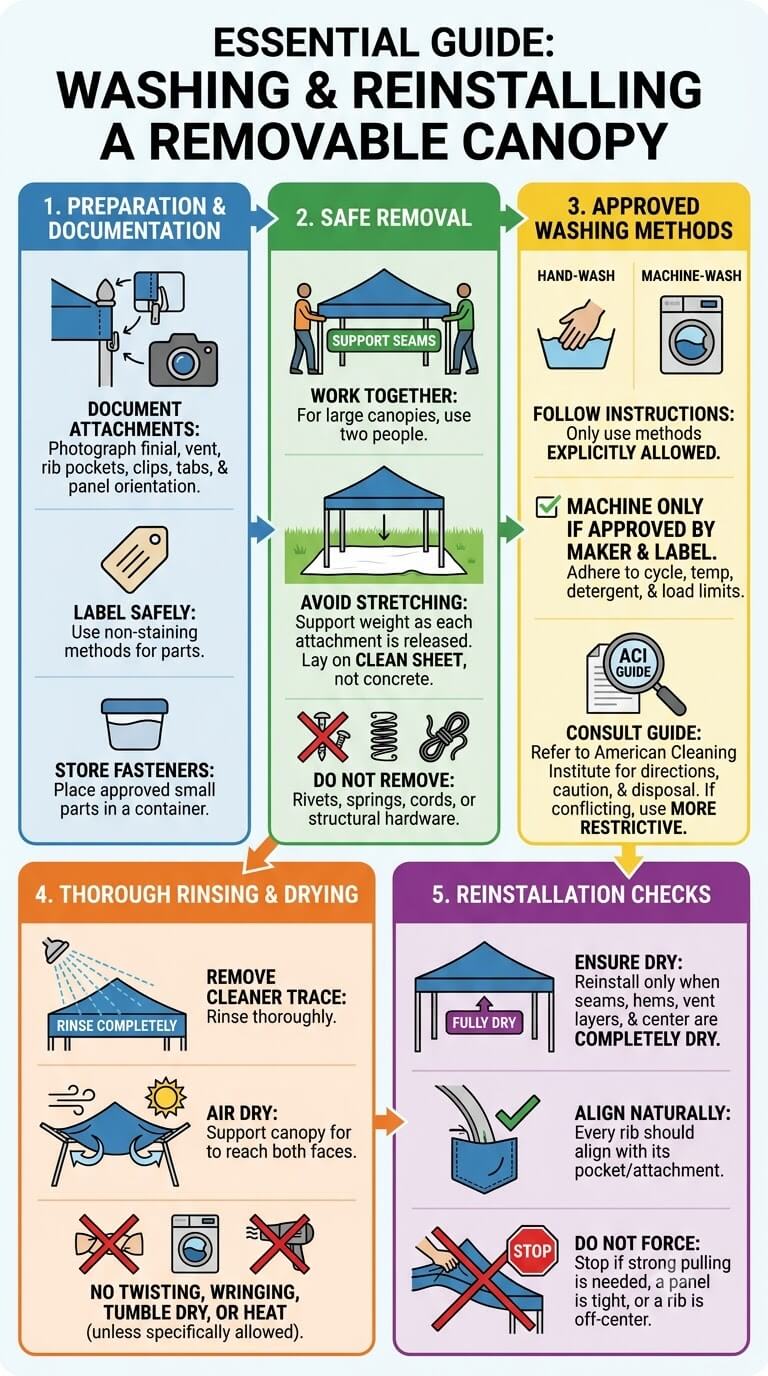
Photograph the finial, vent, rib pockets, clips, tabs, and panel orientation. Label parts only with a method that will not stain or leave adhesive. Place small approved fasteners in a container. Do not remove rivets, springs, cords, or structural hardware to free the fabric.
Support seams and avoid stretching
Work with another person when the canopy is large. Support its weight as each approved attachment is released so one seam does not carry the load. Lay the fabric on a clean sheet, not directly on concrete or decking.
Follow hand-wash or machine-wash instructions if explicitly allowed
Machine washing is acceptable only when the umbrella maker and the fabric label both permit it. Follow the stated cycle, temperature, detergent, and load limits. The American Cleaning Institute’s product-label guide explains where to find directions, caution statements, storage information, and disposal instructions. When instructions conflict, use the more restrictive requirement or contact the maker.
Rinse and dry before reinstallation
Remove every trace of cleaner, then support the canopy so air reaches both faces. Do not twist, wring, tumble dry, or apply heat unless the label specifically allows it. Reinstall only after seams, hems, vent layers, and the center opening are fully dry.
Do not force a canopy back onto bent or damaged ribs
Every rib should align naturally with its pocket or attachment. Stop if reinstallation requires strong pulling, if one panel is unusually tight, or if a rib point sits off center.
Clean the Pole, Ribs, Finial, and Hub
Aluminum and painted metal components
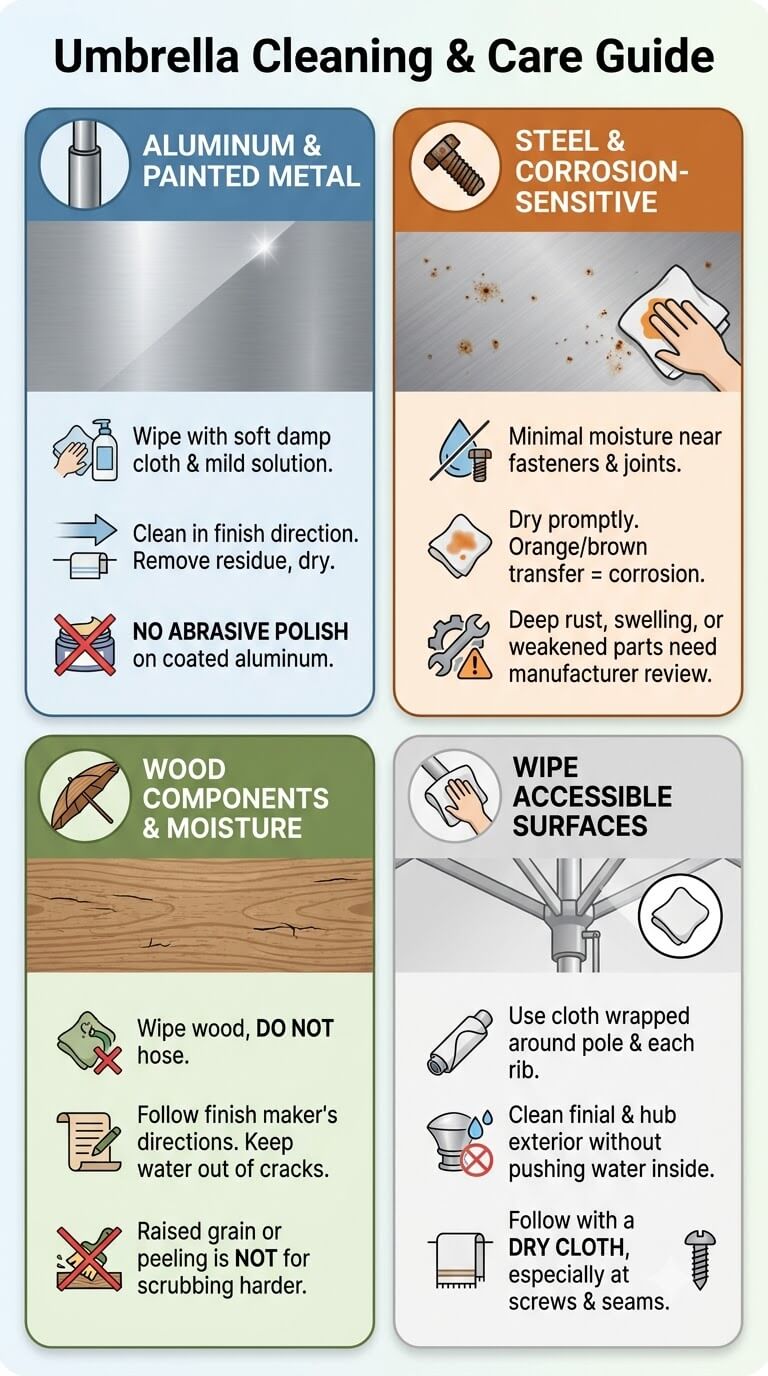
Wipe with a soft damp cloth and an approved mild solution when needed. Clean in the direction of the finish, then remove residue and dry. Do not polish coated aluminum with abrasive metal polish.
Steel and corrosion-sensitive parts
Use minimal moisture near fasteners, welded joints, scratches, and hollow openings. Dry promptly. Orange or brown transfer on the cloth can indicate corrosion. Cleaning loose surface soil is reasonable, but deep rust, swelling beneath paint, weakened fasteners, or a thinning pole calls for manufacturer review or repair.
Wood components and moisture limits
Wipe wood rather than hosing it. Follow the finish maker’s care directions and keep water out of end grain, cracks, and joints. Raised grain, splitting, dark soft areas, or peeling finish are not signs to scrub harder.
Wipe accessible surfaces without flooding joints
Use a cloth wrapped around the pole and each reachable rib. Clean the finial and exterior of the hub without pushing water inside. Follow with a dry cloth, especially at screws, collars, and seams between dissimilar materials.
Protect the Crank, Tilt, Cord, and Moving Parts
Clean only accessible exterior surfaces
Wipe the handle, housing, release button, and exposed pole with a barely damp cloth, then dry them. Keep cleaner out of slots and cable openings. Remove debris around an exterior collar with a soft brush.
Do not open, disassemble, oil, or repair mechanisms without instructions
Internal springs, gears, cables, and tensioned parts can move unexpectedly. Do not remove covers, add lubricant, replace cord, or loosen the hub based on a generic online method. Use only maintenance steps stated for the exact model.
Signs that operation should stop
Stop if the crank free-spins, reverses unexpectedly, slips under load, produces grinding sounds, or requires rising force. Also stop for a frayed cord, jerky tilt, misaligned collar, cracked housing, loose hub, or ribs that open at different rates.
When manufacturer support or professional repair is appropriate
Contact the maker or an experienced repair service when safe opening and closing cannot be confirmed. Provide the model, photographs, symptoms, and any event that preceded the problem. Do not keep testing a damaged mechanism.
Dry the Umbrella Completely

Open fully only in safe, calm conditions
A sound canopy dries best with its panels separated and airflow on both sides, but an open umbrella creates a large sail. Open it only when the base is secure, wind is calm, and someone can monitor it.
Check folds, seams, rib pockets, vent panels, and the top cap area
Touch the underside of hems and seams, then press a dry white towel against thick sections. Lift the vent overlap and inspect around the finial. Rib pockets and folded corners may stay cool or dark after the main panel looks dry.
Dry pole and frame joints
Wipe droplets from the hub exterior, ribs, collar, pole connection, and base hardware. Pay special attention to steel fasteners and areas where water can sit against paint. Do not operate the tilt or crank simply to shake out water.
Fold, cover, or store only after every thick or hidden area is dry
A cover protects against debris but can trap moisture around a damp canopy. Close the umbrella only after the fabric, seams, vent, pockets, pole, and mechanism exterior are dry. If storage must be delayed, keep the closed umbrella in a protected, ventilated location and reopen it when calm conditions return.
Dirt, Mildew Clue, Fading, or Mechanical Damage?
Removable surface residue
Dirt usually transfers to a damp cloth, softens with an approved cleaner, and leaves stable fabric beneath it. Pollen may create a yellow film, while road dust can look gray.
Recurring moisture and localized organic clues
A mark that returns in the same fold, a persistent musty smell, or repeated dampness beneath a vent suggests that storage and drying need correction. A localized, label-approved treatment may be possible for sound fabric.
Sun fading, degraded coating, and brittle fabric
Fading tends to follow exposure patterns and does not transfer to a cloth. Degraded coatings may feel powdery, sticky, or uneven. Brittle fabric may crack when flexed. Cleaning can reveal these conditions but cannot reverse them.
Torn seams, bent ribs, frayed cord, and damaged crank or tilt
These are repair or replacement problems. Do not hide a tear with a cover, straighten a loaded rib by hand, knot a lifting cord, or force a slipping crank. Keep the umbrella closed and secured until the correct part or professional repair restores normal operation.
Common Patio-Umbrella Cleaning Mistakes
Cleaning in wind or on an unstable base
Wind can move the canopy suddenly, pull a wet brush from your hand, and tip an inadequately secured umbrella. A wet patio also reduces footing. Postponing the job is the correct response when the base rocks, the canopy flaps, or the forecast is uncertain.
Standing on furniture to reach the canopy
Outdoor chairs and tables are not access equipment, especially when wet or placed on uneven pavers. Reaching sideways also pushes against the umbrella and may shift the base. Change the umbrella position only as permitted, use a safe ground-level tool, or leave the unreachable area for professional cleaning.
Pressure washing fabric or mechanisms
High-pressure water can distort the weave, damage coating, tear seams, force water into the hub, and strip finish from the frame. More pressure does not provide better control. Use low-flow rinsing or damp wiping according to the canopy and umbrella instructions.
Folding the umbrella while damp
Moisture becomes trapped between panels, around rib pockets, and beneath the vent. This can create odor, staining, corrosion, and recurring organic residue. Check hidden areas with a dry towel before closing. When in doubt, allow more airflow rather than covering the umbrella early.
Treating sun fading or torn fabric as a stain
Repeated cleaner, stronger brushing, or unapproved bleach will not rebuild damaged yarns or restore lost pigment. Compare protected and exposed areas before deciding what remains. Replace a failing canopy or arrange repair instead of escalating a cleaning method that is already removing sound material.
Storage and Seasonal Care
Clean and dry before extended storage
Remove dry debris and localized residue before the umbrella is closed for weeks or months. Dry every layer and wipe the frame. Store only after the mechanism operates normally. Soil left in folds becomes harder to remove, while hidden moisture can affect fabric, fasteners, and finishes during storage.
Protect without trapping condensation
Use the maker’s fitted cover or storage method, and keep the umbrella in a dry, ventilated place. Do not wrap damp fabric tightly in plastic. Keep the lower pole off a wet floor when the design allows.
Inspect the base, canopy, cord, ribs, and moving parts before reuse
At the start of the season, remove the cover, look for pest debris and moisture, and inspect every attachment. Confirm that the base and fasteners are sound before opening. Operate the crank and tilt slowly with the area clear.
When Canopy Replacement or Professional Repair Is Needed
Widespread fabric breakdown or contaminated material
Replacement is often more practical when fabric is brittle, extensively torn, delaminating, permanently stretched, or affected through multiple layers by recurring contamination. A new canopy must match the frame dimensions and attachment system. Do not assume that a similar diameter guarantees a safe fit.
Bent supports, damaged hub, failed crank, tilt, or cord
These components control load and movement. Keep the umbrella closed if ribs no longer align, the hub is cracked, the cord has broken strands, or the crank cannot hold position. Arrange model-specific parts and qualified installation rather than improvising with wire, tape, knots, or mismatched hardware.
Unsafe instability or inability to open and close normally
An umbrella that leans, rotates unexpectedly in the base, catches while opening, or cannot close smoothly should stay out of service. Professional help is also appropriate when the unit is very large, cantilevered, permanently mounted, electrically equipped, or beyond safe ground-level reach.
Frequently Asked Questions About Cleaning a Patio Umbrella
Should the canopy be removed before cleaning?
Usually not. Clean it attached unless the umbrella manual and canopy label explicitly allow removal. Attached cleaning avoids stretching seams and misplacing fittings. Removal can help with an approved wash method, but only when every attachment can be released and reinstalled without disturbing structural or moving parts.
Can a patio umbrella be cleaned while closed?
Dry brushing of accessible outer folds may be possible while closed, but wet cleaning is rarely complete because inner panels, seams, and rib pockets remain hidden. Open the umbrella only when the base, frame, mechanism, weather, and work area are safe. Never force a damaged umbrella open for cleaning.
How can the crank be protected from water?
Keep the flow directed toward the canopy edge, not the center pole. Use cloth application near the hub and wrap the crank housing loosely if needed without trapping water. Wipe splashes immediately, let the exterior dry, and do not operate or disassemble the mechanism while it is wet.
Is it safe to dry an umbrella fully open?
Yes, when the umbrella is sound, secured in the correct base, monitored, and exposed only to calm conditions. An open canopy improves airflow but also catches wind. Close it if gusts develop or the umbrella cannot be supervised, then continue drying during the next safe period.
When is canopy replacement better than another cleaning attempt?
Replacement is the better choice when fabric is brittle, tearing, permanently stretched, widely contaminated, or no longer secured to the ribs. Cleaning also cannot reverse severe fading or coating breakdown. Confirm frame condition and obtain a canopy made for the exact model before reusing the umbrella.
Final Thoughts
Clean a patio umbrella as both a textile and a moving outdoor product. Stable setup, dry debris removal, compatible cleaner, controlled rinsing, and complete drying handle most routine soil. Stop when fabric or hardware has failed, then use model-specific replacement or repair.

Ethan Carter is the Founder & Editor of HomeCleanSecrets. Based in the United States, he has 5 years of experience creating practical home cleaning, laundry care, stain removal, decluttering, and home organization content. His goal is to help everyday households clean smarter and build simple routines that are easier to maintain.
Read more about Ethan Carter on his author page: https://homecleansecrets.com/ethan-carter/