
If you need to learn how to organize sports equipment in garage without losing balls under the car, stepping over scooters, or hunting for helmets five minutes before practice, build the space around how your household actually uses gear. Sports storage works best when it is fast to grab, easy to put back, and separated from messy or risky garage items.
A garage sports area does not have to look like a showroom. It has to handle real life: kids dropping cleats after practice, adults storing golf clubs or tennis rackets, bikes rolling in with wet tires, and seasonal gear waiting for the next trip. The right system gives every category a clear landing place so the floor does not become the default storage shelf.

Quick Answer: The Garage Sports Gear System
Place this category within a broader garage organization and storage plan so the surrounding zones work together.
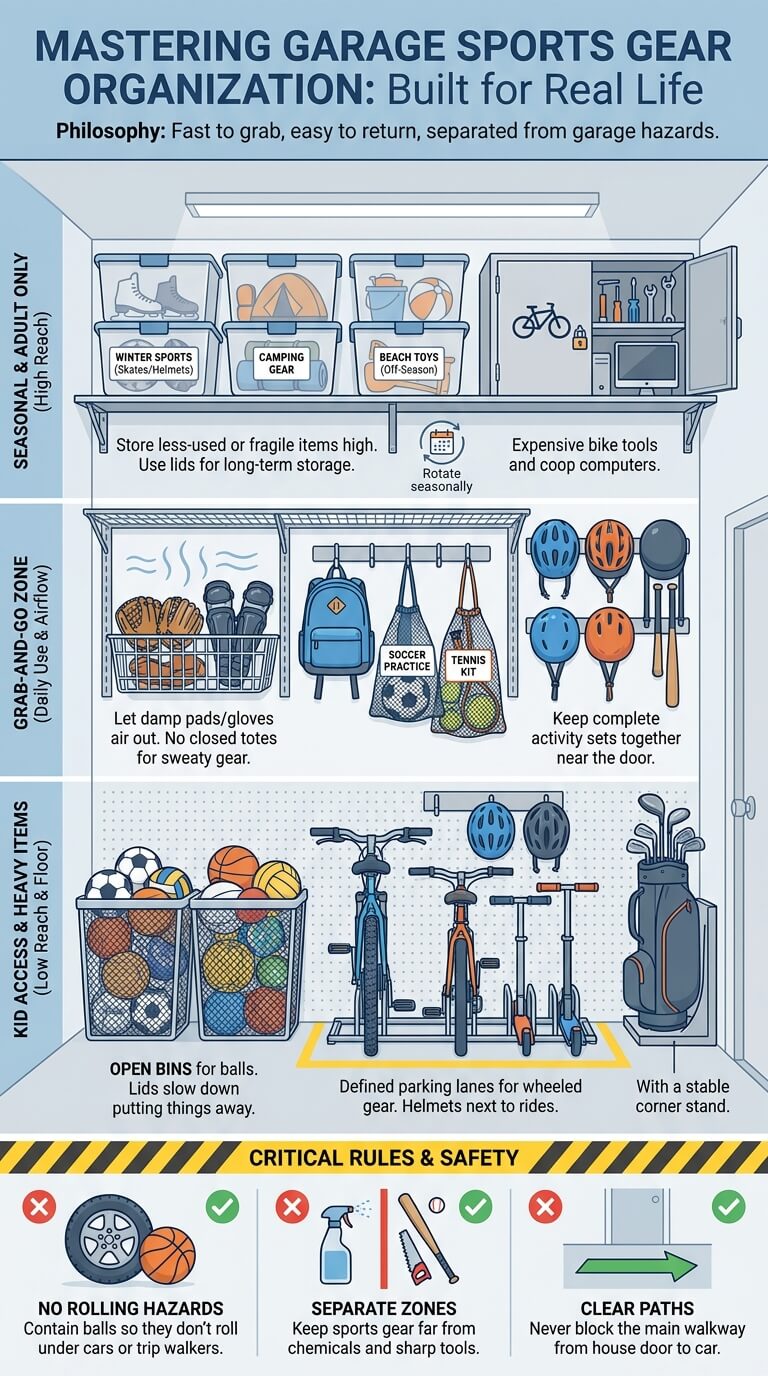
The simplest system is to sort gear by sport, place the most-used items near the door, keep balls in open containers, park bikes and scooters in a defined lane, store helmets and pads where they can dry, and move off-season items to higher or less convenient shelves. Before installing hooks or racks, check the weight limits and the instructions that came with the product.
Group by sport and frequency
Do not start by buying one large bin labeled sports. That bin becomes a pile of baseball gloves, soccer shin guards, tennis balls, jump ropes, and random outdoor toys. Sort by the activity first, then by how often it is used. Daily basketballs and bike helmets need easy access. A beach volleyball set or ski gloves can live farther away until the season changes.
A good test is whether someone can find the complete set for one activity without opening three containers. If a soccer practice needs cleats, shin guards, a ball, and a water bottle, those items should live near one another. If a bike ride needs a helmet, lock, tire pump, and lights, those accessories should sit near the bike parking area rather than on a far shelf.
Create kid-reachable zones for daily gear
Kids are more likely to put gear away when the return spot is visible and reachable. Low open bins work better than lidded boxes for balls, cones, sidewalk chalk, bubbles, and outdoor toys. Hooks at a child-friendly height can hold small backpacks, helmets, mitts, or jump ropes, as long as the hooks do not create a head-level hazard in a walking path.
Keep the easiest zones for the items you want returned every day. High shelves are useful for adult gear, spare pads, or seasonal equipment, but they are not practical for a child who needs to put a soccer ball away after school. If the child has to ask for help every time, the floor usually wins.
Keep balls, bikes, helmets, and pads off the main walking path
Use hooks, shelves, and simple return rules to keep sports gear off the garage floor.
The main walking path should stay open from the house door to the driveway, trash area, freezer, laundry corner, or any storage you use often. Rolling items need containment, and bulky items need a parking line. A basketball on the floor is not just visual clutter. It can roll under a tire, stop a door from opening, or trip someone carrying groceries.
Mark the sports area with shelves, bins, tape on the floor, or a parking mat. The boundary matters because sports gear tends to spread. Once a scooter is allowed to sit in the middle of the garage, helmets, balls, and cleats gather around it.
Sort Sports Equipment Before Storage
If shelves and bins are overflowing, declutter unused sports gear so storage is not built around broken, duplicate, or unused items.

Sorting first prevents you from building the wrong system. Lay gear out by category on the driveway, garage floor, or a drop cloth. Keep a trash bag, donation box, repair pile, and return-to-owner pile nearby. If you have kids, let them help identify what still fits, what they still use, and what belongs to a team, school, or neighbor.
Balls, bats, sticks, rackets, and clubs
Group hard gear by shape and activity. Balls need open containment. Bats and hockey sticks need upright storage or wall slots. Tennis rackets, pickleball paddles, and badminton rackets need a narrow bin or wall hooks that do not bend strings or press frames awkwardly. Golf clubs often need a stable corner or a dedicated stand so the bag does not topple into the walkway.
Check for flat balls, cracked bats, splintered handles, frayed nets, and broken zippers before putting anything back. Repair or remove those items now. Keeping damaged gear only teaches everyone to dig past it every time they need the good version.
Helmets, pads, gloves, and uniforms
Soft and protective gear needs a different plan from balls and bats. Helmets should not be crushed under heavy items. Pads, gloves, and uniforms need airflow after use. A closed plastic tote can trap sweat and moisture if gear goes in damp, which makes the next practice unpleasant and may shorten the life of the gear.
Create a soft-gear shelf or hook rail near the sports zone. Keep helmet straps untangled and place each helmet where it will not fall when someone grabs a ball. For sport-specific safety gear, check the care directions and replace items when the manufacturer or league rules call for it. Basic storage can protect access and shape, but it cannot make worn protective equipment safe forever.
Bikes, scooters, skates, and boards
Wheeled gear needs a parking plan, not just storage. Bikes, scooters, skateboards, rollerblades, and longboards are used differently from boxed items because they move in and out often. Give them a lane or rack where wheels face the same direction and handlebars do not catch on shelves, car doors, or each other.
Before choosing wall hooks or ceiling storage, think about who will lift the item. A ceiling hook may work for an adult road bike that is used weekly, but it is usually a bad fit for a child scooter used every afternoon. Low racks, wheel slots, and a painted parking strip are often easier for family use.
Camping, beach, and outdoor activity gear
Some items are not sports gear in the narrow sense, but they behave like it in the garage. Tents, beach chairs, pool toys, coolers, hiking poles, fishing gear, and camping bins need a place that does not crowd daily balls and bikes. Put these in a seasonal or trip-prep area instead of mixing them with after-school gear.
Keep wet items out until they are dry. Tents, life jackets, towels, and inflatable toys should not be packed damp. A short drying step before storage prevents a bigger cleanup later. If an item smells musty, has visible residue, or feels wet inside, leave it open until you can clean and dry it properly.
Outgrown, broken, or rarely used items
Sports storage gets crowded when old sizes stay beside current sizes. Set aside cleats that no longer fit, helmets that are outgrown, bats from a past age group, and gear for sports nobody plays anymore. If an item has a recall notice or damage that affects safe use, do not donate it as usable gear. The CPSC recall search is a helpful place to check when you are unsure about a product.
For rarely used items, decide whether they are truly worth the space. A once-a-year badminton set might stay in a labeled seasonal bin. Three cracked plastic sleds in a warm garage may not deserve a shelf. Keep the items that support your current household, not every activity your family has ever tried.
Design a Grab-and-Go Sports Zone
If the surrounding space still lacks structure, take time to create clear garage zones before fine-tuning this area.
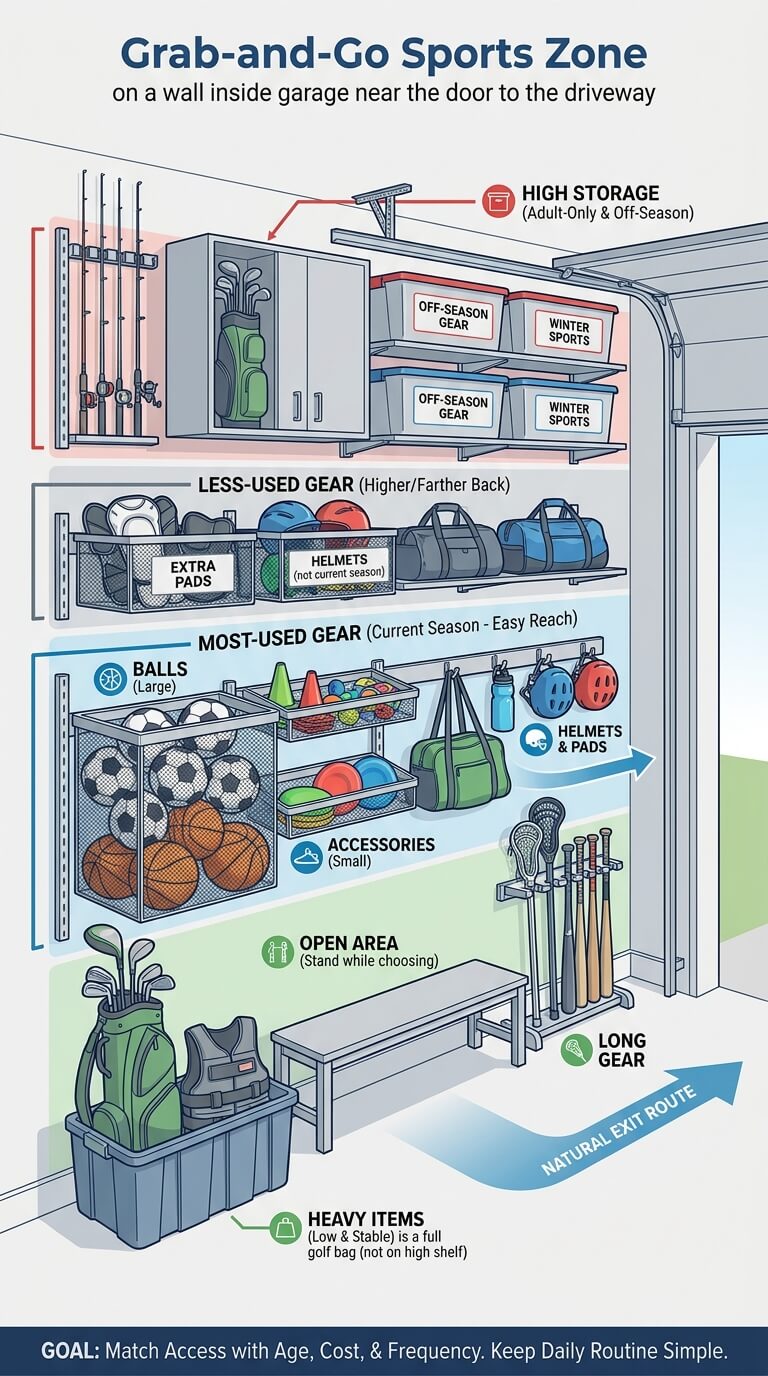
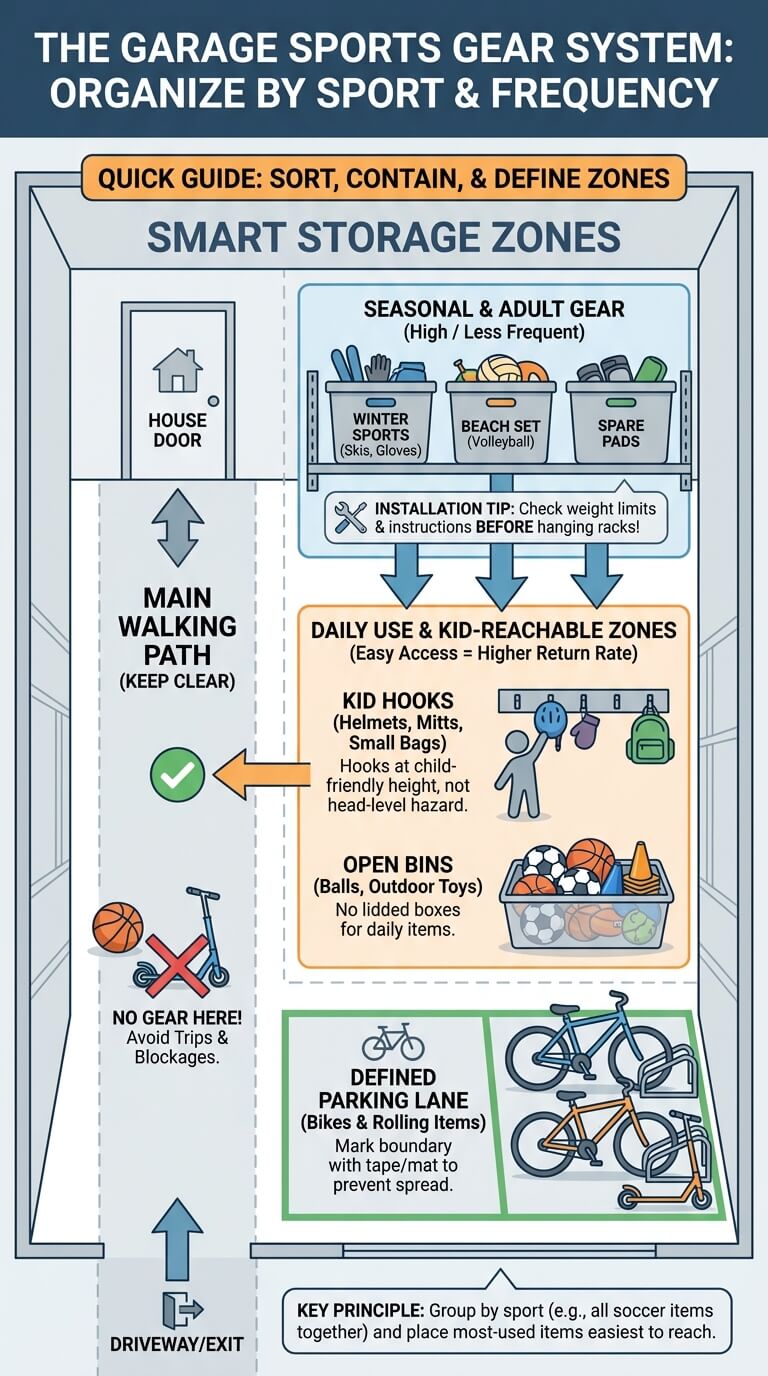
A grab-and-go zone should sit where sports gear naturally enters and exits the house. For many homes, that is near the garage door to the driveway or the house entry. The zone should include a place for balls, a place for long gear, a place for helmets and pads, and a place for small accessories that usually get lost.
Place frequent gear near the door
The most-used gear should be the easiest to reach. Put current-season balls, cleats, water bottles, helmets, and practice bags close to the exit route. Less-used gear can move higher, farther back, or into labeled bins. This keeps the daily routine simple and stops everyone from digging through holiday boxes or garden supplies before practice.
Leave enough space to stand while choosing gear. If the sports zone is wedged behind trash cans or a parked bike, items will end up on the floor. A small open area in front of the bins is often more valuable than one extra storage shelf.
Use open bins for fast returns
Open bins are the easiest return system for balls, cones, frisbees, outdoor toys, and practice accessories. Use taller bins for large balls and shallow bins for smaller items. Mesh bins help you see what is inside and can improve airflow for gear that comes in slightly dirty or sweaty.
Keep lids for off-season storage, not daily gear. A lid adds one more step, and one extra step is often enough to make kids drop items beside the bin. If you want the zone to look neat, choose matching open containers and put the label on the front.
Keep adult-only or fragile equipment higher
Some sports equipment should not be at child height. Fishing rods, golf clubs, archery equipment where legally owned and stored, specialty rackets, delicate bike tools, and expensive electronics such as cycling computers should sit higher or in a closed cabinet. The goal is not to make the garage difficult to use. The goal is to match access with age, cost, and risk.
Do the same with heavy items. Do not put a full golf bag, weighted training gear, or a loaded camping bin on a high shelf that someone has to pull down while standing under it. Heavy items belong low and stable. Light bulky items can go higher if the shelf or rack is rated for the load.
Store Balls and Small Gear
Balls and small gear cause most of the visible mess because they roll, scatter, and multiply. A strong ball system prevents the garage from looking messy even when the rest of the sports zone is working.
Mesh bins, ball carts, crates, and wall baskets
Choose containment based on how the balls are used. A tall mesh bin works for soccer balls, basketballs, playground balls, and volleyballs. A rolling ball cart works for families that practice in the driveway and want to move several balls at once. Wall baskets work when floor space is limited, but they should be mounted at a height users can reach safely.
Small items need smaller containers. Use a divided bin or drawer for tennis balls, pickleballs, golf balls, pumps, whistles, cones, chalk, and spare mouthguards in sealed packaging. Without small-item storage, these pieces collect in the bottom of big bins where nobody finds them until they buy duplicates.
Label by sport or child
Labels work best when they match how your family searches. Some families need labels by sport: soccer, basketball, baseball, biking, beach, camping. Others need labels by child because each child has a separate team bag. Choose the method that reduces arguments and searching.
Use short labels on the front of each container. For younger kids, add a simple picture or color mark. A label that says balls is less useful if it contains balls for five activities. A label that says soccer balls or driveway toys makes the return step clearer.
Prevent balls from rolling under cars or shelves
Rolling control matters in a garage. Add a lip to low shelves, use bins with high sides, and avoid placing balls on flat shelves near parked cars. If balls keep escaping, the container is either too shallow, too full, or too far from where the balls are used.
Check under shelves and behind bikes during your weekly reset. Those hidden spaces are where baseballs, tennis balls, and foam balls collect. When a ball is always found in the same wrong place, move the storage closer to that activity rather than blaming the user every time.
Store Bikes, Scooters, and Boards
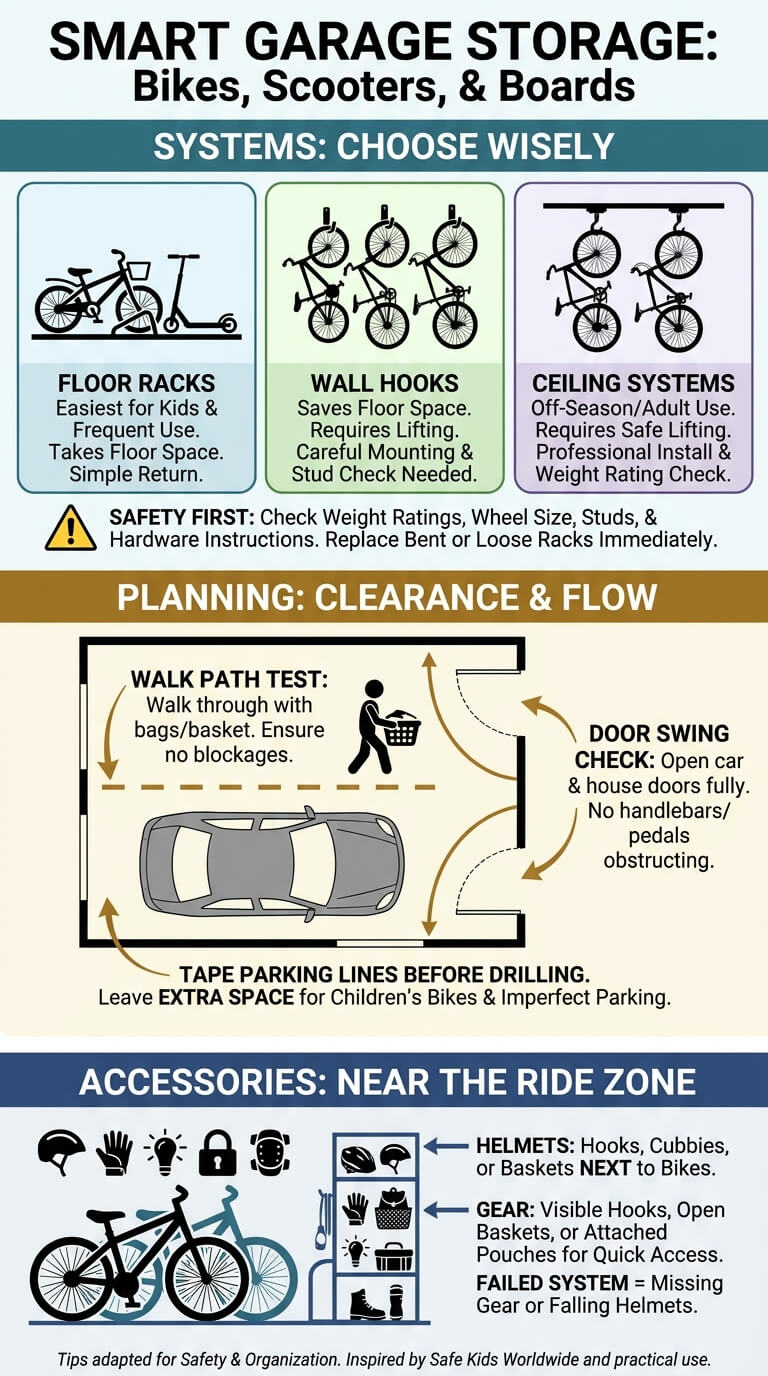
Bikes and wheeled gear need more clearance than bins because they have handlebars, pedals, wheels, and awkward angles. A garage can look organized on the wall and still fail if a bike blocks the car door or a scooter sits in the walking path.
Floor racks versus wall hooks versus ceiling systems
Floor racks are easiest for kids and frequent rides. They take floor space, but they make return simple. Wall hooks save floor space, but they require lifting and careful mounting. Ceiling systems can help with adult bikes or off-season gear, but they should be used only when the user can lift safely and the system is installed according to the rack maker’s directions.
Read the hardware instructions before hanging anything overhead or on a wall. Check stud placement, weight rating, wheel size, and clearance. If the rack looks bent, pulls away from the wall, or requires someone to stand in an unsafe position to load a bike, stop using it until it is fixed or replaced.
Parking clearance and door swing checks
Before installing a bike rack, park the car, open the car doors, open the house door, and walk through the garage with a laundry basket or grocery bag. This simple test shows whether handlebars or scooters will block normal movement. Tape the future parking line on the floor before drilling into the wall.
Leave extra space around children’s bikes because kids rarely park perfectly. A tight adult-style bike wall may look neat but fail the first week if a child cannot line up the wheels. The easier the parking target, the more often the gear returns to it.
Helmet and accessory storage near the ride zone
Helmets should live next to the bikes, not on a random shelf across the garage. Add hooks, cubbies, or open baskets for helmets, locks, lights, gloves, knee pads, and small pumps. Safe Kids Worldwide offers practical bike safety tips that can help families think about helmets and visibility before rides.
Keep accessories visible. When a child cannot find a helmet quickly, the storage system has failed the routine. If helmets fall from hooks, switch to cubbies or baskets. If gloves and lights disappear, add a small drawer or pouch attached to the bike area.
Store Helmets, Pads, Uniforms, and Soft Gear
Soft gear needs airflow, separation, and a little patience before storage. The biggest mistake is tossing damp pads, sweaty gloves, and uniforms into the same closed tote as clean backup gear.
Ventilated baskets and hooks
Use ventilated baskets for pads, gloves, and practice accessories that need air around them. Hooks work well for gear bags, drawstring sacks, and uniforms that need to hang briefly. Keep the soft-gear area near the sports zone so it is easy to return items after practice.
Do not overload hooks. A heavy bag can pull weak hardware out of drywall, and a crowded hook rail turns into a knot of straps. If the gear is heavy, use a shelf, bench cubby, or freestanding unit instead of a small decorative hook.
Drying before storage
Make drying part of the routine. Open gear bags after practice, remove damp towels or socks, and let pads air out before they go into a bin. If the garage is humid, very hot, or poorly ventilated, some soft gear may need to dry indoors before storage.
A good test is to touch the inside of gloves, pads, or bags before closing a container. If the inside feels damp or smells strong, do not seal it. Clean according to the care label or manufacturer instructions, then let it dry completely.
Keeping muddy or wet gear away from clean supplies
Muddy cleats, wet skates, and damp uniforms need a landing area that does not contaminate clean gear. Put a washable tray, boot mat, or shallow bin under items that drip or shed dirt. Keep cleaning products, garden chemicals, paint, and sharp tools away from the sports zone so a child does not have to reach past them to get a ball.
For contact sports and shared gear, follow the care instructions given by the equipment maker, team, or league. The CDC HEADS UP safety equipment guidance is useful background for families thinking about fit, condition, and proper use, but storage should still follow the directions for the exact item you own.
Rotate Seasonal Sports Gear
To protect fragile and rarely used items, rotate off-season items with labels, moisture protection, and a rotation plan.
Sports gear changes throughout the year. A garage that works in spring may fail in winter if bikes, sleds, beach gear, school sports bags, and holiday bins all compete for the same easy-access space.
In-season gear at reach height
Put the active season at shoulder height or lower. During soccer season, soccer gear gets the prime bin. During winter, sleds, skates, or snow-play items may move forward. During summer, beach bags, pool toys, and camp gear may come down from higher storage.
This rotation does not require a full garage reset. It can be a 20-minute swap at the start of each season. Move the current activity forward and move the inactive activity up, back, or into labeled bins.
Off-season bins and high shelves
Off-season gear can use lidded bins, higher shelves, or less convenient wall areas. Keep the bins lighter than you think they need to be. A bin packed with helmets, skates, balls, and pads becomes awkward and unsafe to lift from a high shelf.
Label each bin by season and contents. Winter sports, summer beach gear, camping accessories, and backup balls are clearer than a single label that says sports. Put the heaviest off-season items low even if they are rarely used.
End-of-season donation and repair review
At the end of each season, review what no longer fits, what broke, and what the family did not use. This is the best time to donate usable outgrown gear, repair favorite items, and throw away pieces that are damaged beyond safe use. It also prevents a new season from piling on top of old decisions.
Before donating helmets, pads, or wheeled gear, check condition carefully. Do not pass along anything with damage that affects safe use. For sport and recreation questions beyond storage, Safe Kids has broad sports safety guidance that can help families decide when to pay closer attention to fit and protective equipment.
Sports Equipment Organization Checklist
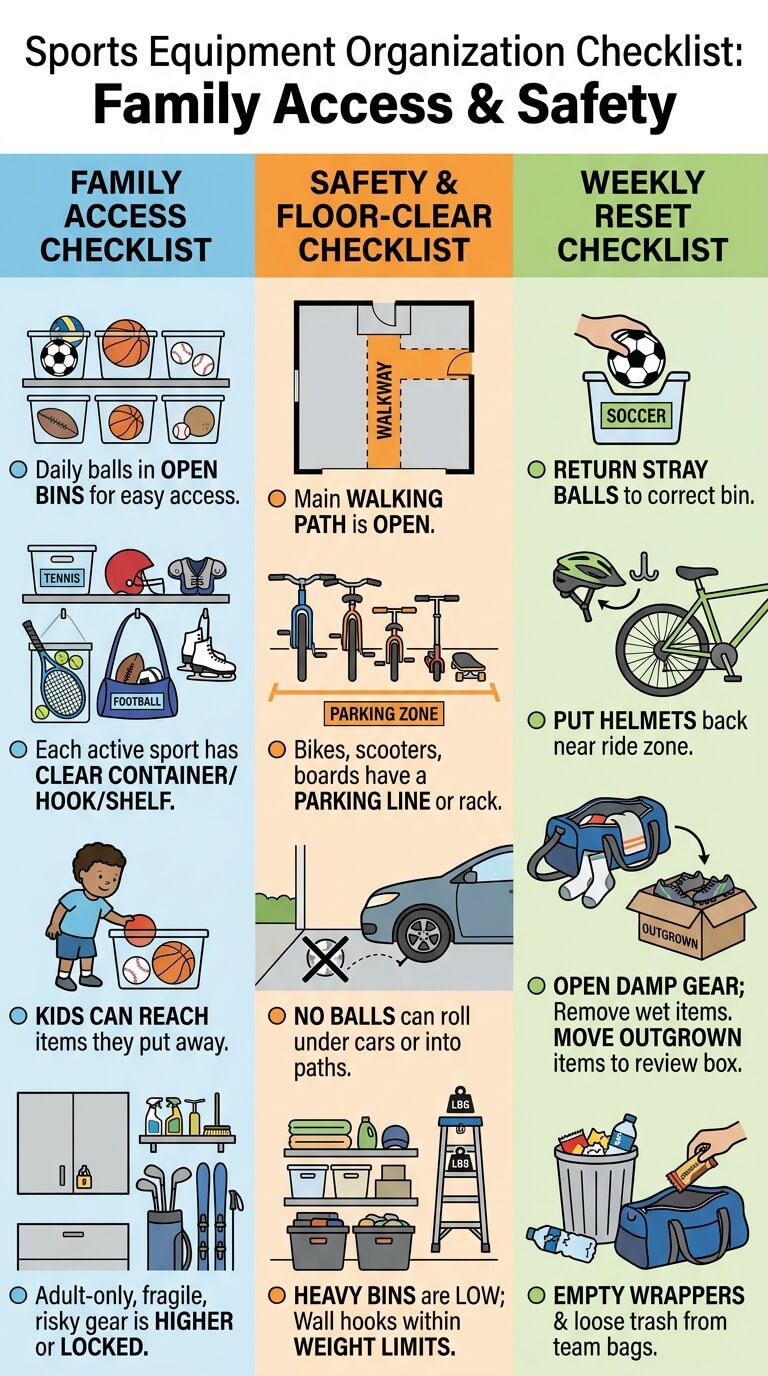
Use this checklist after the first sort, then repeat the shorter weekly version to keep the system from sliding back to the floor.
Family access checklist
- Daily balls are in open bins, not sealed boxes.
- Each active sport has a clear container, hook, shelf, or bag space.
- Kids can reach the items they are expected to put away.
- Adult-only, fragile, expensive, or risky gear is higher or in a closed cabinet.
- Bike helmets, locks, pumps, and pads are stored near the bikes.
- Small accessories have drawers, pouches, or divided bins.
Safety and floor-clear checklist
- The walking path from the house door to the driveway is open.
- Bikes, scooters, and boards have a parking line or rack.
- No balls can roll under the car or into the main walking path.
- Heavy bins are stored low, not above head height.
- Wall hooks and ceiling racks are installed within the listed weight limits.
- Sports gear is separated from cleaners, paint, pesticides, sharp tools, and lawn equipment.
Weekly reset checklist
- Return stray balls to the correct bin.
- Put helmets back near the ride zone.
- Open damp gear bags and remove wet towels or socks.
- Move outgrown items to a review box.
- Check that bike handlebars and scooters are not blocking doors.
- Empty wrappers, broken packaging, and loose trash from team bags.
Common Mistakes
Most sports storage problems come from making the system too closed, too high, too mixed, or too dependent on one adult. Fix those issues first before buying more shelves.
Using closed bins for gear kids use daily
Closed bins look neat, but they slow down the return step. If a child uses a basketball, scooter helmet, or baseball glove several times a week, open storage usually works better. Save lids for off-season gear, spare uniforms, or items that need dust protection.
Mixing sports gear with chemicals or garden tools
Do not make kids reach through cleaners, paint, pesticides, saws, rakes, or sharp garden tools to get sports gear. Keep the sports zone separate and visible. This is especially important for balls and outdoor toys that younger kids grab without asking.
Blocking parking and walkways
A sports zone that blocks the car door or walking route will not last. Test the space with normal movement before calling the setup finished. Park the car, open the doors, carry bags through, and make sure nobody has to step over a scooter or ball bin.
Keeping outgrown gear without a review date
Outgrown gear quietly consumes the best storage space. Put a date on the review box and handle it at the end of the season. Keep what is still useful, donate what is safe and usable, recycle or discard what is broken, and return borrowed gear to the right person.
FAQ
How do I store balls in a garage?
Store balls in open containers with high sides, such as mesh bins, rolling ball carts, crates, or wall baskets. Keep the container near the activity area so balls are easy to return. Avoid flat shelves near cars because balls can roll off and disappear under vehicles or storage units.
What is the best garage storage for kids sports gear?
The best storage is low, open, and easy to understand. Use bins for balls and outdoor toys, hooks for helmets or small bags, and clear labels by sport or child. Keep adult-only gear, fragile items, chemicals, and sharp tools out of the child-access zone.
How do I organize bikes and helmets in a garage?
Give bikes a parking lane, floor rack, wall hook, or ceiling system based on who uses them and how often. Store helmets, locks, lights, gloves, and pumps right beside the bike area. Check door swings, car clearance, and rack weight limits before installing hardware.
How do I keep sports equipment from taking over the garage floor?
Set a clear boundary for the sports zone, use open bins for daily gear, park wheeled items in a defined lane, and rotate off-season gear to higher or less convenient storage. Do a short weekly reset so loose balls, helmets, and practice bags do not slowly spread across the garage.
Final Thoughts
The best way to organize sports equipment in a garage is to build around motion. Balls roll, bikes need parking, helmets need to be found quickly, and damp gear needs air before it is packed away. When each activity has a reachable home and risky garage items stay separate, the space becomes easier for everyone to use.
Start with the gear used this week. Give it the easiest storage, move inactive items out of the way, and review outgrown or broken pieces at the end of each season. A sports zone works when it can survive a busy school morning, a rushed practice night, and a tired kid coming home with muddy cleats.

Ethan Carter is the Founder & Editor of HomeCleanSecrets. Based in the United States, he has 5 years of experience creating practical home cleaning, laundry care, stain removal, decluttering, and home organization content. His goal is to help everyday households clean smarter and build simple routines that are easier to maintain.
Read more about Ethan Carter on his author page: https://homecleansecrets.com/ethan-carter/