
If you want to learn how to organize a garage without turning the project into a month-long mess, work in a clear order: open a safe path, group items, build storage zones, put things back by use frequency, then label the system so your household can maintain it. A garage can hold tools, cleaning products, yard equipment, sports gear, seasonal decorations, and overflow storage, but it cannot do all of those jobs well when everything lands on the floor.
The goal is not to make the garage look empty. The goal is to make it usable. You should be able to park if that is part of the plan, reach the door without stepping over bins, grab a rake or soccer ball without moving paint cans, and put groceries, bikes, or trash bags through the space safely. A good garage reset makes the next normal day easier, not just the project day prettier.
Quick Answer: The Best Order to Organize a Garage
Place this category within a broader garage organization and storage plan so the surrounding zones work together.
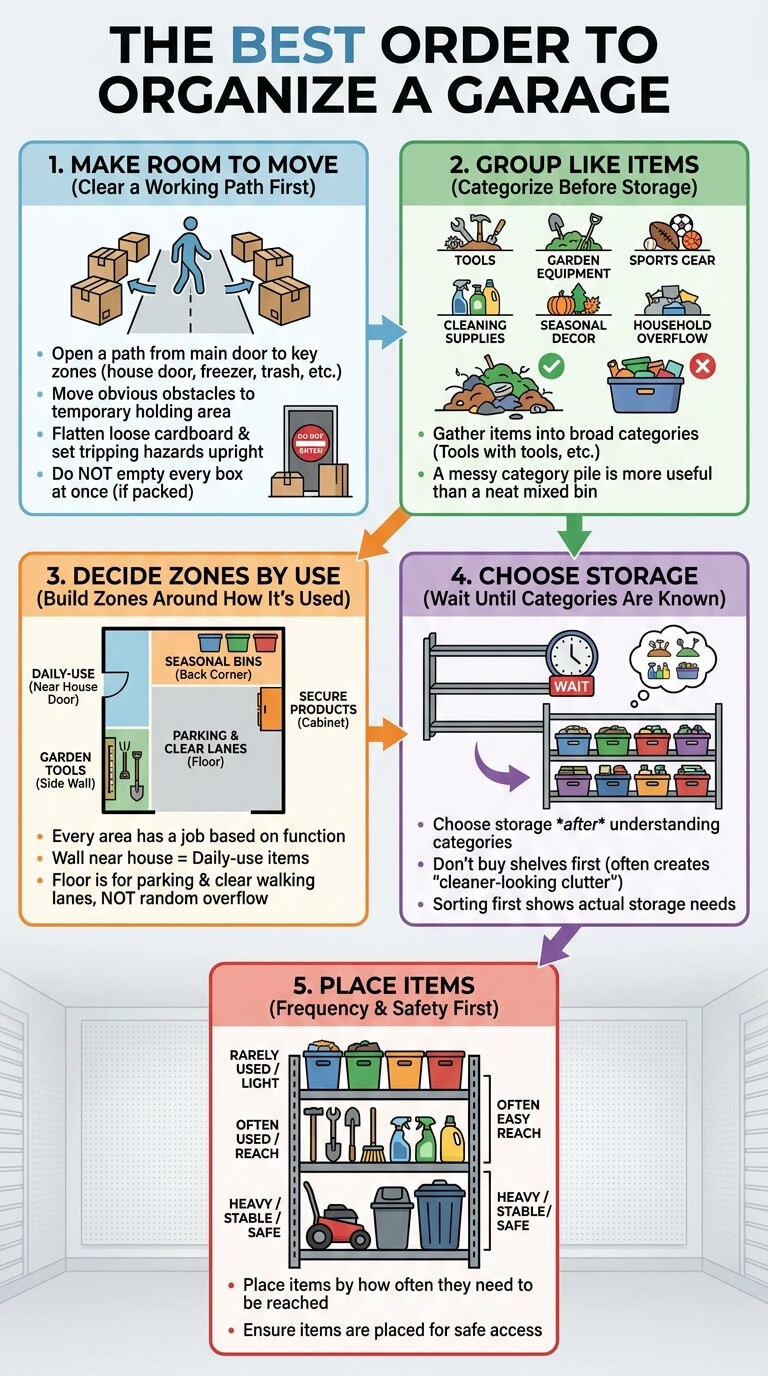
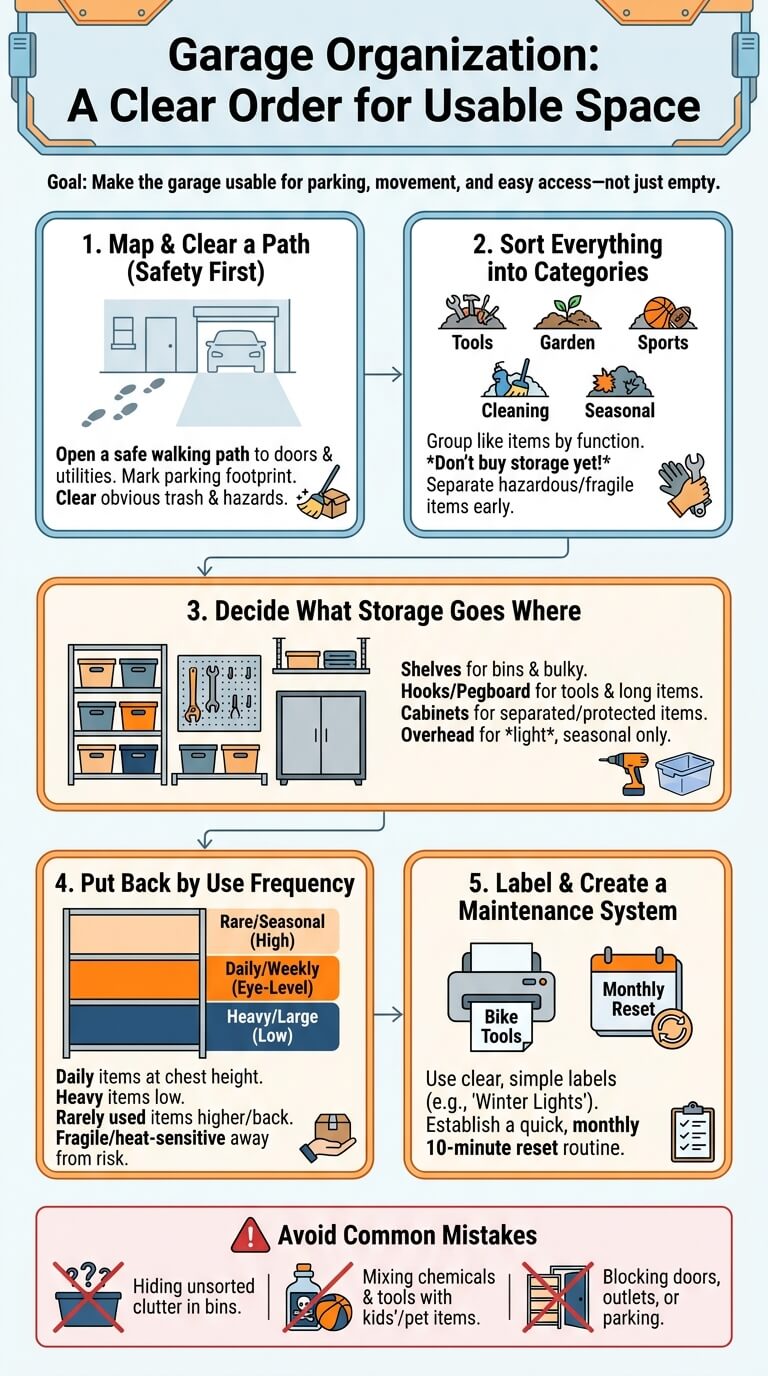
The best order is simple: make room to move, group like items, decide what each wall or zone should do, choose storage after you understand the categories, then place items by how often and how safely they need to be reached. Buying shelves first often creates a cleaner-looking version of the same clutter. Sorting first shows what the storage actually needs to hold.
Clear a working path first
Start by opening a path from the main garage door to the house door, exterior door, freezer, laundry area, trash cans, or any outlet you need to access. Do not empty every box at once if the garage is packed. Move obvious obstacles to one temporary holding area, flatten loose cardboard, set tripping hazards upright, and remove anything blocking an exit.
Group items before choosing storage
Once you have a path, gather items into broad categories. Put tools with tools, garden equipment with garden equipment, sports gear with sports gear, cleaning supplies with cleaning supplies, seasonal decorations with seasonal decorations, and household overflow with household overflow. At this stage, a messy category pile is more useful than a neat mixed bin.
Build zones around how the garage is used
A garage works better when every area has a job. The wall nearest the house door may hold daily-use items. A back corner may hold seasonal bins. A side wall may hold garden tools. A cabinet may hold products that need to stay closed and separated. The floor should be reserved for parking, large equipment, and clear walking lanes, not random overflow.
Before You Start
A garage organizing project is easier when you set boundaries before opening every bin. Decide how much time you can spend, what tools you need nearby, and which items should not be handled casually. The garage often contains sharp tools, heavy boxes, chemical products, cords, batteries, pest products, fuel, and unstable stacks. Treat the first hour as setup, not wasted time.
Choose a realistic reset window
For a moderately cluttered one-car garage, plan at least half a day for the first pass. For a two-car garage with years of storage, plan a full weekend or split the job by zones. Trying to finish too fast usually leads to one of two problems: everything gets shoved back before it has a home, or the driveway stays full overnight because the project was too big.
Gather sorting boxes, labels, gloves, and cleaning basics
You do not need perfect containers on day one, but you do need sorting tools. Use large boxes, bins, laundry baskets, contractor bags, painter’s tape, a marker, gloves, a broom, a dustpan, and a basic trash bag setup. A folding table helps if you need to sort small hardware, cords, batteries, or hand tools without crouching on the floor.
- Use one container for items that belong inside the house.
- Use one container for donations or giveaways.
- Use one container for items that need repair before storage.
- Use one container for hazardous or label-dependent products that need a closer check.
- Use one trash bag for obvious trash and one for recycling if your local rules allow it.
Check safety limits for chemicals, sharp tools, and heavy storage
Before pulling everything out, identify items that need special handling. These can include gasoline, pesticides, paint products, aerosols, pool chemicals, fertilizers, sharp blades, saws, ladders, propane cylinders, extension cords, lithium batteries, and very heavy boxes. Keep these out of general family sorting piles.
The U.S. Fire Administration advises keeping items that can burn away from appliances and gives garage-specific fire safety reminders, which is worth checking before you decide where fuel, paint, oily products, or powered equipment should sit.
Step 1: Map the Garage by Function
Parking and walking paths
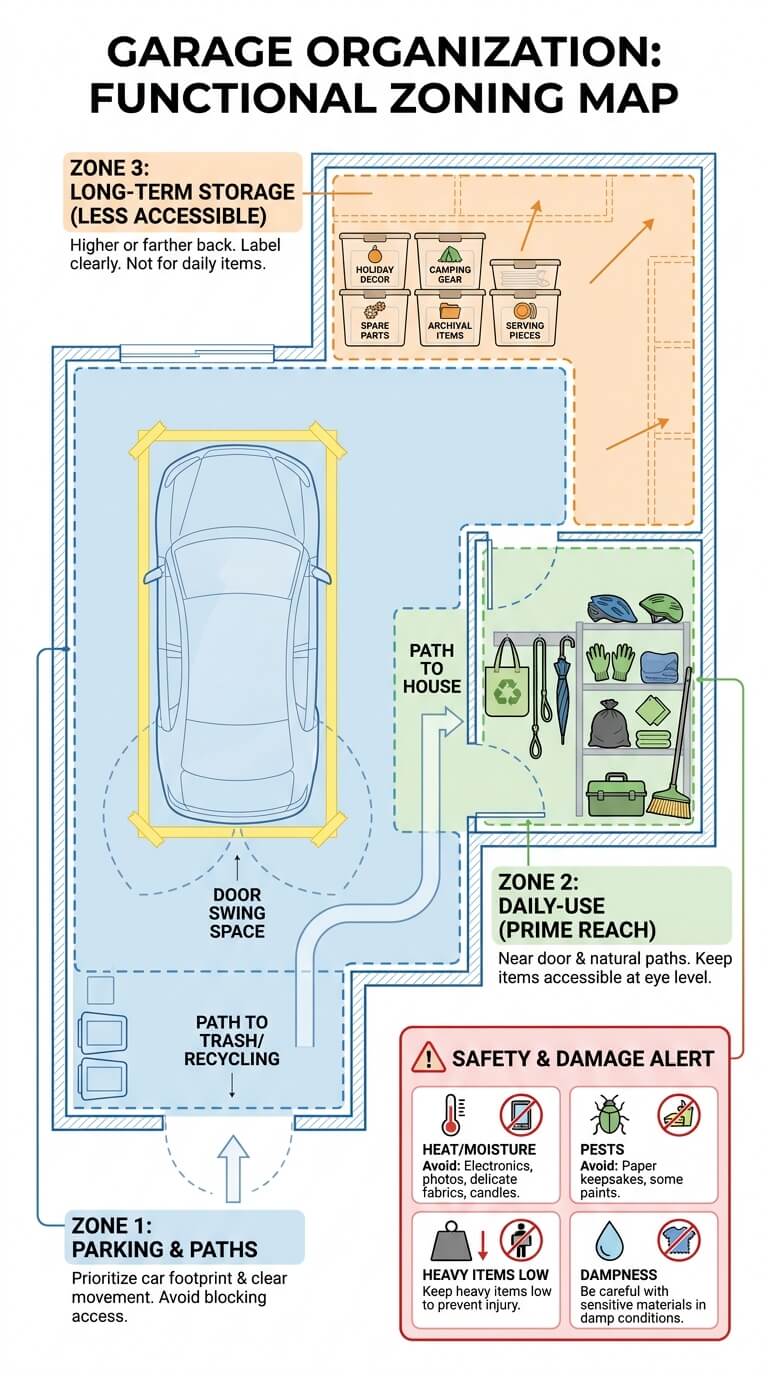
If the garage must hold a car, park the car first or mark its footprint with painter’s tape. Include door swing space, the path to the house, and the path to trash or recycling. A shelf that looks fine when the garage is empty may block a car door once the vehicle is back in place.
Daily-use items near the entrance
Daily and weekly items belong near the door or the path where they are naturally used. This may include reusable shopping bags, pet leashes, umbrellas, bike helmets, work gloves, trash bags, cleaning cloths, a broom, or frequently used tools. Put these at eye to chest height when possible.
Long-term storage away from prime reach zones
Long-term storage should not occupy the best reach zones. Holiday decorations, camping gear used twice a year, spare parts, archival household items, and rarely used serving pieces can go higher, farther back, or into clearly labeled bins. Keep the prime shelves for items that actually move in and out.
Be careful with heat, moisture, pests, and weight. Photos, delicate fabric, candles, paper keepsakes, some paints, and electronics may not belong in a hot or damp garage. Heavy items should stay low even if you only use them once a year. A rarely used item can still cause injury if it has to be lifted down from overhead storage.
Step 2: Sort Everything into Categories
If shelves and bins are overflowing, declutter your garage first so storage is not built around broken, duplicate, or unused items.
Tools and hardware
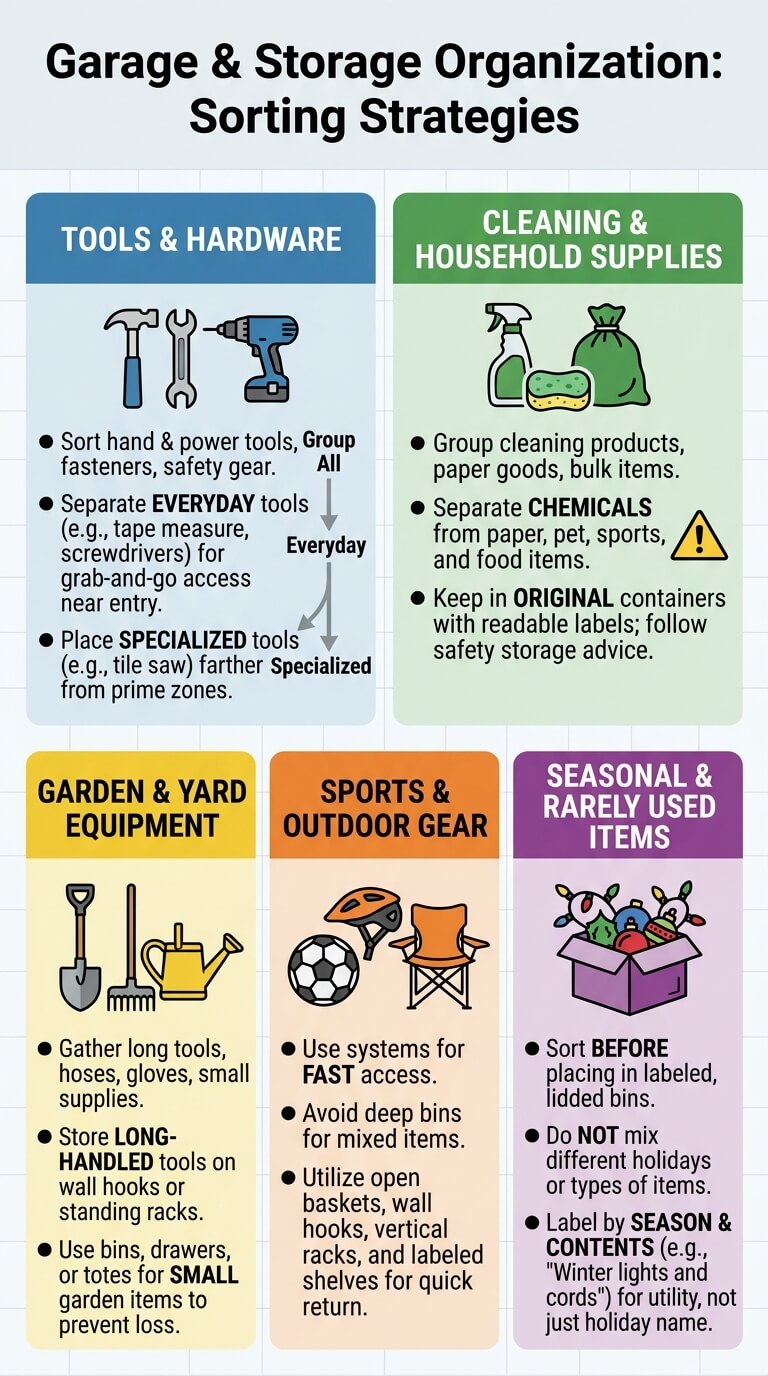
Put hand tools, power tools, screws, nails, anchors, tape, cords, batteries, chargers, safety glasses, work gloves, and small repair supplies together. Then separate everyday tools from specialized tools. A tape measure, screwdriver set, hammer, flashlight, and small bit kit may deserve a grab-and-go home near the door. A tile saw or specialty sander can live farther from the prime zone.
Cleaning and household supplies
Because labels, leaks, temperature, and access matter, cleaning supplies need a safer storage zone in a controlled area.
Group cleaning products, mops, brooms, sponges, cloths, trash bags, paper towels, bulk soap, and backup household supplies. Then separate chemical products from paper goods, pet supplies, sports gear, and food-related items. A garage can be convenient for overflow cleaning supplies, but it should not become a mixed chemical shelf.
If you store cleaners, pest products, lawn chemicals, or automotive fluids in the garage, keep them in original containers with readable labels. EPA storage advice for pesticides is especially useful when deciding how to handle labeled products, child-resistant packaging, and containers that should not be transferred.
Garden and yard equipment
Gather shovels, rakes, brooms, pruning tools, hoses, gloves, plant supports, watering cans, spreaders, and small outdoor supplies. Long-handled tools usually work better on wall hooks, a standing rack, or a narrow garden zone than in a deep bin. Small garden items need a bin, drawer, or tote so they do not disappear behind larger equipment.
Sports and outdoor gear
To stop balls and shared gear from spreading into walkways, give sports equipment its own grab-and-go zone near the main entry.
Sports gear needs a system that fast-moving people can use. Balls, helmets, rackets, skates, pads, scooters, bike pumps, camping chairs, and beach items should not all go into one deep bin. Use open baskets, wall hooks, vertical racks, or labeled shelves where the item can be returned quickly.
Seasonal decorations and rarely used items
Seasonal items are perfect for labeled, lidded bins, but only after they are sorted. Do not mix Halloween cords, winter ornaments, patio cushions, spare lights, and random gift wrap in the same container. Label by season and contents, not just by holiday. A label such as “winter lights and extension cords” is more useful than “Christmas.”
Step 3: Decide What Storage Goes Where
Shelves for bins and bulky items
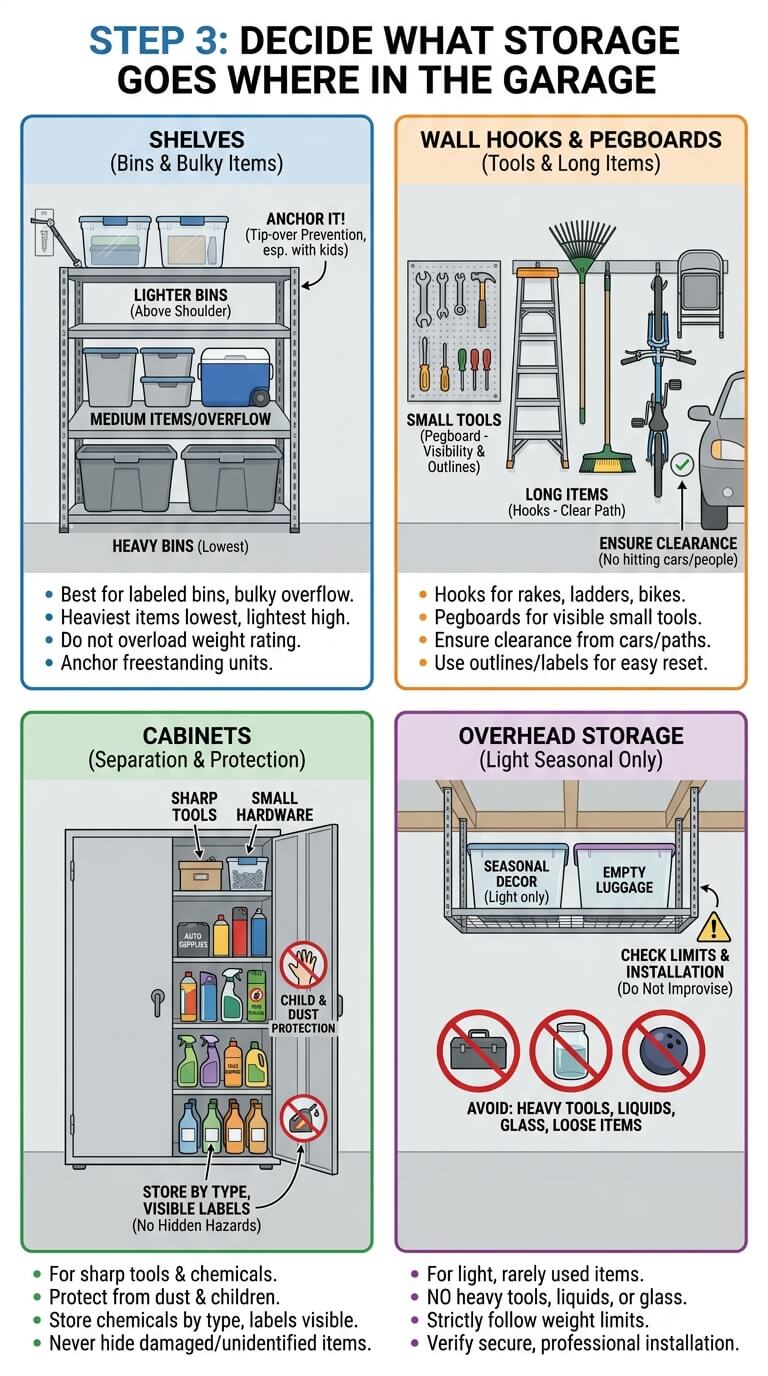
Shelves work well for labeled bins, bulky household overflow, coolers, folded tarps, car wash supplies, and medium-weight categories. Choose shelves that fit the depth of your bins so containers do not hang off the edge. Put heavier bins on the lowest shelves and lighter bins above shoulder height.
Do not overload shelves beyond their stated rating. If a freestanding shelf wobbles, leans, sits on an uneven floor, or holds heavy items above head height, fix that before filling it. The CPSC Anchor It campaign explains why anchoring furniture and shelving matters for tip-over prevention, especially in homes with children or busy shared spaces.
Wall hooks and pegboards for tools and long items
Wall storage is useful for rakes, shovels, ladders, brooms, bikes, cords, folding chairs, and frequently used hand tools. Place hooks where the item can be lifted without hitting a car, garage door track, light fixture, or another person. Long tools should not swing into a walking path.
Pegboards are best for smaller tools that need visibility. Use outlines, labels, or grouped sections if multiple people use the tools. If every hook can hold any tool, items will drift. If each section has a clear purpose, the reset is easier.
Cabinets for products that need separation or protection
Closed cabinets are helpful for sharp tools, small hardware, automotive supplies, cleaning products, pest products, and items you want protected from dust. Cabinets are also useful when young children visit or when the garage is a shared entry point. Use child-resistant packaging correctly, but do not treat it as the only safety measure.
Store chemical products by type, keep labels visible, and avoid stacking products where a leak from one container can drip onto another. If something smells strong, is corroded, or no longer has instructions, do not simply hide it in a cabinet.
Overhead storage for light seasonal items only
Overhead storage can free floor space, but it should be used carefully. Reserve it for light, rarely used, clearly labeled seasonal bins or bulky empty items. Avoid storing heavy tools, liquids, glass, loose items, or anything needed during a rushed moment.
Check the manufacturer’s installation instructions, weight limits, ceiling structure requirements, and hardware requirements before using an overhead rack. Stop if the rack shifts, the fasteners are not secure, or you are not certain the system is attached correctly. Overhead storage is not the place to improvise.
Step 4: Put Items Back by Use Frequency
Putting items back is not just filling empty shelves. It is the moment when you decide what the garage will feel like on a normal Tuesday. If daily items are buried and rare items are easy to reach, the space will get messy again.
Daily and weekly items at chest height
The easiest reach zones should hold the items used most often. Keep a small home repair kit, the active sports gear, dog walking items, broom, trash bags, and current-season yard tools near normal traffic. Chest height is easier than top shelves or low corners for items that move frequently.
Use open bins only where visual access helps. Use closed bins where dust, pests, or loose small pieces are a problem. The key is not whether the container is pretty. The key is whether the person using the item can return it in under ten seconds.
Heavy items low
Heavy items belong low, even if they are not used often. This includes full paint cans, toolboxes, large hardware bins, tile boxes, salt bags, soil bags, and heavy coolers. A heavy item stored above shoulder height is harder to control and more likely to damage something if dropped.
If you cannot lift an item comfortably with both hands while standing stable, it should not go high. Split heavy categories into smaller containers instead of creating one oversized bin that nobody wants to move.
Fragile or heat-sensitive items away from risky areas
Some items do not belong in the garage, or they need a protected spot. Heat, cold, moisture, pests, and fumes can damage paper, photos, delicate fabric, candles, electronics, certain paints, and keepsakes. Move these indoors or choose sealed storage only if the garage conditions are appropriate.
Keep fragile items away from traffic corners, ladders, bikes, and tool zones. A bin that survives storage can still break if it is placed where people regularly bump into it.
Step 5: Label and Create a Maintenance System
Labels are not decoration. They make the system teachable. A garage usually fails when only one person knows where everything goes. Clear labels, simple zones, and a short reset routine make it easier for the whole household to keep the floor clear.
Bin labels by category and season
Label bins with plain words: camping cooking gear, winter lights, car wash supplies, sprinkler parts, bike tools, painting supplies, pool toys, or extension cords. Label at least two sides if bins are stored sideways or stacked. Avoid mystery labels such as “miscellaneous” because they invite more mixed clutter.
If a bin holds items needed together, note that on the label. “Inflatables and pump” prevents the pump from drifting to a separate shelf. “Holiday lights and clips” keeps the small pieces with the main task.
Open-front zones for shared family gear
Shared gear should be easy to return. Open-front bins, cubbies, low hooks, and clear baskets work well for balls, helmets, outdoor toys, reusable bags, and active shoes. If the storage requires a lid, a latch, and a high shelf, children and rushed adults will leave the item on the floor.
Use pictures or large labels if younger kids help put things away. Keep the label practical. “Balls here” works better than a complicated category name.
Monthly 10-minute reset routine
Use hooks, shelves, and simple return rules to keep the garage floor clear.
A garage reset should be short enough that it actually happens. Once a month, walk the floor, return items to zones, break down cardboard, move donations out, check for leaks, and make sure paths are still open. Do not reorganize the whole garage every month. Just restore the system.
Use a trigger you already have, such as the first trash pickup of the month, the day after bulk shopping, or the weekend you mow the lawn. The less dramatic the reset feels, the more likely it is to stick.
Garage Organization Checklist
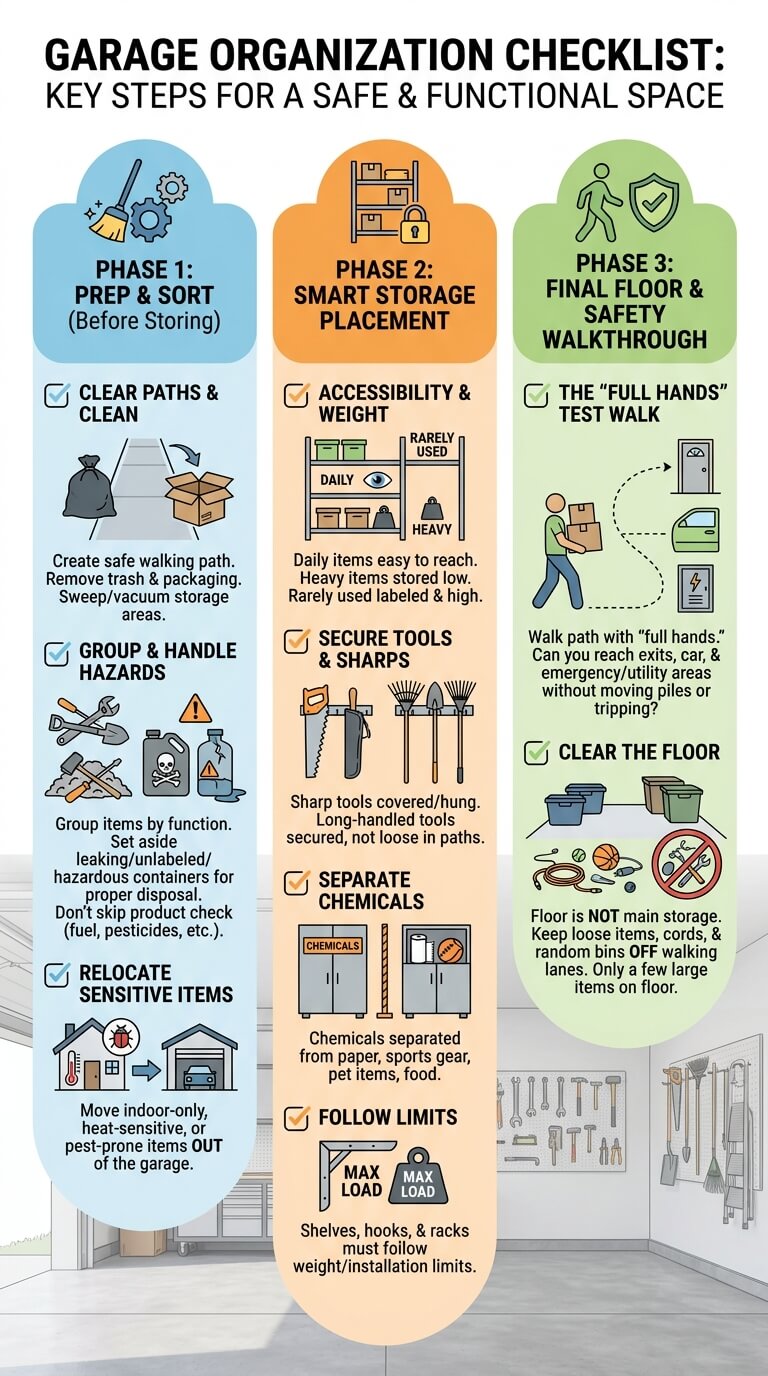
Use this checklist before you call the project finished. A garage can look organized for a photo and still fail in daily life if exits are blocked, heavy items are stored high, or labels are too vague.
Must-do tasks before storing items
- Open a safe walking path through the garage.
- Remove obvious trash, broken cardboard, and empty packaging.
- Group items by function before choosing bins or shelves.
- Set aside leaking, unlabeled, rusty, or swollen containers for proper handling.
- Move indoor-only, heat-sensitive, or pest-prone items out of the garage when needed.
- Sweep or vacuum storage areas before placing clean bins back.
Do not skip the product check. Gasoline, diesel fuel, pesticides, and similar products need extra care. Poison Control guidance on gasoline and diesel fuel gives practical reminders about keeping these products away from children and pets and storing them away from heat and flames.
Storage placement checklist
- Daily-use items are easy to reach without moving other bins.
- Heavy items are stored low.
- Sharp tools are covered, hung securely, or stored in protected containers.
- Long-handled tools are not leaning loose in walking paths.
- Chemical products are separated from paper goods, sports gear, pet items, and food-related items.
- Rarely used items are labeled and stored outside prime reach zones.
- Shelves, hooks, cabinets, and overhead racks follow weight and installation limits.
Final floor and safety check
Walk the garage as if you just came home with full hands. Can you reach the house door? Can a child or guest move through without tripping? Can the car door open? Can trash cans roll out? Can you reach the electrical panel, water heater area, freezer, or stored emergency item without moving a pile?
Then look down. The floor should not be the main storage system. A few large items may need floor space, but random bins, loose tools, cords, balls, and cardboard should have homes off the walking lanes.
Mistakes That Make Garages Messy Again
Most garage systems fail because the setup is too hard to use, not because the household is lazy. Watch for the mistakes below before you declare the project done.
Hiding unsorted clutter in bins
A lidded bin can make clutter disappear for a week, but it does not create a system. If a bin contains unrelated items, label it honestly and sort it again before stacking it. Mixed bins are the reason people buy duplicates, lose hardware, and spend half a Saturday looking for one charger.
Storing too many items on the floor
Floor storage spreads quickly. One box becomes several, then a corner, then a blocked path. Move small and medium items to shelves, wall hooks, cabinets, or labeled bins. Reserve floor space for items that truly need it, such as trash cans, bikes, large equipment, or a parked car.
Mixing tools, cleaners, and children’s gear
Do not store children’s sports gear, toys, pet items, and frequently touched household items next to sharp tools, pesticides, automotive fluids, or strong cleaners. Convenience should not override separation. If one shelf holds too many types of risk, divide it into zones or use a closed cabinet for the items that need more control.
Buying storage that blocks doors, outlets, or parking
Measure before buying. Include door swings, outlet access, appliance clearance, garage door tracks, car mirrors, bike handlebars, and the path to trash cans. A deep shelf that blocks a freezer door or makes parking stressful will become a new problem, even if it holds a lot.
FAQ
How long does it take to organize a garage?
A small garage with light clutter may take four to six hours. A packed garage may take a full weekend or several shorter sessions. The biggest time difference is sorting. Installing shelves is usually faster than deciding what each item is, where it belongs, and whether it should stay.
Should I empty the whole garage first?
Emptying the whole garage can work if you have good weather, enough driveway space, and enough time to finish before night. If the garage is very full, start by clearing a path and sorting one zone at a time. A full empty-out can backfire when the project is larger than the time available.
What should go on garage shelves?
Garage shelves are best for labeled bins, medium-weight storage, coolers, folded tarps, car care supplies, household overflow, and bulky items that need visibility. Store heavy items low and keep chemical products separated. Avoid putting loose sharp tools, leaking products, or unlabeled containers on open shelves.
How do I keep the garage organized after the reset?
Give every category a clear home, label bins plainly, keep shared gear easy to return, and do a short monthly reset. When a new item enters the garage, decide immediately whether it belongs in an existing zone, needs a new home, or should leave the house. The habit matters more than the container.
Final Thoughts
The best way to organize a garage is to make the space match real household behavior. Start with safe access, sort by function, build zones around use, choose storage that fits the items, and keep the easiest spots for things you use often. When the garage has clear zones and a short reset routine, it stops being the place where everything gets dropped and becomes a useful part of the home again.

Ethan Carter is the Founder & Editor of HomeCleanSecrets. Based in the United States, he has 5 years of experience creating practical home cleaning, laundry care, stain removal, decluttering, and home organization content. His goal is to help everyday households clean smarter and build simple routines that are easier to maintain.
Read more about Ethan Carter on his author page: https://homecleansecrets.com/ethan-carter/