
A bedroom can look tidy while months of dust remain behind furniture, beneath the bed, along baseboards, and inside window tracks. A proper deep clean reaches those areas without damaging fabrics, finishes, flooring, or electronics. The safest method is to work from high to low, remove dry soil before adding moisture, and keep cleaned items away from dusty ones.

Use this guide for a seasonal reset, a catch-up clean, or a room that still feels stale after ordinary dusting and vacuuming. It covers the bed area, furniture, hidden edges, vents, windows, and floor, plus warning signs that call for a different response.
Quick Answer: What Counts as a Bedroom Deep Clean?

A bedroom deep clean reaches high dust, hidden floor edges, furniture backs, bed-frame crevices, vent faces, window tracks, and baseboards. It also includes label-based inspection of textiles and the mattress area. The goal is a thoroughly cleaned, fully dry room, not a rushed makeover. For the broader cleaning order and the relationship between routine, deep, furniture, floor, and textile tasks, use the bedroom and living room cleaning guide.
When routine cleaning is enough
Routine cleaning is enough when dust is light, the floor is accessible, and there is no stale odor or hidden buildup. Put away loose items, dust reachable surfaces, clean high-touch points, and vacuum or mop. The CDC guidance on home cleaning notes that regular cleaning is sufficient in many everyday situations; disinfecting is mainly for illness or known contamination concerns.
Signs the room needs a deeper reset
Plan a deeper clean when dust returns quickly, the room smells stale after airing, pet hair collects along edges, or debris is visible beneath the bed. Gray vent buildup, sticky switches, lint behind a dresser, and dust on curtain hems or frame tops also point to neglected zones.
What this guide does not replace
This process does not replace a specialized treatment for a stained mattress, damaged upholstery, pest contamination, a large mold problem, or water-damaged flooring. You may temporarily remove items that block access, but avoid emptying every drawer and storage container unless organizing is the planned job for another day. Keeping the scope narrow helps you finish the room safely and return it to use. For ordinary reachable surfaces, bedding, and the open floor, return to the routine guide on how to clean a bedroom step by step.
Plan the Job Before Moving Anything

Five minutes of planning can prevent damaged finishes, trapped moisture, and a room full of displaced belongings. Walk around the room once before cleaning. Note the floor type, the heaviest furniture, electrical cords, fragile decor, and any fabrics with care labels. Decide where clean bedding will wait, where a vacuum can move safely, and which furniture should remain in place.
Read fabric, furniture, flooring, and appliance instructions
Check care tags on sheets, protectors, pillows, blankets, curtains, and removable upholstery. For wood, laminate, vinyl, and specialty flooring, use the care instructions supplied by the manufacturer because moisture tolerance varies. Unplug lamps or small electronics before cleaning around them, and follow their manuals rather than spraying cleaner directly onto controls, vents, or screens.
Choose a realistic room sequence
Use one direction around the room and work from the ceiling line down to the floor. A dependable sequence is: remove trash, start permitted laundry, dust high areas, clean furniture, open access behind or beneath selected pieces, detail edges and windows, then clean the floor. It also keeps you from repeatedly moving the same objects.
Gather a small material-safe kit
Gather a vacuum with crevice and soft-brush tools, clean microfiber cloths, an extendable duster, a mild surface-approved cleaner, a small brush, a trash bag, and any gloves required by the label. The American Cleaning Institute’s hard-surface guidance stresses checking the correct surface, amount, and method before use.
Protect clean bedding and a clear exit path
Place clean bedding in a closed laundry basket, a clean bag, or another room before dusting starts. Keep the doorway and the route to the laundry area clear so you are not stepping over cords, bins, or furniture parts. A clear path is especially important when carrying a vacuum, moving a nightstand, or handling a loaded laundry basket.
Deep-Cleaning Order for the Whole Bedroom
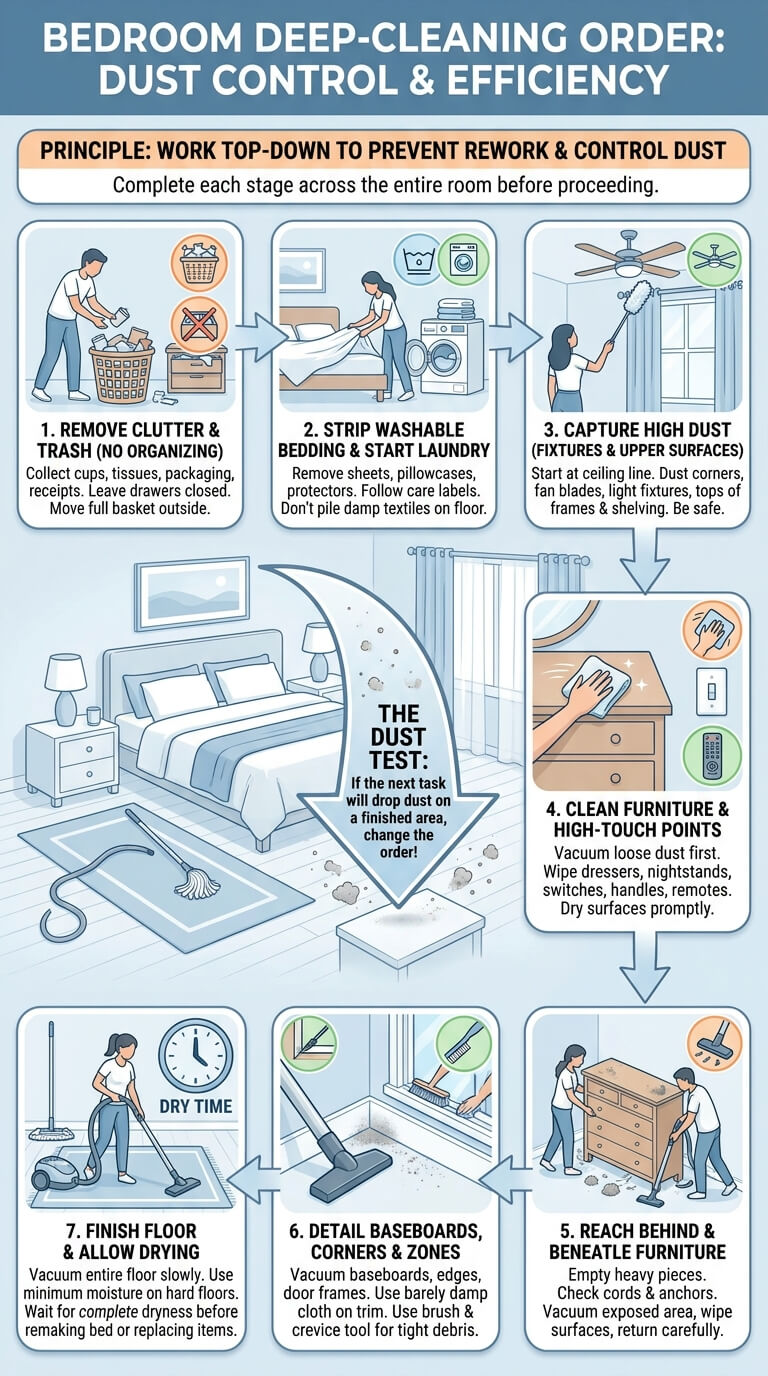
The sequence below is designed to control dust and reduce rework. Complete each stage across the whole room before moving to the next. A good test is to look back at the area you just finished: if the next task will drop dust or debris onto it, the order needs to change.
Remove trash and obvious clutter without starting a full organizing project
Collect cups, tissues, packaging, receipts, and anything that clearly belongs elsewhere. Leave drawers and storage bins closed unless spilled material or pests require inspection. This creates working space without turning the clean into a decision-heavy sorting session. Once the basket is full, place it outside the bedroom and deal with it after the room is finished.
Strip only washable bedding and start label-approved laundry
Remove sheets, pillowcases, and any protector or blanket that is due for cleaning and permitted by its label. Do not pile damp or heavily soiled textiles on clean flooring. Follow care symbols, load size, detergent directions, and drying limits; the laundry basics from the American Cleaning Institute provide a useful explanation of fabric-care symbols and label-based washing.
Capture high dust from fixtures, vents, frames, and upper surfaces
Start at the ceiling line. Use a long-handled duster or a vacuum brush on ceiling corners, fan blades, light fixtures that can be safely reached, curtain rods, picture-frame tops, tall shelving, and vent faces. If a fixture requires a ladder on an unstable surface or removal of electrical parts, leave it for someone with the right equipment.
Clean furniture surfaces and high-touch points
Vacuum loose dust from textured furniture before wiping it. Work on dresser tops, nightstands, bed-frame rails, drawer pulls, switches, door handles, and remote controls using the method permitted for each material. Dry polished wood and metal promptly. Stop if the cloth lifts color, leaves a cloudy patch, or catches on a damaged finish. For finish testing, drawer interiors, hardware, and residue on bedroom furniture, see how to clean a nightstand and dresser.
Reach behind and beneath movable furniture safely
Empty only what is necessary to reduce weight, then check for wall anchors, cords, leveling feet, and loose parts. Small nightstands may slide safely with furniture glides, but tall dressers, wardrobes, loaded bookcases, and bed frames can be unstable or too heavy for one person. Vacuum exposed dust first, wipe only surfaces that tolerate moisture, and return the piece without trapping cords or crushing a floor vent.
Detail baseboards, corners, door edges, and window zones
Vacuum baseboard tops, carpet edges, door hinges, door-frame ledges, and the narrow gap beside furniture. Follow with a barely damp cloth on washable painted trim, testing first in an inconspicuous spot. Use a small brush to loosen compacted debris, then remove it with the crevice tool rather than flooding the track with water.
Finish with the floor and let the room dry
Vacuum the entire floor slowly, including the perimeter and newly opened areas. Use the minimum moisture needed and avoid leaving liquid near baseboards, laminate joints, rug backing, or furniture feet. Do not remake the bed, replace bins, or close furniture tightly against damp edges until the floor and cleaned surfaces feel completely dry.
Clean the Bed Area Without Taking Over Other Topics
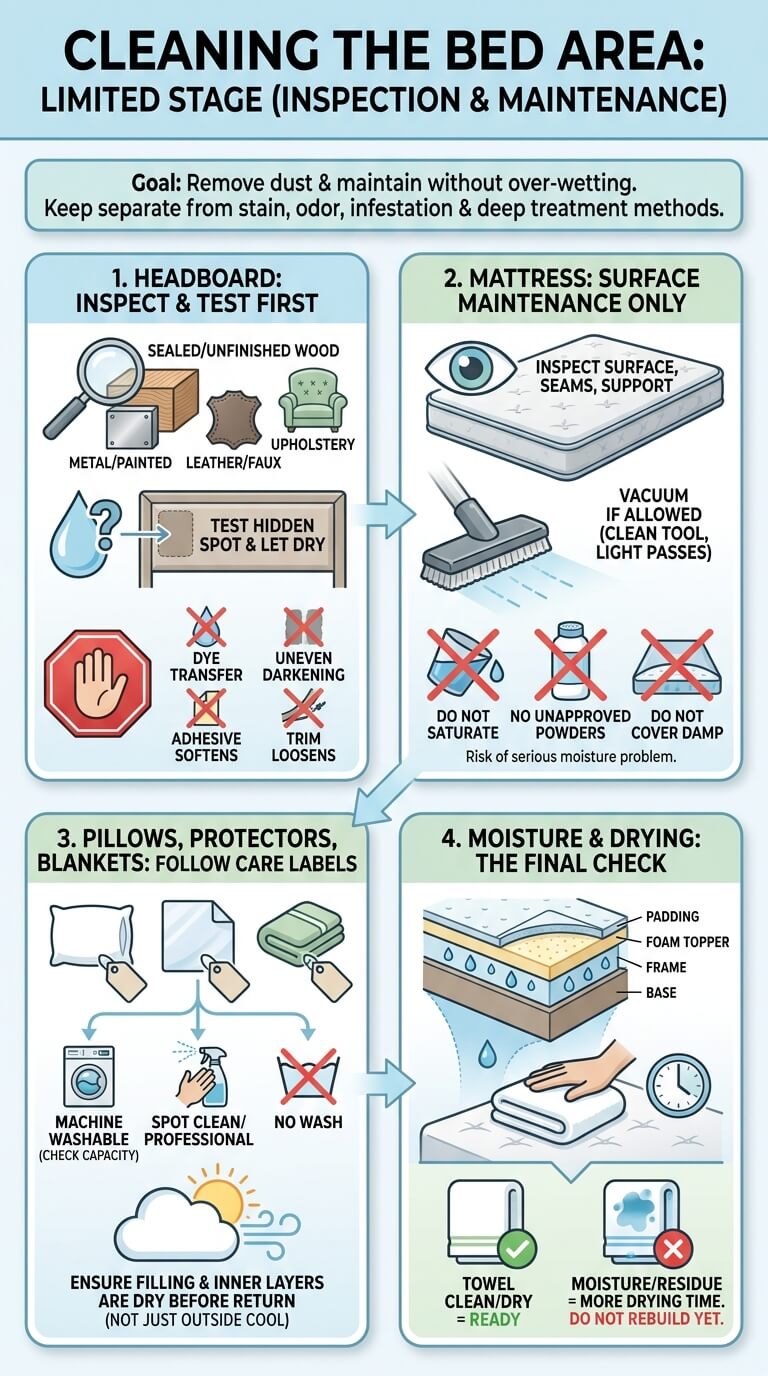
The bed area often holds the most textile dust, but it also contains materials that are easy to over-wet or damage. Keep this stage limited to inspection, dry-soil removal, and label-approved maintenance. Stains, odors, infestations, and deep mattress treatment need their own method.
Inspect the headboard before choosing a method
Identify whether the headboard is sealed wood, unfinished wood, metal, painted material, leather, faux leather, or upholstery. Test any damp method on a hidden spot and wait for it to dry before continuing. Do not assume a general furniture spray is safe for every headboard. Stop if dye transfers, the surface darkens unevenly, adhesive softens, or decorative trim becomes loose. For upholstery, wood, leather, metal, cane, and mixed construction, use the full guide to clean a headboard by material.
Vacuum or maintain the mattress only as the manufacturer allows
With the bedding removed, inspect the mattress surface, seams, and support area. If the manufacturer permits vacuuming, use a clean upholstery attachment and light passes rather than pressing hard into the fabric. Do not saturate the mattress, apply unapproved powders, or cover it while damp. A mattress that cannot dry quickly can develop a more serious moisture problem.
Handle pillows, protectors, and blankets by care label
Some pillows and protectors are machine washable, while others require spot cleaning, professional care, or no washing at all. Large blankets may exceed the washer’s safe capacity even when the fabric itself is washable. Return every item only when the filling, seams, and inner layers are dry, not merely when the outside feels cool. When the pillow insert itself needs care, use the fill-specific guide on how to clean pillows.
Keep moisture away from layers that cannot dry quickly
Bed bases, upholstered frames, foam toppers, and thick padding can hold water below the surface. A good test is to press a dry white towel against the treated area after the stated drying time. If the towel picks up moisture, color, or cleaner residue, allow more drying time and do not rebuild the bed yet.
Hidden Dust Zones Worth Checking
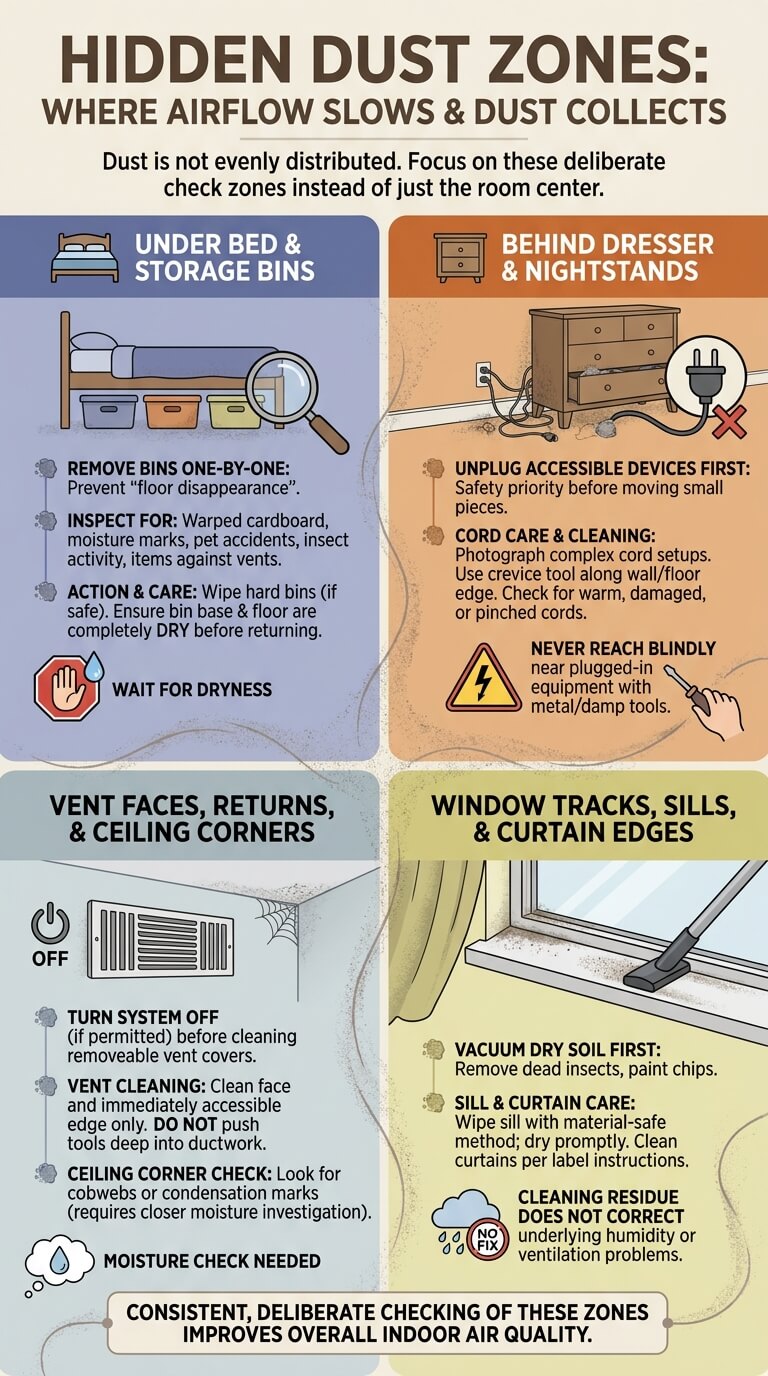
Hidden dust is not always evenly distributed. It collects where airflow slows, fabrics shed, pets rest, and furniture blocks the vacuum. Check these zones deliberately instead of assuming one pass through the center of the room is enough.
Under the bed and around storage bins
Remove bins one at a time so the floor does not disappear beneath a new pile. Inspect for warped cardboard, moisture marks, pet accidents, insect activity, or items pressed against a vent. Wipe hard bins only if their material allows it, and wait until both the bin base and floor are dry before returning storage. The dedicated guide to clean under a bed covers access limits, storage bins, floor types, and far-edge dust control in more detail.
Behind the dresser and nightstands
These gaps commonly hold lint, dropped objects, hair, and dust caught around cords. Unplug accessible devices before moving a small piece, then photograph the cord arrangement if reconnection may be confusing. Use the crevice tool along the wall and floor edge. Check for warm, damaged, pinched, or discolored cords. Never reach blindly behind plugged-in equipment with a metal tool or damp cloth.
Vent faces, returns, and ceiling corners
Turn the heating or cooling system off before vacuuming a removable vent cover if the system instructions permit. Clean the face and the immediately accessible edge, but do not push tools deep into ductwork. Ceiling corners may also show cobwebs or condensation marks that deserve a closer moisture check.
Window tracks, sills, and curtain edges
Vacuum dry soil first, including dead insects and loose paint chips. Wipe the sill with a material-safe method and dry it promptly. Wash or vacuum curtains only as their label permits. If moisture repeatedly forms on the glass or sill, cleaning the residue will not correct the underlying humidity or ventilation problem.
Adjust the Method to the Floor
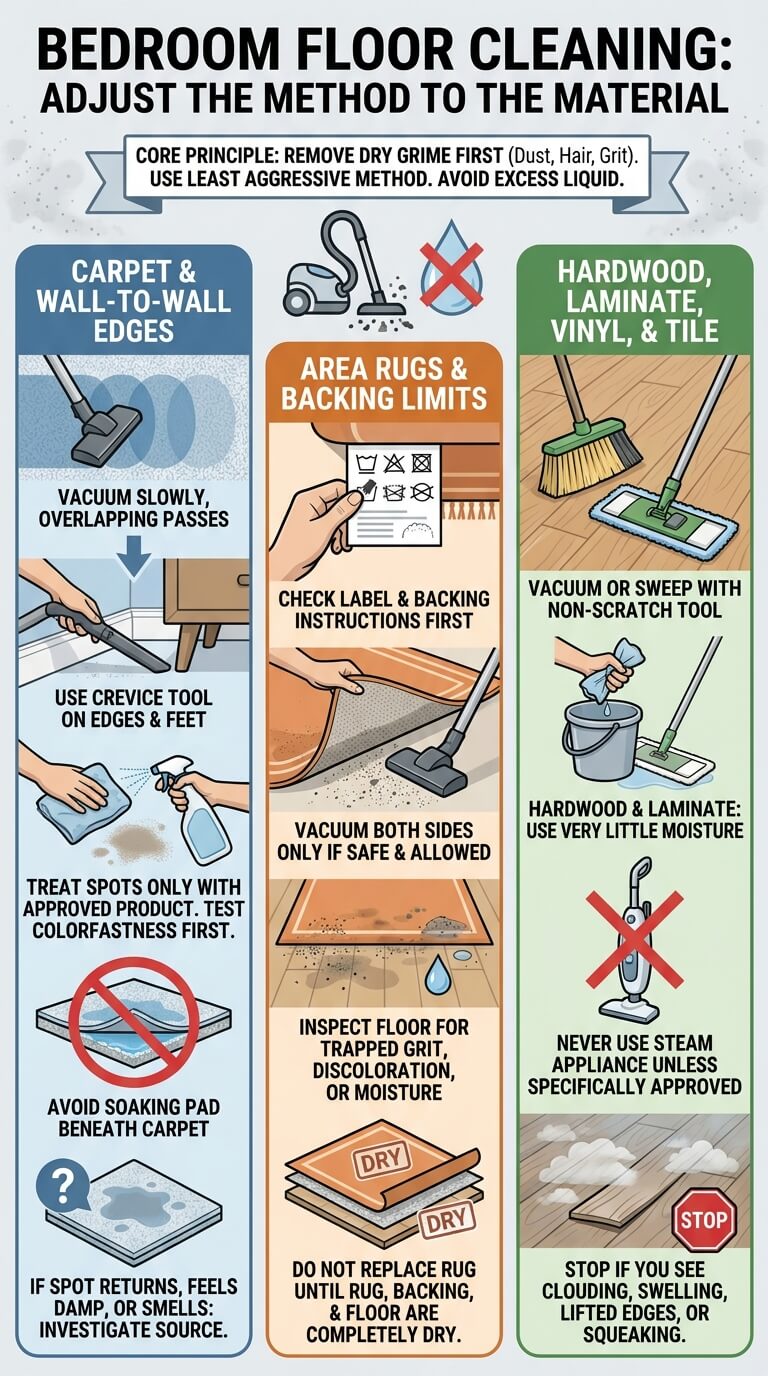
The final floor step depends on the material beneath the bed, rugs, and furniture. Using too much liquid is a common mistake because bedroom grime is often mostly dry dust, hair, fibers, and grit. Remove that material first, then use the least aggressive approved method.
Carpet and wall-to-wall edges
Vacuum slowly in overlapping passes, then use the crevice tool where carpet meets baseboards and furniture feet. Treat spots only with a product approved for the carpet and backing, and test colorfastness first. Avoid soaking the pad beneath the carpet. If a spot repeatedly returns, feels damp, or carries a strong odor, investigate the source rather than adding more cleaner.
Area rugs and rug backing limits
Check the rug label and backing before lifting, shaking, washing, or steam cleaning. Vacuum both sides only when the rug can be moved safely and the instructions allow it. Inspect the floor below for trapped grit, discoloration, or moisture. Do not replace a rug until the rug, backing, and floor are all dry, since a dry surface can hide moisture underneath.
Hardwood, laminate, vinyl, and tile moisture limits
Vacuum or sweep with a tool that will not scratch the finish. For hardwood and laminate, use very little moisture and prevent liquid from sitting at seams or edges. Never use a steam appliance unless the flooring manufacturer specifically approves it. Clouding, swelling, lifted edges, or squeaking after cleaning are reasons to stop.
Deep-Cleaning Scenarios
Not every bedroom can be cleaned with the same staging plan. Adjust the order to the people, animals, space, and furniture in the room while keeping the same principles: dry soil first, safe access, controlled moisture, and complete drying.
Small bedroom with limited staging space
Work in two zones. Clear and clean one side of the room, then use that dry area to hold a small number of cleaned items while you address the other side. Avoid removing all under-bed storage at once because it can block the only safe walking path.
Bedroom used by children
Remove children from the room during dusting, product use, cord handling, and furniture movement. Check that dressers, bookcases, and televisions remain secured after any movement. The CPSC Anchor It guidance explains why tall furniture and televisions should be anchored to reduce tip-over risk. Do not place toys on high furniture where a child may climb to reach them.
Bedroom with pets and concentrated hair
Remove pet bedding, bowls, and toys before vacuuming, following each item’s care instructions. A rubber tool approved for the upholstery may help gather hair before vacuuming, but test it on delicate fabric. Check for scratches, chewed cords, urine marks, and flea dirt. Persistent pest signs or repeated accidents need treatment beyond ordinary room cleaning.
Room that smells musty or shows moisture clues
Pause before masking the odor. Look at window frames, exterior-wall corners, the back of furniture, carpet edges, and the wall behind the headboard for condensation, staining, peeling paint, or visible growth. The EPA guide to mold and moisture stresses that moisture control is central and that wet materials should be dried promptly. Large or recurring problems need qualified help.
Heavy furniture that should not be moved alone
Do not gamble with a wardrobe, loaded dresser, adjustable bed, large mirror, or solid-wood frame. If furniture must move, empty permitted drawers, remove loose shelves, protect the floor, disconnect power, and use equipment rated for the load. Never use a vacuum cord, drawer handle, or decorative rail as a pulling point. Stop if the piece tilts, racks, or resists unexpectedly.
Bedroom Deep-Cleaning Mistakes to Avoid
Most damage during a deep clean comes from poor sequencing, excess moisture, or trying to complete several unrelated projects at once. These mistakes are preventable when the room is treated as a series of controlled stages.
Starting several storage zones at once
Opening the closet, every drawer, under-bed bins, and a jewelry box at the same time creates clutter faster than it creates cleanliness. Move what blocks the floor or a dusty surface, place it in one contained location, and return it after the area dries. Save decisions about donating, categorizing, and reorganizing for a separate session with its own time and containers.
Wet-cleaning before dry soil is removed
Water turns loose dust into streaks and pushes grit into seams. Vacuum, brush, or wipe with a dry cloth before using any damp method. This is particularly important on baseboards, window tracks, textured headboards, fan blades, and hard floors. If a cloth becomes muddy immediately, stop and remove more dry material. Starting dry also reduces the amount of cleaner and rinsing needed.
Soaking upholstery, mattresses, or flooring seams
More liquid does not mean a deeper clean. It can carry soil into padding, loosen adhesives, swell wood products, stain fabric, or leave a musty odor. Blot and ventilate. Do not sleep on, cover, or place furniture over a damp area. When drying takes much longer than the product instructions suggest, stop adding moisture and investigate airflow or saturation.
Mixing cleaning products
Use one product at a time exactly as labeled. Rinse only when the label directs it, ventilate the room, and keep products away from children and pets. If an accidental mixture produces strong fumes, leave the area, seek fresh air, and contact the appropriate emergency or poison service for local advice.
Returning textiles or bins before they are dry
A freshly washed blanket, wiped storage bin, damp rug backing, or mopped floor can feel dry at the surface while holding moisture in folds and seams. Allow extra time in humid weather or a poorly ventilated room. Returning items too soon traps moisture against the mattress, wall, or floor and can create odor, staining, or material damage that was not present before the clean.
When to Stop or Escalate
A deep clean should improve the room without exposing you to avoidable hazards. Stop when the problem is no longer ordinary household dust and soil, when the material is valuable or unfamiliar, or when safe access requires equipment and skill you do not have.
Recurring moisture or visible mold
Do not repeatedly wipe a patch that returns. EPA guidance indicates that the response depends on the size of the affected area, the material, and the amount of water damage. Widespread growth, contaminated heating or cooling equipment, sewage-related water, or ongoing leaks should be assessed by an experienced professional.
Pest droppings or nesting material
Stop dry sweeping or vacuuming when you find rodent droppings, nesting material, large numbers of insects, shed skins, or suspected bed-bug evidence. Keep people and pets away, avoid disturbing the area, and follow current public-health or licensed pest-control guidance for identification and cleanup. Photographing the evidence from a safe distance may help a professional assess it.
Damaged electrical items or outlets
Do not wipe, move, or continue using an outlet, power strip, lamp, cord, charger, or electric bed component that is hot, sparking, cracked, discolored, wet, or producing a burning odor. Turn off power only when you can do so safely and know the correct circuit. Cleaning residue is not worth the risk of shock or fire.
Valuable, antique, or unfamiliar materials
Antique wood, gilded frames, hand-dyed textiles, silk lampshades, specialty leather, old wallpaper, and collectible furniture may react badly to ordinary household products. Limit cleaning to gentle dry dust removal only when that is known to be safe. A conservator, specialty cleaner, or manufacturer can recommend a method based on the exact material and finish.
Frequently Asked Questions
These answers clarify the safest scope, timing, and practical limits of a thorough bedroom clean before you begin.
What is the difference between cleaning and deep cleaning a bedroom?
Routine cleaning handles visible clutter, reachable dust, bedding changes, and the open floor. It also includes a closer inspection for moisture, damaged cords, pests, and material limits. Deep cleaning is less frequent and should be planned so disturbed dust is removed in a controlled order.
How long should a bedroom deep clean take?
A lightly furnished bedroom may take two to four hours of active work, while a neglected room, pet bedroom, or space with many movable items may take longer. Laundry and drying can extend the elapsed time even when the cleaning itself is finished. Break the work into stages if fatigue makes furniture movement, ladder use, or product handling less safe.
Should I strip the bed before dusting?
Yes, when the bedding is due for washing and the care labels allow it. If a specialty cover cannot be removed or washed, follow its instructions and keep it protected while high areas are cleaned. Do not place dusty tools, storage bins, or decor on the stripped bed.
Do I need to move every piece of furniture?
No. Move only furniture that can be handled safely without damaging anchors, flooring, walls, cords, or the furniture itself. A complete clean does not require taking an unnecessary lifting risk. The important point is to address hidden dust as safely as the room permits and note areas that need a planned two-person visit.
Should mattress cleaning be part of every bedroom deep clean?
The mattress should be inspected and maintained according to its manufacturer instructions, but a full stain or odor treatment is not necessary every time. Vacuuming may be allowed on some models, while others have specific restrictions. Keep liquids and unapproved powders off the mattress. Treat major stains, persistent odor, pest evidence, or water exposure as a separate problem that may require specialized guidance.
How often should a rarely used bedroom be deep cleaned?
Inspect it seasonally and deep clean when dust, stale air, insects, moisture marks, or unused textiles show that the room needs attention. A closed guest room may collect less daily debris but can still develop dust on high surfaces and condensation near exterior walls. Keep the room ventilated as appropriate, vacuum periodically, launder guest bedding before use when needed, and check beneath furniture rather than relying on appearance alone.
Final Thoughts
A successful bedroom deep clean depends on sequence, material-safe methods, clean hidden edges, and complete drying. Remove dry soil first, work from high to low, keep the exit path clear, and stop when moisture, pests, electricity, heavy furniture, or unfamiliar materials make the job unsafe. Keep future buildup manageable by leaving floor edges accessible, avoiding blocked vents, using wipeable storage containers, and adding one hidden zone to routine cleaning each week.

Ethan Carter is the Founder & Editor of HomeCleanSecrets. Based in the United States, he has 5 years of experience creating practical home cleaning, laundry care, stain removal, decluttering, and home organization content. His goal is to help everyday households clean smarter and build simple routines that are easier to maintain.
Read more about Ethan Carter on his author page: https://homecleansecrets.com/ethan-carter/