
The space beneath a bed can collect dust, hair, lint, crumbs, forgotten objects, and moisture clues long before the bedroom looks dirty. Clean it by removing reachable items, capturing dry debris from the far edge outward, using a floor-safe method, and drying the space before storage returns.

You do not always need to move the bed. Clearance, construction, flooring, cords, storage, and weight should decide the method. Often, a flashlight and long-reach tool are enough.
Quick Answer: The Safest Under-Bed Cleaning Order

Clear reachable items, inspect the space, capture dry soil, clean the floor, dry it, and return only clean storage. This order limits scattered dust and trapped moisture. For the broader cleaning order and the relationship between routine, deep, furniture, floor, and textile tasks, use the bedroom and living room cleaning guide.
Remove accessible items first
Pull out shoes, boxes, bags, clothing, toys, and anything near the edge. Stage them on a washable sheet or hard floor, not clean bedding. Leave closed containers closed unless they are wet or damaged. Expose enough floor to inspect the frame and use your tools.
Capture dry debris before adding moisture
Pick up large objects, then vacuum or lift dust with microfiber. Water turns loose soil into streaks and can push grit into seams. Shine a flashlight sideways across the floor. Add permitted moisture only after hair, crumbs, and moving dust are gone.
Let the area dry before storage returns
Even a lightly damp cloth can leave moisture beneath a low bed where air moves slowly. Keep bins out until the floor, baseboards, container bottoms, and frame legs feel fully dry. If the space still smells damp or the floor looks darker, improve ventilation and wait rather than closing the area again.
Identify the Bed and Access Limits

Inspect both sides and the foot. Note low crossbars, center supports, wheels, drawers, cords, and attachments. Measure the smallest opening so a tool does not become trapped behind a lower support.
Standard frame with open clearance
An open frame is usually easy to clean in place. Remove storage, work from several sides, and use a crevice or extension tool. Watch for center legs, screw ends, and hanging fabric. Do not force a rigid wand past supports or the mattress cover.
Low-profile or platform bed
A platform bed may leave only a narrow floor slot. Use a flat microfiber head, flexible attachment, or low-profile tool. If it sits nearly flush, clean the perimeter and check instructions before lifting panels. Structural parts should not be removed only to gain access.
Bed with drawers or built-in storage
Remove one drawer at a time only when the design allows it and you can support the weight. Several open drawers may affect balance. Vacuum cavities without pushing dirt into tracks, clean drawer bottoms separately, and reinstall them after the floor dries.
Adjustable or powered bed
Powered bases contain motors, control boxes, moving joints, and cords. Flatten the base, turn it off, keep children and pets away, and follow the model instructions before reaching underneath. Tempur-Pedic’s EASE adjustable-base manual instructs users to unplug the base before cleaning and keep openings clear of lint and hair. Never place a hand or tool near moving sections while power is connected.
Bed that is too heavy to move safely
Furniture movement is not mandatory. Large frames, waterbeds, storage beds, wall beds, and platforms may need two people or professional help. Use long tools from accessible sides. Stop if the frame rocks, twists, lifts unevenly, or pulls against an anchor.
Gather Tools That Match the Clearance
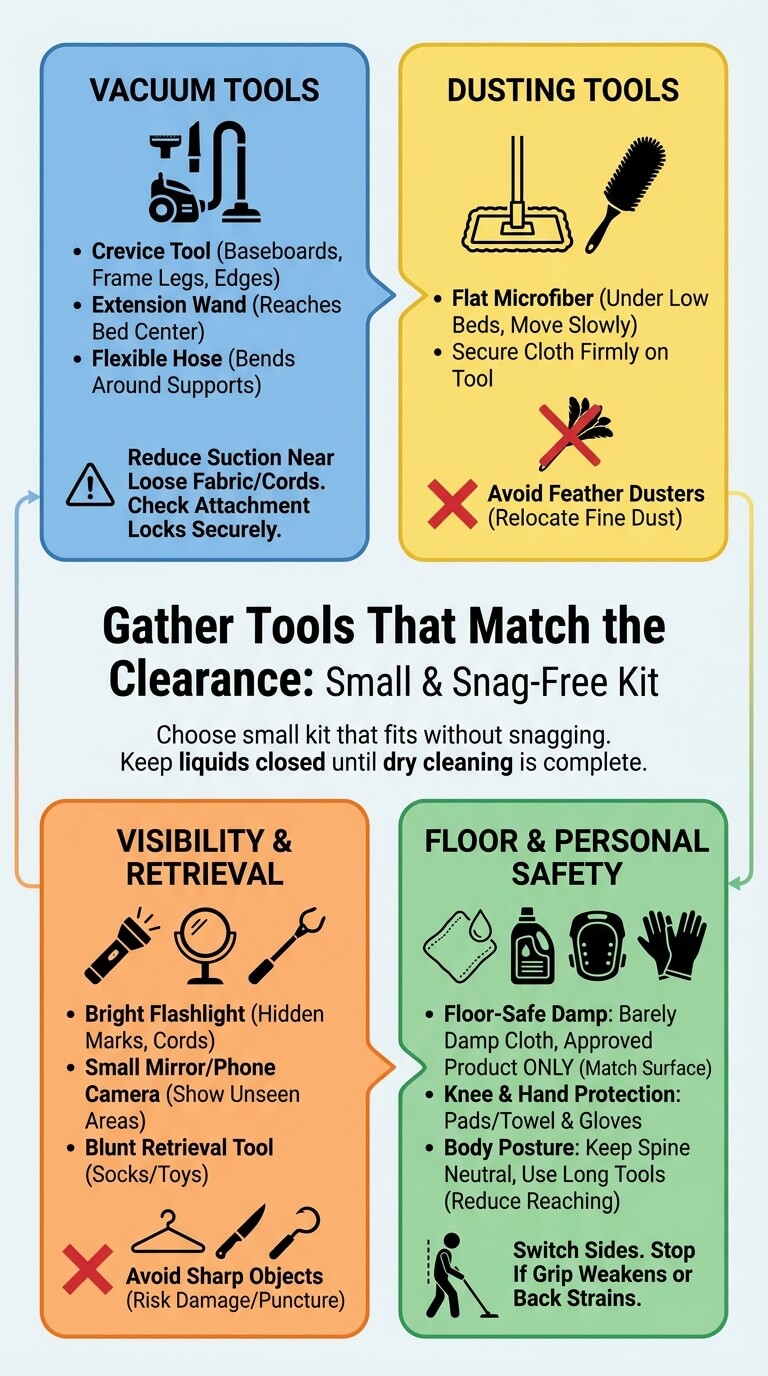
Choose a small kit that fits the measured opening and will not snag. Keep liquids closed until dry cleaning is complete.
Vacuum crevice and extension tools
A crevice tool works along baseboards, frame legs, and carpet edges. An extension wand reaches the center of an open bed, while a flexible hose can bend around supports. Check that the attachment locks securely. Reduce suction near loose fabric, electrical cords, fringe, or lightweight items that could be pulled into the hose.
Flat microfiber and flexible dust tools
A washable flat head can collect dust under low beds. Move slowly so debris stays attached. If using a microfiber cloth on a flat tool, secure it firmly. Avoid feather dusters, which tend to relocate fine dust.
Flashlight, mirror, and retrieval tool
A bright flashlight reveals moisture marks, insects, cords, and objects hidden behind supports. A small mirror or phone camera can show areas you cannot see directly. Use a blunt retrieval tool for socks or toys. Avoid wire hangers, knives, or sharp hooks that could damage flooring, puncture stored items, or contact wiring.
Floor-safe damp cleaning supplies
Use only what the exposed flooring permits, such as a barely damp microfiber cloth, a floor product approved by the maker, and a dry towel. The American Cleaning Institute’s hard-surface guidance emphasizes following product labels and matching the cleaner to the surface. Never assume one spray is safe for wood, laminate, vinyl, tile, painted trim, and storage bins.
Knee, back, and hand protection
Use knee pads or a folded towel and wear gloves for unknown debris. Keep your spine neutral, switch sides instead of twisting, and use long tools to reduce reaching. Stop if your grip weakens or your back strains.
Step-by-Step Under-Bed Cleaning

Work from the far wall toward the open edge. Finish one side at a time unless several access points make the frame easier to reach.
Photograph the storage layout if needed
Photograph labeled bins or paired containers before removal. Record placement without starting an inventory. Note any bin that blocks a vent, rubs a cord, or bows against the frame so it does not return there.
Remove bins and loose items without opening a whole-room decluttering project
Place containers in a single staging area and keep their contents closed unless something is wet, leaking, or damaged. Put loose items in one temporary basket. Trash obvious waste, but postpone decisions about sentimental belongings, clothing, and long-term storage. Cleaning access is the finish line for this session.
Pick up large debris and inspect for damage
Remove coins, hair accessories, paper, food pieces, broken plastic, and anything that could jam the vacuum. Check the floor, frame, and wall for scratches, rust, loose fasteners, leaks, insect material, droppings, gnaw marks, or damp patches. Stop before disturbing anything that may require special handling.
Vacuum or capture dust from the far edge toward the exit
Start along the back baseboard and pull debris toward the nearest open side. Use slow overlapping passes rather than quick sweeping motions. On carpet, make a second pass in the opposite direction where the tool fits. On hard floors, follow the vacuum with a clean microfiber head to collect the fine film left behind.
Clean baseboards, bed legs, and accessible frame parts
Vacuum baseboard tops, corners, leg joints, wheels, and lower rails with a soft brush or crevice tool. Wipe washable trim only after grit is gone. Use very little moisture on wood or painted parts and dry promptly. Do not lubricate wheels, joints, or adjustable mechanisms unless the furniture instructions specifically call for it.
Spot-clean the exposed floor only when the material allows
Treat sticky marks one at a time. Apply the permitted cleaner to a cloth rather than flooding the floor. Work from the outside of the mark inward, then dry the area. Stop if color transfers, a finish turns dull, laminate edges swell, or the mark appears to be damage rather than removable residue.
Dry the space fully
Use room airflow rather than a fan aimed beneath the bed. Leave drawers and bins out and let the floor dry. Check far corners with a dry white cloth. Moisture or dirt on the cloth means the area is not ready to close.
Return only clean, dry containers and useful items
Wipe or vacuum container exteriors before they go back. Check lids, handles, fabric seams, and bottoms. Return items with space around them rather than packing the entire cavity tight. Anything damp, leaking, pest-damaged, or rarely used should be handled outside the cleaned space so the problem is not hidden again.
Clean Under the Bed by Floor Type
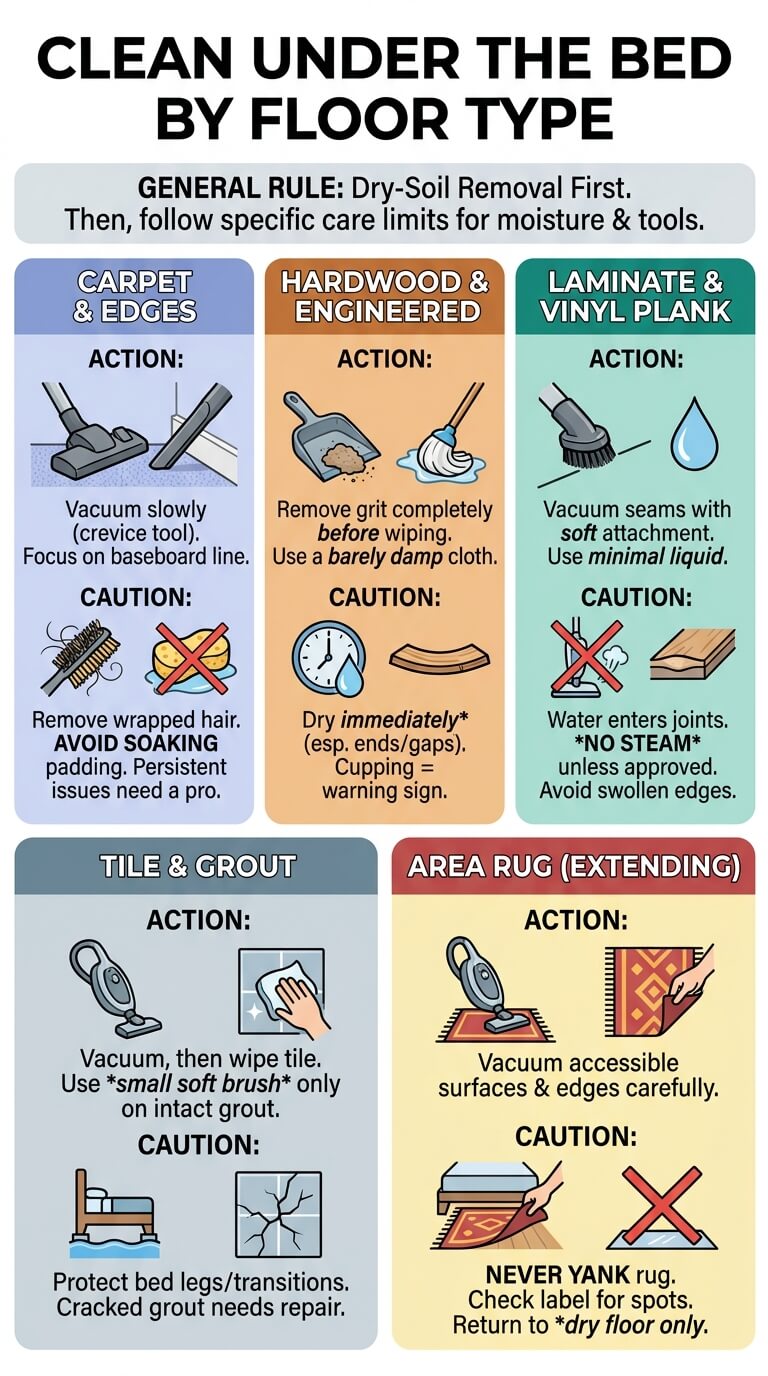
Floor type controls moisture, scrubbing, and product choice. Begin with clean, nonabrasive dry-soil removal, then follow the exact care limits for the exposed surface.
Carpet and carpet edges
Vacuum slowly with a low-profile head or crevice tool, paying attention to the line where carpet meets baseboard. Hair often wraps around tool edges, so stop and remove it when suction drops. Avoid soaking a small spot because padding under a bed dries slowly. A persistent stain, odor, or wet backing may need professional carpet assessment.
Hardwood and engineered wood
Remove grit completely before wiping because trapped particles can scratch the finish. Use a wood-floor method approved for the exact product and keep the cloth barely damp. Dry immediately, especially near board ends, wall gaps, and damaged finish. Cupping, dark seams, or repeated dampness are warning signs, not cleaning challenges.
Laminate and vinyl plank seams
Vacuum seams and perimeter gaps with a soft attachment. Use minimal liquid, since water can enter joints even when the top looks water-resistant. Do not steam unless the flooring maker expressly permits it. If an edge is lifted, swollen, or loose, keep moisture away and document the damage before placing storage over it.
Tile and grout
Vacuum hair and grit first, then wipe tile with a suitable solution. Use a small soft brush only on grout that is intact and meant to be scrubbed. Keep liquid away from wood bed legs, metal hardware, and nearby flooring transitions. Cracked grout, loose tile, or recurring darkening may indicate a repair or moisture issue.
Area rug extending beneath the bed
Vacuum accessible rug surfaces and edges without catching fringe. Never yank a rug from beneath a heavy bed. Removal may require enough helpers or qualified service. Check the care label before spot treatment and return the rug only over a dry floor.
Handle Under-Bed Storage Safely
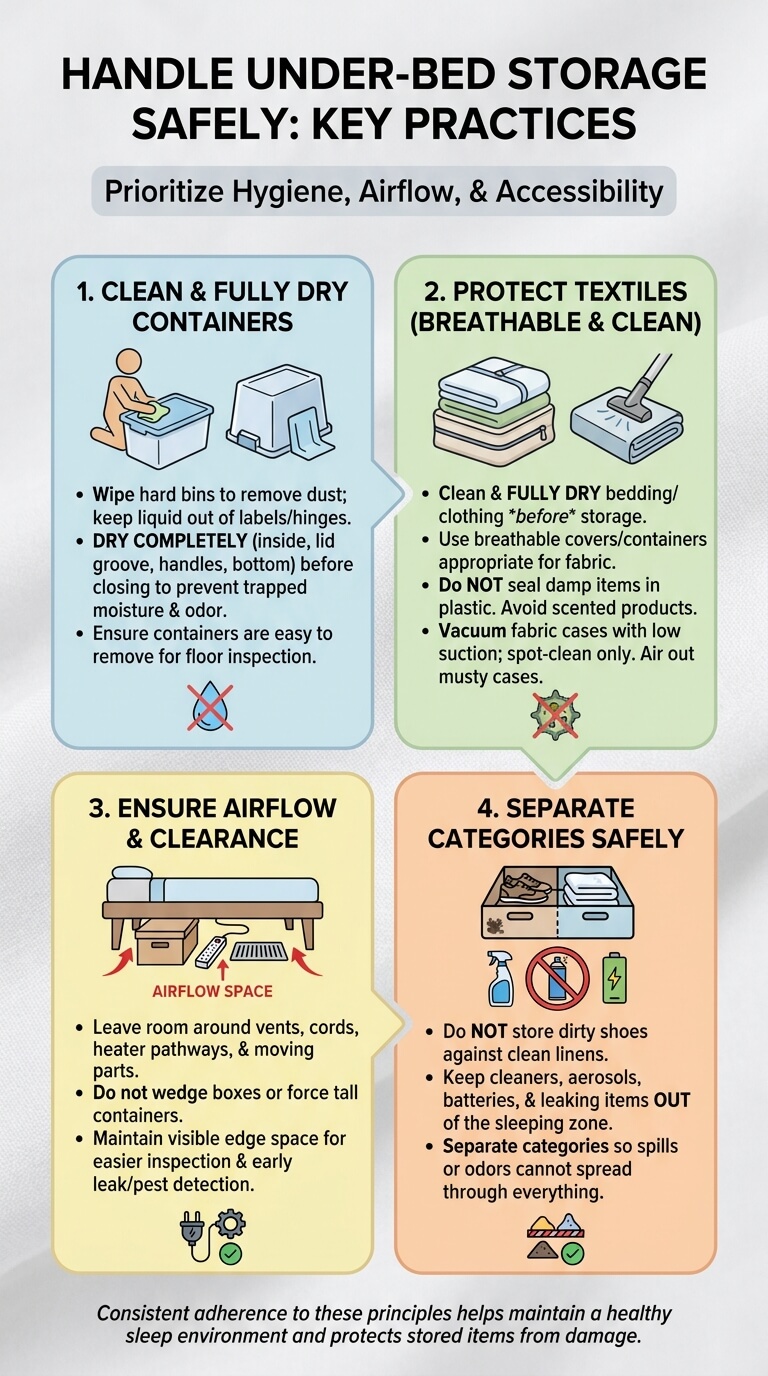
Storage reduces visibility and airflow beneath the bed. Keep containers clean, fully dry, separated by use, and easy to remove whenever the floor needs inspection. In a guest bedroom, combine this hidden-zone task with the guest room cleaning checklist so storage, access, and trip hazards are reviewed together.
Wipe hard bins without trapping moisture
Vacuum or dry-wipe dust first. Clean washable plastic with a product suitable for the material, keeping liquid out of labels and hinges. Dry the inside, lid groove, handles, and bottom before closing. A lid that is snapped on while the bin is still damp can trap odor and moisture around textiles.
Vacuum fabric storage cases
Use low suction and support the fabric so it does not collapse into the nozzle. Check seams and zippers for lint, pet hair, staining, and pest damage. Spot-clean only according to the care instructions. If the case smells musty, empty it in a well-ventilated area and identify the moisture problem before returning it.
Keep textiles protected but breathable as appropriate
Clean, fully dry bedding and clothing before storage. Use containers or covers appropriate for the fabric and length of storage. Do not seal damp textiles in plastic. Delicate natural fibers may require different protection than washable synthetic items, so follow care labels and avoid scented products that can transfer residue.
Avoid overfilling or blocking airflow
Leave room around vents, powered-base components, heater pathways, and moving parts. Do not wedge boxes against electrical cords or force a tall container beneath a low rail. A few inches of visible space at the edge makes inspection and vacuuming easier and helps you notice leaks or pest activity early.
Separate shoes, cleaning products, and clean bedding
Do not store dirty shoes against clean linens. Keep household cleaners, aerosols, batteries, and leaking personal-care items out of the sleeping zone unless their labels allow the conditions and the containers are secure. Separate categories so a spill or odor cannot spread through everything stored beneath the bed.
Special Under-Bed Problems
Moisture, pests, wiring, and soaked materials can change the job. Disturb the area as little as possible until you know the next safe step.
Concentrated pet hair
Lift thick hair with a rubber-edged tool or dry microfiber pad before vacuuming so the hose does not clog. Check bed legs, carpet edges, and fabric storage seams where hair wraps tightly. Clean the vacuum brush and filter as directed afterward. Increase inspection frequency if a pet regularly sleeps beside or beneath the bed.
Sticky spills or food debris
Remove solids first and identify the floor before treating residue. Use a small amount of permitted cleaner on a cloth, then dry. Food beneath a bed can attract pests, so inspect nearby baseboards and containers. If liquid has soaked carpet padding, unfinished wood, or a powered base, stop and arrange appropriate help.
Musty odor or condensation clues
A musty smell, damp bin bottom, wall condensation, dark flooring, or repeated moisture beneath the bed should not be covered with fragrance. Find the moisture path and improve drying. The EPA guide to mold and moisture stresses moisture control and prompt drying. Recurring dampness, visible growth, or affected porous materials may need professional evaluation.
Lost objects near electrical cords
Disconnect power when the equipment instructions require it and the plug is safely accessible. Use a flashlight and a nonmetal retrieval tool. Do not probe a power strip, outlet, motor, or damaged cable. If an object is caught in an adjustable-base mechanism, leave the mechanism still and contact the manufacturer or a qualified technician.
Insect or rodent evidence
Droppings, nests, shed skins, gnaw marks, or repeated insects are not ordinary dust. Keep children and pets away. Utah State University Extension’s mouse cleanup guidance warns against sweeping or vacuuming rodent urine, droppings, and nesting material. Follow local health advice or contact a licensed pest professional when evidence is extensive.
Maintenance Plan
Use short inspections based on pets, storage, flooring, dust levels, and ease of access. A small recurring task is more manageable than another heavy catch-up clean. After the hidden floor is reset, the routine guide to clean a bedroom step by step can keep open areas manageable.
Quick monthly visual check
Shine a flashlight beneath the bed, retrieve loose items, and vacuum the open perimeter. Check for hair clumps, food, dampness, damaged cords, and containers touching the frame. This takes only a few minutes and reveals whether a full removal of storage is needed.
Seasonal removal of storage
Several times a year, remove every container and clean the entire reachable floor. Wipe bin exteriors, inspect textile cases, and check the wall edge. Seasonal work is also the time to confirm that stored items are dry and that nothing is blocking airflow or powered components.
Clean after spills, illness, pest activity, or room rearrangement
Do not wait for the calendar after a drink spill, food accident, pest treatment, leak, or furniture move. Clean promptly according to the material and let the area dry. After illness, follow current household hygiene advice for affected surfaces rather than disinfecting every hidden floor by default.
Adjust frequency for pets and high-dust rooms
Rooms with shedding pets, open windows, nearby construction, forced-air vents, or thick carpet may need more frequent vacuuming. Use what you find as the guide. If the flashlight shows new hair and dust within weeks, shorten the interval and keep fewer items underneath to improve access.
Mistakes to Avoid
The common errors are scattering dust, over-wetting floors, and taking avoidable risks with furniture or contamination. Correcting the order usually prevents most of them.
Blowing dust deeper with a fan or air duster
Compressed air and strong fans send debris into corners, bedding, vents, and the rest of the room. Capture dust with suction or microfiber instead. Use room ventilation only after the dry soil has been removed, and aim airflow across the room rather than directly beneath the frame.
Wet-mopping before vacuuming
Water combines with hair, grit, and fine dust to make residue harder to remove. It can also carry dirt into flooring joints and under baseboards. Finish vacuuming first, inspect the floor, then use only the amount of moisture allowed for that material.
Pulling a heavy bed alone
A large bed can damage flooring, strain the body, loosen joints, or shift attached furniture. Check anchors and construction before moving anything. The CPSC Anchor It information explains why furniture stability matters. Use help, remove safe-to-remove weight, protect the route, and stop if the frame becomes unstable.
Returning damp bins
A container can feel dry on top while moisture remains in the lid groove, bottom rim, or fabric seam. Check all sides and wait. Damp bins placed against cool walls or floors can encourage odor, staining, and material damage that remains hidden until the next cleaning.
Treating pest or mold evidence as ordinary dust
Do not sweep, vacuum, scrub, or spray first and investigate later. Disturbing the area may spread contamination or hide the extent of the problem. Isolate the space, document what you found, and follow appropriate health, pest, or moisture guidance before routine cleaning resumes.
When to Stop or Escalate
Stop when access, electricity, stability, or contamination is uncertain. Do not trade safety for a finished floor, especially when the problem extends beyond ordinary household debris.
Damaged bed frame or unstable furniture
Do not crawl beneath a frame with loose legs, cracked slats, missing hardware, bent metal, or unexpected movement. Remove weight only when the instructions allow it, keep others off the bed, and arrange repair. Cleaning tools should never be used to brace or lift furniture.
Electrical wiring or powered-base problems
Stop if you see a damaged plug, frayed cord, hot power supply, exposed wiring, scorch mark, liquid near components, or a base that moves unpredictably. Disconnect power only when it is safe to do so and contact the manufacturer, electrician, or qualified service technician.
Recurring dampness or visible mold
Repeated condensation, wet flooring, swollen trim, staining, or visible growth requires the moisture cause to be corrected. Do not place storage back over the area. Large affected areas, contaminated water, hidden wall damage, or health concerns are reasons to seek professional assessment.
Droppings, nests, or extensive pest signs
Fresh droppings, nesting material, strong urine odor, multiple insects, live pests, or widespread gnawing indicate more than a single missed crumb. Keep the area undisturbed, prevent access, and contact local health guidance or a licensed pest professional for identification, cleanup, and exclusion.
Frequently Asked Questions
These answers cover access, timing, moisture, tools, and storage so you can adjust the method without turning the task into a full bedroom clean.
How do I clean under a bed without moving it?
Remove reachable storage, inspect with a flashlight, and use a crevice tool, flexible hose, or flat microfiber head that fits the lowest clearance. Work from the far wall toward the open side. Clean from more than one edge when possible, and accept that a heavy bed may need an occasional assisted move for complete access.
What is the best tool for a very low bed?
A washable flat microfiber tool is useful for fine dust, while a low-profile vacuum attachment is better for hair and crumbs. Measure the narrowest gap before buying anything. The tool should flex around supports, hold the cleaning pad securely, and come back out without scraping the floor.
How often should I vacuum under my bed?
Inspect monthly and vacuum when dust, hair, or debris is visible. A full removal of storage every season is practical for many rooms. Pets, carpet, open windows, nearby vents, and allergies may justify more frequent cleaning, while a raised bed with no storage may remain manageable with quick perimeter passes.
Can I mop under a bed with storage bins?
Yes, if the flooring permits damp cleaning and every bin is removed first. Vacuum thoroughly, use minimal moisture, and dry the entire area before anything returns. Do not mop around container bottoms because water can wick beneath them and remain trapped.
How do I remove pet hair from under a bed?
Lift dense clumps with a dry rubber-edged tool or microfiber pad, then vacuum from the far edge toward the exit. Use a crevice tool around legs and carpet borders. Clean the vacuum brush and filter afterward, and check fabric storage cases because hair often gathers along their seams.
What should not be stored under a bed?
Avoid damp textiles, open food, dirty shoes beside clean bedding, leaking toiletries, hazardous cleaners, loose batteries, flammable products, and anything that blocks vents, motors, cords, or moving parts. Do not hide items with pest damage, mold, or strong odor. Store only clean, dry belongings in containers suited to the material.
Final Thoughts
Let access and safety decide the method. Remove reachable storage, inspect before disturbing debris, capture dry soil from the far edge outward, use a floor-safe damp method only when needed, and allow complete drying. Do not move a heavy or powered bed without proper help and instructions. Stop for moisture, instability, damaged wiring, droppings, nests, or visible growth and address the cause before closing the space.

Ethan Carter is the Founder & Editor of HomeCleanSecrets. Based in the United States, he has 5 years of experience creating practical home cleaning, laundry care, stain removal, decluttering, and home organization content. His goal is to help everyday households clean smarter and build simple routines that are easier to maintain.
Read more about Ethan Carter on his author page: https://homecleansecrets.com/ethan-carter/