
A headboard sits close to hair, skin, pillows, wall dust, and products used at bedtime, so it often develops a dull film before it looks visibly dirty. The safest cleaning method depends on what the surface is made from and what is beneath it.

Begin with dry dust removal, identify the material and care directions, test any permitted cleaner in a hidden place, and use as little moisture as possible. Stop when color, texture, structure, wiring, or mounting changes.
Quick Answer: Identify the Headboard Before Cleaning

Do not choose a cleaner by color alone. A beige panel may be woven polyester, velvet, leather, coated vinyl, painted wood, or laminate, and each responds differently. For the broader cleaning order and the relationship between routine, deep, furniture, floor, and textile tasks, use the bedroom and living room cleaning guide.
Check labels, model information, and hidden surfaces
Look behind the headboard, under a lower rail, inside a removable cover, or in the product manual for a material name or cleaning code. Photograph the label before moving the bed back. Without a label, compare the front, edge, backing, seams, and a hidden underside before deciding what the surface may be.
Separate dust, body-oil residue, spills, and damage
Loose gray dust usually lifts with a vacuum or soft cloth. A darker band where hair or pillows touch may be body oil, hair product, or transferred dye. A sharply edged mark may be a spill. Peeling coating, swollen wood, loose cane, or crumbling foam is damage, not ordinary soil, and should not be scrubbed.
Start dry and test before adding moisture
Vacuum or dust first so liquid does not turn loose debris into muddy streaks. Test the proposed method where a pillow normally hides the result. Let the test area dry completely, then check it in daylight for dye transfer, rings, stiffness, nap change, gloss loss, swelling, or adhesive release.
Prepare the Bed and Wall Area

Create enough space to see the full surface and to keep cleaning residue away from bedding, paint, outlets, and attached hardware. If the pillow inserts also need washing or spot care, use the separate guide on how to clean pillows.
Protect the mattress, bedding, and nearby wall
Remove pillows and sheets from the work zone. Cover the mattress with a clean waterproof layer or move it away if the frame allows. Place towels along the lower edge to catch dry debris. Shield wallpaper or delicate paint with a rigid barrier that will not rub the wall.
Check mounting, movement, outlets, lights, and attached controls
Gently test whether the headboard is wall-mounted, frame-mounted, freestanding, or part of a powered bed. Locate brackets, bolts, outlets, reading lights, USB ports, switches, and cords before inserting tools. Follow the product instructions for disconnecting power. The CPSC home electrical safety checklist advises checking cords and plugs for damage, so stop if anything is frayed, hot, loose, or discolored.
Gather soft tools and clean white cloths
Useful basics include a vacuum with an upholstery brush, a soft detailing brush, several white lint-free cloths, cotton swabs for hard trim, a bowl for a permitted solution, and dry towels. White cloths make dye transfer easy to see. Avoid stiff scrub brushes, abrasive pads, colored towels, and unmarked spray bottles.
Photograph existing discoloration or wear
Take clear pictures of faded zones, scratches, loose threads, stains, wall marks, and damaged corners before cleaning. This shows whether a change was already present, especially on rental furniture, antiques, mixed materials, and pale upholstery where old rings become clearer after dust is removed.
Remove Dust and Loose Debris

Dry cleaning is the lowest-risk starting point for nearly every headboard and may be all that is needed for routine care.
Vacuum upholstery with controlled suction
Use a clean upholstery attachment and reduce suction if the machine has that option. Support loose fabric and move slowly from the top downward. Do not press hard enough to stretch the cover or pull batting through the weave. Keep the nozzle away from decorative fringe, loose piping, and weakened seams.
Dust wood, metal, and laminate from top to bottom
Use a clean microfiber cloth or soft brush, turning the cloth as it loads with dust. Work with the grain on wood and along edges on laminate. Hold the cloth rather than flicking it, which can send debris onto bedding or behind the frame. Finish the lower rail, legs, and mounting points last.
Clean tufting, seams, buttons, trim, and edges
Dust settles deeply around buttons, nailhead trim, welting, carved grooves, and the line where the headboard meets the wall. Loosen it with a soft brush while the vacuum hovers nearby. Never pry under a button or force a crevice tool into a seam. A cotton swab can lift dust from hard trim if it does not snag.
Avoid pushing debris behind the bed
Place the vacuum hose below the area being brushed so falling particles are captured. Clean the wall-facing top edge from both sides when accessible. If the bed cannot move safely, use a slim tool wrapped securely with microfiber. Do not blow compressed air into the gap because it can spread dust into outlets, bedding, and inaccessible corners.
Clean an Upholstered Fabric Headboard
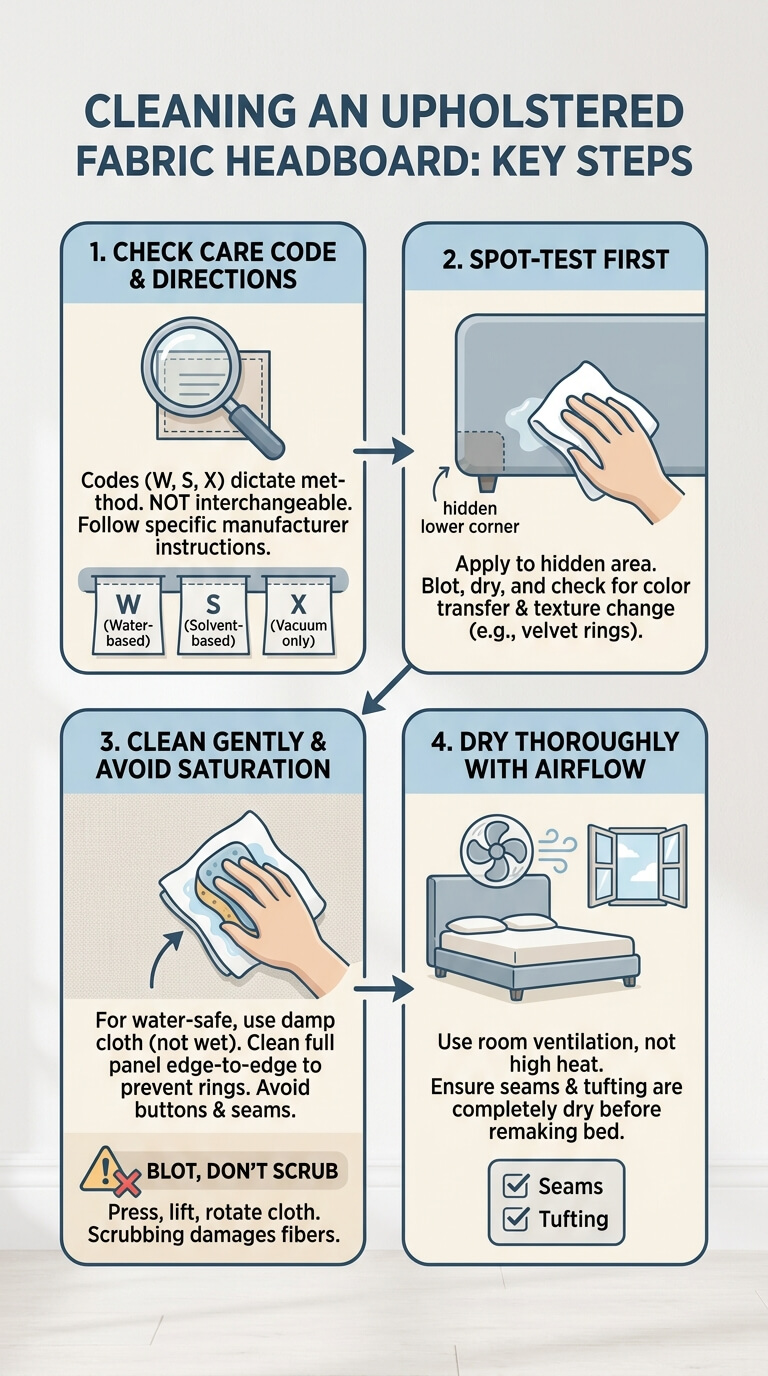
Fabric headboards contain a textile cover, padding, seams, and often adhesive or backing. A surface that looks washable may still react badly to water or solvent.
Read the upholstery care code or manufacturer directions
Codes commonly indicate water-based cleaning, solvent-based cleaning, either method, or vacuum-only care. They are not interchangeable. La-Z-Boy’s fabric and leather care directions explain that Code W permits a water-based upholstery product, Code S requires a water-free solvent, and Code X is limited to vacuuming or light brushing. Follow the directions for the exact headboard rather than a general recipe.
Spot-test for color transfer and texture change
Apply the permitted method to a hidden lower corner using a white cloth. Blot briefly, then inspect the cloth for color. After drying, compare the test area with the surrounding fabric by looking and touching from several angles. Velvet, chenille, linen blends, and printed fabrics may show pile distortion or rings even when no dye transfers.
Treat light surface residue without saturating padding
For a water-safe fabric, put a small amount of approved foam or solution on the cloth, not directly on the headboard. Work in a small area and keep the cloth merely damp. Clean the full visibly affected panel edge to edge when possible, since isolated wet spots can leave rings. Keep liquid away from buttons, seams, piping, and the lower frame.
Blot rather than scrub
Press the cloth against the residue, lift, rotate to a clean section, and repeat. Work from the outer edge toward the center of a small mark. Scrubbing can fuzz fibers, spread pigment, polish a matte weave, or drive soil into padding. If gentle blotting produces no improvement after several passes, stop instead of increasing pressure.
Dry with airflow before remaking the bed
Leave pillows, sheets, and mattress protection away from the cleaned area. Open the room door or use normal room ventilation, but do not aim high heat at the fabric. Check seams and tufting with a dry cloth because they hold moisture longest. A cool, dark, stiff, or musty area is not ready to be covered.
Clean Wood, Painted, or Laminate Headboards
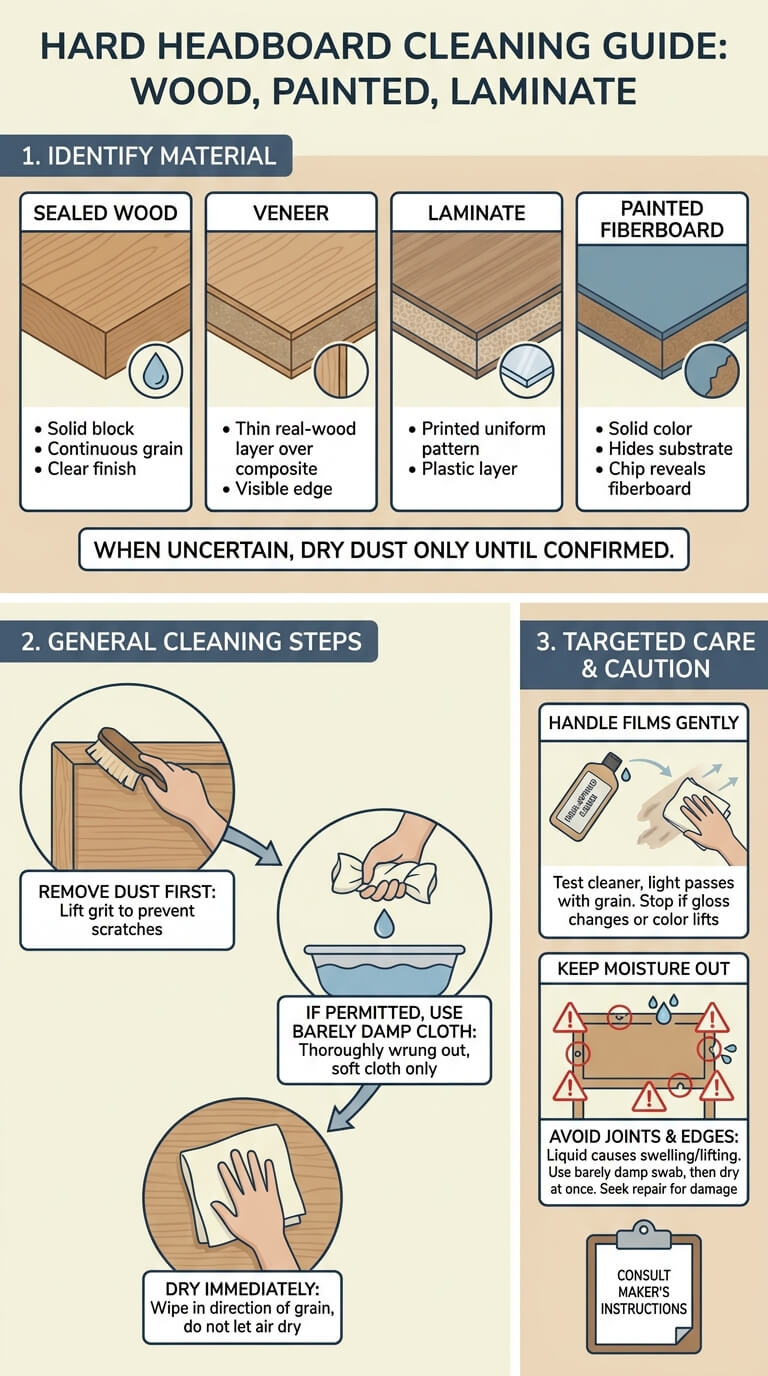
Hard headboards vary from solid sealed wood to thin veneer, painted fiberboard, and plastic laminate over a composite core. The weakest edge controls how much moisture is safe.
Distinguish sealed wood, veneer, paint, and laminate
Look at an unfinished back edge or hardware opening. Solid wood shows continuous grain, veneer has a thin real-wood layer, laminate has a printed or uniform surface, and painted panels hide the substrate. Chips may reveal fiberboard underneath. When identification remains uncertain, use only dry dusting until the maker confirms the finish.
Remove dust before a lightly damp wipe
Grit can scratch glossy paint and clear finishes, so lift it first. For a finish that permits damp cleaning, wipe with a soft cloth that has been thoroughly wrung out, then dry immediately. Herman Miller’s Nelson bedroom furniture care guide recommends a slightly damp, lint-free cloth followed by drying in the direction of the grain.
Handle hair-product or skin-oil film gently
A greasy band often needs more than dry dusting, but it does not justify a strong degreaser. Test a cleaner approved for the finish, apply it to the cloth, and make light passes with the grain. Follow with the maker’s rinsing or drying step. Stop if gloss changes, paint softens, stain color lifts, or the cloth catches on raised grain.
Keep moisture out of joints, chips, and raw edges
Do not let liquid collect around dowels, bolt holes, decorative inlays, veneer seams, damaged paint, or exposed composite board. These areas can swell, lift, or stain. Clean around them with a barely damp cotton swab or cloth, then dry at once. Deep chips, lifted veneer, and cloudy finish need repair advice rather than repeated washing.
Clean Leather and Faux-Leather Headboards

Real leather and synthetic upholstery can look similar, yet oils and cleaners that suit one may damage the other. Identification comes before conditioning.
Confirm real leather versus synthetic coating
Check the product label, receipt, or model page for terms such as top-grain leather, corrected leather, bonded leather, polyurethane, vinyl, or faux leather. Do not rely on smell or burn testing. Bonded and coated materials may peel at flex points, while real leather often shows natural variation. Unknown material should receive dry dusting only.
Use manufacturer-approved cleaner and minimal moisture
Vacuum seams gently, then wipe with a clean dry cloth. When the maker allows further cleaning, use its recommended product and method across a controlled area rather than soaking one dot. Herman Miller’s leather care guidance recommends frequent dusting or vacuuming and cautions against saturating leather. Remove residue and let the surface air dry naturally.
Avoid oils, solvents, and household recipes unless approved
Cooking oil, essential oil, saddle soap, alcohol, nail-polish remover, bleach, and multipurpose sprays can darken leather, strip protective coating, or leave a sticky film. Conditioner is not automatically required after every cleaning. Use only the product specified for that leather finish, in the stated amount, after a hidden test.
Watch for peeling, cracking, or dye transfer
Stop when the cloth lifts color, the finish becomes tacky, cracks widen, or flakes detach. Cleaning cannot restore a failing synthetic coating or repair split leather. Keep pillows from rubbing the area and ask the manufacturer, an upholsterer, or a leather specialist whether repair, panel replacement, or protective adjustment is realistic.
Clean Metal, Cane, Rattan, and Mixed Materials
Openwork and mixed construction collect dust in narrow gaps. Use soft tools and let the most moisture-sensitive component set the limit.
Dust metal and inspect for corrosion
Wipe powder-coated or plated metal with a soft dry cloth, then use a lightly damp cloth only if the product instructions allow it. Dry joints and welds promptly. Orange spots, bubbling paint, green residue, or rough pitting may indicate corrosion. Do not sand or apply rust treatment while the headboard remains beside bedding and a wall.
Clean cane or rattan weave with soft tools
Support the weave from behind when possible and brush along, not across, the strands. Vacuum loosened dust with low suction. For a maker-approved damp wipe, use a well-wrung cloth and dry afterward. IKEA’s rattan care directions call for wiping with a damp cloth, drying with a clean cloth, and keeping the material away from strong heat.
Avoid soaking natural fibers
Water can soften fibers, raise roughness, loosen bindings, and create uneven color. Do not hose, steam, or saturate woven panels. Clean small areas and keep airflow moving through both sides. Stop if strands sag, bindings loosen, dye transfers, or a musty odor appears. Broken cane or brittle rattan should be repaired before routine wiping continues.
Treat mixed-material joints according to the most sensitive component
A fabric panel may meet wood trim, leather may wrap around metal, and cane may be held in a painted frame. Apply cleaner to the cloth and keep it away from boundaries. Use separate cloths. If one method would wet a sensitive edge, clean only to a safe distance and leave the joint dry.
Match the Method to the Problem
After identifying the material, classify the mark. The goal is to remove soil without spreading discoloration.
Ordinary dust
Use a vacuum with a clean soft attachment on fabric and woven surfaces, and microfiber on hard finishes. Pay attention to the top edge, wall side, lower rail, buttons, and trim. If the headboard looks even and feels clean after dry treatment, stop. Adding liquid to a dust-only problem creates unnecessary risk. For the rest of the reachable room, use the standard bedroom cleaning sequence.
Hair and skin-product film
This residue usually forms where pillows or a person’s head repeatedly touch the surface. Replace or wash pillowcases first so the soil does not return immediately. On a compatible surface, use the maker-approved cleaner in small amounts. Work gradually across the whole contact band and check for a darker halo as the area dries.
Small water-based spill
Blot fresh liquid with a clean absorbent cloth without pressing it deeper. Check the care directions before using any rinse or cleaner. Keep the treated area small, but feather the edge when the material’s directions call for it. Do not use heat. If the spill reaches padding, wood joints, electronics, or the wall cavity, stop and assess the depth.
Greasy or cosmetic mark
Oil, lotion, hair serum, makeup, and ointment need a method approved for both the finish and the soil. Do not add water automatically because it may spread grease. Lift excess material without scraping, then contact the maker or a trained cleaner when the code requires solvent treatment or the mark sits on velvet, silk, leather, or unfinished wood.
Unknown stain or old discoloration
Photograph the area and compare it with hidden sections for fading, abrasion, wall paint transfer, and finish wear. Test the mildest permitted method once. Old color change may be permanent or may reflect sunlight and rubbing rather than soil. Repeated wetting, bleaching, or stronger chemistry often makes the boundary more obvious.
Odor without a visible mark
Inspect the back, wall, floor line, padding, mounting holes, and bedding before deodorizing. Odor may come from moisture, smoke, pets, body oils, or an adjacent wall problem. Air the area and clean only identified soil. Do not pour powder or fragrance into tufting, since residue can remain in padding and hide a continuing moisture issue.
Dry, Inspect, and Reassemble
Cleaning is not complete until the surface is dry, the structure is stable, and the bed can return without trapping moisture or rubbing freshly treated material.
Check for rings, color change, loosened fibers, or swelling
Inspect in daylight and from the side, not only straight on. Touch the cleaned and uncleaned areas with dry hands. Look for a stiff boundary, raised nap, shiny patch, lifted veneer, swollen edge, loose binding, or color on a white cloth. Do not apply another product until you understand the change.
Keep bedding away until fully dry
Pillows and sheets restrict airflow and can transfer dye, fragrance, or moisture. Leave a gap until fabric seams, buttons, the lower edge, and the back feel dry. Drying time varies with padding, humidity, airflow, and the amount used. When uncertain, wait longer and check again with a dry white cloth.
Restore wall clearance and secure attachments
Restore the maker’s recommended spacing. Check that brackets sit correctly, bolts are properly snug, and no cord is pinched against the wall. Do not improvise mounting repairs. A headboard that rocks, scrapes the wall, or pulls away from its bracket needs correction before regular use. When the wall, bed frame, floor edge, and furniture gaps also need attention, continue with the guide to deep clean a bedroom.
Document the method that worked
Record the material name, care code, product used, dilution if stated on the label, test location, drying time, and result. Keep a photo of the care tag. This prevents guesswork and helps others avoid a conflicting product.
Headboard Cleaning Mistakes to Avoid
Most damage comes from excessive moisture, aggressive friction, or treating every material as though it were washable fabric.
Spraying directly onto padding or joints
Spray can travel through fabric, around buttons, under veneer, and into electrical openings. Put a permitted product on the cloth or create foam exactly as directed. Keep the application visible and controlled. If liquid runs downward or reaches the back, stop and dry the area.
Scrubbing tufted fabric
Tufting changes the angle and tension of the textile. Hard scrubbing can fuzz high points, stretch the cover, loosen buttons, and leave a polished ring. Use gentle blotting and a soft brush only when the manufacturer permits it. Soil trapped deep around a button may require a trained upholstery cleaner.
Using vinegar, baking soda, steam, or oils without approval
Popular household ingredients are not universally safe. Acid can affect finishes and dyes, powder can remain inside padding, steam can loosen adhesive or set some stains, and oil can darken or soften coatings. A method is suitable only when the furniture directions allow it for that exact material and construction.
Ignoring electrical or mounting components
Built-in lights, chargers, switches, adjustable sections, and wall brackets change the risk. Do not wipe around live connections, pull a headboard forward by its wiring, or remove structural bolts for access. Disconnect and service components according to the product instructions, and use a qualified person when wiring or stability is uncertain.
Covering damp upholstery with pillows
A headboard may feel dry at the face while moisture remains around seams and padding. Replacing pillows too soon slows evaporation and can create rings, odor, or transfer. Keep bedding away until the deepest treated area feels dry and a pressed white cloth remains clean.
When to Stop or Seek Professional Help
Seek professional assessment when the material is valuable, the stain is unknown, the padding is wet, or the headboard is not structurally or electrically safe.
Color transfer, shrinkage, or water rings
Stop immediately if dye appears on the cloth, fabric tightens, a ring grows, or texture changes as it dries. Do not chase the boundary with more liquid. Photograph the result, note what was used, and ask the manufacturer or an upholstery cleaner about correction. Early restraint gives a specialist more options.
Antique, silk, velvet, suede, or specialty upholstery
These materials may have unstable dyes, delicate pile, aged padding, hand-applied trim, or sensitive finishes. Limit care to gentle dust removal unless a conservator or qualified cleaner advises otherwise. Do not test an aggressive method simply because the hidden area is out of sight.
Mold, persistent odor, or water damage
Visible growth, repeated mustiness, wet padding, stained wall contact, or swelling after a leak requires the moisture cause to be addressed. Fragrance and surface wiping are not enough. Keep bedding away, document the area, and arrange suitable inspection. Extensive porous damage may require replacement rather than repeated cleaning.
Loose mounts, damaged wiring, or structural movement
Stop using the headboard if brackets pull from the wall, legs split, the panel shifts unexpectedly, a light flickers, or a cord is damaged. Do not lean against it. Contact the furniture maker, a qualified installer, electrician, upholsterer, or repair professional as appropriate.
Frequently Asked Questions
These answers cover the main decisions for safe home care.
How do I know what material my headboard is?
Check the care tag, receipt, model page, underside, and back. Look for terms such as polyester, velvet, linen blend, leather, polyurethane, veneer, laminate, cane, or rattan. Examine a hidden edge for layers and backing. When appearance and documentation disagree, ask the manufacturer before using liquid or solvent.
Can I use a carpet cleaner on an upholstered headboard?
Only when the headboard manufacturer and machine instructions explicitly allow that equipment and the fabric code supports the solution. Carpet machines can deliver too much liquid to padding, seams, wood backing, and adhesive. A vacuum-only code, delicate textile, deep tufting, powered feature, or unknown construction rules out routine machine washing.
How do I remove oily hair marks from a headboard?
First wash or replace the pillowcase that contacts the same area. Vacuum the headboard, identify the material and care code, and test the approved cleaner. Blot gradually across the contact zone without saturating it. For solvent-only fabric, leather, velvet, or an old dark mark, contact a qualified cleaner instead of experimenting.
Can a fabric headboard be steam cleaned?
Do not assume so. Heat and moisture can distort pile, set certain stains, loosen adhesive, affect dye, and wet the padding or backing. Steam is appropriate only when the product directions specifically permit it and the equipment can be used without contacting electrical or sensitive structural parts.
How long should a headboard dry before use?
There is no universal number. A light surface blot may dry within hours, while tufting and padding can take much longer. Keep bedding away until the face, seams, buttons, lower edge, and back feel dry, no cool dampness remains, and a pressed white cloth shows no moisture or color.
How often should I dust a headboard?
Inspect it when changing bedding and dust when a visible film develops. A gentle vacuum or microfiber pass every few weeks suits many homes, with more frequent care for dark fabric, open windows, pets, or heavy hair-product use. Promptly blot compatible fresh spills rather than waiting for the regular schedule.
Final Thoughts
A safe headboard clean begins with identification, not a household mixture. Remove dry dust, follow the care code or furniture directions, test in a hidden spot, apply minimal moisture, and let every seam and padded area dry before pillows return. Stop for color transfer, peeling, swelling, persistent odor, unstable mounting, or damaged electrical parts. Gentle maintenance protects the material better than infrequent aggressive cleaning.

Ethan Carter is the Founder & Editor of HomeCleanSecrets. Based in the United States, he has 5 years of experience creating practical home cleaning, laundry care, stain removal, decluttering, and home organization content. His goal is to help everyday households clean smarter and build simple routines that are easier to maintain.
Read more about Ethan Carter on his author page: https://homecleansecrets.com/ethan-carter/