
A new homeowner cleaning checklist should do more than tell you to wipe counters and mop floors. Once you own the home, you are also taking over appliances, filters, storage areas, previous-owner residue, moisture clues, old odors, garage leftovers, and routines that may not have been maintained well. The first goal is to make the home safe and usable. The second goal is to learn how the home behaves before you fill every closet, cabinet, and utility area.
Use this guide for the first day, first week, and first 30 to 90 days after getting the keys. It is not a full inspection or repair plan, and it does not replace professional help when you find damage, mold growth, electrical issues, pests, or unsafe materials. It is a practical cleaning order for new owners who want to reset the home carefully before habits and clutter make hidden problems harder to see.
Quick Answer: What to Clean First in a New Home

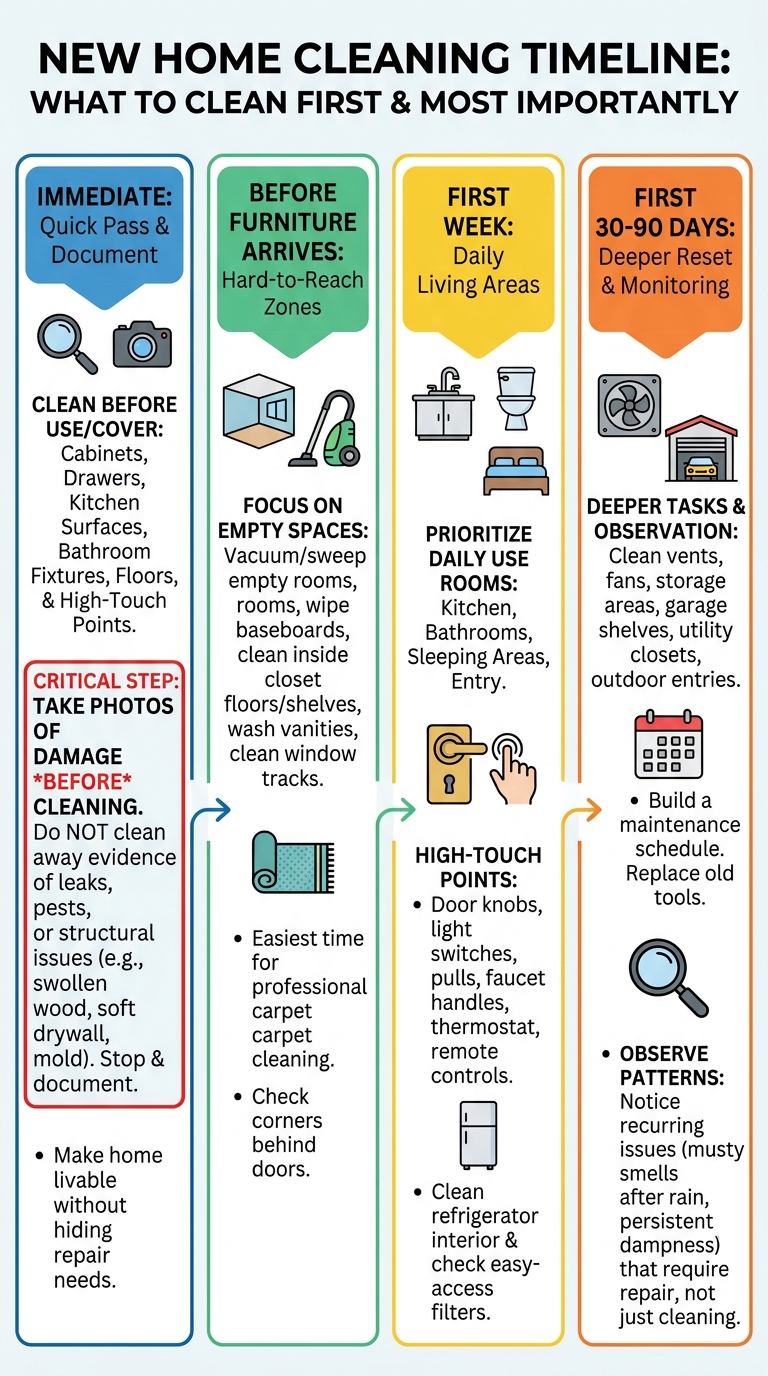
Clean the areas that will be covered, touched, or used immediately. Start with cabinets, drawers, closets, bathroom fixtures, kitchen surfaces, appliance handles, floors, and high-touch points. Then move to appliance interiors, filters, vents, storage zones, and utility areas. A good first pass should make the home livable without hiding clues you may need to document or repair later.
Before moving furniture in
Before large furniture arrives, clean what will become difficult to reach. Vacuum or sweep empty rooms, wipe baseboards, clean closet floors and shelves, wipe inside kitchen cabinets, wash bathroom vanities, clean window tracks where safe, and check corners behind doors. If the home has carpet, this is the easiest time to have it professionally cleaned or to vacuum slowly in multiple directions.
Take photos before you clean anything that looks damaged, stained, warped, or damp. Cleaning can remove useful evidence of a leak pattern, pest activity, smoke residue, or old appliance spill. If you see a swollen cabinet bottom, soft drywall, active dripping, strong musty odor, or blackened electrical area, stop cleaning that spot and get qualified help.
During the first week
The first week should focus on the rooms you use every day. Clean the kitchen, bathrooms, sleeping areas, laundry area, entry, and main walkways. Wipe high-touch surfaces such as door knobs, light switches, cabinet pulls, railings, faucet handles, appliance handles, thermostat controls, and remote controls left with the home. Clean the inside of the refrigerator, run empty appliance cleaning cycles only when manuals allow them, and change or check filters that are easy to access.
During the first 30 to 90 days
The first 30 to 90 days are for deeper resets and routine setup. Work through appliances, vents, fans, storage areas, garage shelves, utility closets, windows, baseboards, flooring edges, and outdoor entry areas. Replace worn cleaning tools you inherited, remove abandoned chemicals correctly, and build a simple schedule for monthly and seasonal tasks.
This is also when patterns appear. A cabinet that smells musty after every rain, a bathroom that never dries, a dryer that leaves laundry damp, or a basement corner that smells stronger after storms deserves more attention than another round of surface cleaning. Cleaning tells you a lot about how the home works, but it should not be used to cover problems that need repair.
How New Homeowner Cleaning Differs from Move-In Cleaning
Move-in cleaning is often about making rooms ready for boxes and furniture. New homeowner cleaning goes further because you now have responsibility for hidden spaces, appliance care, ventilation, storage, and long-term upkeep. You are not only cleaning what you can see. You are learning which areas collect dust, moisture, grease, odors, lint, and clutter. The move-in cleaning checklist covers the immediate empty-home clean before the longer ownership routine begins.
Ownership means more hidden systems
As a homeowner, you need to look at places renters may never touch: return vents, exhaust fan covers, range hood filters, dryer lint paths, utility closets, garage corners, crawl-space access areas, basement storage walls, and appliance filter locations. You do not need to dismantle systems you do not understand, but you do need to identify what exists and what looks neglected.
Check the HVAC filter slot, bathroom fans, kitchen ventilation, washer area, dryer vent connection, dishwasher filter, refrigerator coils if accessible, and sump or utility areas if your home has them. ENERGY STAR’s heating and cooling maintenance checklist is a helpful reminder that filters and airflow are part of home upkeep, not just comfort.
Cleaning before decorating or organizing
Clean before you line shelves, install organizers, paint around furniture, hang storage systems, or fill cabinets. Old dust, grease, crumbs, pet hair, and pest traces can hide behind pretty storage solutions. Wipe and dry the area first, then decide what belongs there. This is especially important in pantries, bathroom vanities, laundry cabinets, linen closets, and garage shelves.
When to document damage or call a pro
Document before cleaning when something looks like damage, not dirt. Take clear photos of water marks, stained subflooring, cracked tile, soft cabinet bottoms, missing caulk, damaged appliance cords, burnt outlets, pest droppings, damaged ductwork, or heavy smoke residue. Keep notes with dates so you can compare whether the condition changes after you clean and ventilate.
Call a qualified professional when there is active water, suspected mold growth over a large area, sewage odor, electrical damage, gas smell, structural concern, or appliance behavior that feels unsafe. Cleaning can improve a dirty surface, but it cannot make a failing system safe. Stop if a task requires removing panels, handling unknown wiring, disturbing suspect materials, or using a product in a way the label does not allow.
First-Day and First-Week Cleaning Tasks

The first day and first week should make the home usable without exhausting you. Work from the most personal and food-related spaces outward. Keep supplies simple: gloves, microfiber cloths, mild cleaner, dish soap, trash bags, vacuum, mop appropriate for your floors, scrub brush, sponges, and disinfectant only where the product label and situation call for it. A practical cleaning supplies list helps new owners replace unknown products and build a surface-appropriate starter kit.
Kitchen, bathrooms, and high-touch surfaces
Start in the kitchen because it affects food safety, odors, pests, and daily comfort. Empty cabinets and drawers if the seller left anything behind. Vacuum crumbs from corners, wipe shelves, clean drawer tracks, scrub the sink, clean faucet bases, wipe counters, clean the stovetop, wash the refrigerator interior, and wipe appliance handles. Clean the trash cabinet or trash area before placing a new bin there. CDC guidance on cleaning and disinfecting at home is useful because cleaning comes before disinfecting.
Floors, carpets, and closets
Clean floors before furniture hides corners and edges. Vacuum hard floors first if there is dust or renovation debris, then mop with a damp method approved for the floor type. Avoid soaking wood, laminate, and older flooring. For tile, pay attention to grout along walls and around toilets. For carpet, vacuum slowly and empty the vacuum canister often if the home was dusty or had pets.
Trash, odors, and previous-owner residue
Remove leftover trash, old food, empty bottles, worn sponges, used shelf liners, abandoned toiletries, and mystery containers. Do not keep inherited cleaning products unless the label is readable, the container is intact, and you know you will use the product safely. Sticky residue inside cabinets, under sinks, and near appliances can hold odors long after the room looks clean.
For odors, clean the cause before adding fragrance. Wash trash cans, clean sink drains according to product and plumbing limits, wipe cabinet interiors, launder washable curtains if care tags allow it, vacuum upholstery left with the home, and clean pet areas carefully. If smoke odor, musty odor, or sewage odor remains after basic cleaning, treat it as a clue rather than a scent problem.
Appliance and System Cleaning Checks

Appliances can hold old food spills, lint, mineral buildup, grease, detergent residue, and odors. New owners often clean visible rooms but forget machines that touch dishes, clothing, and indoor air. Work slowly and check manuals before removing filters, panels, racks, or parts.
Refrigerator, dishwasher, oven, washer, and dryer
Clean the refrigerator before filling it. Remove expired food, wash removable bins and shelves if the manual allows, dry parts fully, wipe door gaskets gently, and check the drip area only if it is safely accessible. For the dishwasher, remove food debris from the filter area if your model has an accessible filter, wipe the door gasket, and run a cleaning cycle only with a product allowed by the manufacturer.
For the oven, remove crumbs and spills before running any high-heat cycle. Read the manual first because self-cleaning cycles are not right for every situation. For the washer, wipe the gasket or lid area, clean detergent residue, and leave the door open to dry when the manual allows. For the dryer, clean the lint screen before every load and inspect the visible vent connection for lint buildup, crushing, or damage.
Filters, vents, fans, and air circulation
Find the HVAC filter, range hood filter, bathroom fan covers, return vents, supply vents, and any portable filters left with the home. Replace disposable filters with the correct size and rating recommended for your system. Wash reusable filters only if the product instructions say they are washable. Vacuum vent covers before wiping so dust does not smear into paste.
Manuals, labels, and signs to stop or escalate
Collect manuals, model numbers, warranty papers, and care instructions during the first month. If the seller left manuals in a drawer, sort them by appliance or system. If a manual is missing, look for the model number plate before searching online. The right instructions matter because the wrong cleaner can damage stainless steel, glass cooktops, stone counters, washing machine gaskets, oven coatings, and floor finishes.
Stop and escalate if an appliance smells like burning, leaks, trips a breaker, sparks, shows damaged cords, or behaves unpredictably. Also stop if cleaning exposes rusted connections, standing water, heavy lint in hidden areas, or damaged venting. Surface cleaning is useful, but it should not become improvised repair work.
Moisture, Odor, and Indoor Air Clues to Watch

A newly purchased home may smell different after windows are closed, after rain, or after the HVAC runs. Some odors fade with normal cleaning and ventilation. Others point to moisture, trapped residue, neglected filters, old smoke, pests, or plumbing concerns. Pay attention to when the smell appears, where it is strongest, and whether cleaning changes it.
Musty smells and damp storage zones
Musty smells are most common in basements, closets on exterior walls, under sinks, laundry rooms, crawl-space access areas, and garages. Empty the area, clean dust and residue, dry the surface, and leave space for airflow. Do not pack cardboard boxes tightly against a wall that smells damp or shows staining. EPA information on mold and moisture explains why moisture control matters when cleaning musty areas.
A good check is to return the next day and smell the area before opening cleaners or air fresheners. If the musty odor comes back quickly, look for damp materials, blocked airflow, plumbing leaks, condensation, or exterior water entry. Cleaning may remove surface dirt, but the odor can return until the moisture path is fixed.
Bathroom and basement moisture cues
In bathrooms, look for peeling paint, swollen trim, cracked caulk, loose grout, recurring dark spots on ceilings, and towels that never dry. Clean surface residue where safe, run the fan, and keep shower areas dry between uses. If caulk is cracked, soft, or separating, cleaning will not seal it. A homeowner may need repair or replacement rather than repeated scrubbing.
In basements, look at corners, stored boxes, floor edges, utility penetrations, and the area around washers, water heaters, and sump equipment. Do not store fabrics, paper, or seasonal decorations in a damp corner just because it is empty. Clean and dry the area first, then monitor it through rain, humidity, and laundry use.
When cleaning is not enough
Cleaning is not enough when a problem returns quickly, spreads, smells stronger after moisture, or affects building materials. Repeatedly bleaching or perfuming a musty area without fixing moisture can make the home harder to assess. Heavy smoke residue, old pet urine in subflooring, sewage odors, pest activity, and large areas of suspected mold need more than a normal cleaning routine.
Use your first months to separate ordinary dirt from recurring conditions. Ordinary dirt improves with cleaning and stays improved for a reasonable time. A deeper problem returns, moves, or changes with weather, plumbing use, appliance use, or ventilation. When that happens, document what you see and bring in the right help.
Storage, Garage, and Utility Area Reset
Storage spaces can look harmless because they are not part of daily living, but they often reveal how the previous owners used the home. Garages, sheds, utility closets, attics, basements, and under-sink cabinets can contain old chemicals, paint, pest traces, moisture, dust, and forgotten repairs. Clean these areas before they become long-term storage.
Cleaning before storing belongings
Before placing boxes in a storage area, sweep or vacuum, wipe shelves, check wall and floor edges, and look for water marks or pest evidence. Use clear bins for items that need protection from dust or moisture, but do not seal damp items in plastic. Keep storage off the floor in basements and garages when possible, especially near exterior walls or utility equipment.
Leave access to panels, shutoffs, filters, drains, sump areas, water heaters, electrical panels, and HVAC equipment. A clean storage system should make maintenance easier, not block it. If you cannot reach a shutoff or filter without moving ten boxes, the storage setup will fail during the first real problem.
Paint, chemicals, and unknown products left behind
Previous owners may leave paint, pesticides, automotive fluids, pool chemicals, solvents, cleaners, fertilizer, or unlabeled containers. Do not open, sniff, mix, or pour out unknown products. Keep children and pets away from these areas. For general home safety, the Consumer Product Safety Commission’s safety education resources are a useful starting point when thinking about household hazards.
Sort products by what you can identify and what your local waste program accepts. Keep useful paint only if the can is sealed, labeled, and related to your home. Store it away from heat, ignition sources, and living areas according to the label. Dispose of old or unknown products through the proper local program rather than putting them in regular trash or drains.
Utility closet and garage safety basics
Utility closets and garages should stay clean, dry, and accessible. Sweep dust and debris, remove cardboard from damp floors, keep flammable clutter away from appliances, and avoid stacking items around mechanical equipment. Do not store cleaning products above or beside heat sources. Keep the floor clear enough that you can inspect for leaks, pests, or unusual smells.
Check smoke alarms and carbon monoxide alarms early in the ownership period. Replace batteries or devices according to manufacturer instructions and local requirements. NFPA guidance on smoke alarm safety is a reminder that home resets should include basic safety checks, not only visible cleaning.
First 30-60-90 Day Cleaning Timeline

A 30-60-90 day plan keeps new homeowner cleaning realistic. You do not have to perfect the entire home before unpacking. Instead, make the home usable first, then reset hidden areas, then turn what you learned into a routine you can actually maintain. During days 61 to 90, use an annual home cleaning calendar to spread future maintenance across the year.
First 30 days: make the home usable
During the first 30 days, focus on essential rooms and basic health of the space: kitchen, bathrooms, bedrooms, laundry, trash, floors, filters, and obvious odors. Clean cabinets before filling them, wash appliance interiors before heavy use, and set up a safe cleaning supply area. Remove abandoned products and trash as soon as you can do so safely.
Days 31 to 60: deep clean and organize
In the second month, work through deeper cleaning by zone. Clean windows and tracks where safe, baseboards, door frames, light fixtures you can reach safely, vent covers, garage shelves, utility closets, pantry shelves, laundry machines, and less-used cabinets. Wash or replace doormats. Vacuum upholstery and rugs. Clean under furniture once it is placed. For the deeper work scheduled after the home is usable, follow a deep cleaning checklist rather than adding every project to the first week.
Days 61 to 90: build your annual routine
By the third month, you should know which rooms get dirty fastest, which appliances need regular attention, and which areas need seasonal checks. Build a simple routine: weekly bathrooms and kitchen, monthly appliance and vent checks, quarterly storage review, seasonal moisture checks, and yearly deep-clean tasks. Keep it visible on a calendar or home notebook.
Do not build a routine around unrealistic deep cleans. A homeowner routine works when it is repeatable. Choose a few tasks each month instead of saving every hidden chore for one exhausting weekend. The best plan is the one that prevents buildup without turning the home into a constant project.
Common New Homeowner Cleaning Mistakes
Most mistakes happen because new owners are tired, excited, and surrounded by boxes. The goal is to avoid choices that hide old problems, damage surfaces, or make routines harder later. Slow down before using strong products, filling storage areas, or treating recurring odors as normal.
Cleaning around old dirt instead of resetting zones
It is tempting to unpack first and clean around belongings later. That usually creates more work. Once dishes, linens, tools, and bins are in place, shelves and closet floors become harder to clean. Reset empty zones first, even if the reset is simple: vacuum, wipe, dry, and inspect.
Pay special attention to pantries, bathroom cabinets, laundry shelves, linen closets, and garage storage. These areas collect residue that is easy to ignore once filled. If you only clean visible walkways, the home may look better but still carry old smells, dust, and grime where your belongings touch.
Ignoring appliance manuals
Appliance cleaning mistakes can be expensive. Do not assume every oven should run a self-cleaning cycle, every dishwasher filter twists out the same way, every fridge drawer can be soaked, or every washing machine should get the same cleaner. Manuals exist because finishes, seals, filters, and cycles vary.
Check instructions before removing parts, using descalers, running cleaning cycles, or applying abrasive tools. If a product label and appliance manual disagree, stop and find the safer answer from the manufacturer or a qualified technician. A clean appliance is not a win if the gasket, finish, sensor, or drain is damaged in the process.
Treating moisture or smoke damage as simple dirt
Moisture and smoke residue can look like ordinary grime at first. Repeated scrubbing may lighten the surface, but the smell or stain can return if the material underneath is affected. Watch for yellow-brown residue on walls, sticky cabinet tops, musty baseboards, damp carpet edges, and odors that strengthen when the home is closed up.
Do not cover these clues too quickly with paint, fragrance, storage bins, or furniture. Clean what is safe, document what remains, and get advice when the affected area is large, recurring, or connected to building materials. Knowing when to stop is part of good homeowner cleaning.
FAQ
These answers cover the most common first-home cleaning decisions and where to place your effort when everything feels urgent.
What should I clean first after buying a house?
Clean the kitchen, bathrooms, high-touch surfaces, cabinet interiors, closets, and floors first. These areas affect food, hygiene, sleeping, storage, and daily movement. If the house is empty, clean shelves, drawers, baseboards, and floor edges before moving furniture and boxes inside. Document damage, moisture, pest evidence, or strong odors before cleaning those spots.
Should I deep clean before or after moving in?
Deep clean before moving in whenever you have access and time, especially for floors, carpets, cabinets, closets, appliance interiors, bathrooms, and storage areas. After moving in, continue with deeper tasks that are less urgent, such as vents, baseboards, garage shelves, windows, utility areas, and detailed appliance care. The best approach is to clean hidden areas before they are covered, then finish slower tasks once the home is functional.
What cleaning supplies does a new homeowner need?
A new homeowner should start with gloves, microfiber cloths, sponges, scrub brush, trash bags, vacuum, broom, mop suited to the floor type, dish soap, mild all-purpose cleaner, toilet bowl cleaner, glass cleaner if needed, and a disinfectant for appropriate high-touch uses. Add specialty products only after checking surfaces, appliance manuals, and product labels. Also keep a flashlight, step stool, replacement filters, batteries, and a notebook for home observations.
When should a new homeowner call a professional instead of cleaning?
Call a professional when you find active leaks, sewage odor, suspected mold over a large area, damaged wiring, gas smell, appliance sparking, repeated breaker trips, pest activity, structural concerns, or smoke and moisture damage that returns after cleaning. Also get help when a task requires opening equipment, disturbing unknown materials, or using products beyond label directions. Clean only what you can reach and understand safely.
Final Thoughts
A new homeowner cleaning checklist is really a reset plan for the first season of ownership. Clean the empty zones first, make the kitchen and bathrooms usable, check appliances and filters, watch moisture and odors, and reset storage before it fills with belongings. Do not rush to hide every mark or smell before you understand what caused it.
As you clean, build a record of what the home needs. Some tasks will become weekly habits, some will become monthly maintenance, and some will become repair calls. A careful first 90 days gives you a cleaner home, a better routine, and a clearer sense of which problems are simple dirt and which ones deserve expert attention.

Ethan Carter is the Founder & Editor of HomeCleanSecrets. Based in the United States, he has 5 years of experience creating practical home cleaning, laundry care, stain removal, decluttering, and home organization content. His goal is to help everyday households clean smarter and build simple routines that are easier to maintain.
Read more about Ethan Carter on his author page: https://homecleansecrets.com/ethan-carter/