
Lampshades collect dust, insects, film, and splashes, yet can be delicate. Fabric may be glued to backing, paper can crease, and trim may loosen with moisture. Disconnect power, let the bulb cool, identify each material, and begin with the gentlest dry method. Add moisture only when the maker allows it.

Quick Answer: Start Dry and Disconnect Power

Most shades need careful dust removal more often than washing. Before touching the shade, remove electrical and heat risks so you can work slowly. For the broader cleaning order and the relationship between routine, deep, furniture, floor, and textile tasks, use the bedroom and living room cleaning guide.
Unplug the lamp or switch off the fixture safely
For a table or floor lamp, switch it off and pull the plug by the plug body, not the cord. For a pendant or ceiling fixture, turn off the correct wall switch and, when removal brings your hands near wiring or the lampholder, use the breaker specified by the fixture instructions. UL Solutions notes that portable luminaires are evaluated for risks that include electric shock, contact burns, overheating, and instability, which is why cleaning should never begin while power remains connected. Review its portable lighting safety overview when assessing an unfamiliar lamp.
Let the bulb and shade cool
Wait until the bulb, socket area, harp, frame, and shade feel fully cool. Incandescent and halogen bulbs can remain hot after the light goes off, and even LED assemblies may warm surrounding parts. Cleaning a warm shade can set oily residue, soften some plastics or adhesives, and expose your hands to a burn.
Identify material, lining, glue, trim, and frame
Inspect both the outside and inside under good room light. Note whether the shade is fabric, paper, parchment, plastic, acrylic, glass, metal, or a combination. Look for a laminated backing, sewn seams, glued edges, taped binding, pleats, fringe, beads, painted decoration, and rust on the wire frame.
Remove the Shade Safely
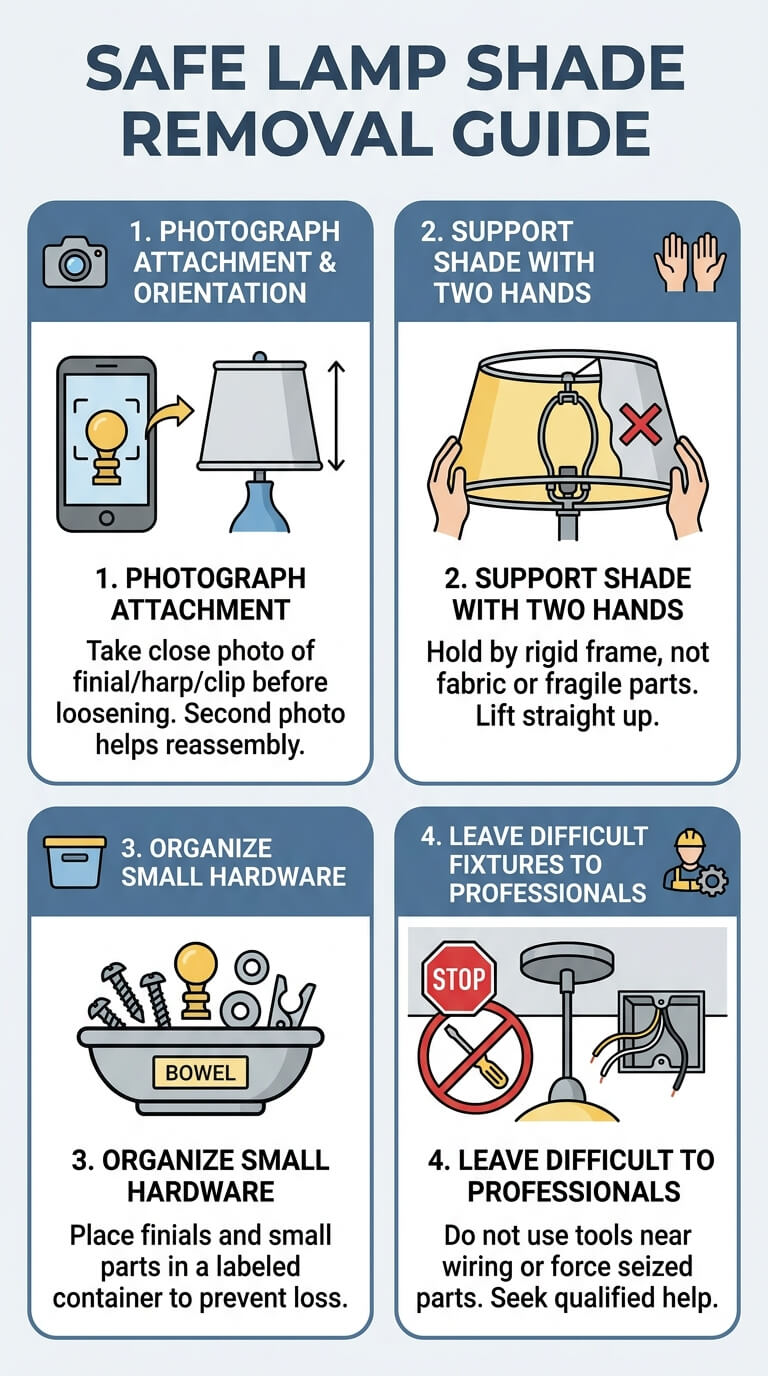
Removal gives better control, but only when the shade is designed to come off without disturbing wiring or forcing fragile parts.
Photograph the attachment before removal
Take one close photo of the finial, harp, clip, uno ring, threaded collar, or retaining ring before loosening anything. A second photo showing the shade height and orientation helps during reassembly.
Support fragile shades with two hands
Hold the shade by its rigid frame or fitter whenever possible, not by the fabric panel, paper wall, pleat tips, beads, or fringe. Support wide shades with one hand on each side and lift straight up. If the material flexes, crackles, sheds, or separates from the frame, stop.
Keep finials and small hardware together
Place the finial, washers, clips, screws, and any decorative cap in a shallow bowl or labeled container. Do not set small parts on carpet, bedding, or a crowded table where they can disappear.
Leave hardwired or difficult fixtures to qualified help
Do not loosen a canopy, disconnect conductors, remove a socket, or reach into a ceiling box for cleaning. Stop when the shade cannot be released without tools near wiring, the fixture moves at the ceiling, the socket turns with the collar, or the retaining ring is seized. Arrange qualified service rather than forcing the attachment.
Choose the Right Dust-Removal Tool
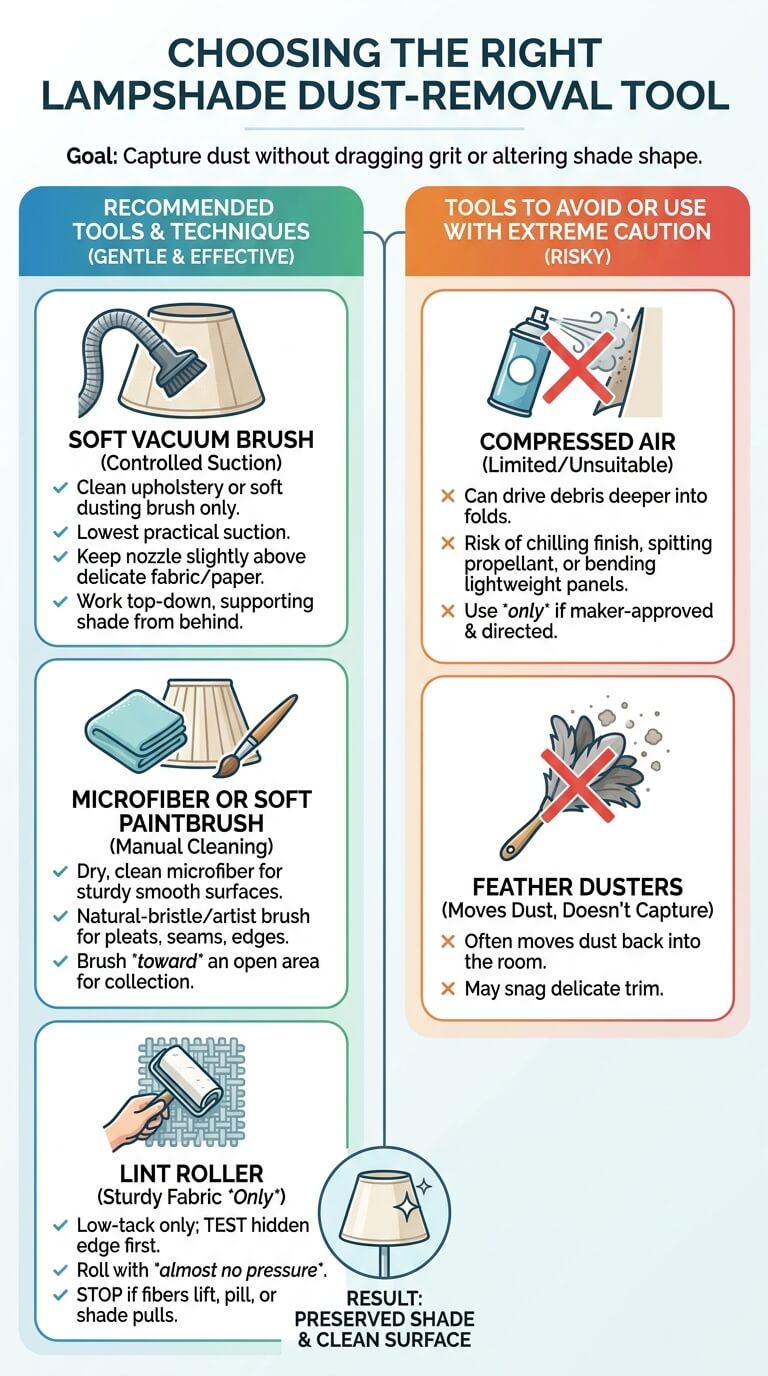
The best tool captures dust without dragging grit across the surface or pulling the shade out of shape. Use the separate guide to remove dust from nearby furniture without applying the lampshade method to other materials.
Soft vacuum brush with controlled suction
Use a clean upholstery or soft dusting brush at the lowest practical suction. Keep the nozzle slightly above delicate fabric and paper rather than sealing it against the panel. Work from the top edge downward while supporting the shade from behind.
Clean microfiber or soft paintbrush
A dry, freshly washed microfiber cloth works on sturdy smooth surfaces, while a clean natural-bristle or artist brush reaches pleats, seams, and decorative edges. Brush toward an open area so loosened dust can be collected.
Lint roller for suitable sturdy fabric
A low-tack lint roller can lift hair and loose dust from tightly woven, firmly attached fabric. Test a hidden lower edge first, roll with almost no pressure, and stop if fibers lift, the surface pills, or the shade pulls away from its backing.
Compressed air and feather dusters as limited or unsuitable options
Canned air can drive debris deeper into folds, chill a finish, spit propellant, or bend lightweight panels. A feather duster often moves dust into the room and may snag trim. Reserve air only for a maker-approved component and use it exactly as directed.
Clean Fabric Lampshades
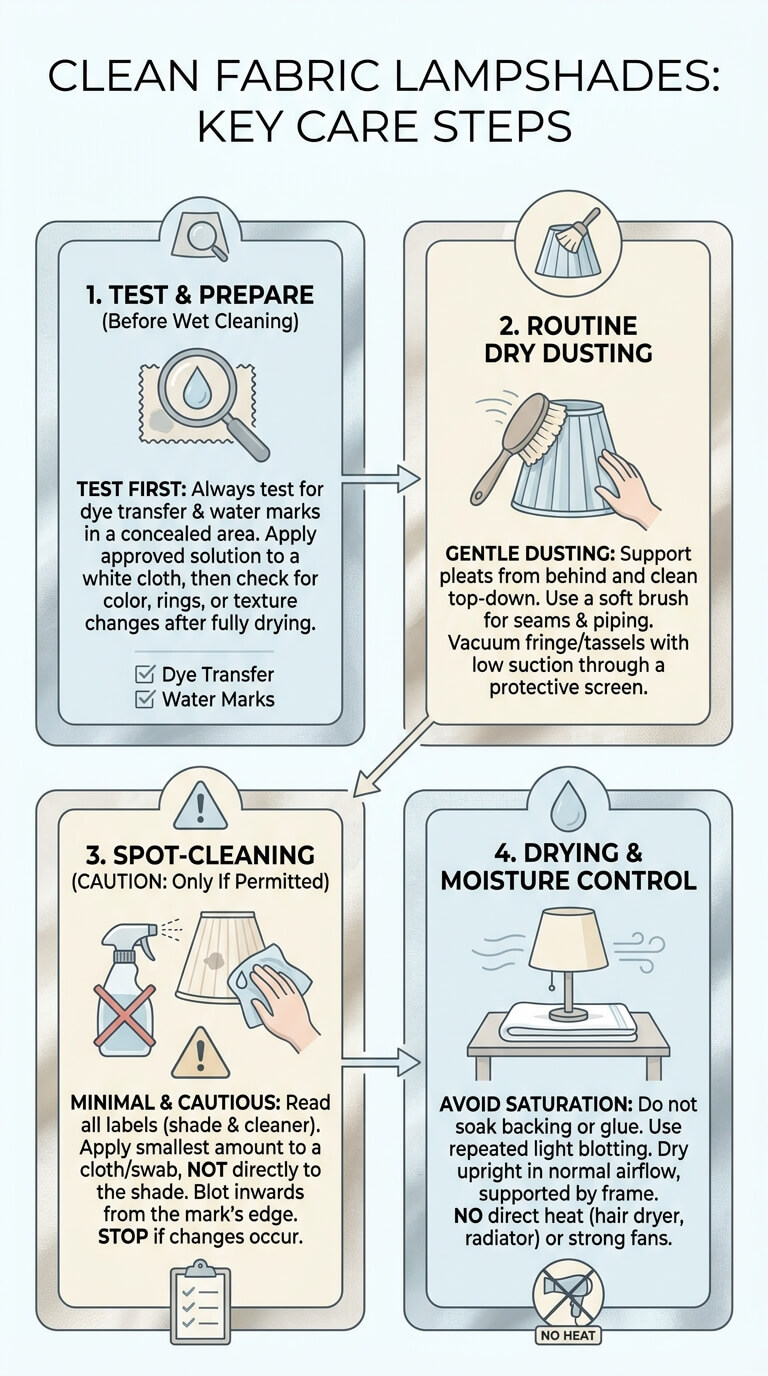
Fabric shades vary widely because the visible textile may be sewn, stretched, laminated, or glued over a separate lining.
Test for dye transfer and water marks
After dry dusting, inspect a concealed area near the lower seam. If the maker permits spot cleaning, touch the approved solution to that area with a white cloth. Check immediately for color on the cloth, then let the test dry fully and inspect for a ring, stiffness, puckering, changed sheen, or loose adhesive.
Dust pleats, seams, and trim
Support each pleat from behind and clean from the top toward the bottom so debris does not collect at the fold. Use a soft brush around piping, taped edges, and stitched seams. Vacuum fringe or tassels only through a protective screen and at very low suction.
Spot-clean only when manufacturer guidance allows
Read both the shade instructions and the product label. The American Cleaning Institute explains that a cleaner label includes directions, caution warnings, ingredients, and storage or disposal information; those product directions and cautions matter even for a tiny mark. Apply the smallest approved amount to a cloth or swab rather than spraying the shade. Blot from the outside of the mark inward and stop if color, texture, or adhesive changes.
Avoid saturating backing, glue, and inner lining
Moisture can travel farther than the visible wet spot. It may dissolve adhesive, loosen binding tape, wrinkle a laminated backing, rust the frame, or leave a tide line on the lining. Keep treatment away from glued edges and use repeated light blotting instead of one heavy application.
Dry in the correct shape
Place the shade upright on a clean towel in a room with normal airflow. Support it by the frame so the fabric does not rest on a damp edge. Do not use a hair dryer, radiator, direct sun, clothes dryer, or fan strong enough to deform the panels.
Clean Paper, Parchment, and Delicate Shades

These shades should generally be treated as dry-clean-only objects unless their own documentation says otherwise.
Use dry tools only unless the maker approves otherwise
Choose a very soft brush, low-suction vacuum held above the surface, or clean dry microfiber used with almost no pressure. IKEA lists dry dusting for its rice-paper GULLSUDARE shade, illustrating why paper construction should not be assumed washable. Follow the shade’s exact materials and care instructions rather than a general fabric method.
Remove insects and loose dust gently
Turn the cool, disconnected shade so gravity helps debris fall toward the opening. Lift a loose insect with a soft artist brush or clean tweezers without scraping the panel. Vacuum nearby while keeping the nozzle away from the paper.
Avoid water, steam, oils, and household sprays
Water can cause swelling, cockling, translucency changes, tide marks, and separated seams. Steam adds heat as well as moisture. Oils, furniture polish, glass spray, fragranced mist, and all-purpose cleaner may create a permanent dark patch. Never erase a mark aggressively, since even a clean white eraser can burnish, thin, or discolor paper and parchment.
Recognize permanent yellowing, brittleness, and heat damage
Age-related yellowing, oxidation, smoke discoloration, and heat-darkened areas are not ordinary surface dust. A brittle panel may crack when brushed, and a scorched lining may indicate an unsafe bulb or poor clearance. Do not bleach, paint over, or wet these changes.
Clean Plastic, Acrylic, and Vinyl Shades
Smooth synthetic shades are often wipeable, but they can scratch, cloud, craze, or distort when the wrong chemical or temperature is used.
Remove dry grit first
Lift dust with a soft brush or a lightly dampened, approved cloth before wiping the full surface. Grit dragged under pressure creates fine scratches that become obvious when the lamp is on. Clean the inside as carefully as the outside, since dead insects and dust often settle near the lower rim and around vent openings.
Use a mild approved wipe
Check whether the shade is acrylic, polycarbonate, polystyrene, vinyl, or another plastic because care limits differ. When the maker permits moisture, use lukewarm water with the specified mild cleaner on a soft cloth, then wipe evenly. Keep liquid away from glued seams, printed decoration, metal rings, and electrical parts.
Avoid solvents, abrasives, and hot water
Window spray, acetone, concentrated alcohol, scouring powder, rough sponges, and solvent wipes can cloud or weaken some plastics. Hot water may soften a panel or alter its curve. Stop if the cloth drags, the finish turns hazy, tiny cracks appear, or printed color transfers.
Dry without scratching or clouding
Blot with a clean lint-free cloth rather than rubbing a nearly dry surface. Support thin panels so they do not flex at the frame. Let hidden seams and rims air-dry fully before reassembly. Inspect with the light still disconnected; once illuminated, remaining streaks can be addressed with another maker-approved gentle wipe instead of hard polishing.
Clean Glass and Metal Shades

Removable glass and metal can tolerate more handling than paper, but coatings, paint, etching, and electrical connections still set strict limits.
Confirm the shade can be removed
Read the fixture instructions and support the shade before loosening a retaining ring or screw. Kichler recommends turning off current before fixture cleaning and hand washing removable glass rather than putting it in a dishwasher. Its lighting cleaning guidance also calls for thorough drying before reassembly. If the glass is captive, unusually heavy, or above a difficult stairwell, arrange safer access.
Protect painted, frosted, etched, or coated surfaces
Do not assume every glass shade accepts window cleaner. Frosted coatings, hand-painted decoration, mirrored interiors, applied films, and etched patterns may spot or abrade. Dust first, then follow the model-specific method. For metal, identify whether the surface is painted, plated, lacquered, polished, or intentionally aged before using even mild soap.
Keep water away from sockets and wiring
Wash only a shade that has been completely removed and approved for washing. Never run water over a socket, cord, LED module, ceiling canopy, switch, or wired metal housing. For a fixed shade, apply the permitted moisture to the cloth, not the fixture, and keep the cloth well below dripping wet.
Dry fully before reinstalling
Set glass on a padded towel where it cannot roll, chip, or be knocked into a hard sink. Dry both sides, the rim, screw holes, decorative grooves, and any metal collar with a lint-free cloth, then allow more air time. Water trapped under a retaining ring can cause spotting or corrosion.
Clean Pleated, Beaded, Fringed, and Mixed-Material Shades
Decorative construction increases the number of fragile edges, dust pockets, and adhesive points that can fail during cleaning.
Support pleats and avoid crushing
Place one hand behind the pleat being cleaned and move a soft brush from the top outward. Do not pinch folds together or press a vacuum nozzle flat against them. For narrow accordion pleats, several light passes are safer than forcing a tool deep into the valley.
Clean beads and fringe section by section
Work over a light-colored towel so a loose bead or hook is easy to find. Hold one short section of fringe near its attachment and brush downward without tugging. Dust bead strands with a small soft brush while supporting their weight.
Treat glued trim as moisture-sensitive
Decorative braid, ribbon, paper tape, and fabric binding are often held by adhesive even when they resemble stitching. Keep liquids away unless the maker confirms the glue is washable. If an edge begins lifting, do not press it down with household glue while damp.
Follow the most delicate material in mixed construction
A shade with fabric over plastic, paper lining, metal frame, and glued fringe should be cleaned to the limit of its weakest part. A wipeable outer panel does not make the paper lining washable. Separate treatment is appropriate only when components are designed to detach and their instructions explain how.
Match the Method to the Problem
The type and location of soil determine whether a careful home treatment is realistic or likely to spread damage.
Ordinary dust
Disconnect power, cool the lamp, and remove dust with the gentlest tool suited to the material. Clean the upper rim, lower rim, seam, pleats, and inside surface rather than brushing only the visible front. Regular light dusting is safer than waiting until a thick layer requires pressure or liquid. After the shade is dry and reinstalled, return it during the standard living-room cleaning sequence.
Dead insects
Let loose insects fall out or lift them with a soft brush. Avoid crushing them into fabric or paper because body residue can create a dark mark. If debris sits near a socket or enclosed LED component, do not probe with metal tweezers. If the shade problem is part of broader film, soot, or hidden decor buildup, include it in a planned guide to deep clean a living room.
Greasy kitchen film
Cooking aerosol binds dust to glass, metal, and some plastic shades. Remove dry grit first, then use only the degreasing method approved for that exact finish. Fabric, paper, and glued shades can develop a larger halo when grease is spot-treated. A heavily coated delicate shade may be better replaced than repeatedly wetted.
Smoke or soot residue
Soot is fine, oily, and easy to smear. Do not start with water or vigorous brushing. Widespread residue from a fire, fireplace malfunction, or repeated indoor smoke may penetrate fabric, paper, lining, and adhesive. Professional assessment or replacement is usually more realistic than attempting to restore a delicate shade at home.
Small water mark
A water ring on fabric, paper, or parchment may be a change in dye, sizing, backing, or surface texture rather than removable dirt. Do not wet only the dark edge or add more water without approval.
Unknown stain or discoloration
When you cannot identify the material or mark, limit work to loose dry dust. Stronger cleaner can set pigment, dissolve coating, or create a cleaner-looking spot surrounded by older soil. Stop after one safe test if the mark spreads, color transfers, texture changes, or the shade develops an odor.
Reassemble and Inspect
Cleaning is not complete until the shade is dry, stable, correctly fitted, and safely separated from the bulb.
Confirm the shade is completely dry
Check the outside, lining, lower binding, top ring, seams, trim, and any screw holes. A cool feel, darkened seam, soft paper edge, or cleaner odor can indicate remaining moisture. Extend drying time instead of relying on heat from the bulb. Never reconnect a lamp to finish drying the shade.
Check frame, lining, clips, and finial
Look for bent rings, cracked welds, loose clips, torn lining, detached tape, rust, and stripped threads. Seat washers and spacers in the photographed order, then tighten the finial only until secure. Overtightening can distort the frame or crack a glass fitter. The shade should sit level without wobbling when the lamp is gently touched.
Maintain safe clearance from the bulb
Make sure the shade, lining, trim, and clip do not touch the bulb and that the bulb matches the fixture label. The CPSC home electrical checklist warns that a bulb above the recommended wattage can overheat the fixture, wiring, or nearby combustible material. Use its home electrical safety checklist as a reminder to verify bulb rating and inspect cords and fixtures.
Restore power and inspect for odor, heat, or instability
Reconnect power only after reassembly is complete and your hands are dry. Turn the lamp on while standing nearby. Switch it off and unplug it immediately if you notice a burning smell, crackling, flickering, unusual heat, smoke, a loose socket, or a shade leaning toward the bulb.
Lampshade Cleaning Mistakes to Avoid
Most preventable damage comes from skipping identification, adding too much moisture, or working while the fixture remains energized.
Cleaning while the lamp is connected
Switching the lamp off is not always the same as isolating it from power. Unplug portable lamps and follow the fixture instructions for hardwired lighting. Never spray around an energized socket or steady a live fixture with one hand while wiping with the other. Cleaning can wait until safe shutdown is possible.
Washing paper or glued shades
Immersion can wrinkle paper, dissolve sizing, detach seams, rust the frame, and leave permanent tide marks. Fabric wrapped over glued backing may fail in the same way. Do not copy a washing method from a shade that merely looks similar. Follow the exact material and construction instructions for the item in front of you.
Using high suction on pleats
A strong vacuum can pull fabric from the frame, flatten pleats, tear aged paper, and swallow loose trim. Reduce suction, keep the nozzle moving, and support the panel. If the shade lifts toward the tool, increase distance or switch to a soft brush. More force does not produce a safer clean.
Spraying product near the socket
Overspray can enter the lampholder, switch, cord connection, LED driver, or metal joint. It can also land unevenly on fabric or paper and create spots. Apply an approved product to the cloth away from the lamp, then return with a barely damp tool. For fixed fixtures, work below any opening that leads to electrical parts.
Reinstalling a damp shade
Moisture trapped against a metal ring may encourage corrosion, while a damp lining can warp or release adhesive as it warms. Do not judge dryness only by the outer panel. Check seams, folds, and hardware, then allow extra time. The bulb should never be used as a drying device.
When to Replace or Seek Help
Some conditions indicate material failure, heat exposure, electrical trouble, or a level of value that makes home cleaning inappropriate.
Brittle paper, scorched lining, or heat damage
Replace a basic shade that crackles, crumbles, has brown heat marks, smells scorched, or has a lining pulling toward the bulb. Also inspect bulb type, rating, and clearance before installing a new shade. Reusing the same unsafe setup can damage the replacement and may indicate a fixture problem that needs professional attention.
Loose wiring, damaged socket, or unstable fixture
Stop using the lamp when the cord is cracked, plug is damaged, socket rotates or sparks, switch feels erratic, fixture leans, or ceiling mounting moves. Cleaning does not correct electrical or structural faults. Keep the lamp disconnected and arrange qualified repair, or replace it according to local disposal guidance.
Valuable, hand-painted, silk, antique, or specialty shades
Historic silk, parchment, painted scenes, unusual trim, and custom frames can lose value through ordinary household treatment. Limit handling, photograph the condition, and consult a textile conservator, paper conservator, decorative-arts specialist, or reputable lampshade restorer. Ask about dry surface cleaning, adhesive stability, and safe transport before work begins.
Widespread smoke or water damage
A shade soaked by a leak, exposed to fire residue, or affected across several layers may contain hidden corrosion, weakened adhesive, distorted backing, and persistent odor. Do not reconnect it merely because the surface looks dry. A specialist can assess a valuable piece; replace ordinary shades when structural or electrical safety cannot be confirmed.
Frequently Asked Questions
These answers cover common decisions that depend on material, construction, and maker instructions.
Can fabric lampshades be washed?
Only when the shade manufacturer explicitly permits washing and explains the method. Many fabric shades are laminated or glued to a lining and can shrink, wrinkle, bleed, or separate when soaked. Most routine care should begin with vacuuming or brushing.
What is the safest way to dust a pleated lampshade?
Disconnect power, let the lamp cool, and support each pleat from behind. Use a clean soft brush or a low-suction vacuum held slightly above the surface, moving from the upper edge downward. Do not pinch folds, press the nozzle into the valleys, or use sticky tools on delicate paper, silk, or aged fabric.
Can I use a lint roller on a lampshade?
A low-tack roller may be suitable for sturdy, tightly woven fabric that is firmly attached. Test a hidden edge first and use almost no pressure. Avoid it on paper, parchment, velvet, silk, flocking, loose weave, fringe, hand-painted material, and old fabric. Stop at once if fibers lift or the panel pulls from its backing.
How do I clean a paper lampshade?
Keep the shade dry unless its own instructions state otherwise. After disconnecting power and cooling the lamp, use a very soft clean brush or carefully controlled vacuum held away from the paper. Do not use water, steam, oil, spray cleaner, or aggressive erasing. Yellowing, water rings, and heat marks may be permanent.
Can glass lampshades go in a dishwasher?
Do not use a dishwasher unless the fixture manufacturer expressly approves it. Heat, detergent, spray pressure, and contact with racks can damage glass, coatings, painted details, and attached metal. Many lighting makers recommend careful hand washing for removable plain glass, followed by complete drying before installation.
How often should lampshades be cleaned?
Dust them lightly during regular room cleaning and inspect more often in kitchens, homes with pets, rooms with open windows, or areas where insects gather around light. Clean before the layer becomes heavy enough to require pressure.
Final Thoughts
Safe lampshade cleaning depends on restraint. Disconnect power, let every part cool, identify the material and construction, and begin with dry dust removal. Treat fabric, paper, acrylic, glass, metal, pleats, and glued trim according to their own limits. Add moisture only when written care guidance permits it, keep liquid away from electrical parts, and allow complete drying before reassembly. Replace or seek qualified help when heat damage, brittle material, unstable mounting, loose wiring, valuable decoration, or widespread contamination makes a home method uncertain.

Ethan Carter is the Founder & Editor of HomeCleanSecrets. Based in the United States, he has 5 years of experience creating practical home cleaning, laundry care, stain removal, decluttering, and home organization content. His goal is to help everyday households clean smarter and build simple routines that are easier to maintain.
Read more about Ethan Carter on his author page: https://homecleansecrets.com/ethan-carter/