
A room-by-room cleaning checklist gives every space a clear job list, so you can stop wandering through the house wondering what to clean next. Instead of trying to clean everything at once, you can look at one room, choose the most urgent surfaces, and finish the tasks that actually change how the space feels and functions.
This guide is organized by room and by timing. Use it for a full-house reset, a weekly cleaning routine, or a quick rescue session before guests arrive. The goal is not perfection. The goal is to make kitchens safer for food prep, bathrooms less grimy, bedrooms easier to sleep in, living areas more comfortable, and entry zones easier to maintain.

Quick Answer: What to Clean in Every Room

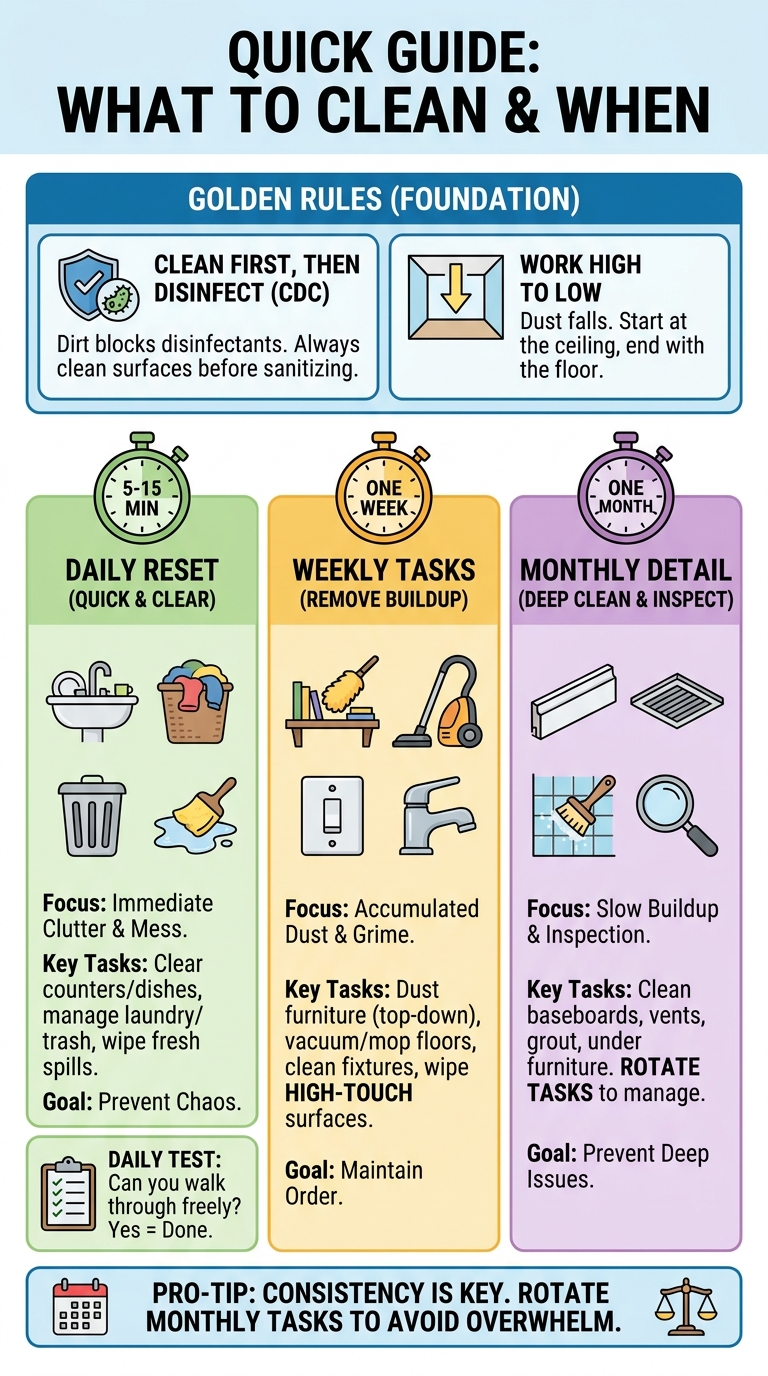
Every room has its own mess pattern, but most rooms need the same basic order: put items back, remove trash, dust from high to low, wipe high-touch surfaces, clean the floor, and deal with moisture or odors before they spread. The CDC notes that cleaning should happen before sanitizing or disinfecting because dirt can get in the way of the product doing its job cleaning before disinfecting.
Daily reset tasks
Daily resets are the small jobs that keep a room from tipping into a full cleanup. In most homes, this means dishes in the kitchen, towels and sink splashes in the bathroom, laundry and bedside clutter in bedrooms, cups and crumbs in living areas, and shoes or mail in the entryway. A good daily reset should take five to fifteen minutes per busy zone.
- Kitchen: clear counters, wash dishes or load the dishwasher, wipe the sink area, remove food trash, and sweep visible crumbs.
- Bathroom: hang wet towels, wipe toothpaste from the sink, rinse shower splashes, close product caps, and empty small trash if needed.
- Bedroom: make the bed, move laundry to the hamper, clear cups and dishes, and return items from the floor to their real home.
- Living area: gather dishes, fold blankets, return remotes, pick up toys, and wipe sticky spots from tables or handles.
- Entryway: line up shoes, shake or vacuum the mat when gritty, hang bags, and move mail or packages to a sorting spot.
A good test is whether you can walk through the room without stepping around clutter, smelling old trash, or seeing fresh spills. If that is true, save the deeper work for your weekly pass.
Weekly room tasks
Weekly tasks remove the buildup that daily resets miss. Dust furniture, vacuum or mop floors, clean bathroom fixtures, wipe kitchen appliance fronts, refresh trash cans, and check corners where hair, crumbs, or pet fur collect. Work from top to bottom so dust lands on surfaces you have not cleaned yet. For the broader preparation, order of work, product choices, and safety limits, start with the complete home cleaning guide.
Weekly cleaning should also include high-touch items that many people forget: light switches, door handles, faucet handles, appliance pulls, remote controls, stair rails, drawer pulls, and chair backs. Use the correct cleaner for the surface, and avoid soaking electronics, unfinished wood, or painted areas that may soften with too much moisture. The home cleaning schedule guide explains how to place these room tasks into daily, weekly, monthly, and seasonal layers.
Monthly detail tasks
Monthly tasks keep slow buildup from becoming a weekend project. Clean baseboards, ceiling fans, vents, blinds, window tracks, cabinet fronts, appliance edges, shower grout, under-bed dust, trash cans, and storage corners. You do not need to do every detail task on the same day. Rotate one or two per week so the house stays easier to manage.
Monthly cleaning is also a good time to inspect. Look for damp smells, pest clues, loose caulk, clogged drains, sticky cabinet handles, worn floor finish, and fabric stains that did not come out with normal cleaning. Stop and change methods if a finish gets cloudy, a cleaner smells unusually strong, or a damp area keeps returning.
How to Use This Checklist Without Getting Overwhelmed
A whole house cleaning checklist can look long because a home has many small surfaces. The way to make it usable is to choose a narrow target: one room, one task type, or one time block. The American Cleaning Institute recommends breaking larger cleaning plans into smaller room-based tasks, which works well when you do not have a full day available room-based cleaning plan.
Choose one room or one task category
Room cleaning works best when clutter is uneven. Start with the kitchen if food mess is the biggest problem, the bathroom if odor or grime is most visible, or the entryway if dirt is being tracked through the house. Stay in that room until the basic reset is done before moving on.
Task-category cleaning works better when the house is generally tidy but dusty. In that case, dust every room first, then vacuum every room, then mop only the hard floors that need it. This reduces tool switching and saves time, but it can feel scattered if the house is very messy.
Match tasks to your available time
For ten minutes, choose trash, dishes, visible clutter, and one wipe-down surface. For thirty minutes, add floors in one or two high-traffic spaces. For one hour, clean a kitchen or bathroom properly and do one fast reset in nearby rooms. For half a day, work through the house in order: kitchen, bathrooms, bedrooms, living areas, then entry and utility spaces.
Do not start a wet deep-cleaning job when you only have a few minutes. Showers, ovens, upholstery spots, carpet stains, and grout usually need setup, dwell time, rinsing, drying, or follow-up. Starting them too late can leave a room half-clean and harder to use.
Adjust for pets, kids, allergies, and clutter
Homes with pets usually need more frequent floor care, upholstery vacuuming, litter or feeding area cleanup, and odor checks. Homes with kids often need high-touch surfaces, bathroom floors, dining chairs, toy bins, and laundry zones cleaned more often. If allergies are a concern, prioritize dust control, washable bedding, vacuum filters, and clutter reduction where dust collects.
Clutter changes the checklist because you cannot clean a surface you cannot reach. When a room is packed, spend the first pass removing trash, dishes, laundry, and items that belong elsewhere. Once the surface is visible, cleaning becomes faster and less frustrating.
Kitchen Cleaning Checklist

The kitchen usually needs the most frequent attention because food, water, grease, trash, and high-touch surfaces all meet in one space. Clean it in zones: food-prep surfaces first, then sink and appliances, then floors and trash.
Counters, sink, stovetop, and appliance fronts
Clear counters before spraying anything. Put away food, move mail and random items, and remove crumbs with a dry cloth or brush. Wipe counters with a cleaner safe for the material. Avoid acidic cleaners on natural stone unless the care instructions allow them.
- Wash or load dishes before wiping the sink area so splashes do not re-soil clean counters.
- Clean faucet handles, cabinet pulls, refrigerator handles, microwave buttons, and the dishwasher handle.
- Wipe the stovetop after it cools, using a cooktop-safe method for glass, enamel, stainless steel, or grates.
- Clean small appliance fronts and the counter under them, especially near toasters, coffee makers, and air fryers.
- Spot-clean cabinet fronts near the trash, stove, sink, and coffee station where hands leave residue.
Check this before scrubbing: if the surface is glossy, coated, painted, or stone, use a soft cloth first. Abrasive pads can leave dull spots that are harder to fix than the original mess.
Floors, trash, odors, and food zones
Sweep or vacuum crumbs before mopping. Mop only after sticky spots and food spills are lifted, or the mop will spread residue. If the floor has wood, laminate, vinyl plank, tile, or stone, use the amount of water and cleaner recommended for that floor type.
Empty trash before it smells, not only when it is full. Wipe the lid, rim, and the floor around the can. If the kitchen has a recycling bin, rinse sticky containers before they sit overnight. Check the pantry floor, pet feeding area, and under the sink for crumbs or damp spots that can attract pests.
Monthly kitchen detail tasks
Once a month, wipe cabinet fronts, clean the top of the refrigerator if reachable, vacuum or wipe toe kicks, wash the trash can, clean the range hood exterior, wipe backsplash grout, and check the refrigerator for expired food. Pull small appliances forward and clean the counter underneath.
Clean appliance filters and parts only according to the manual. Dishwasher filters, range hood filters, refrigerator drip areas, and oven surfaces vary by model. Stop if a part does not release easily, if a coating flakes, or if you are unsure whether water can touch a component.
Bathroom Cleaning Checklist
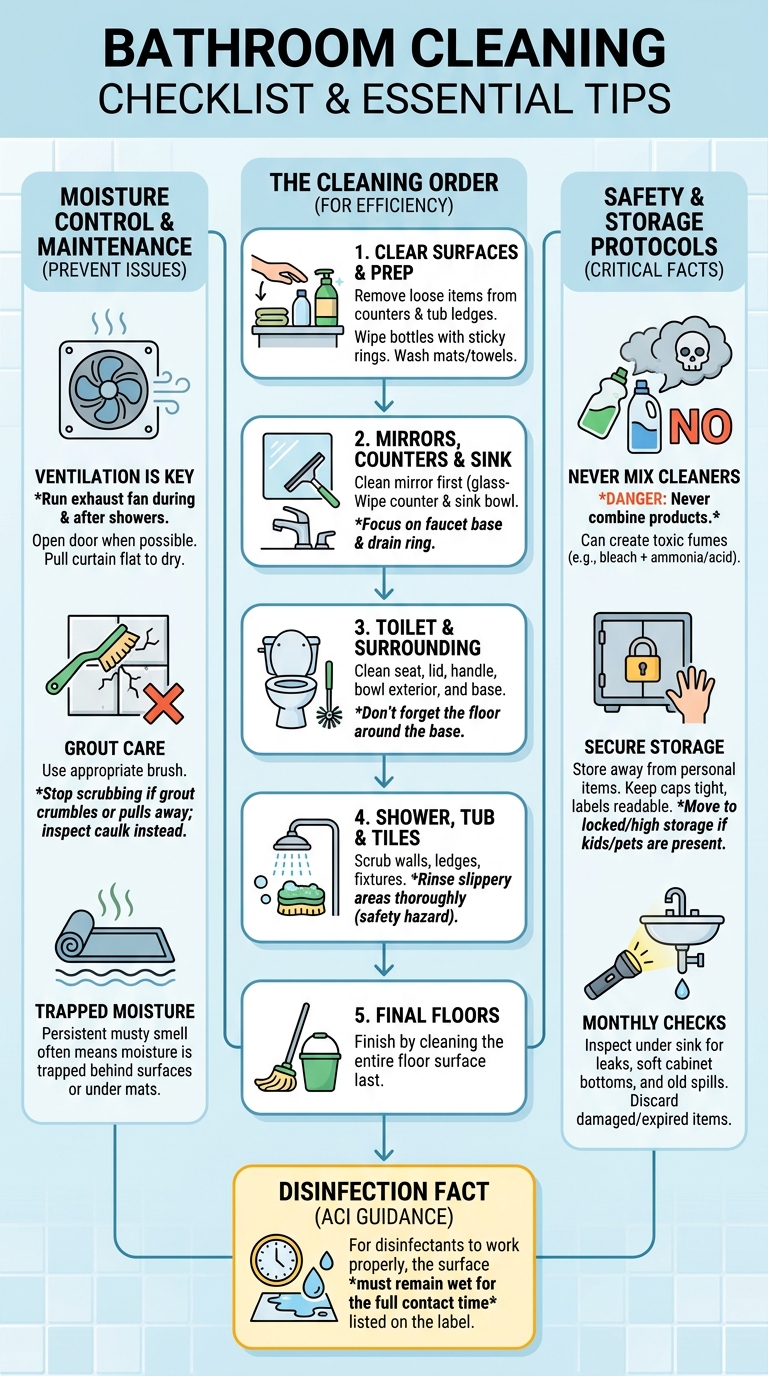
Bathrooms need consistent cleaning because moisture, soap residue, body oils, toothpaste, hair, and product spills build quickly. Work in this order: remove items, clean mirrors and counters, clean sink and faucet, clean toilet, scrub shower or tub, then finish floors.
Toilet, sink, shower, tub, and mirrors
Start by moving loose products off the counter and tub ledges. Clean the mirror with a glass-safe cloth or cleaner, then wipe the counter, faucet, and sink bowl. Pay attention to the faucet base and drain ring, where residue collects.
- Clean the toilet seat, lid, handle, outer bowl, base, and the floor around the toilet.
- Scrub the shower or tub walls, ledges, fixtures, and floor with a product safe for the surface.
- Rinse areas where cleaner could remain slippery, especially tub floors and shower floors.
- Wash or replace hand towels and bath mats regularly, especially if they stay damp.
- Wipe product bottles if they leave sticky rings on shelves or counters.
If you disinfect, read the label for contact time and surface compatibility. The ACI explains that disinfectants often need to stay wet for the full time listed on the label to work properly disinfectant contact time.
Grout, drains, ventilation, and moisture-prone areas
Moisture control matters as much as scrubbing in a bathroom. Run the exhaust fan during showers and after, open the door when privacy is no longer needed, and pull the shower curtain closed so it can dry flat. EPA guidance on indoor air quality explains that ventilation can help remove or dilute indoor pollutants from indoor activities home ventilation and indoor air.
Clean grout with a brush that matches the grout condition. If grout is crumbling, stained below the surface, or pulling away from tile, stop scrubbing harder and inspect the caulk and sealant. A musty smell that returns quickly can mean moisture is trapped behind surfaces or under mats.
Bathroom supplies and safety checks
Store bathroom cleaners away from towels, toothbrushes, skin care, and medicine. Keep caps tight and labels readable. Do not keep unlabeled mixtures under the sink, and never combine cleaners because bathroom products can include acids, bleach, ammonia, alcohol, or other ingredients that should not be mixed.
Monthly, check under the sink for leaks, soft cabinet bottoms, swollen baseboards, and product spills. Throw away empty bottles, hardened products, and anything with a damaged cap. If children or pets can reach the cabinet, move products to locked or higher storage.
Bedroom Cleaning Checklist
Bedrooms collect dust, laundry, skin cells, hair, cups, paper, and clutter from daily routines. A clean bedroom should feel easier to sleep in, not just look neat from the doorway.
Bedding, dust, floors, and laundry
Change sheets on a routine that fits your household, with more frequent washing when there is heavy sweating, pets in the bed, illness, or allergies. Wash pillowcases regularly because they collect skin oils and hair products. Let the bed air briefly before making it if the bedding feels damp from sleep.
- Dust nightstands, lamps, headboards, dresser tops, window sills, and picture frames.
- Vacuum carpet edges, under the bed if accessible, and around laundry baskets.
- Mop hard floors with a method safe for the floor finish.
- Move laundry to a hamper instead of letting it form piles on chairs or the floor.
- Clear cups, dishes, tissues, receipts, and packaging before they become hidden clutter.
A good test is whether the floor and bedside surfaces can be cleaned without moving piles first. If not, add a five-minute clutter reset before dusting.
Closet-adjacent clutter and under-bed dust
Closets make bedroom cleaning harder when shoes, bags, returns, and half-worn clothing spill into the room. Create a small spot for worn-once clothes, but keep it limited. If it grows beyond that space, wash, hang, or put items away before cleaning day.
Under-bed storage should be closed, wipeable, and easy to move. Open baskets under the bed collect dust and pet hair. If you store linens or seasonal clothes there, use bags or bins that protect fabric while still allowing you to inspect for dampness or pests.
Monthly mattress and fabric tasks
Monthly, vacuum the mattress surface if your vacuum and mattress care instructions allow it, rotate the mattress if recommended, wash washable pillow covers, and check curtains or fabric headboards for dust. Spot-clean stains according to the fabric care tag, not with a random bathroom or kitchen product.
Stop if a fabric stain spreads, dyes transfer to the cloth, or the material changes texture. Blot instead of rubbing, use less liquid than you think, and let fabric dry fully before covering it with bedding or pillows.
Living Room and Family Room Cleaning Checklist
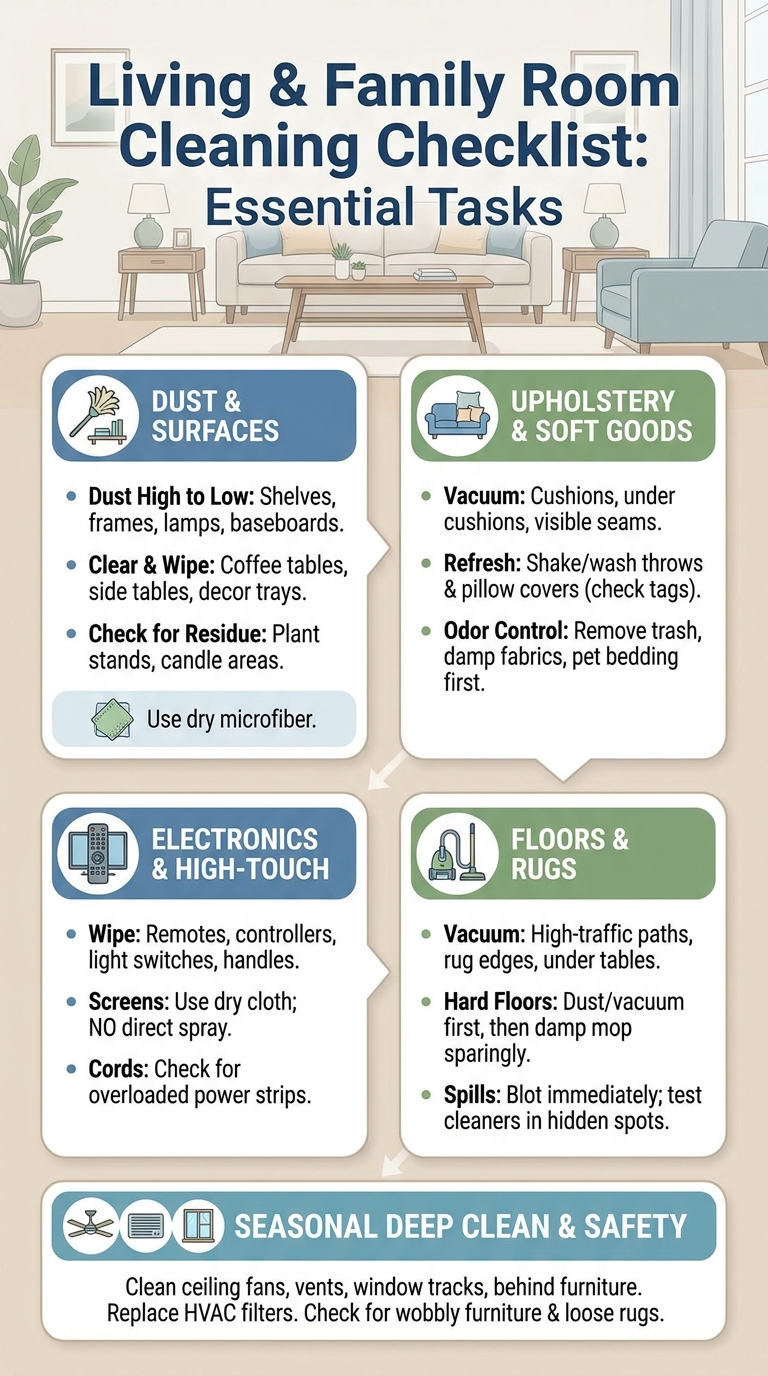
Living rooms collect dust, crumbs, pet hair, electronics residue, drink rings, and daily clutter. Since this is often the room guests see first, quick visual resets matter, but hidden dust and upholstery also need attention.
Dust, upholstery, electronics, and high-touch areas
Dust from high to low: shelves, picture frames, lamps, side tables, entertainment centers, and baseboards. Use a dry microfiber cloth for electronics exteriors, and follow manufacturer instructions for screens. Do not spray cleaner directly onto a screen or speaker.
- Wipe remote controls, game controllers, light switches, door handles, and table edges.
- Vacuum sofa cushions, under cushions, and visible seams where crumbs collect.
- Shake or wash throws and pillow covers if the care tag allows it.
- Clear coffee tables and side tables before dusting so you can wipe the full surface.
- Check plant stands, candle areas, and decor trays for dust rings or wax residue.
If the room smells stale, remove trash, dishes, damp fabrics, pet bedding, and hidden food before adding fragrance. Covering the smell does not fix the mess that caused it.
Floors, rugs, pet hair, and odor spots
Vacuum high-traffic paths, rug edges, under tables, and the area around pet beds. For hard floors, dust or vacuum first, then mop with the least amount of moisture needed. Rugs may need more frequent vacuuming at entrances, near sofas, and in pet resting spots.
Blot fresh spills on rugs or upholstery before cleaning. Use a fabric-safe or carpet-safe product and test a hidden spot first. If a pet accident has soaked padding, a surface wipe may not be enough. Repeated odor in the same area usually means residue remains below the surface.
Seasonal detail tasks
Seasonally, clean ceiling fans, vents, curtain tops, window tracks, lampshades, behind media furniture, and under heavy rugs if you can move them safely. Replace or clean HVAC filters according to the system instructions. Dust buildup near vents can make rooms feel dirty even after surfaces are wiped. When rooms are empty and access is still open, follow the move-in cleaning checklist before switching to routine room care.
Check cords, overloaded power strips, wobbly furniture, loose rug corners, and sharp clutter while you clean. A room that is easy to walk through is easier to maintain and safer during quick tidy sessions. For a seasonal pass with additional detail work, use the spring cleaning checklist by room.
Entryway, Hallway, and Utility Area Checklist
Entryways and utility spaces decide how much dirt travels into the rest of the home. These areas often look small, but they handle shoes, bags, mail, pet gear, cleaning tools, laundry, and outdoor grit.
Shoes, bags, door mats, and drop zones
Shake, vacuum, or wash door mats based on the material. Sweep the threshold, wipe the door handle, and clean smudges around the frame. Give shoes a defined tray or rack so grit does not spread into nearby rooms.
- Move mail to one sorting spot instead of letting it stack on every flat surface.
- Hang bags, coats, leashes, and keys where they are easy to return.
- Wipe benches, hooks, shoe racks, and stair rails.
- Check corners for leaves, sand, salt, pet hair, and small wrappers.
- Clean the floor more often during rainy, snowy, muddy, or pollen-heavy weeks.
If the entry always gets messy again within a day, the storage is probably too far from the door or too full to use quickly.
Laundry area and cleaning supply zones
In the laundry area, wipe detergent drips, clean lint from reachable areas, sweep behind baskets, and keep the floor clear. Do not stack items on top of machines if vibration can knock them down. Let damp cloths and mop pads dry before putting them in a closed bin.
Cleaning supplies should stay labeled, upright, and away from heat, food, and pet areas. Keep products that should not touch each other in separate trays if leaks are possible. Store gloves and cloths where they can dry between uses.
Garage or storage-adjacent tasks
Garages, mudrooms, and storage closets need a different kind of cleaning. Sweep grit, remove cobwebs, wipe shelves, check for leaks, and keep cardboard away from damp floors. Do not store flammable or chemical products near heat sources, pilot lights, or direct sunlight unless the label allows it.
Seasonally, inspect stored items for mildew, pest damage, rust, and broken containers. If a box smells damp, open it outside or in a ventilated area and check the contents before moving it back into the home.
Room-by-Room Priority Matrix
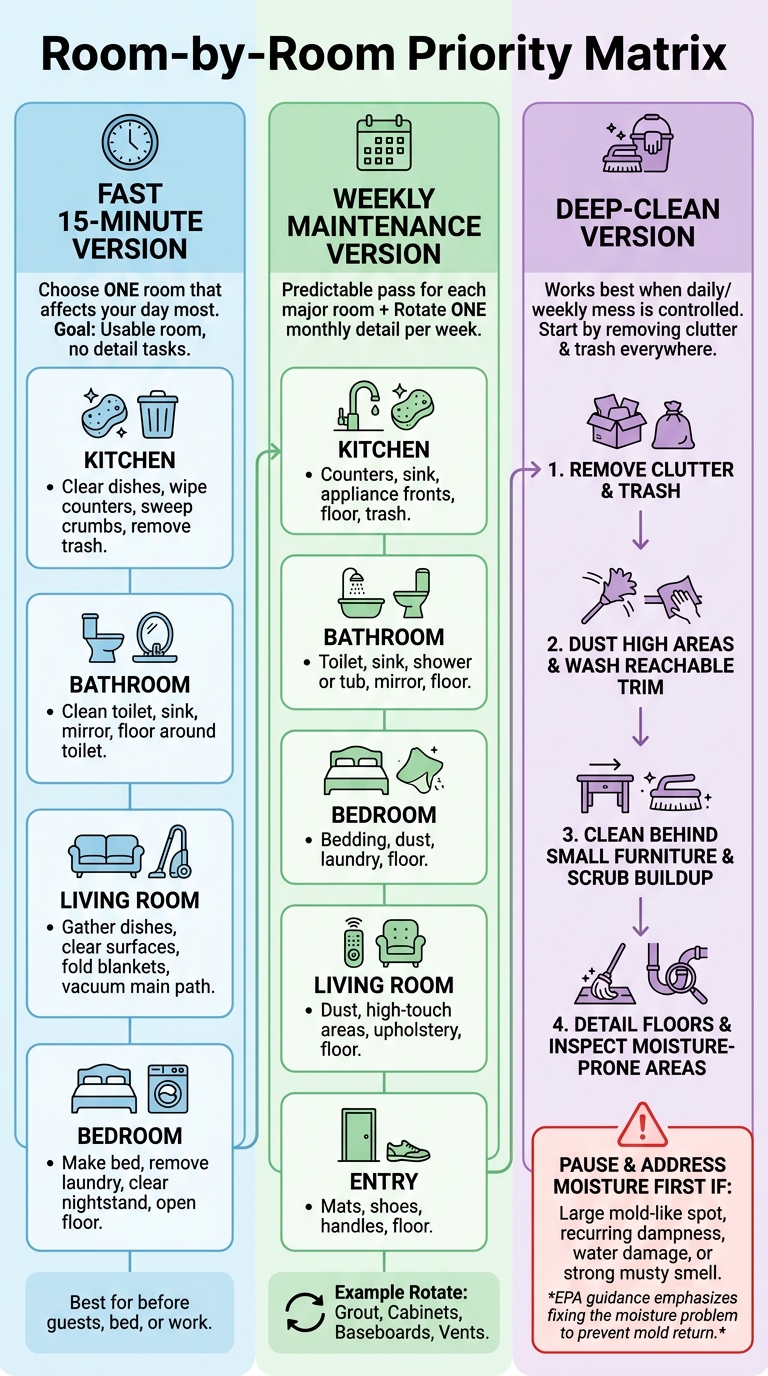
When you do not have time for the full checklist, use a priority version. Choose the level that matches your time and the condition of the home.
Fast 15-minute version
Choose the one room that affects your day most. In a kitchen, clear dishes, wipe counters, sweep crumbs, and remove trash. In a bathroom, clean the toilet, sink, mirror, and floor around the toilet. In a living room, gather dishes, clear surfaces, fold blankets, and vacuum the main path. In a bedroom, make the bed, remove laundry, clear the nightstand, and open the floor.
This version works best before guests, before bed, or before leaving for work. Do not add detail tasks. The win is a room that becomes usable again.
Weekly maintenance version
For weekly maintenance, give each major room a predictable pass. Kitchen: counters, sink, appliance fronts, floor, trash. Bathroom: toilet, sink, shower or tub, mirror, floor. Bedroom: bedding, dust, laundry, floor. Living room: dust, high-touch areas, upholstery, floor. Entry: mats, shoes, handles, floor.
Rotate one monthly detail into each week so it never becomes overwhelming. For example, clean bathroom grout one week, kitchen cabinet fronts the next, bedroom baseboards the next, and living room vents after that.
Deep-clean version
A deep-clean pass works best when the daily and weekly mess is mostly controlled. Start by removing clutter and trash from every room. Then dust high areas, wash reachable trim, clean behind small furniture, scrub buildup, detail floors, and inspect moisture-prone areas. When a room needs access-heavy work or heavy buildup removal, switch to the deep cleaning checklist.
If you find mold-like growth larger than a small spot, recurring dampness, water damage, or a strong musty smell, pause the routine and address moisture first. EPA mold guidance emphasizes fixing the moisture problem because mold growth will return if the moisture remains mold and moisture control.
Mistakes That Make Room Cleaning Harder
Most cleaning mistakes come from working in the wrong order, using too much product, or cleaning around clutter instead of clearing it first. Fixing these habits can make the same checklist much faster.
Cleaning in the wrong order
Do not mop before counters are wiped, vacuum before dusting high shelves, or scrub the shower before removing bottles and hair. Work dry to wet and high to low when possible. This prevents you from cleaning the same surface twice.
In kitchens and bathrooms, remove loose debris before using liquid cleaner. In bedrooms and living rooms, clear fabric and clutter before dusting. In entryways, shake mats and sweep grit before mopping.
Skipping dry dust before wet cleaning
Wet cleaner on dust can turn light buildup into streaky paste. Dry dust furniture, shelves, baseboards, vents, and floors before using a damp cloth or mop. This is especially important on blinds, fan blades, cabinet tops, and textured surfaces.
Use a damp method only when the surface allows it. Unsealed wood, damaged paint, paper lampshades, some wallpaper, and electronics can be harmed by too much moisture.
Using the wrong product for the surface
A strong cleaner is not always a better cleaner. Acid can damage natural stone, abrasives can dull glossy finishes, bleach products can discolor fabrics, and too much water can harm wood or laminate. Read labels and care instructions before trying a new product on a visible area.
Test first when you are unsure. Choose a hidden spot, use a small amount, wait, and check for color change, dullness, swelling, residue, or texture changes. If anything changes, stop and choose a gentler method.
FAQ
Use these answers to adjust the checklist when time, space, or room condition changes. The best routine is the one you can repeat without creating more mess than you solve.
What room should I clean first?
Clean the room that creates the biggest daily problem first. For many homes, that is the kitchen because food mess, dishes, trash, and crumbs can spread quickly. If guests are coming, start with the bathroom they will use, then the entryway and living room. If your bedroom affects your sleep, start there and keep the task list simple: bed, laundry, dust, floor, trash. Small-space renters can use the apartment cleaning checklist for a version adapted to limited storage and rental-safe surfaces.
How often should each room be cleaned?
Kitchens and bathrooms usually need daily resets and weekly cleaning. Bedrooms and living rooms usually need weekly dusting, floor care, and clutter resets, with bedding and fabric tasks adjusted to your household. Entryways may need floor care several times a week during muddy, wet, snowy, or high-pollen periods. Monthly detail tasks can rotate so you are not deep-cleaning the entire home at once.
What is the fastest way to clean a messy house by room?
Use a three-pass method. First, remove trash, dishes, laundry, and obvious clutter from every room. Second, clean the rooms with water and food mess: kitchen and bathrooms. Third, dust and vacuum bedrooms, living areas, hallways, and the entry. Do not detail drawers, closets, grout, or decor during the fast pass unless that is the specific reason the room feels unusable.
How do I adapt this checklist for a small apartment?
Group tasks by zones instead of formal rooms. A studio may have one sleeping zone, one cooking zone, one sitting zone, and one entry zone in the same open area. Clean the cooking zone first, then the bathroom, then bedding and laundry, then floors and surfaces. Use smaller tools, keep supplies minimal, and avoid storing wet mops or damp cloths in closed closets before they dry.
Final Thoughts
A cleaning checklist for every room should make the next step obvious. Start with the room that affects your day most, clear what does not belong, clean from high to low, and save detailed jobs for a planned pass. When the checklist matches your rooms, your surfaces, and your available time, the house becomes easier to reset before it feels out of control.

Ethan Carter is the Founder & Editor of HomeCleanSecrets. Based in the United States, he has 5 years of experience creating practical home cleaning, laundry care, stain removal, decluttering, and home organization content. His goal is to help everyday households clean smarter and build simple routines that are easier to maintain.
Read more about Ethan Carter on his author page: https://homecleansecrets.com/ethan-carter/