
Streak-free window cleaning depends less on using a powerful formula and more on controlling dust, cleaner, tools, and drying time. A pane that looks cloudy after wiping may still hold cleaner residue, grease, lint, or marks left by a dirty cloth. Starting with dry soil removal and finishing with a clean tool usually matters more than adding extra product.

The method below is intended for reachable interior glass and ground-level exterior panes that can be cleaned from a stable position. Before starting, identify any tint film, decorative finish, coating, damaged edge, crack, or unusual manufacturer requirement. Specialty glass can have limits that ordinary uncoated glass does not.
A good test is to clean one small section completely before committing to the entire pane. Let it dry, inspect it from an angle, and note whether the mark moved, disappeared, or stayed fixed. That quick check can reveal a dirty tool, excess product, or a condition that routine cleaning will not correct.
Quick Answer: The Streak-Free Sequence

Remove dry grit first
Use a soft brush, clean dry microfiber cloth, or vacuum attachment near the edges to lift dust, hair, insects, and loose grit. Do not grind dry particles across the pane with a wet cloth. Brush the top frame and nearby trim first so debris does not fall onto freshly cleaned glass. When the pane is only one part of the job, a complete window-care approach also separates tracks, sills, screens, frames, and treatments by material and access.
Use less cleaner than expected
Apply only enough approved cleaner to loosen the film on the section you can finish before it dries. A wet pane is not automatically a cleaner pane. Excess liquid increases runoff, carries dirt toward the lower edge, and can leave surfactant residue that becomes visible when sunlight reaches the glass.
Work in controlled sections
Divide a large pane into manageable areas rather than spraying the entire surface. Clean and finish one section while it remains evenly damp, then move to the next. On a small pane, one section may be the whole window. On a patio-door panel, several vertical sections are easier to control.
Finish the edges and inspect from two angles
After the main wipe or squeegee pass, use a separate dry detail cloth on the top, sides, corners, and bottom line. Look across the pane from the left and right, then change the room lighting or viewing angle. Marks that disappear from one angle may become obvious from another.
When This Guide Applies and When It Does Not
Ordinary dust, fingerprints, grease film, and cleaner residue
This process is suitable for common household soil such as fingerprints, pet nose marks, cooking film, dust, light smoke residue, and streaks left by a previous cleaning. Greasy film may need a second controlled application, but the basic sequence remains dry removal, limited cleaner, gentle agitation, and a clean finish.
Reachable interior or ground-level exterior panes
Clean only where you can maintain stable footing and comfortable control of the tool. A ground-level exterior pane may use the same glass technique, provided weather and access are safe. Do not stand on furniture, lean through an upper-story opening, walk on a roof, or overreach from a ladder to complete this process.
Signs the problem may be mineral deposits, scratches, a failed seal, or coating damage
White rings or spots that remain after routine cleaning may be bonded mineral deposits. A scratch stays fixed as you change wiping direction. Fog or droplets trapped between insulated panes cannot be reached from either exposed surface. Peeling tint, iridescent damage, chips, or cracks require reassessment rather than stronger scrubbing.
Identify the Glass and Its Limits
Standard uncoated glass
Plain, intact window glass usually tolerates a labeled glass cleaner, soft cloth, non-scratch applicator, or clean squeegee. Even standard glass can be scratched by trapped grit, damaged blades, abrasive pads, or improvised scrapers. Inspect the surface and tools under good light before making broad passes.
Tinted, filmed, coated, decorative, or specialty glass
Applied window film, factory coatings, decorative textures, leaded details, and other specialty surfaces may restrict cleaner ingredients or tools. Cleaning recommendations can also differ between the room-facing and exterior surfaces. LLumar’s architectural window-film care information advises non-abrasive cleaning and avoiding hard, sharp metal objects.
Manufacturer instructions and spot testing
Check the window label, warranty documents, film installer information, or manufacturer care manual when the glass type is uncertain. Andersen provides a care and maintenance guide directory for identifying product-specific instructions. Test an approved method in an inconspicuous corner and let it dry before cleaning the full pane.
Tools That Reduce Streaks and Scratches
Microfiber cloth selection and rotation
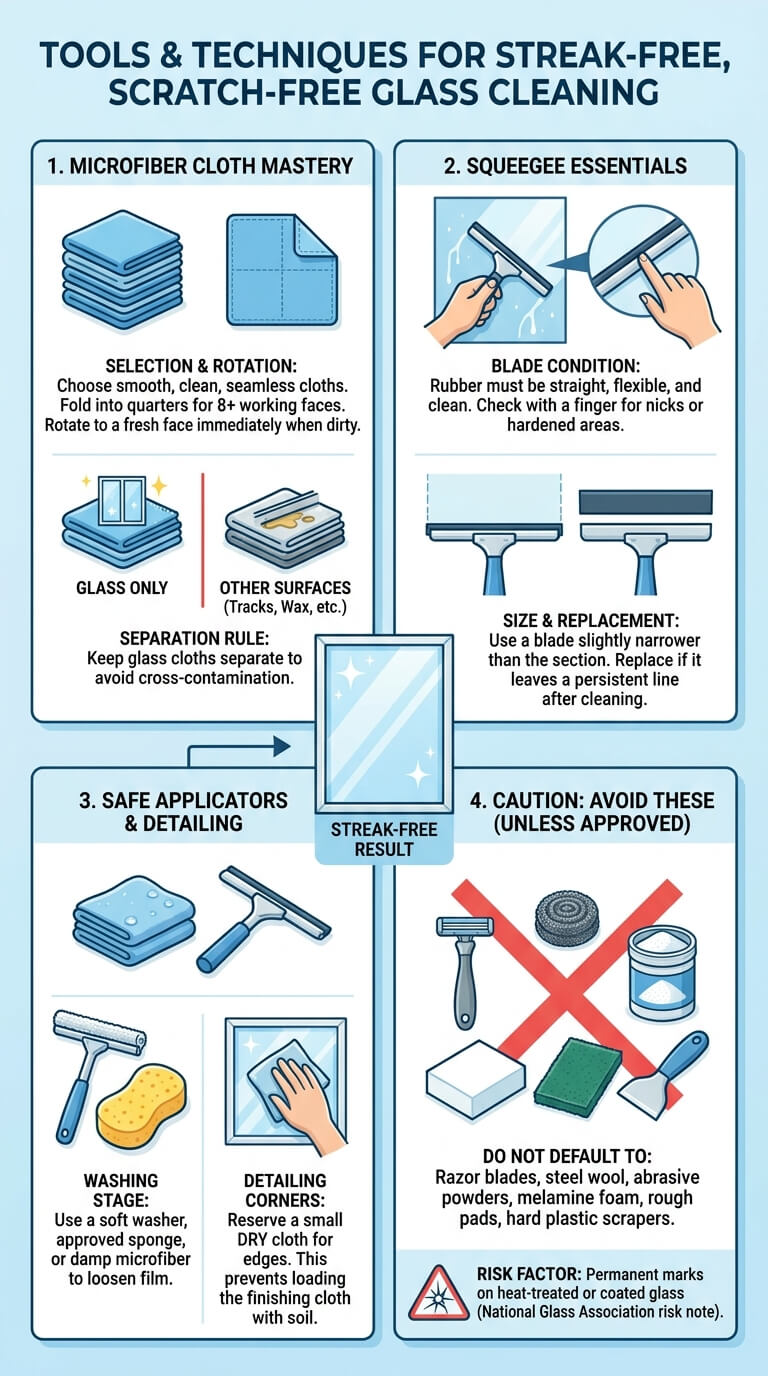
Choose smooth, clean microfiber cloths without rough seams, embedded debris, or oily residue. Fold each cloth into quarters to create several working faces. Rotate to a fresh face as soon as it becomes visibly dirty or saturated. Keep glass cloths separate from cloths used on tracks, sills, kitchens, or waxed furniture.
Squeegee size, blade condition, and safe beginner use
A squeegee works best when its rubber edge is straight, flexible, clean, and slightly narrower than the section being finished. Run a finger carefully along the rubber to check for nicks or hardened areas. Replace a blade that leaves the same narrow line after it has been wiped clean.
Non-scratch applicators and detail cloths
A soft window washer, clean sponge approved for glass, or damp microfiber cloth can spread cleaner and loosen film. Reserve a small dry cloth for corners and edges. This separation prevents the finishing cloth from becoming loaded with the soil removed during the washing stage.
Tools to avoid unless specifically approved
Do not make razor blades, steel wool, abrasive powders, melamine foam, rough scrub pads, or hard plastic scrapers the default. Heat-treated or coated glass can be permanently marked by an unsuitable scraping method. The National Glass Association notes the risk of scratching heat-treated glass with razor blades in its discussion of glass-cleaning precautions.
Why Windows Streak After Cleaning
Too much product
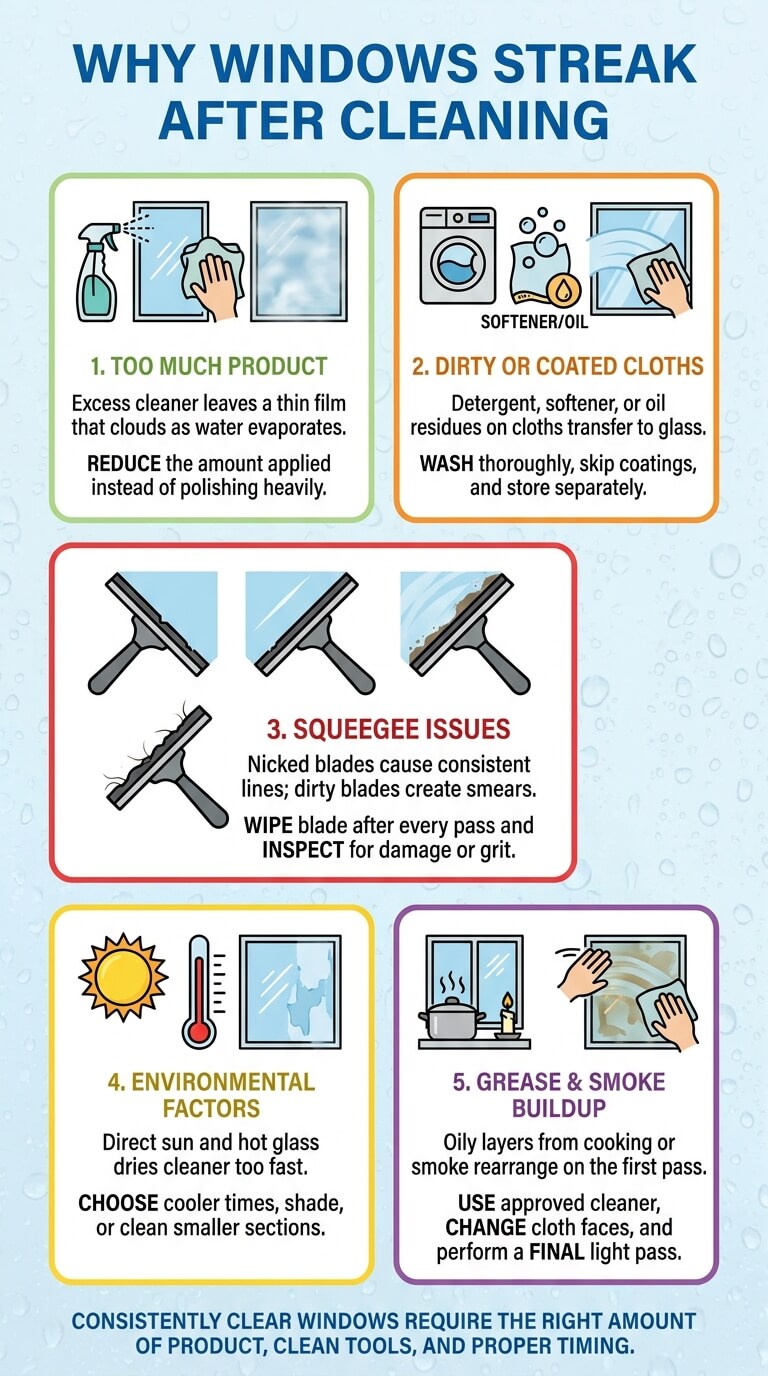
Glass cleaner contains ingredients that help lift and suspend soil. If more product is applied than the cloth or squeegee can remove, a thin film remains. The result may look clear while wet but become cloudy as water evaporates. Reduce the amount rather than repeatedly polishing a heavily coated pane.
Dirty or fabric-softener-coated cloths
A cloth can look clean while holding detergent, fabric softener, oil, or previous cleaning product. Those residues transfer to glass in broad arcs. Wash glass cloths according to their care instructions, skip products that leave a coating, rinse thoroughly, and store them away from oily household rags.
A worn or contaminated squeegee blade
A nicked blade leaves a consistent line. A dirty blade drags a changing smear. Wipe the rubber after every pass and inspect it when the same mark reappears. Hair, grit, and dried cleaner along the edge can create a streak even when the pane was washed correctly.
Direct sun, hot glass, or product drying too fast
Strong sun and warm glass shorten the working time. Cleaner may dry before it can be removed, especially on a large pane. Choose a cooler time, shade the work area when practical, or clean smaller sections. Do not keep adding liquid to glass that is too hot to finish predictably.
Grease film, smoke film, and repeated cleaner buildup
Kitchen windows, glass near candles, and panes exposed to indoor smoke can hold a thin oily layer. A first pass may rearrange the film rather than remove it. Use a cleaner approved for the glass and soil, change cloth faces frequently, and perform a light final pass after the greasy layer is gone.
Step-by-Step Streak-Free Window Cleaning
Prepare the area and inspect the pane
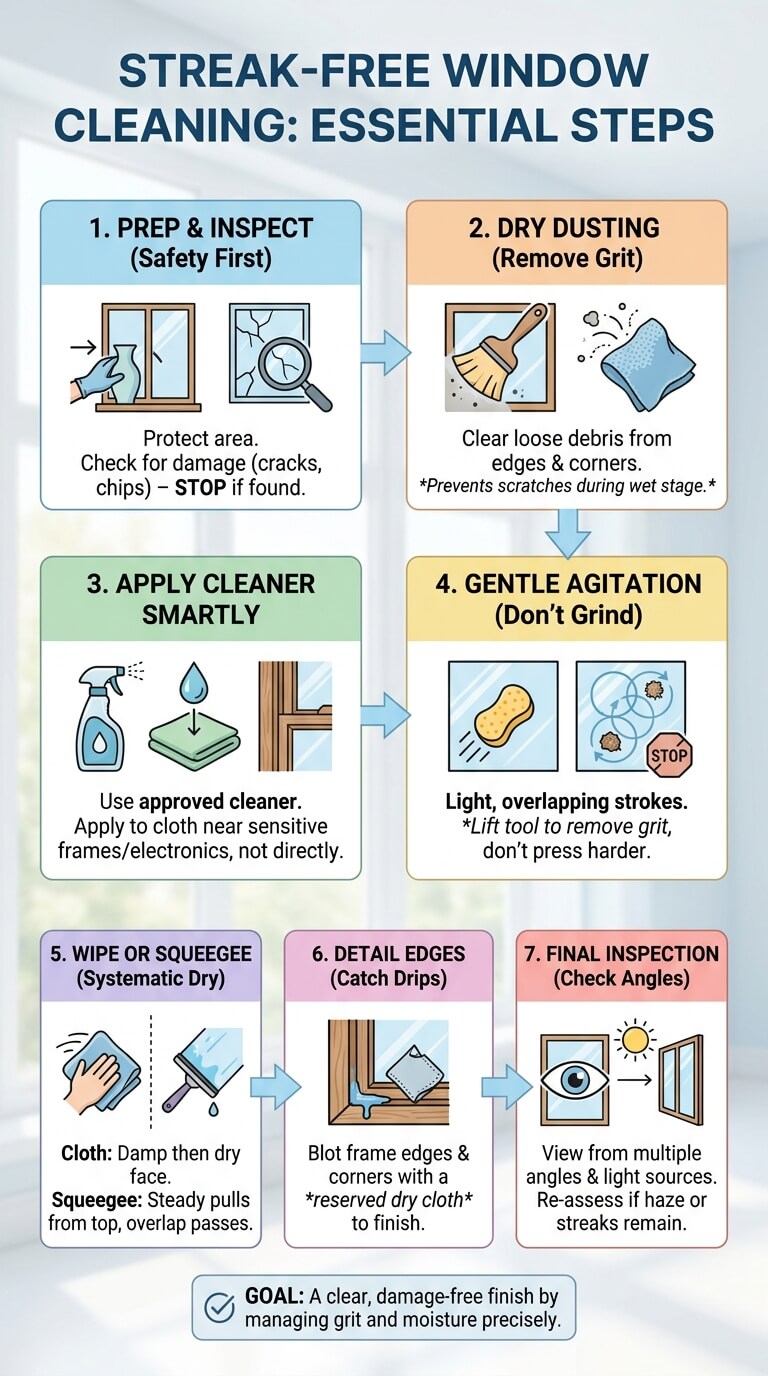
Move fragile items, protect the floor and sill from drips, and secure curtains or shades without stressing their hardware. Close or stabilize the sash as directed by its manufacturer. Look for cracks, chips, loose glazing, damaged film, or moisture between panes. Stop before cleaning if the glass appears structurally damaged.
Dry-remove dust from glass edges and nearby frame
Brush or vacuum loose debris from the upper edge, corners, and adjacent frame. A clean dry microfiber cloth can lift light dust from the pane. Do not turn this step into a full track or sill cleaning job. The goal is to keep grit and falling debris out of the wet glass-cleaning stage.
Apply a controlled amount of approved cleaner
Follow the cleaner label for compatible surfaces, ventilation, and application. The American Cleaning Institute’s window-cleaning guidance recommends a glass or glass-and-multisurface cleaner, followed by a clean drying method. When spraying could reach wood, stone, locks, or electronics, apply product to the cloth or applicator instead.
Agitate fingerprints and film without grinding grit
Move the damp applicator over the pane with light, overlapping strokes. Give extra attention to fingerprints and nose marks, but do not press harder when you feel a particle. Lift the tool, remove the particle, and continue with a clean face. Persistent greasy spots may need a second label-approved application.
Wipe or squeegee section by section
For a cloth finish, wipe the damp section with a clean folded cloth, then rotate to a dry face before it becomes saturated. For a squeegee finish, start at the top and pull through the wet area with steady contact. Slightly overlap each pass so no wet strip is left behind.
Detail corners, edges, and the bottom line
Moisture tends to collect at the frame edges and bottom of the pane. Blot these areas with the reserved detail cloth instead of wiping runoff back across the clean center. Check muntins, latches, and frame joints for drips, but do not spray cleaner directly into hardware or drainage spaces.
Dry and inspect from multiple angles
Allow the pane to settle for a minute, then view it from both sides when accessible. Face the light, then stand at an angle to it. A directional streak points to the final tool movement. Uniform haze suggests residue. A fixed mark that does not change may be a scratch, mineral spot, coating issue, or internal fogging.
Beginner Squeegee Technique
Wetting the pane evenly
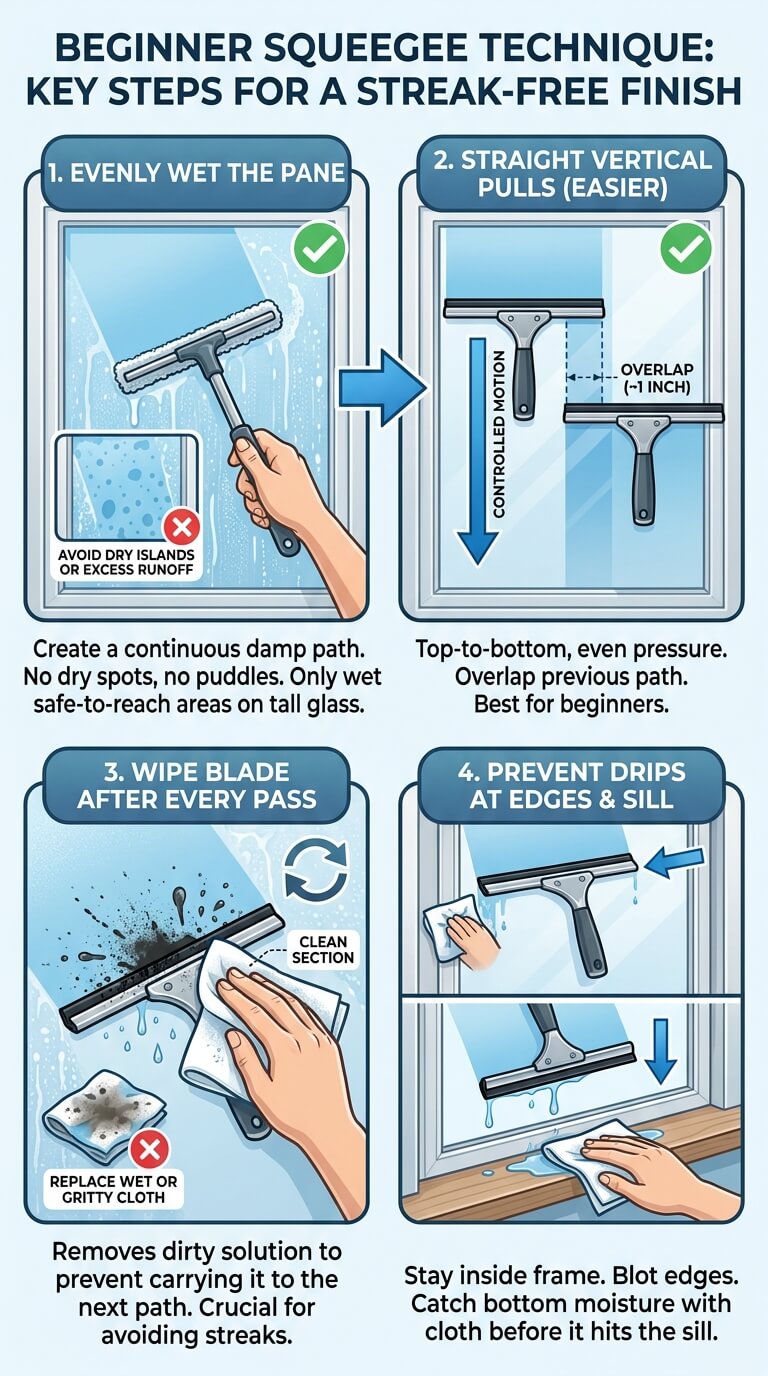
The squeegee needs a continuous damp path. Spread the cleaner evenly without leaving dry islands or excessive runoff. On tall glass, wet only the area you can reach safely and finish promptly. Never stretch beyond comfortable control to complete one long pull.
Straight pulls versus simple overlapping passes
Straight vertical pulls are easier for beginners to repeat. Place the rubber at the top, keep even pressure, and draw it down in one controlled motion. On wide panes, overlap the previous path by about an inch. Horizontal pulls can work on short, wide panes when edge drips are controlled.
Wiping the blade between passes
After every pull, wipe the rubber with a clean section of the detail cloth. This removes dirty solution before it can be carried into the next path. When the cloth becomes wet or gritty, replace it. Continuing with a saturated blade cloth often creates the final streaks.
Preventing drips at edges and the sill
Keep the squeegee inside the frame edge rather than striking trim or dragging across seals. Blot the starting edge before the next pass if water accumulates there. At the bottom, lift the tool cleanly and catch the line of moisture with the detail cloth before it reaches a wood or stone sill.
Cloth-Only Technique for Small or Divided Panes
Fold-and-rotate method
Fold a clean cloth twice so it forms a flat pad with eight usable faces. Clean with one face, turn to a fresh face when it shows soil, and replace the cloth before every face becomes damp. A balled-up cloth hides dirt inside folds and makes pressure less even.
Separate damp and finishing cloths
One cloth should loosen and collect soil; another should provide the final dry finish. Do not use the same saturated cloth for both jobs. The finishing cloth should touch only glass that has already been cleaned, which helps prevent smears from being redistributed across the pane.
Handling muntins, corners, and narrow sections
Work each divided section from top to bottom. Apply cleaner to the cloth when spraying would soak painted muntins or surrounding trim. Use a fingertip behind the folded cloth to reach a corner gently. Avoid scraping along decorative joints, applied film edges, or leaded details.
Troubleshooting Haze and Marks

Streaks that change direction with the final wipe
Directional streaks usually reflect the last cloth or squeegee movement. Reclean only the affected area with a small amount of product and a fresh tool. Change the final wiping direction. If the mark changes with it, the problem is likely residue or tool contamination rather than damaged glass.
Uniform haze from residue
A thin, even haze often means too much cleaner, an unsuitable mixture, or residue in the cloth. Use a clean damp cloth if the product label calls for rinsing, then finish with a dry cloth or squeegee. Do not add another heavy layer of cleaner over the existing film.
Isolated lint or blade lines
Loose fibers suggest the cloth or paper product is shedding. A narrow repeated line suggests a nick or particle on the squeegee blade. Replace the shedding material, clean the blade, and test one short pass. If the line returns in exactly the same place on the glass, inspect for a scratch.
Greasy smears that return
Returning smears indicate that oily soil is still being spread. Clean a smaller area, use a fresh cloth face after each greasy patch, and keep the finishing cloth separate. Check whether nearby cooking, candles, smoke, or frequent pet contact is adding a recurring film.
Cloudiness between panes
Clean and dry both accessible surfaces. If the cloudiness remains sealed inside the insulated unit, household cleaning cannot reach it. Do not drill, separate, or attempt to open the glass assembly. Ask the window manufacturer or a qualified window professional about inspection, warranty, or replacement options.
White spots that survive routine cleaning
Spots from sprinklers, runoff, or repeated water contact may be mineral deposits. Stop repeating the ordinary cleaning cycle when the glass around the spots is clear but the spots remain. Specialty coatings, tint film, and nearby frames require compatibility checks before any deposit-removal product is considered.
Adapting the Method to Nearby Situations
Large sliding glass door panels
Use the same dry-first and controlled-product principles, but divide the large panel into vertical sections. Stabilize your stance and keep runoff away from the threshold, lock, and roller path. Clean handles, frames, and the accessible track separately so dirty track water never reaches the glass cloth. For the rest of the door, including the threshold, track, handles, and operation check, use a sliding glass door cleaning sequence rather than extending the glass-only method.
Reachable exterior surface soil
Choose calm weather and glass that is not hot from direct sun. Remove cobwebs, pollen, and loose grit before washing. Keep both feet on a stable surface and stop when the pane requires climbing, leaning, or uncontrolled extension-tool use. Exterior access decisions take priority over a perfect finish.
Glass next to dirty screens, tracks, or sills
Dusty screens and tracks can redeposit particles on glass. Complete nearby dry debris removal before the final pane cleaning when practical. Use separate tools for each component. A cloth that has entered a track or wiped a sill should not return to the glass because it may carry grit, finish residue, or moisture.
Common Mistakes to Avoid
Cleaning in intense sun
Sunlight helps reveal streaks, but hot glass can dry cleaner before it is removed. Work when the pane is cooler or clean the shaded side of the home first. If product flashes dry during the first few strokes, stop and change the timing rather than applying more.
Reusing one dirty cloth for the entire house
One cloth quickly collects grease, dust, and cleaner. Rotate through several clean cloths and retire each one when its working faces are damp or dirty. Keep a clearly separate detail cloth. This simple change often improves results more than switching to a different cleaning formula.
Spraying mechanisms, frames, or sills indiscriminately
Overspray can reach locks, motors, wood, stone, painted trim, weatherstripping, or drainage openings. Apply cleaner to the tool when nearby materials are sensitive. Wipe accidental drips promptly according to the affected material’s care instructions. Never flood a track or mechanism to clean the pane above it.
Using abrasives or blades as a default
A stubborn speck does not justify an unapproved razor or rough pad. First determine whether it is paint, adhesive, mineral residue, a scratch, or coating damage. Check the glass manufacturer’s instructions before attempting any specialty removal. Stop if the surface catches, changes sheen, or shows a new line.
Assuming homemade formulas suit every coating
Vinegar, dish soap, alcohol, ammonia, and other common ingredients can be incompatible with some films, coatings, frames, or adjacent stone. There is no universal household ratio for every window. Follow the product label and the care instructions for the exact pane and surrounding materials.
When to Stop Cleaning and Reassess
Possible hard-water etching
Mineral deposits may improve with an approved specialty process, but etched glass has physical surface damage. If routine cleaning removes the surrounding film while pale spots or rough cloudy areas remain, do not escalate to aggressive acids, polishing, grinding, or abrasive powders without qualified guidance.
Scratches or chips
A scratch remains fixed and may catch a fingernail, while a chip interrupts the glass edge or surface. Cleaning will not repair either condition. Avoid pressure around damage, keep people away from a pane that appears unstable, and contact the manufacturer or a glass professional for assessment.
Failed insulated-glass seals
Condensation, droplets, or haze between panes points to a possible seal problem. Wiping the room-facing and exterior surfaces will not remove material inside the unit. Do not attempt to dismantle insulated glass. Record the window information and ask about warranty or professional evaluation.
Film, tint, or coating damage
Bubbles, lifted edges, peeling, scratches in film, patchy reflectivity, or color changes are not ordinary soil. Stop scrubbing and locate the installer or product information. Stronger cleaner may expand the damaged area or affect warranty coverage.
Glass that is not safely reachable
A clear window is not worth a fall. Stop when cleaning requires standing on furniture, climbing onto a roof, leaning outside an upper-story opening, working near electrical lines, or controlling a tool beyond a stable reach. Choose a ground-based safe option or qualified service instead.
Streak-Free Window FAQ
Is a squeegee necessary for streak-free windows?
No. A clean squeegee is efficient on large panes, but small windows can be finished well with separate damp and dry microfiber cloths. Tool cleanliness, limited product, and complete edge drying matter more than using a particular tool.
Why do streaks appear only after the glass dries?
Water can temporarily hide a thin layer of cleaner, grease, or cloth residue. As moisture evaporates, that material remains and becomes visible in reflected light. Reduce the product amount, use a fresh finishing tool, and check whether the cleaner requires rinsing.
Should the inside and outside be wiped in different directions?
Different directions can help identify which side holds a directional streak, such as vertical passes inside and horizontal passes outside. It is optional, not a requirement for a clear finish. Do it only when both sides are safely accessible.
Can paper towels leave haze or lint?
Some paper towels shed fibers or spread product as they become saturated. Others can work when the glass and manufacturer instructions allow them. Change sheets frequently, avoid rough products on specialty surfaces, and switch to a clean microfiber cloth if lint appears.
Why does one window stay cloudy after the others look clear?
That pane may have different soil, a coating, mineral deposits, scratches, or fogging between insulated panes. Clean both accessible surfaces using the approved routine method, then inspect from several angles. If cloudiness remains fixed or appears internal, stop repeating the same process and reassess the condition.
Final Thoughts
The most reliable streak-free routine is simple: remove grit while dry, confirm the glass limits, use a small amount of approved cleaner, work in sections, keep tools clean, and detail the edges before inspection. When a mark survives a careful routine cleaning, identify whether it is mineral residue or damage instead of applying more force. Good results come from control, not saturation.

Ethan Carter is the Founder & Editor of HomeCleanSecrets. Based in the United States, he has 5 years of experience creating practical home cleaning, laundry care, stain removal, decluttering, and home organization content. His goal is to help everyday households clean smarter and build simple routines that are easier to maintain.
Read more about Ethan Carter on his author page: https://homecleansecrets.com/ethan-carter/