
Window tracks collect more than ordinary dust. Open windows pull in pollen, grit, insects, and windblown debris, while pets and household activity add hair, crumbs, and sticky marks.

The safest general approach is to inspect the window without forcing it, remove loose debris while it is dry, use only enough moisture to lift the residue that remains, and dry the channel before closing the sash. This method is intended for accessible tracks and exposed openings on an operable household window.
Before beginning, locate the window manufacturer and product information when possible. Track shapes, weatherstripping, finishes, drainage designs, and maintenance limits differ. A good test is to clean one short, open section first.
Quick Answer: Clean Dry Debris Before Adding Moisture

Open and inspect without forcing the sash
Unlock and open the window only as far as it moves normally. Support it in the position recommended for that design, and keep fingers away from pinch points. Look for cracked parts, loose hardware, displaced weatherstripping, bent metal, standing water, or severe corrosion before placing a tool in the channel.
Vacuum loose material
Fit a crevice attachment to a vacuum and begin with the widest exposed areas. Hold the nozzle slightly above fragile seals so suction lifts dust rather than pulling on weatherstripping. Work slowly enough to collect grit instead of scattering it.
Brush corners toward the vacuum
Use a soft detail brush to move particles out of intersections and tight ends while the vacuum nozzle waits nearby. Short strokes are easier to control than vigorous scrubbing. Direct debris toward the open channel, not into holes, under seals, or behind trim.
Damp-clean only the residue that remains
After vacuuming, place a small amount of a compatible cleaner or plain water on a cloth or controlled applicator, not directly into the track. Wipe the visible surface, changing to a clean section of cloth as soil transfers. The American Cleaning Institute advises following the product label and the care directions for the surface in its hard-surface cleaning guidance.
Dry before closing
Press a dry absorbent cloth into the channel and corners until no visible moisture remains. Leave the window open briefly when conditions are safe and the manufacturer permits it. Operate the sash only after tools have been removed and the path is dry.
Know Which Part You Are Cleaning

Sash track and frame channel
The sash is the movable part that holds the glass. Its track or channel guides that movement and may include raised rails, grooves, weatherstripping, or hardware. Clean only the accessible surfaces where debris rests.
Narrow corners and intersections
Track ends often collect compacted material because a cloth cannot lie flat there. Corners may also contain fasteners, seals, or molded stops. Use light, directed brush strokes and inspect frequently.
Accessible weep or drainage openings
Some windows include exposed openings that let incidental water leave the sill or frame system. Their location and appearance vary by product. Andersen describes exterior weep holes as part of a contain-and-drain design in its explanation of water standing in a window sill. Treat only a clearly identified, visible opening as a drainage feature.
Sill and trim surfaces that are not the track
The sill or interior ledge is a broad horizontal surface below or beside the moving channel. It may be painted wood, vinyl, stone, tile, or another material that needs different moisture and cleaner limits.
Sliding-door track as a different system
A patio door has a larger threshold, roller path, panel edges, locks, and weather seals. Although the dry-first principle still helps, the door system carries more weight and may hide rollers beneath the panel.
When This Guide Applies
Dust, grit, insects, pet hair, pollen, and loose soil
Dry household debris is the best match for this method. It can usually be lifted with suction and a soft brush before any liquid is introduced. Removing these particles first reduces scratching risk and prevents a damp cloth from packing grit into corners. Track cleaning is only one part of window care; nearby glass, sills, screens, frames, and treatments each have different moisture and material limits.
Light mud and compacted debris
Dried mud should be treated as a layered problem. Vacuum the loose crust, break up only the exposed compacted material with a non-scratch tool, and vacuum again. Add minimal moisture at the end to soften the thin residue left on the surface.
Sticky residue that remains after vacuuming
Finger residue, drink splashes, plant drips, and household film may stay attached after dry cleaning. Identify the surrounding finish and test a compatible cleaner on a short section. Apply it to the cloth so the amount is controlled.
Situations that suggest corrosion, damaged weatherstripping, water intrusion, or mechanism failure
Cleaning is not the correct next step when metal is flaking, a channel is bent, a seal is torn, water repeatedly enters after storms, or the sash remains difficult to move after visible debris is gone. Photograph the condition, note when it occurs, and check the manufacturer manual or request qualified inspection instead of scraping or forcing the assembly.
Tools for Narrow Tracks and Corners
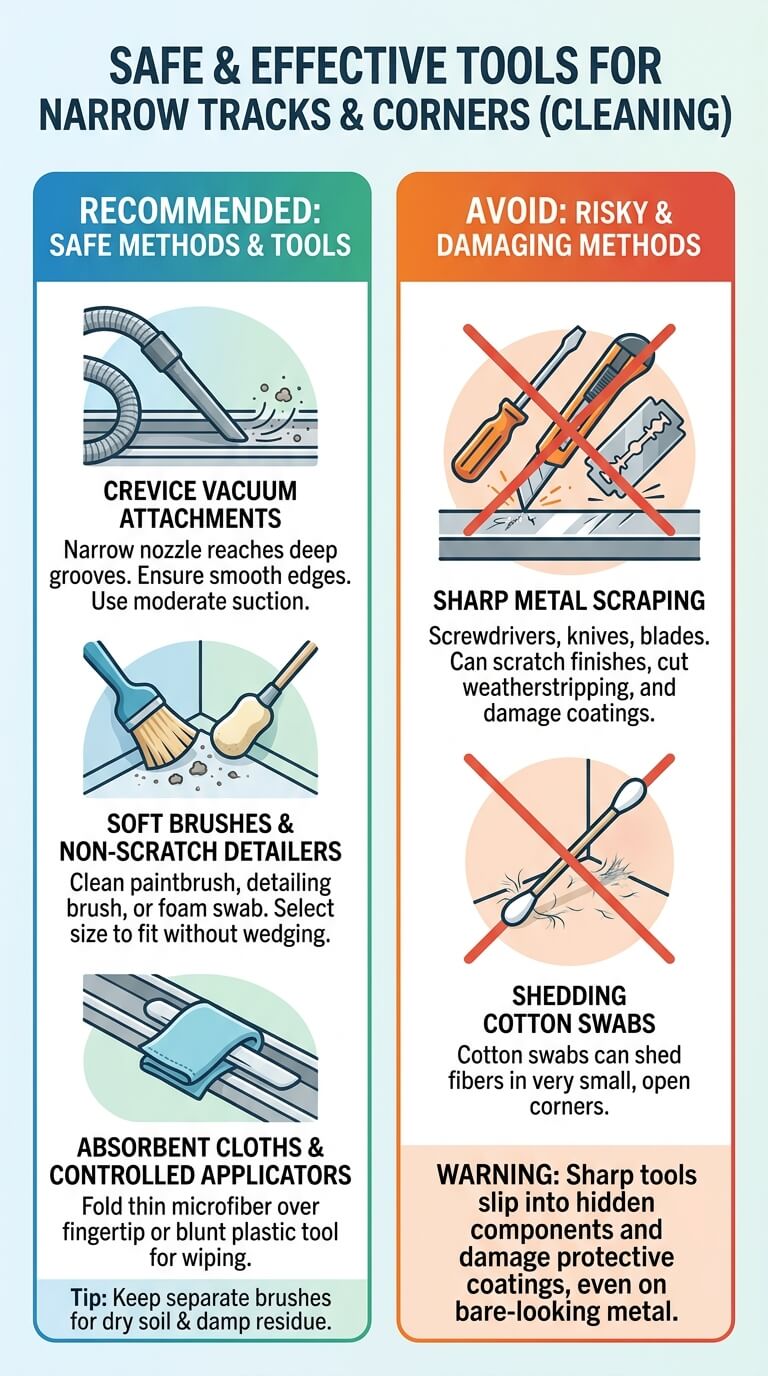
Crevice vacuum attachments
A narrow nozzle reaches open grooves while keeping most of the vacuum body away from glass and hardware. Choose an attachment with smooth edges and inspect it for embedded grit. Moderate suction is usually enough.
Soft brushes and non-scratch detail tools
A clean paintbrush, soft detailing brush, foam swab, or manufacturer-approved non-scratch tool can dislodge debris. Select a size that fits without wedging. Keep separate brushes for dry soil and damp residue.
Absorbent cloths and controlled applicators
Thin microfiber cloths can be folded over a fingertip or a blunt plastic detail tool to reach a groove without exposing a hard edge. Cotton swabs may help in very small, open corners, but they can shed fibers.
Why sharp metal scraping is not a universal method
Screwdrivers, knives, razor blades, and metal picks can scratch finishes, cut weatherstripping, widen drainage openings, or slip into concealed components. Even a track that appears to be bare metal may have a coating.
Step-by-Step Window Track Cleaning

Protect the sill and inspect the sash path
Place an absorbent towel on the interior ledge and floor to catch debris. Remove nearby plants, curtain hems, and fragile objects. Trace the visible movement path with your eyes and identify locks, stops, balance components, and flexible seals.
Remove the screen only when its design and manufacturer guidance allow
A screen can block access or drop debris back into the track, but removal methods vary. Do not bend the frame, pull on mesh, or improvise around clips. If the screen does not release easily using the intended tabs or instructions, leave it in place and clean only the accessible area.
Vacuum from open areas toward corners
Begin where the nozzle has room to move, then approach the ends. This removes the large volume first and gives corner debris somewhere to go. Keep the nozzle parallel to the groove when possible.
Loosen packed soil without driving it into gaps
Hold the vacuum near the deposit and tease the upper layer toward the suction with a soft brush. Work in small increments. When packed soil contains tiny stones, lift them individually rather than dragging them along the channel.
Clean narrow corners and junctions
Wrap a thin cloth around a blunt, non-scratch tool and press it gently into the visible corner. Pull outward in one direction so loosened material exits the junction. Refold the cloth after each dirty pass.
Wipe light residue with minimal moisture
Apply the smallest useful amount of labeled, compatible cleaner to the cloth. Wipe the exposed channel in short sections, then follow immediately with a clean damp cloth if the label requires residue removal. Keep liquid away from locks, balance systems, wood edges, and cavities.
Dry the full channel before operating the window
Blot the base, sides, rail, and corners with a dry cloth. Inspect weatherstripping for trapped droplets and wipe them without pulling the strip. Moisture left in a closed channel can hold dust, transfer to wood, or hide recurring water.
Recheck movement without forcing
Remove every cloth, brush, and attachment, then operate the window slowly through its normal range. A cleaner track may feel smoother because grit is gone, but cleaning does not correct a bent rail, worn balance, damaged roller, misalignment, or lock problem. Stop if movement catches, tilts unexpectedly, or requires unusual force.
Product-specific maintenance directions take priority over generic habits. The Pella window and patio door owner’s manual repeatedly emphasizes keeping tracks free of dirt and debris, while maintenance details vary by window style. Confirm the exact model before applying any lubricant or removing a component.
How to Handle Specific Track Soil

Fine dust and pollen
Fine particles spread easily when wiped. Vacuum slowly, then use a dry microfiber cloth folded into a narrow pad. If a yellow or gray film remains, finish with a barely damp cloth approved for the frame material. Clean during calm conditions when an open window will not immediately draw new pollen into the channel.
Pet hair and insect debris
Hair often winds around rough edges, while insect fragments lodge at corners and screen-side junctions. Loosen them with a dry brush and capture them immediately with suction. Wear disposable gloves if desired, wash hands afterward, and avoid crushing debris into porous weatherstripping. Check the screen edge for gaps that may be contributing to repeated buildup.
Dried mud or compacted grit
Let damp mud dry if doing so will not worsen a moisture problem, then remove the loose portion mechanically with soft tools and suction. For the remaining film, touch a damp cloth to a small area until it softens, then lift it outward. Repeated controlled passes are safer than pouring water along the entire track.
Sticky household residue
First determine whether the residue is food, adhesive, plant sap, grease, or an unknown product. Check cleaner compatibility with vinyl, paint, metal coating, wood, and seals. Allow only the label-approved contact time, then remove the cleaner completely. Stop if the finish becomes tacky, changes color, or transfers to the cloth.
Persistent damp debris or dark discoloration
Dark material in a wet track should not automatically be labeled as mold. Remove loose debris safely, dry the area, and observe whether moisture returns. The EPA recommends acting quickly when condensation or moisture collects around windows and addressing the water source in its guide to mold and moisture. Recurring dampness deserves investigation beyond surface wiping.
Accessible Weep and Drainage Openings
How to recognize an exposed opening
An exposed drainage opening is generally a deliberate hole or slot located where the manufacturer designed water to exit. It may be easier to identify from the exterior side, but appearance differs by window type. Check diagrams or product instructions. Do not mistake a fastener hole, assembly gap, crack, or damaged seal for a drain.
Removing only visible loose blockage
If an identified opening contains a leaf fragment, insect, or loose dirt at the entrance, lift or vacuum only what is clearly visible and reachable. Work from the opening outward. Avoid enlarging the slot or pushing a tool through it. The goal is to remove an obvious surface obstruction, not to clean the entire concealed path.
Why not to probe concealed drainage cavities
Hidden drainage routes can include baffles, chambers, seals, and connections that are not accessible household cleaning surfaces. A wire, skewer, compressed-air blast, or liquid flush may drive debris deeper or damage the design. When drainage seems blocked beyond the exposed entrance, use the manufacturer support process or qualified service.
Clues that recurring water requires inspection beyond cleaning
Standing water after ordinary weather may occur briefly in some contain-and-drain designs, but repeated overflow into the room, staining, swollen wood, loose trim, corrosion, or water that appears during calm dry conditions needs assessment. Record the weather, window position, and location of the water. Do not seal or alter openings without product-specific guidance.
Track Condition Inspection

Dirt versus corrosion
Dirt usually transfers to a cloth or moves under a brush. Corrosion may look rough, pitted, powdery, flaking, or permanently discolored. Do not scrub aggressively to make corroded metal look new. Remove loose surface debris gently, dry the area, and seek guidance when the channel has lost material or the finish is lifting.
Bent channel versus removable debris
Sight along the rail under good light. A pebble or hardened deposit creates a localized obstruction that may be lifted. A bent rail changes the shape of the track itself and often causes the sash to catch at the same point. Do not hammer, pry, or reshape a window channel as part of cleaning.
Damaged or displaced weatherstripping
Weatherstripping may be fuzzy, rubber-like, foam, or another flexible material. It should not be brushed as if it were stubborn dirt. If it is loose, torn, flattened, hardened, or pulled from its groove, stop working around it. Photograph its position and check replacement or service instructions for the exact window.
Lock, balance, or sash resistance
A lock that will not align, a sash that drops, or a window that will not stay open points to a functional issue. Cleaning visible debris may remove one obstruction, but it should not involve opening balance covers or adjusting hardware. Keep the window secured and arrange inspection when safe operation is uncertain.
When a rough track is not a cleaning problem
Some textured finishes and molded channels are naturally less smooth than polished metal. Others feel rough because a coating is deteriorating. Compare a clean section with the problem area. If both have the same texture, more scrubbing will not help. If the surface is changing or shedding, stop before causing further damage.
Maintenance Based on Exposure
Frequently opened windows
Windows used for daily ventilation collect material faster than rarely opened units. Inspect the channels when you notice visible grit, increased drag, or debris at the corners. A brief dry vacuuming before buildup compacts is usually easier than a wet deep clean. Always close and lock the window normally after maintenance.
Pet, insect, and pollen exposure
Pet beds near a window, seasonal pollen, and lights that attract insects can increase track debris. During high-exposure periods, use a soft brush and vacuum as soon as a visible layer forms. Address torn screens or gaps separately. Avoid fragrance sprays or oily treatments that make fine particles adhere to the channel.
Windows behind screens
Screens reduce some debris but can also shed trapped dust into the track when moved. Inspect the lower screen edge and the channel beneath it. Remove only a screen designed for homeowner removal, and support the frame. Keep screen-cleaning water away from the open window assembly until the screen is fully rinsed and dry.
Exterior-facing tracks after storms or dusty seasons
Wind can carry sand, leaves, and rain-spattered soil into exposed channels. Inspect once conditions are calm and access is safe. Begin dry whenever the material has dried without causing damage. If water repeatedly enters the interior, do not treat each event as a routine cleaning chore. Investigate the source and window condition.
Common Window Track Mistakes
Wetting grit before vacuuming
Water binds dust and sand into paste, making it harder to remove from narrow corners. The paste may also move beneath seals or scratch a finish when wiped. Collect dry particles first, even when a final damp step will be needed. Replace a damp vacuum method with ordinary suction unless the equipment and window instructions specifically support it.
Flooding channels
Pouring water into a track can send moisture toward wood, walls, concealed cavities, hardware, or the floor. It also makes it difficult to tell whether later water is cleaning runoff or a real leak. Control moisture on the cloth, work in sections, and dry each section before continuing.
Spraying into locks, balances, or concealed cavities
A broad spray may reach areas that were never intended to be wet or coated with cleaner. Apply product to the cleaning tool whenever hardware is nearby. Do not spray behind covers, through slots, or around motorized accessories. Wipe accidental overspray promptly according to the component instructions.
Forcing the sash
Grit can obstruct movement, but a hard pull may damage a lock, balance, guide, or frame. Clean only the accessible portion with the sash in a safe normal position. If the window must be forced to expose the dirty area, stop. Access should come from the intended operation or approved service procedure.
Treating every dark mark as mold
Dark marks can be dirt, insect residue, oxidized metal, staining, deteriorated seal material, or biological growth. Avoid guessing from color alone. Clean ordinary removable soil, dry the area, and address recurring moisture. Seek appropriate help for extensive contamination, strong persistent odor, water damage, or health concerns rather than relying on stronger household chemicals.
Nearby Cleanup Without Mixing the Jobs
Wiping the nearby sill after track debris removal
Fold the protective towel inward so grit does not scatter, then vacuum the sill before wiping it. Match the method to the sill material. Painted or finished wood needs limited moisture, while stone may restrict acidic products. Do not transfer the dirty track cloth onto a more delicate ledge or trim finish.
Checking the screen as a debris source
Look for loose mesh, a bent frame, torn corners, or heavy dust along the lower edge. These conditions can contribute debris without being corrected by track cleaning. Support the screen and follow its removal instructions. Do not press, scrub, or hose it while it remains attached over an open interior space.
Recognizing when the job is actually a sliding-door threshold problem
A wide floor-level track carrying a heavy glass door requires a door-specific sequence. Pet hair and patio grit may look similar, but the threshold can contain roller paths, locks, and drainage zones. Clean only visible loose debris if needed, and do not apply window-sash assumptions to panel removal, lubrication, or adjustment.
When to Stop and Seek Repair or Moisture Help
Sash, lock, or balance malfunction
Stop using the window when the sash drops, will not stay in position, separates from its guide, or cannot lock normally. Keep children and pets away from an unstable opening. Cleaning cannot restore a failed balance or realign damaged hardware. Contact the manufacturer or a qualified window professional with the product details.
Bent or corroded track
A channel that is visibly deformed, deeply pitted, flaking, or separated from the frame needs evaluation. Do not sand, hammer, pry, or fill it as part of routine care. Prevent loose debris from spreading, keep the area dry when possible, and ask whether repair or component replacement is appropriate.
Damaged weatherstripping
Torn or displaced weatherstripping can affect air and water performance and may snag during operation. Avoid gluing or trimming it without instructions for the exact design. Note where it sits, whether the sash catches it, and whether moisture appears nearby. Product-specific replacement may be simpler and safer than repeated cleaning around the damage.
Persistent water intrusion or inaccessible contamination
Water that repeatedly reaches interior finishes, contamination behind covers, swollen framing, or a strong persistent odor exceeds surface track cleaning. Dry accessible wet areas promptly without disturbing damaged materials, and address the moisture path. Qualified help may be needed to inspect installation, drainage, wall conditions, or a larger affected area.
Window Track FAQ
Can I pour water into window tracks?
Generally, no. Use moisture on a cloth or small applicator so you can control where it goes and remove it immediately. Some window systems manage incidental water through designed drainage, but that does not make pouring water into every channel an appropriate cleaning method.
Should I lubricate a window track after cleaning?
Only when the manufacturer instructions for the exact window specify a product, amount, and location. Oil or an unsuitable spray can attract grit, stain finishes, affect weatherstripping, or reach hardware. A clean track that still resists movement may have a mechanical problem rather than a need for lubricant.
How do I clean corners a vacuum cannot reach?
Loosen visible debris with a soft brush while holding the crevice nozzle nearby. For residue, wrap a thin cloth around a blunt non-scratch tool and pull outward. Do not insert the tool deeper than you can see, and stop if it catches on a seal, fastener, or unfamiliar component.
What if the window is still hard to move after cleaning?
Confirm the track is dry and no tool, cloth, or debris remains. Then stop forcing the sash. Bent channels, damaged guides, worn balances, misalignment, locks, and weatherstripping problems require product-specific diagnosis. Continued force can turn a serviceable problem into more extensive damage.
Should accessible weep openings be completely clear?
The visible entrance should not be packed with loose debris, but do not enlarge it or probe the hidden path. Verify that the opening is actually part of the drainage design. Recurring standing water, overflow, or unclear drainage should be discussed with the manufacturer or a qualified professional.
Final Thoughts
Clean window tracks successfully by controlling the order of work. Inspect first, vacuum dry debris, brush corners toward the suction, use minimal moisture for the remaining film, and dry the full channel before moving the sash. When resistance, corrosion, damaged seals, or recurring water remains after the visible dirt is gone, stop cleaning and address the condition rather than applying more force.

Ethan Carter is the Founder & Editor of HomeCleanSecrets. Based in the United States, he has 5 years of experience creating practical home cleaning, laundry care, stain removal, decluttering, and home organization content. His goal is to help everyday households clean smarter and build simple routines that are easier to maintain.
Read more about Ethan Carter on his author page: https://homecleansecrets.com/ethan-carter/