
Window sills collect dust, pollen, insect debris, fingerprints, water rings, and condensation residue. The challenge is that two sills that look similar may react very differently to water, acids, abrasives, or strong cleaners.

The safest approach is to identify the material and finish, remove loose grit while dry, test the mildest suitable method in a hidden spot, and use as little moisture as the surface allows. Dry the sill promptly and inspect it again under good light.
Cleaning can remove surface soil, but it cannot reverse swollen wood, failed paint, deep stone staining, corrosion, water entry, or a deteriorated seal. Stop when the surface is soft, flaking, cracked, or repeatedly wet after you have dried it.
Quick Answer: Identify the Material Before Choosing Moisture or Cleaner
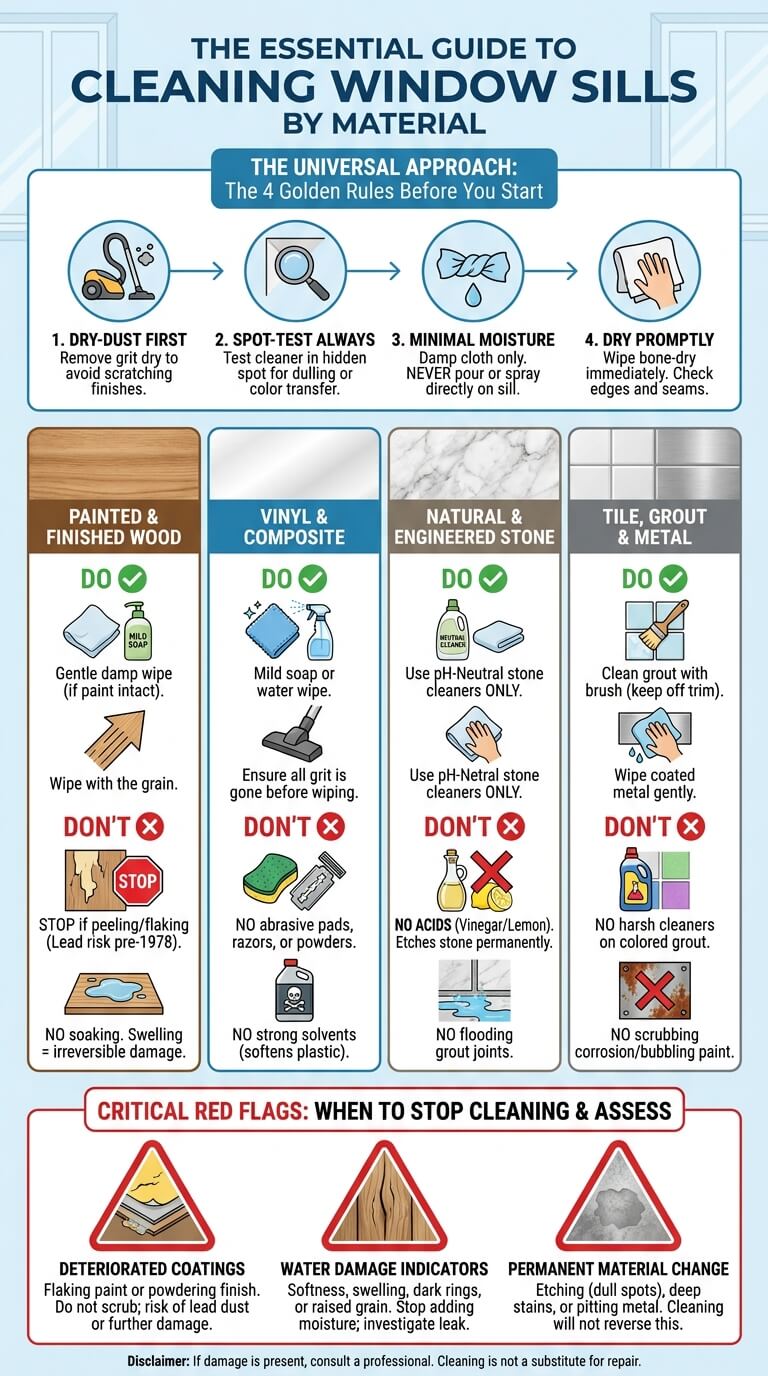
Dry-dust first
Vacuum loose debris with a soft brush attachment or lift it with a clean microfiber cloth. Work from the back edge toward the room so grit does not fall into the window track. Avoid dragging sand or insect fragments across paint, vinyl, or polished stone because even small particles can leave scratches.
Spot-test in an inconspicuous area
Test the cloth, cleaner, and pressure together on a small section near a corner or behind a curtain. Let the area dry fully before judging it. Watch for color transfer, dulling, tackiness, whitening, raised grain, or a change in sheen. Because the sill sits beside glass, tracks, frames, screens, and treatments, it helps to treat it as one component within a complete window-cleaning system.
Use the least moisture the material allows
Place liquid on the cloth rather than pouring or spraying it onto the sill. A cloth that feels damp but does not drip is easier to control near joints, trim, tracks, and wall paint. Work in short sections and follow immediately with a dry cloth.
Dry and inspect for damage
After cleaning, check the front edge, corners, seams, and the area directly below the glass. A good test is to press a dry white cloth against the surface. If it picks up paint, rust-colored residue, loose fibers, or persistent dampness, stop and assess the condition instead of repeating the cleaning cycle.
Is It a Sill, Stool, Ledge, or Track?
Practical names and locations
People often call every horizontal area at the bottom of a window the sill. Indoors, the projecting finished ledge may technically be a stool, while the sloped exterior piece is the sill. For everyday cleaning, the important point is not the label but the material, finish, slope, joints, and exposure to water.
Horizontal finish surface versus moving channel
The broad ledge where plants, dust, or condensation collect is cleaned according to its surface material. The narrow groove where the sash moves is a track and needs a dry-debris-first method that protects weatherstripping and drainage openings. Do not pour sill-cleaning liquid into the channel beside it.
Trim and wall paint next to the sill
Aprons, casings, drywall returns, and painted seams may surround the ledge. These areas can have a different coating from the sill itself. Keep the cloth folded to the working surface and avoid spreading moisture onto wallpaper, unsealed wallboard, cracked caulk, or peeling trim paint.
Identify the Sill Material and Finish
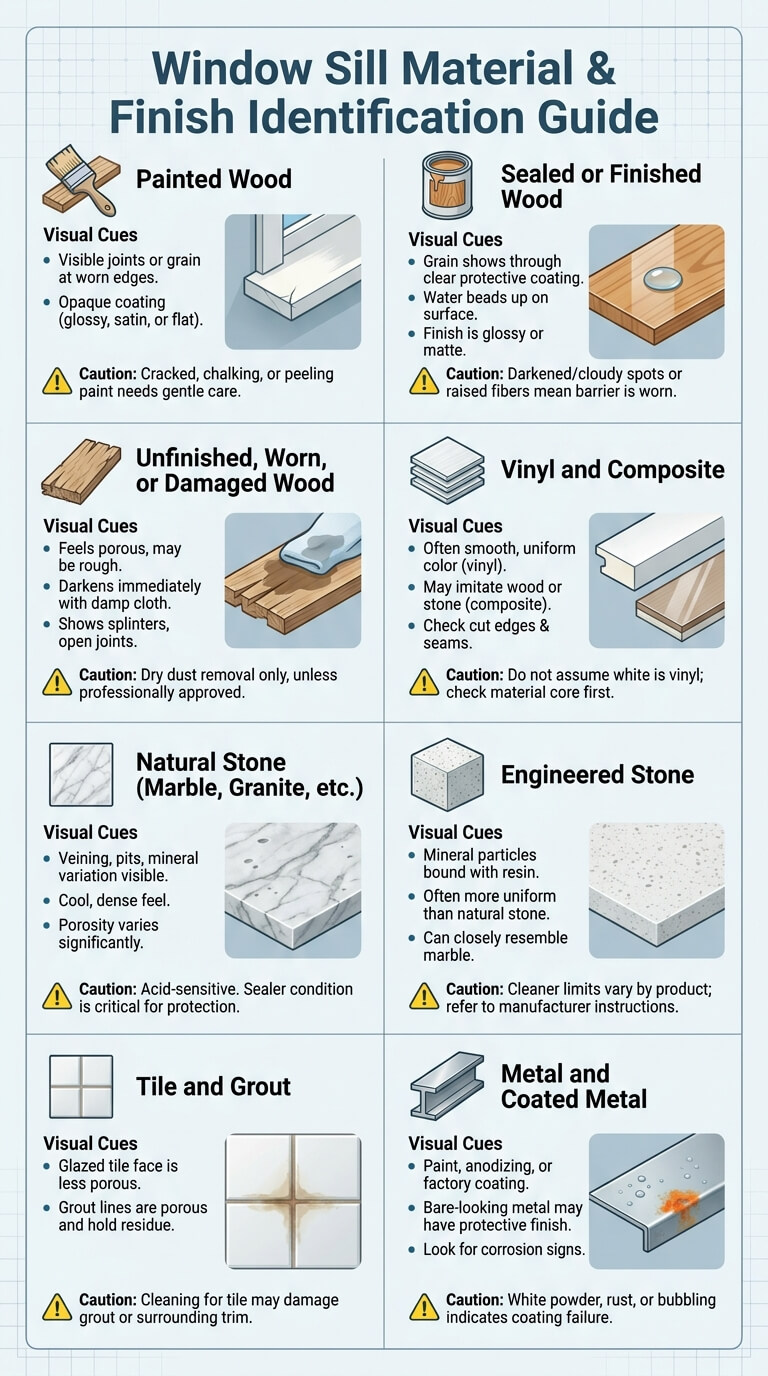
Painted wood
Painted wood usually has visible joints, grain at worn edges, or a profile made from solid or finger-jointed trim. The coating may be glossy, satin, or flat. Intact paint can often tolerate gentle damp wiping, while cracked, chalking, or peeling paint needs much more caution.
Sealed or finished wood
Clear-finished wood shows grain through varnish, polyurethane, oil, or another protective coating. The finish may look glossy or nearly matte. Water should remain on the surface rather than soaking in. Darkened end grain, cloudy finish, or raised fibers suggest the barrier is no longer fully protective.
Unfinished, worn, or damaged wood
Bare wood feels more porous and may darken immediately when touched with a damp cloth. Worn wood can also show splinters, open joints, softness, or swollen edges. Limit cleaning to dry dust removal unless the manufacturer or a qualified professional confirms a suitable method.
Vinyl and composite
Vinyl sills are often smooth, molded, and uniform in color. Composite ledges may imitate wood or stone and can include a film, coating, or mixed material core. Do not assume a white sill is vinyl. Look at cut edges, seams, underside areas, and product records before choosing a cleaner.
Natural stone
Marble, limestone, travertine, granite, and other natural stones vary in porosity and acid sensitivity. Veining, small pits, mineral variation, or a cool dense feel may provide clues, but appearance alone is not reliable. Sealer condition also changes how quickly a spill absorbs.
Engineered stone
Engineered stone may contain mineral particles bound with resin. It can look more uniform than natural stone, but some products resemble marble or quartzite closely. Heat, solvent, abrasive, and cleaner limits depend on the specific product, so manufacturer instructions remain the safest reference.
Tile and grout
Tile sills may be ceramic, porcelain, glass, stone, or another material. The grout lines are more porous than glazed tile and can hold residue. A cleaning method that is acceptable on the tile face may still be unsuitable for natural-stone trim, colored grout, or a surrounding painted edge.
Metal and coated metal
Metal sills may be aluminum, steel, or another alloy with paint, anodizing, or a factory coating. Bare-looking metal may still have a protective finish. White powder, orange staining, bubbling paint, or pitting suggests corrosion or coating failure rather than ordinary dirt.
Soil and Condition Assessment
Loose dust and insect debris
These are usually removed without liquid. Vacuum carefully around corners, then wipe with a dry cloth. If insects collect repeatedly, check the nearby screen, gaps, and exterior exposure rather than relying on frequent wet cleaning.
Fingerprints and light household soil
Oily marks often respond to a cloth lightly dampened with water or a mild cleaner approved for the finish. Use small circular motions only after grit is gone, then wipe in one direction with a clean cloth. Stop if the surface becomes tacky or the finish transfers.
Water rings and condensation residue
A pale ring may be dried mineral residue, cleaner film, or a change in the finish caused by repeated wetting. A dark ring on wood may indicate moisture has moved below the coating. Begin with the gentlest compatible wiping method and do not promise that every ring will disappear.
Stains or discoloration
Discoloration that remains after a mild cleaning pass may be absorbed staining, ultraviolet fading, rust migration, tannin bleed, stone etching, or coating damage. Compare it with an unaffected area under the same light. Repeated scrubbing can enlarge the damaged zone without improving the color.
Peeling paint, softness, swelling, corrosion, or failed caulk
These are stop signs. Do not scrub loose paint, press into soft wood, scrape corrosion, or use cleaning as a substitute for repairing a failed joint. Photograph the condition and note whether it follows rain, cold weather, indoor humidity, or window operation.
Universal Preparation That Is Safe Across Most Materials
Protect the floor and nearby fabric
Move plants, electronics, books, and decorations. Lift curtain hems and secure them away from the work area without stretching the fabric. Place an absorbent towel below the sill, but do not block a heater, vent, or safe window operation.
Remove loose grit without scratching
Use a vacuum brush with clean bristles and moderate suction. If you prefer a cloth, lift debris rather than sweeping it across the finish. Replace the cloth when it becomes gritty. A toothbrush can be too stiff for soft paint or delicate stone, so test any brush before using it on a visible area.
Read cleaner labels and manufacturer guidance
Check whether the product is approved for painted wood, vinyl, sealed stone, grout, or metal. Follow dilution, ventilation, contact-time, rinsing, and protective-equipment directions. Window and finish manufacturers may set narrower limits than a general household-cleaner label.
Pella’s current window-cleaning guidance emphasizes checking product-specific instructions because methods vary by window type and product line. That same principle applies to sills, trim, and factory finishes.
Control liquid near tracks, walls, and seams
Fold the damp cloth into a compact pad and keep a dry cloth in the other hand. Clean from the center toward edges so you can catch moisture before it reaches a seam. Do not spray locks, tracks, drainage cavities, wall joints, or gaps between the sill and frame.
How to Clean Painted Wood Window Sills
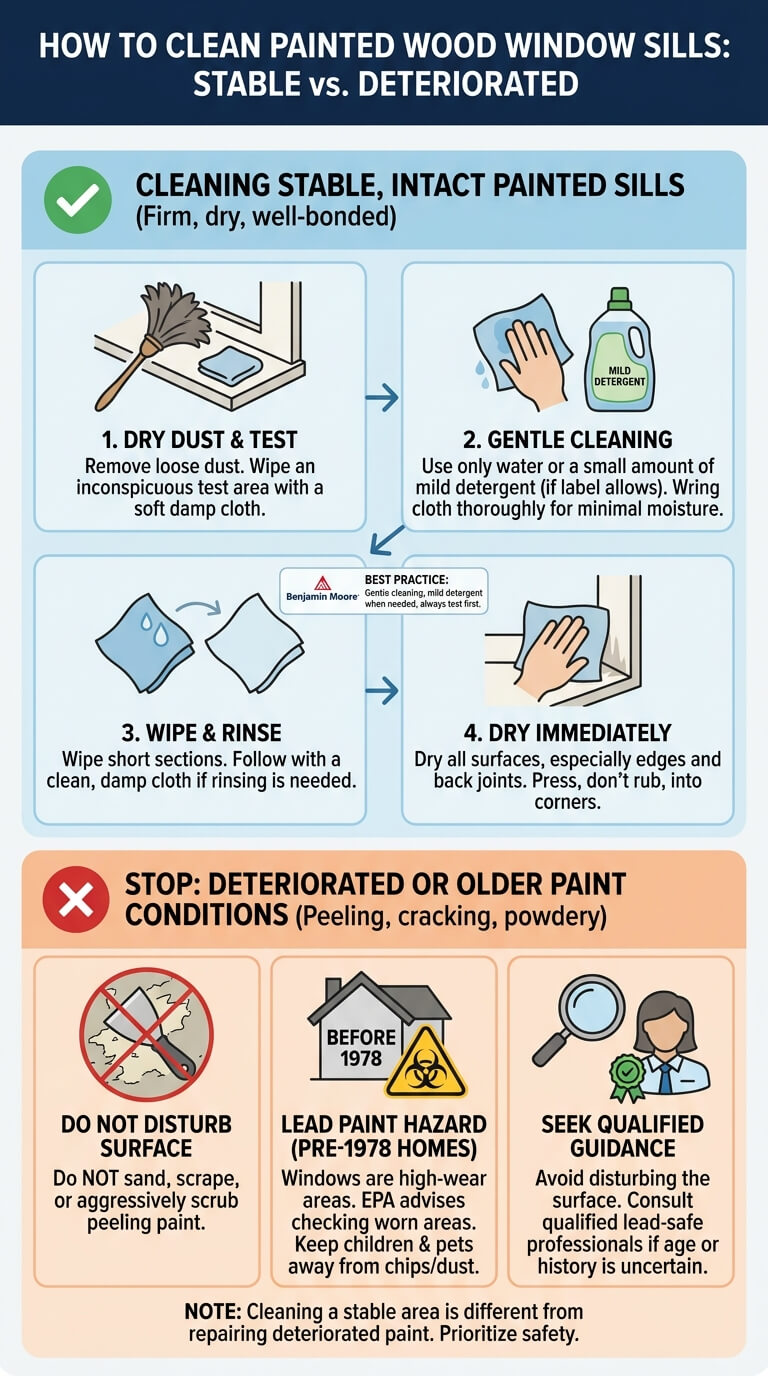
Stable intact paint
Paint should feel firm, dry, and well bonded, without cracking or powdery residue. After dry dusting, wipe a test area with a soft damp cloth. If plain water is not enough, use a small amount of mild detergent only when the paint and product directions allow it.
Benjamin Moore recommends gentle cleaning, mild detergent when needed, and testing in an inconspicuous location in its advice on cleaning painted surfaces without damage. Use the same cautious approach on intact painted trim.
Minimal-moisture wiping
Wring the cloth thoroughly and wipe one short section. Follow with a second cloth dampened with clean water if the cleaner label calls for rinsing. Dry immediately, especially along the back joint and front edge where water can collect.
Edge and corner drying
Press a dry cloth into inside corners rather than rubbing hard. Use a wrapped fingertip or a blunt plastic detail tool under the cloth to reach narrow edges. Do not insert tools beneath peeling paint or into open seams.
Deteriorated or older paint stop conditions
Do not sand, scrape, or aggressively scrub peeling paint during cleaning. Homes built before 1978 may contain lead-based paint, and windows are high-wear areas where dust can form. The EPA advises checking worn painted areas such as windows and window sills in its guidance on making a home lead-safe.
Keep children and pets away from chips or dust, avoid disturbing the surface, and seek qualified lead-safe guidance when the age or coating history is uncertain. Cleaning a stable nearby area is different from repairing or removing deteriorated paint.
How to Clean Sealed, Finished, or Damaged Wood Sills
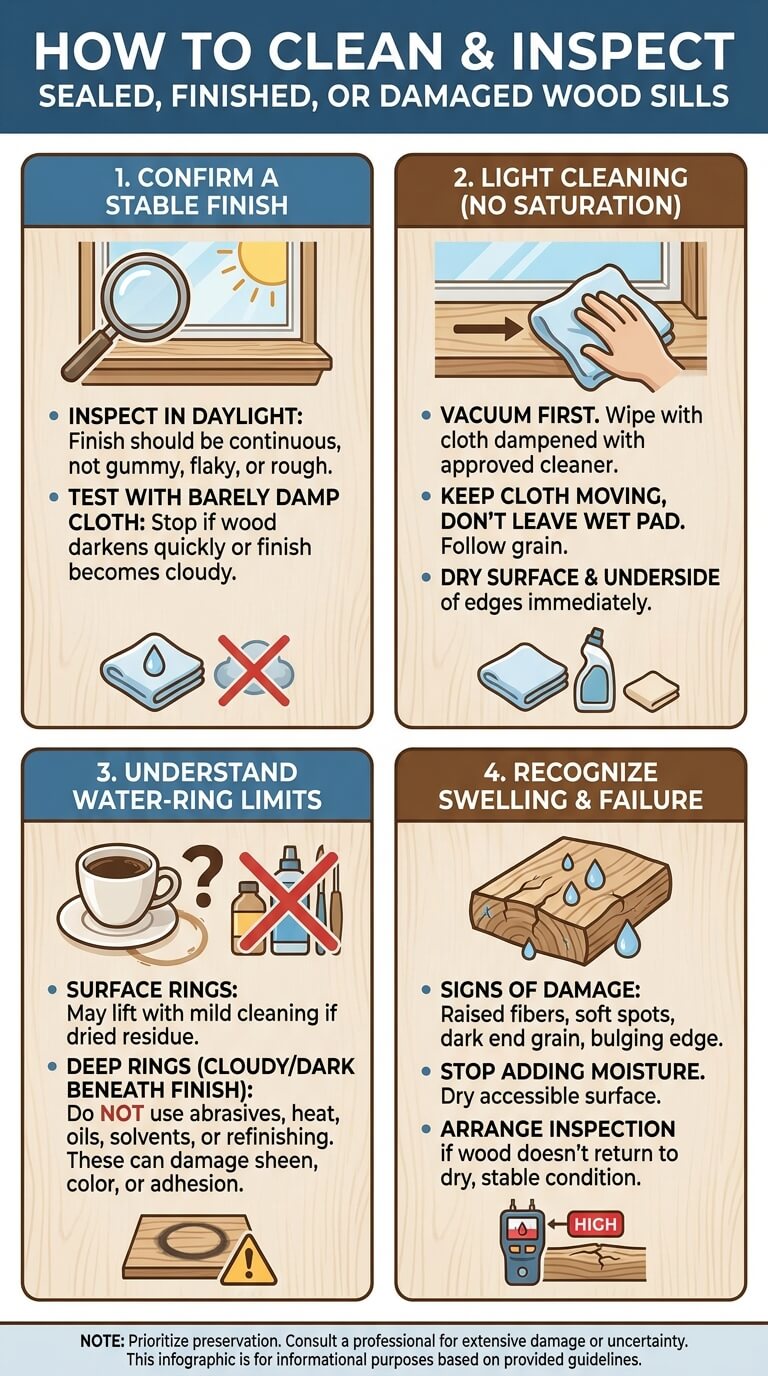
Confirming a stable finish
Inspect the wood in daylight. A stable clear finish should be continuous and should not feel gummy, flaky, or rough at isolated wet spots. Test with a barely damp cloth and stop if the wood darkens quickly or the finish becomes cloudy.
Light cleaning without saturation
After vacuuming, wipe with a soft cloth dampened with a cleaner approved for the finish. Keep the cloth moving and do not leave a wet pad sitting on the wood. Follow the grain when practical, then dry the surface and underside of any projecting edge.
Water-ring limits
A surface ring may lift with mild cleaning if it is dried residue. A cloudy or dark ring beneath the finish is different. Do not escalate to abrasives, heat, oils, solvents, or refinishing methods inside a cleaning routine. Those approaches can change sheen, color, or adhesion.
Swelling, softness, or finish failure
Raised fibers, separated joints, soft spots, dark end grain, or a bulging edge suggest water has entered the material. Stop adding moisture. Dry the accessible surface, look for recurring condensation or leakage, and arrange inspection when the wood does not return to a dry stable condition.
How to Clean Vinyl and Composite Window Sills
Dry grit removal
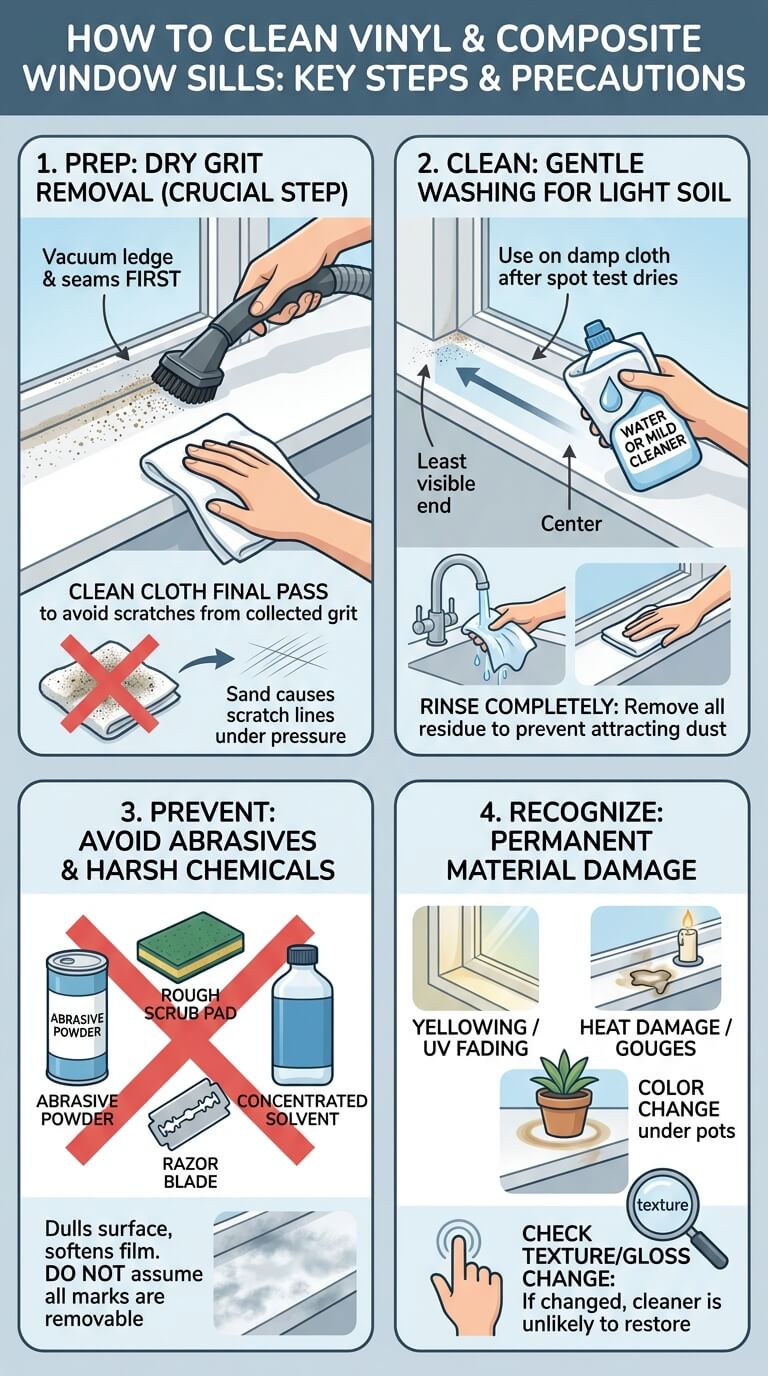
Vacuum the ledge and seams before wiping. Fine sand can create gray scratch lines on white vinyl, especially when pressure is concentrated under a fingertip. Use a clean cloth for the final pass rather than continuing with one that has collected grit.
Gentle washing for light soil
Use water or a mild compatible cleaner on a damp cloth. Work from the least visible end toward the center after the spot test dries. Rinse when required by the label and remove all residue so it does not attract new dust.
Preventing scratches and discoloration
Avoid abrasive powders, rough scrub pads, razor blades, concentrated solvents, and unapproved adhesive removers. These can dull the surface or soften a film. Do not assume a mark is removable simply because the material is synthetic.
Marks that may be material damage
Yellowing, ultraviolet fading, heat damage from candles, deep gouges, or color change below a plant pot may remain after cleaning. Compare the mark with the surface texture. If the texture or gloss has changed, additional cleaner is unlikely to restore it.
How to Clean Natural and Engineered Stone Sills
Confirming the stone or composite
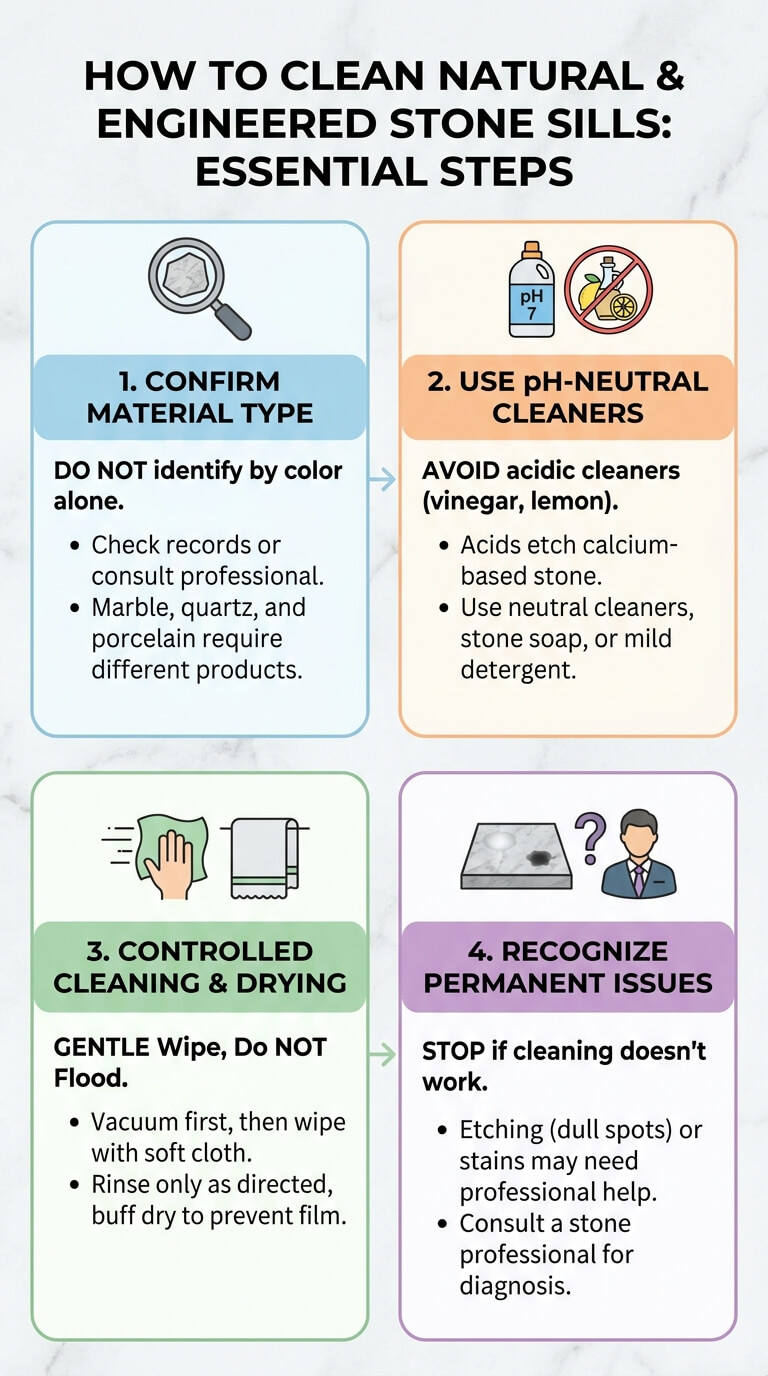
Check installation records, ask the property owner, or consult the fabricator when possible. Do not identify stone by color alone. Marble-look porcelain, engineered quartz, cultured marble, and natural marble can require different products even when their patterns appear similar.
pH and acid-sensitivity limits
Vinegar, lemon-based products, and acidic bathroom cleaners can etch calcium-based stone and may affect some sealers or mixed-mineral surfaces. The Natural Stone Institute recommends neutral cleaners, stone soap, or mild dishwashing detergent and warns against acidic cleaners in its natural-stone care guidance.
Controlled cleaning and drying
Vacuum first, then wipe with a soft cloth and an approved neutral cleaner. Do not flood grout joints or the back seam. Rinse only as directed and buff dry with a clean cloth so mineral-rich water does not leave a new film.
Etching, staining, or sealer issues that cleaning may not reverse
An etch mark often looks duller than the surrounding polish and may be more visible at an angle. A stain may darken the stone without changing its texture. Sealer failure can create uneven absorption. Stop before applying stronger chemistry and consult a stone professional for diagnosis.
How to Clean Tile, Grout, and Metal Sills
Tile surface cleaning
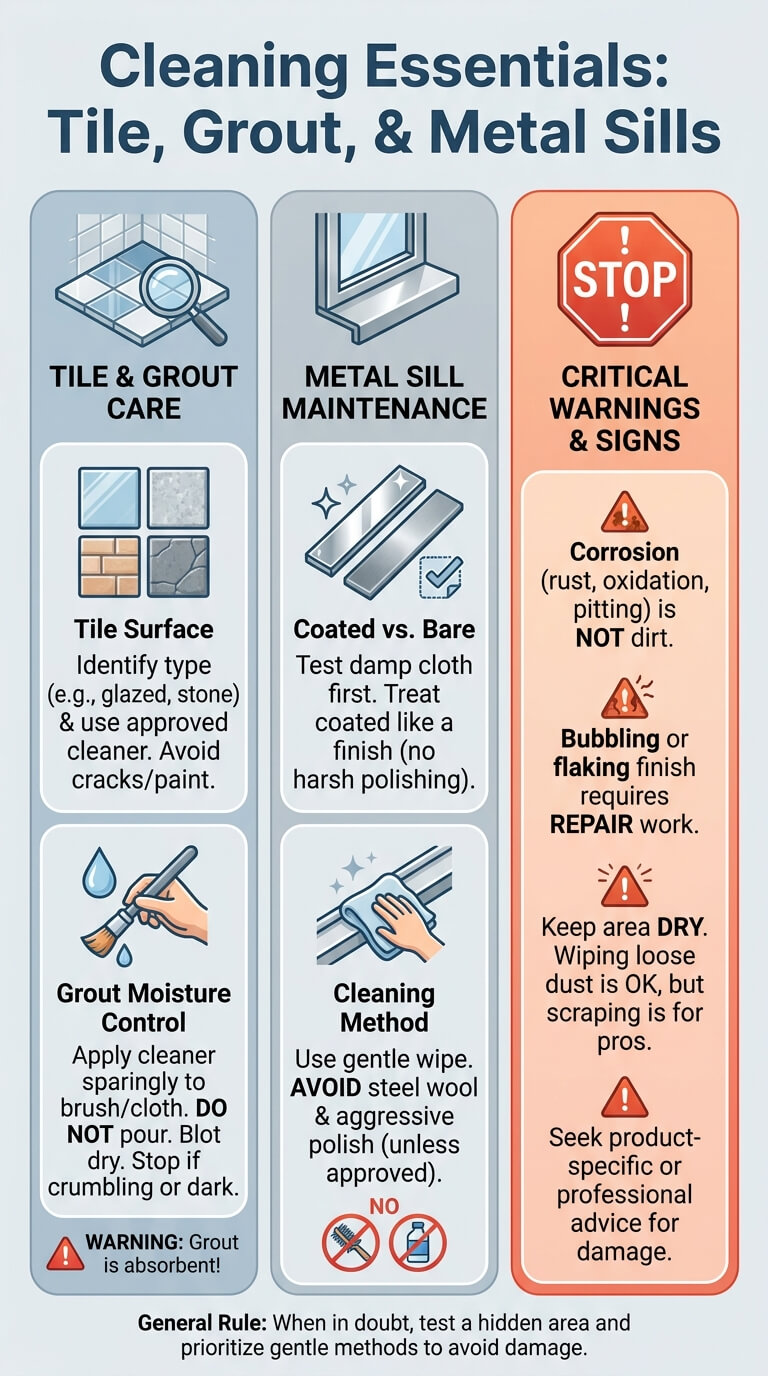
Identify whether the tile is glazed ceramic, porcelain, glass, or natural stone. Vacuum the joints, then use a cleaner approved for both the tile and adjacent grout. Keep liquid away from cracked joints and painted trim.
Grout moisture control
Grout can absorb dirty water, especially if it is unsealed or cracked. Apply cleaner to a small brush or cloth rather than pouring it over the ledge. Blot the joints dry and stop if grout crumbles, remains dark, or separates from the tile edge.
Coated versus bare metal
Test a damp cloth on a hidden area. Coated metal should be cleaned as a finished surface, not polished as bare metal. Avoid steel wool and aggressive metal polish unless the manufacturer specifically approves them for that finish.
Corrosion and finish-loss clues
Orange rust, white oxidation, bubbling paint, pitting, and flaking coating are not ordinary soil. Wiping loose surface dust is reasonable, but scraping or treating corrosion belongs to repair and material-restoration work. Keep the area dry and seek product-specific advice.
Handling Common Sill Problems
Water rings
First determine whether the ring sits on the surface or has changed the finish. Wipe gently with the approved mild method, dry, and inspect from several angles. Stop after one or two controlled attempts if the ring remains unchanged.
Condensation residue
Mineral residue from repeated droplets may appear as a pale edge or chalky film. Remove it only with a cleaner compatible with the sill material. More importantly, dry the window and sill when condensation appears and investigate why moisture keeps collecting.
The EPA advises acting quickly when moisture or condensation collects on windows and reducing the moisture problem in its guide to mold, moisture, and the home. A clean sill will become dirty again if the wetting cycle continues.
Insect debris and pollen
Vacuum these materials while dry. If residue remains, use a damp compatible cloth and dry the area. Repeated buildup may come from a damaged screen, open-window use, nearby outdoor lights, or an exterior gap that needs separate attention.
Light sticky marks
Identify the likely material before choosing a cleaner. Food residue, plant sap, tape adhesive, and oily hand marks need different products. Begin with mild detergent when allowed and avoid solvents until the finish manufacturer confirms compatibility.
Recurring dampness that returns after cleaning
Note whether moisture appears after rain, cold nights, cooking, showering, or operation of a humidifier. Dry the surface and check the glass edge, frame joints, and nearby wall without dismantling anything. Persistent wetting, staining, odor, or softness deserves further assessment.
Damage Versus Dirt Decision Guide
Peeling or chalking paint
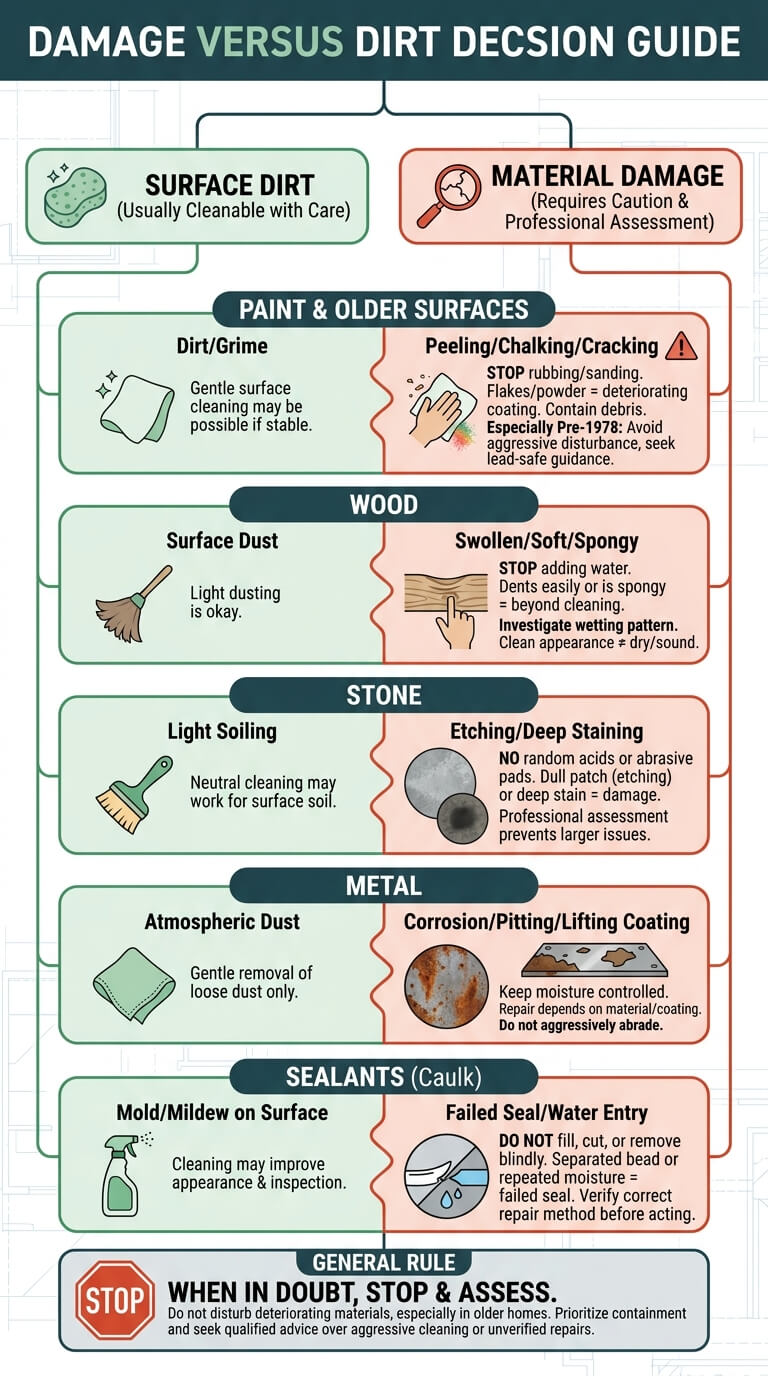
If a dry cloth picks up flakes or colored powder, the coating is deteriorating. Do not keep rubbing. Contain loose debris carefully, keep the area undisturbed, and use lead-safe guidance when the home or paint may be older.
Swollen or soft wood
Wood that dents easily, feels spongy, or has expanded at a joint has moved beyond surface cleaning. Stop adding water and investigate the wetting pattern. A clean appearance does not mean the material is dry or structurally sound.
Stone etching or deep staining
A dull patch that remains after neutral cleaning may be etched. A dark area that appears below the surface may be absorbed staining. Neither should be attacked with random acids or abrasive pads. Professional stone assessment can prevent a small mark from becoming a larger damaged area.
Corrosion
Metal loss, pitting, powdery oxidation, or lifting coating indicates a reaction in the material. Remove only loose dust with a gentle method and keep moisture controlled. Repair decisions depend on the metal, coating, window design, and exposure.
Failed caulk or water entry
A separated bead, open joint, repeated stain line, or moisture after storms can indicate a failed seal or water path. Cleaning may make the area easier to inspect, but it does not restore the joint. Do not fill, cut, or remove material unless the correct repair method is known.
When not to disturb an older painted surface
Stop when paint is peeling, cracking, rubbing off, or producing dust, especially on a pre-1978 window. Keep the area inaccessible to children and pets and avoid sanding, scraping, drilling, or aggressive cleaning. Qualified testing or lead-safe repair may be appropriate.
Common Window Sill Cleaning Mistakes
Using excess water on wood
Soaking does not make cleaning more effective. It moves moisture toward end grain, seams, nail holes, and the wall. Use a controlled damp cloth and dry each section before moving on.
Applying acidic cleaner to sensitive stone
Acid can create permanent dull spots that resemble stubborn residue. Confirm the material first and use a neutral stone-safe product. Keep acidic glass cleaner from dripping onto a stone sill.
Scrubbing grit across vinyl or paint
Grit behaves like an abrasive under pressure. Vacuum or lift it before wiping, and change cloths often. Do not use a melamine sponge or abrasive pad without approval because it can alter sheen.
Ignoring recurring moisture
Repeatedly wiping condensation, rainwater, or seepage addresses the symptom only. Record when it occurs and dry the surface promptly. Moisture that keeps returning can damage paint, wood, grout, metal, curtains, and nearby wall finishes.
Treating discoloration as guaranteed removable soil
Color change may come from fading, staining, finish wear, rust migration, water damage, or material aging. Stop escalating when the texture or sheen changes. A stronger cleaner can worsen damage without restoring the original color.
Adjacent Components to Check
Track debris above the sill
Vacuum loose material from the window channel before wiping the ledge so grit does not fall back onto the clean surface. Keep sill-cleaning liquid out of the track and do not probe drainage openings as part of this job.
Glass drips and exterior exposure
Cleaner running from the glass can stain wood, leave film on vinyl, or etch sensitive stone. Protect the sill during glass cleaning and wipe drips immediately. Exterior sprinklers, rain runoff, and dust may also explain repeated marks near the window edge.
Curtains touching a damp sill
Lift fabric away before cleaning and do not rehang it against a wet surface. If the hem repeatedly touches condensation, dry the sill and check the fabric care label before spot cleaning. Persistent contact can transfer soil or moisture in both directions. If the fabric itself has picked up dust, marks, or moisture, clean the curtain according to its care label and construction rather than extending the sill method to the textile.
Window Sill FAQ
How can I tell whether a window sill is wood or composite?
Look at an unfinished edge, underside, seam, or installation record. Wood usually shows grain and joinery, while composite may have a uniform core, film, or molded profile. Do not scrape the surface to test it. When uncertain, use dry cleaning and ask the manufacturer or property owner.
Can water rings be removed from every sill?
No. Surface residue may wipe away, but absorbed stains, finish whitening, swelling, etching, and fading may remain. Use one mild material-compatible attempt, let the area dry, and stop if there is no improvement or the surface changes.
Is vinegar safe on a stone window sill?
Do not assume it is. Vinegar can etch marble, limestone, travertine, and other acid-sensitive materials, and it may affect sealers or mixed-mineral products. Identify the stone and follow the fabricator or manufacturer instructions.
What should I do with peeling paint on an older sill?
Avoid sanding, scraping, or vigorous cleaning. Keep children and pets away from chips and dust, and use EPA lead-safe information when the home may predate 1978. Arrange appropriate testing or qualified repair rather than treating the loose paint as dirt.
Why does condensation residue keep returning?
The residue returns because moisture continues to collect and dry on the surface. Dry the glass and sill promptly, note when condensation forms, and address indoor humidity, ventilation, temperature, or another moisture cause. Seek help when wetting is persistent, unexplained, or damaging materials.
Final Thoughts
Successful window-sill cleaning starts with identification, not a universal recipe. Remove grit while dry, test the mildest compatible method, control moisture, and dry every edge and seam. When paint flakes, wood swells, stone loses its polish, metal corrodes, or dampness returns, stop cleaning and address the material or moisture problem before more damage occurs.

Ethan Carter is the Founder & Editor of HomeCleanSecrets. Based in the United States, he has 5 years of experience creating practical home cleaning, laundry care, stain removal, decluttering, and home organization content. His goal is to help everyday households clean smarter and build simple routines that are easier to maintain.
Read more about Ethan Carter on his author page: https://homecleansecrets.com/ethan-carter/