
Roller shades look simple because they use one continuous sheet of material, but the sheet may be vinyl, woven polyester, solar mesh, coated blackout fabric, or a specialty material that reacts badly to water. The shade is also attached to a tube, clutch, spring, cord system, or motor that should stay dry and undisturbed.

The safest approach is to remove loose dust first, use the least moisture the material allows, support the shade while touching it, and let it dry fully before rolling it up. A faint remaining stain is usually less costly than a stretched panel, lifted coating, damaged motor, or permanent water ring.
Check the product label, purchase paperwork, or manufacturer instructions before cleaning. Stop if the material is brittle, delaminating, badly creased, unevenly rolling, electrically unresponsive, or pulling away from the lower rail.
Quick Answer: Use the Least Aggressive Method the Material Allows

Identify the shade material and operating system
Look at the front, back, side edges, lower rail, and head area. Note whether the sheet feels slick, woven, mesh-like, coated, paper-like, or laminated. Then identify corded, cordless, spring-assisted, chain-loop, or motorized operation. These details determine the safest cleaning method.
Fully extend only within normal limits
Lower the shade until it reaches its usual stopping point and hangs flat. Do not tug past resistance or force extra fabric off the tube. A shade that stops early, tilts, tracks sideways, or makes unusual sounds may have an operating problem. A roller shade shares the window area with glass, sills, tracks, screens, and other treatments, but each component needs its own cleaning limits.
Remove dry dust first
Loose dust becomes muddy when liquid is added. Use a soft brush, microfiber duster, or low-suction vacuum with a clean upholstery attachment. Work from the upper area downward while supporting the material so suction or brushing does not pull it out of shape.
Spot clean with minimal moisture only when approved
Test a hidden lower corner with a white cloth that is barely damp, not dripping. Watch for color transfer, darkening, loss of sheen, coating lift, or a ring as the area dries. Continue only when the material and written care instructions tolerate the method.
Dry fully before rolling
Leave the shade lowered and undisturbed until both sides, seams, and the lower edge are dry. Rolling damp material can trap moisture in overlapping layers, transfer soil, create creases, and leave a repeating mark every time the wet section wraps around the tube.
Identify Your Roller Shade
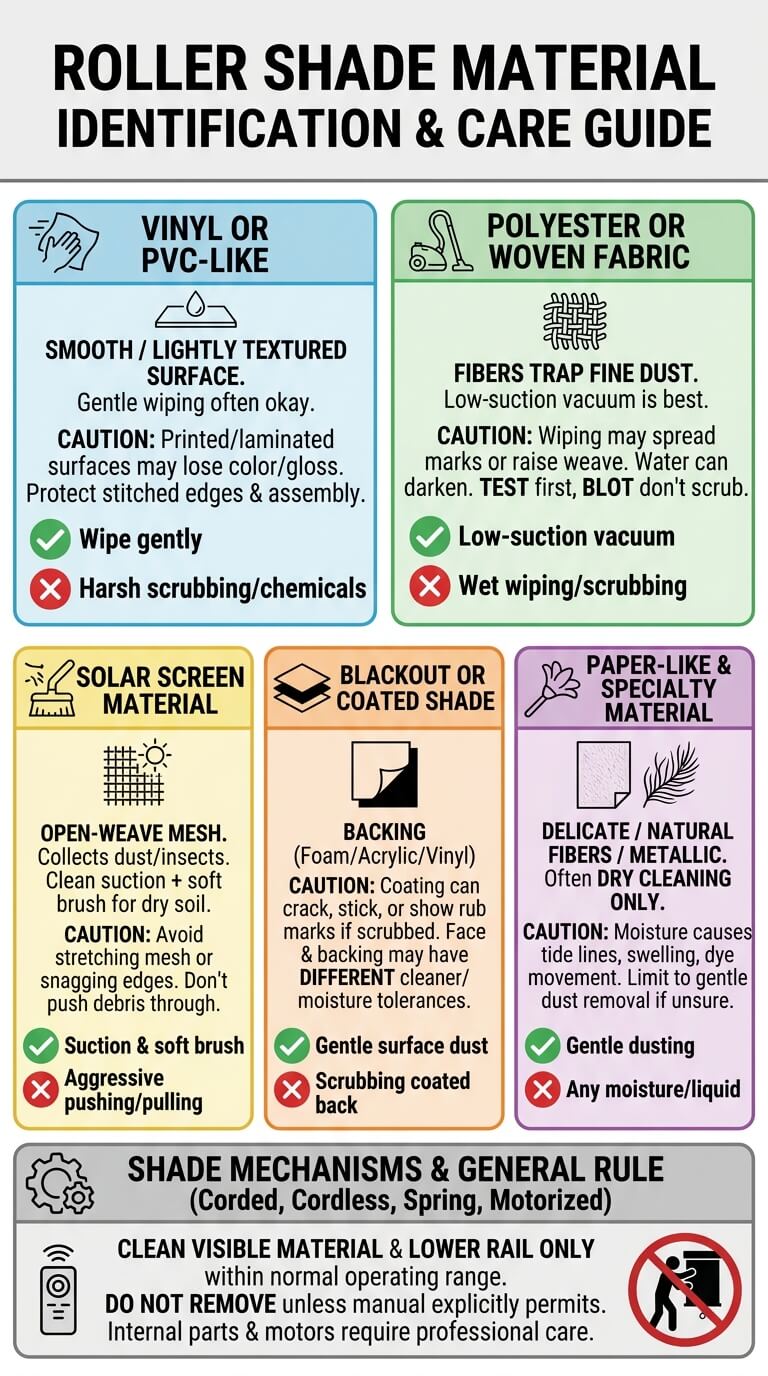
Vinyl or PVC-like material
These shades usually have a smooth or lightly textured surface and may allow gentle wiping, but not every vinyl-like sheet has the same finish. Printed or laminated surfaces can lose color or gloss, so confirm the care instructions and protect stitched edges, bonded layers, and the roller assembly.
Polyester or woven fabric
Woven shades can trap fine dust between fibers. Low-suction vacuuming is often more useful than wiping because rubbing may spread a mark or raise the weave. Water can darken the fabric, so test a hidden area and blot instead of scrubbing.
Solar screen material
Solar shades are open-weave screens designed to manage glare and view. Their small openings collect airborne dust, insects, and kitchen film. Clean suction and a soft brush can remove dry soil without stretching the mesh. Avoid pushing debris through the openings or snagging the edges.
Blackout or coated shade
Blackout performance may come from foam, acrylic, vinyl, laminate, or another bonded backing. The coating can crack, stick, lift, or show shiny rub marks if scrubbed. Do not assume the face fabric and backing tolerate the same cleaner, moisture level, or heat.
Paper-like and specialty material
Natural fibers, paper blends, delicate prints, metallic finishes, and specialty acoustic or decorative sheets may permit dry cleaning only. Moisture can cause tide lines, swelling, dye movement, or loss of stiffness. When documentation is unavailable, limit home care to gentle dust removal.
Corded, cordless, spring, or motorized operation
A continuous loop uses a clutch and tension device, cordless shades rely on internal lifting parts, spring shades store tension in the tube, and motorized shades include powered components and controls. Clean the visible material and lower rail only within the normal operating range unless the manual specifically permits removal.
Read the Label, Model Instructions, and Material Limits
Manufacturer cleaning symbols and written care
Look for a label on the back of the lower rail, inside the head area, on the tube, or in the original paperwork. Similar-looking fabrics may have different coatings. The manufacturer’s home-care guidance illustrates why dusting, vacuuming, spot cleaning, and advanced cleaning vary by treatment and fabric.
Coatings and bonded layers
Inspect the side edge where layers are easiest to see. A face textile may be bonded to a blackout layer, protective film, or backing. Keep tests small because moisture can weaken adhesive or leave a line between treated and untreated zones.
Motor, tube, bracket, and cord restrictions
Do not spray the head area or wipe into gaps around the tube, clutch, spring, charging port, battery case, or motor. Do not loosen brackets for easier cleaning unless the installation manual provides a supported removal procedure. Disconnect power only as directed by the product documentation.
What to do when the material is uncertain
Use the model number to search the maker’s support pages or contact the retailer or installer. Until the material is identified, dust with a soft tool and avoid liquid, detergent, steam, stain remover, and adhesive lint rollers. Conservative care prevents irreversible damage.
Inspect Before Cleaning
Dust, insects, and loose debris
Open windows, nearby plants, pets, and air movement can deposit hair, pollen, insect remains, and gritty particles. Shine light across the lowered shade to reveal soil and edge debris. Remove loose debris before rubbing so grit does not scratch a coating or embed in the weave.
Localized marks and water rings
Fingerprints and insect marks may respond to cautious blotting, while a large ring suggests previous uneven wetting. Identify whether the mark sits on the surface or has changed the material itself. Avoid repeatedly wetting a ring without knowing whether the backing can tolerate it.
Creases, fraying, coating lift, delamination, or discoloration
Photograph defects before cleaning. Frayed sides may catch on a cloth, and lifted coating can peel under light pressure. Yellowing, fading, and brittle areas often reflect sunlight or age rather than removable soil. Cleaning will not restore a failed finish or separated layer.
Uneven rolling or mechanism symptoms
Lower and raise the shade once before cleaning if it operates normally. Note sideways tracking, jerking, clicking, slipping, uneven lower-rail height, or failure to stop. Do not pull harder to straighten it. Mechanical symptoms require the manual or service provider.
Tools and Setup That Protect the Shade
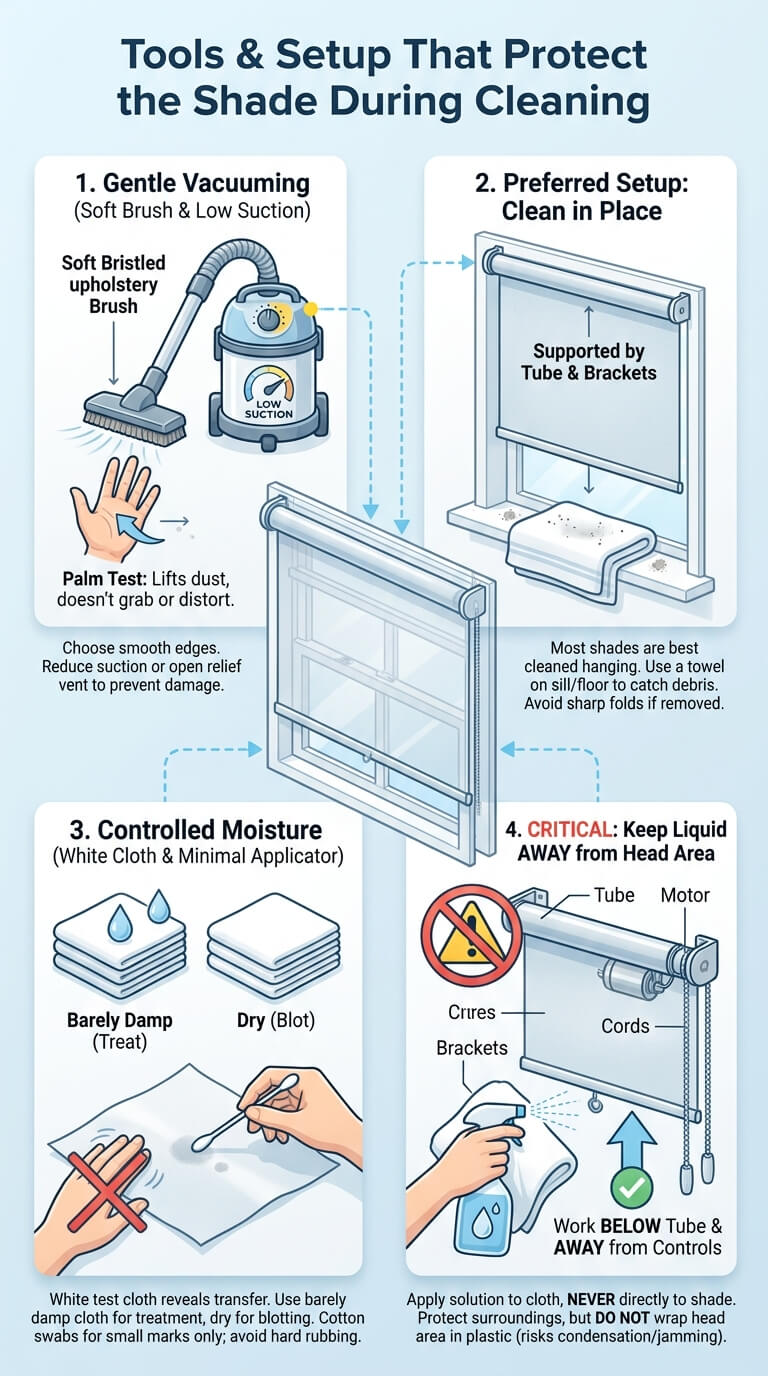
Soft brush and controlled-suction vacuum
Choose a clean upholstery brush with smooth edges. Reduce suction at the vacuum control or open the relief vent when available. A good test is to place the attachment against your palm: it should lift dust without grabbing hard enough to distort the shade.
Supported cleaning surface versus cleaning in place
Most shades can be cleaned while hanging because the tube and brackets support the sheet. Place a clean towel on the sill or floor to catch debris. If written instructions allow removal, use a broad clean surface and support the full width so the material does not fold sharply.
White test cloth and minimal-moisture applicator
A white lint-free cloth reveals dye or coating transfer. Keep one cloth barely damp for treatment and another dry for blotting. Cotton swabs may help at a small insect mark, but avoid hard rubbing or concentrating cleaner along an edge.
Keeping liquid away from the tube, motor, cords, and brackets
Apply any permitted solution to the cloth, never directly to the shade. Work below the tube and away from the control side. Protect the floor and wall, but do not wrap the head area in plastic where condensation or accidental pulling could interfere with operation.
Routine Dry Cleaning for Roller Shades

Extend to a stable working position
Lower the shade enough to expose the dusty area while keeping the lower rail within easy reach. Use a stable floor position and avoid standing on furniture. For a tall treatment, clean only what you can reach without stretching, then use an approved extension attachment or arrange professional help.
Support the material
Place one open hand behind the shade near the area being cleaned, without pressing it into the glass. Move the support hand with the vacuum or duster. This reduces flutter, pulling, and creasing.
Vacuum or dust from top to bottom
Make light overlapping passes with the weave or grain. Do not drag the nozzle sideways across a loose edge. Some manufacturers permit low-suction vacuuming and gentle dusting but prohibit immersion; a current roller-shade care guide is a useful example of why the exact product instructions should control the method.
Clean edges, seams, and lower rail
Use a soft brush to release dust along the sides and where the material enters the bottom rail. Wipe a permitted metal or plastic rail with a nearly dry cloth, avoiding end caps and concealed parts. Do not pry open the rail.
Inspect both sides only when safely accessible
The window-facing side often holds insects and dust. Clean it only when the shade can be reached without twisting, leaning outside, or forcing the sheet away from the glass. Never trap your hand between the shade and a hot window surface.
Spot Cleaning by Material
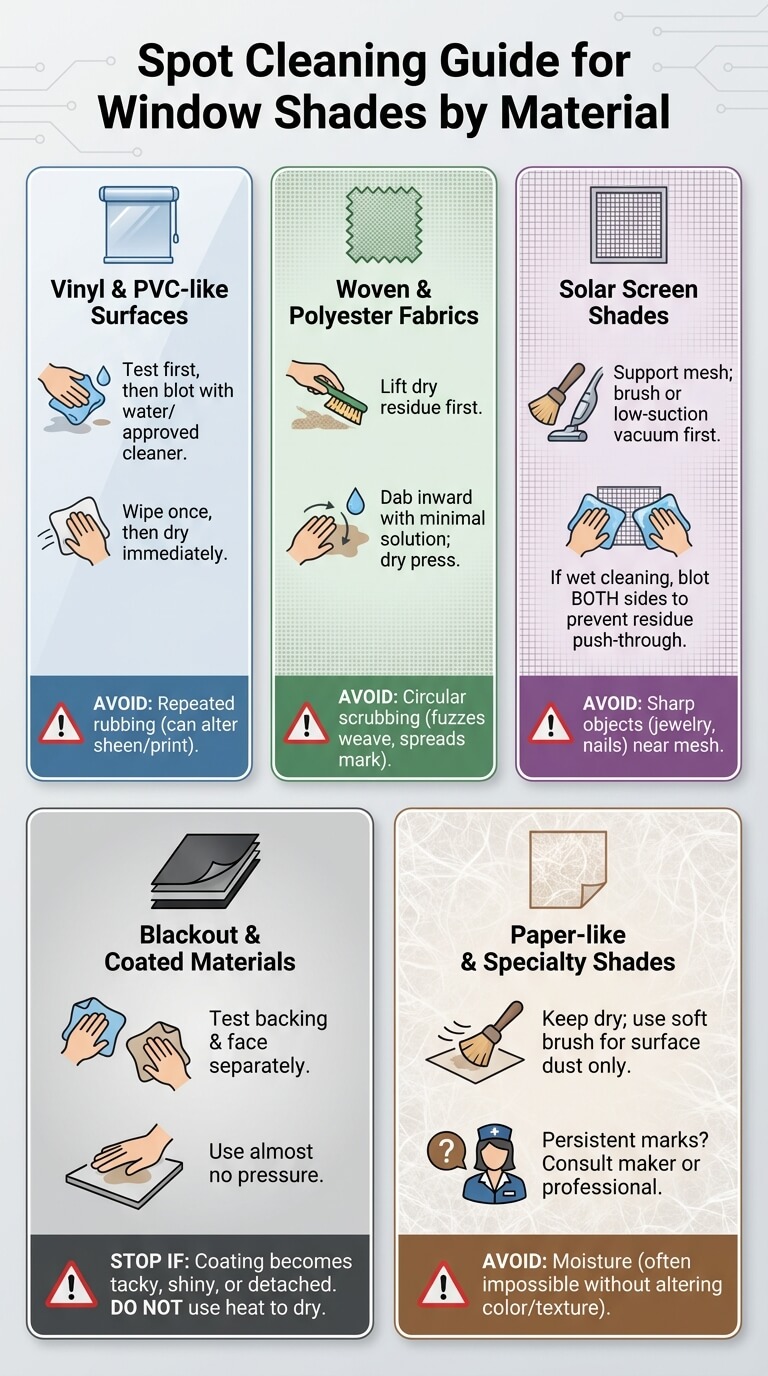
Vinyl or PVC-like surfaces
After testing, blot a small mark with a cloth lightly dampened with water or the cleaner specifically approved by the maker. Wipe once, then dry. Repeated rubbing can change sheen, remove printing, or create a clean patch that looks different from the surrounding aged surface.
Woven and polyester fabrics
Lift dry residue first. Dab from the outer edge toward the center with minimal solution, then press with a dry white cloth. Avoid circular scrubbing because it can fuzz the weave and spread the mark. Let the area dry completely before judging whether another pass is appropriate.
Solar screen shades
Support the mesh and use a soft brush or low-suction vacuum before considering moisture. If damp cleaning is approved, blot both sides of the small area so residue is not pushed through the openings. Keep sharp jewelry and fingernails away from the mesh.
Blackout and coated materials
Test the backing separately from the face. Use almost no pressure and stop immediately if the coating becomes tacky, chalky, shiny, wrinkled, or detached. Do not use heat to speed drying because bonded layers can react differently as temperatures change.
Paper-like or specialty shades that may not tolerate moisture
Keep care dry unless the manufacturer states otherwise. A soft brush can remove surface dust, but stain treatment may be impossible without altering color or texture. Persistent marks on specialty material are better assessed by the maker or a professional.
Minimal-Moisture Wiping Workflow

Confirm that damp cleaning is permitted
Read the instructions for the exact model and color. Check whether only water is allowed, whether mild detergent is permitted, or whether spot cleaning is excluded. Do not substitute a homemade mixture when the material, coating, or adhesive is unknown.
Test for color, sheen, and coating change
Choose a hidden lower corner and apply the least moisture possible. Blot after several seconds, then allow the test to dry fully. Check in daylight and side lighting. Stop if the white cloth picks up color or the test patch differs in gloss, stiffness, or texture.
Support the shade while wiping
Hold a clean dry towel behind the spot without pinching the material. This prevents the sheet from swinging and catches moisture that passes through a weave. Keep the shade flat rather than folding it over a hand, chair back, or narrow sill.
Work a small area without saturating
Dab the mark with the damp cloth, using short controlled touches. Keep the wet zone small. Liquid should not run, drip, or reach the side edges, hem pocket, lower-rail opening, or head area.
Feather and dry the cleaned zone
Blot the boundary with a clean barely damp cloth if the approved method allows it, then press with a dry cloth. Gentle feathering can reduce a hard edge, but broad wetting may enlarge the tide line. Leave the shade fully lowered with airflow in the room.
Inspect before repeating
Wait until the shade is completely dry because wet fabric appears darker. View it from the room and from an angle. Repeat only when the first pass caused no material change. Stop after modest improvement rather than escalating pressure.
Cleaning the Edges and Bottom Rail
Dust trapped at side edges
Use a soft artist brush or clean vacuum brush to draw debris away from the edge. Brush toward open space, not deeper into a side channel or cassette. Avoid trimming fibers unless the manufacturer specifically approves it, because a loose strand may be part of the weave.
Handling the bottom bar or hem
Support the rail with one hand and clean the visible surface with the method allowed for that material. Do not twist the bar, remove end caps, or pull the fabric from its groove. A loose or bowed rail needs service rather than force.
Avoiding creases and tension damage
Never rest the lower rail on a narrow object while the upper material remains under tension. Keep the sheet vertical and flat. When cleaning a removed shade under approved instructions, use a surface wide enough to support the entire width.
Drying before rolling
Check the side edges and the area where the fabric meets the rail. These zones may dry more slowly. Raise the shade only after the material feels dry and looks uniform from both directions.
Corded, Cordless, and Motorized Limits

Cord and loop safety awareness
Do not remove, loosen, or bypass a tension device to make cleaning easier. Keep cords and loops secured as designed, especially in homes where children visit or live. The CPSC window-covering cord information explains the safety concerns associated with accessible loops and other operating cords.
Normal operating range and stop points
Operate the shade with its handle, chain, wand, or control as intended. Do not pull the sheet itself or continue past the normal upper or lower stop. Unexpected resistance is a reason to stop and inspect the manual, not a reason to add force.
No liquid in motors, springs, clutches, or controls
Keep damp cloths away from battery compartments, charging ports, wires, remotes, wall controls, spring tubes, and clutch openings. Do not clean electrical parts while powered unless the manual expressly gives that procedure. Never spray cleaner upward into a cassette.
Manual and service thresholds for uneven rolling
Uneven travel, repeated stalling, grinding, or loss of programmed limits needs model-specific guidance. Consult the maker’s documentation, such as the roller-shade manual library, or contact the installer. Cleaning the sheet will not repair alignment, tension, or motor faults.
Troubleshooting After Cleaning
Water mark or tide line
Let the area dry for a full assessment. Do not immediately wet a wider zone. Check whether the line is residue, altered dye, or a coating change. If one cautious repeat is approved, feather lightly beyond the edge and blot evenly. Stop if the ring expands.
New crease or waviness
Leave the shade lowered and flat at normal room conditions. Do not iron, steam, or pull it tight unless the manufacturer provides that method. A crease caused by folding or localized wetting may remain, especially in coated or paper-like material.
Coating lift or delamination
Stop cleaning and avoid rolling the damaged area around the tube, where pressure can spread separation. Photograph the defect and contact the manufacturer or installer. Adhesive repair, repainting, or added cleaner may worsen the failure and affect appearance.
Uneven rolling
Confirm that nothing is stuck to the fabric and that the lower rail is not wet or obstructed. If the shade still travels sideways or binds, stop operating it. Do not push the roll by hand or adjust the tube without the correct service instructions.
Persistent stain on a material that cannot tolerate escalation
Accept a faint cosmetic mark when the alternatives are saturation, abrasion, or coating damage. Ask about professional treatment only after confirming that the shade material permits it. Replacement may be more predictable for deeply stained or deteriorated specialty material.
Common Roller Shade Cleaning Mistakes
Spraying the shade or mechanism directly
Overspray creates uncontrolled wetting and can enter seams, the tube, motor, clutch, or wall finish. Put an approved solution on the cloth instead, wring it thoroughly, and work below the head area.
Soaking or steaming every fabric
Immersion and steam can stretch woven material, soften adhesives, distort coatings, and leave water lines. A fabric appearance does not prove that laundry or upholstery methods are suitable for a fixed shade.
Rolling before fully dry
Damp layers press against each other around the tube. This can transfer soil, create repeated bands, trap moisture, and make coated surfaces stick. Keep the shade down until the thickest cleaned area is dry.
Pulling beyond the stop point
Extra force can alter spring tension, damage a clutch, strain brackets, or unroll material improperly. Clean only within the normal travel range and seek model-specific help when more access appears necessary.
Assuming all blackout shades share one coating
Blackout describes light control, not one standardized material. Different products use different layers, finishes, and adhesives. Follow the instructions for the exact shade rather than applying a method that worked on another room’s treatment.
Maintenance and Adjacent Dust Sources
Light dusting based on exposure
Dust when a thin film becomes visible rather than following an aggressive schedule. Kitchen-adjacent shades, open windows, pet areas, and busy doors may need attention more often. Frequent gentle dusting is safer than infrequent wet scrubbing.
Window glass and sill dust
Clean the glass and sill separately so wind or operation does not move debris back onto the shade. Keep glass cleaner off the treatment. Allow a damp sill or frame to dry before lowering the shade against it. If the sill itself needs more than a light wipe, switch to a material-specific sill method before lowering the shade against the surface.
Curtains and blinds as different care systems
Removable curtains may have wash or dry-clean instructions, while blinds use individual slats or vanes. Do not carry those methods over to a continuous roller sheet. Treat each covering according to its construction and operating parts.
Insects and open-window use
Remove trapped insects promptly with a soft brush after they are dry enough to lift without smearing. Repair or clean the window screen separately when repeated insects or debris enter. Avoid crushing insects into solar mesh or coating.
When Replacement or Professional Service Is More Appropriate
Delamination, tears, or permanent creases
Separated layers, torn edges, brittle fabric, and deep creases are material failures rather than routine soil. Continued wiping or rolling may spread the damage. Ask whether the fabric panel can be replaced independently or whether the complete unit needs replacement.
Broken cord, spring, or clutch
Stop using a shade that drops unexpectedly, will not hold position, has a damaged loop, or makes grinding sounds. Do not open the tube or improvise a repair. A qualified installer can identify compatible parts and restore safe operation.
Motor or electrical issues
Intermittent movement, overheating, odor, exposed wiring, damaged batteries, or a wet electrical area requires immediate stop and model-specific support. Do not keep cycling the shade or clean near powered components.
Specialty material with no approved cleaning method
When the maker excludes wet cleaning or the material cannot be identified, professional assessment may clarify whether dry treatment is possible. For a low-value shade with broad staining, replacement can be safer and more economical than experimental cleaning.
Roller Shade FAQ
Can roller shades be washed with water?
Usually they should not be immersed or treated like loose laundry. Some vinyl-like or fabric shades permit limited damp wiping or spot cleaning, while others require dry care only. Follow the exact product instructions and keep the tube and mechanism dry.
How do I clean a blackout roller shade?
Vacuum or dust gently first. Identify the face and backing materials, then test any approved spot-cleaning method on a hidden area. Stop if the coating becomes tacky, shiny, cracked, wrinkled, or separated.
Can I vacuum a solar shade?
Often yes, when the manufacturer permits it. Use low suction and a clean soft-brush attachment, support the mesh from behind, and move lightly from top to bottom without snagging the edges.
Why did a spot-cleaned area dry with a ring?
The wet boundary may have moved soil, detergent, dye, or finish toward the edge. It may also reflect a coating response. Let it dry fully, review the care instructions, and avoid enlarging the wet area unless a cautious feathering method is approved.
Should a roller shade be removed from its brackets for cleaning?
Not by default. Cleaning in place usually provides better support and avoids bracket, tube, spring, cord, or motor damage. Remove it only when the model instructions give a safe procedure and you can support the full width without bending the material.
Final Thoughts
Safe roller-shade cleaning depends on identifying both the material and the operating system. Lower the shade only within its normal range, remove dry dust first, support the sheet, test hidden material, and use minimal moisture only when the maker permits it.
Keep liquids away from tubes, cords, clutches, springs, batteries, and motors. Stop when a coating lifts, the sheet creases, a ring spreads, or operation becomes uneven. Gentle maintenance preserves more shades than aggressive stain removal, and damage or mechanical faults belong with the manufacturer, installer, or a qualified service provider.

Ethan Carter is the Founder & Editor of HomeCleanSecrets. Based in the United States, he has 5 years of experience creating practical home cleaning, laundry care, stain removal, decluttering, and home organization content. His goal is to help everyday households clean smarter and build simple routines that are easier to maintain.
Read more about Ethan Carter on his author page: https://homecleansecrets.com/ethan-carter/