
Quick answer: the easiest natural way to clean a shower head
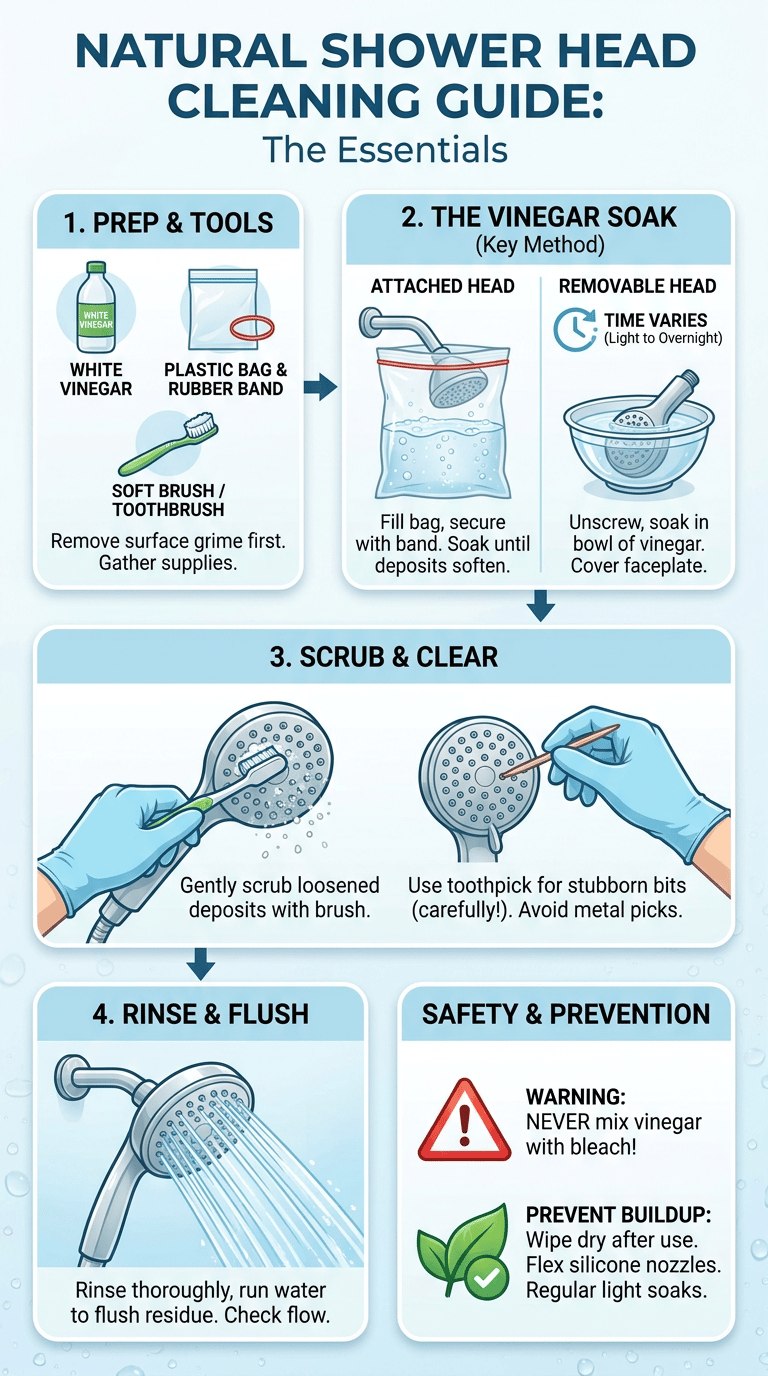
The simplest natural method for most shower heads is a vinegar soak. For an attached shower head, fill a sealable plastic bag with white distilled vinegar, secure it around the head with a rubber band or string, and let the head soak until mineral deposits soften. For a removable shower head, unscrew it and soak it in a bowl of vinegar. After soaking, gently scrub any loosened deposits with a soft brush, rinse thoroughly, and run water through the head to flush remaining residue. This approach uses common household ingredients and small tools you likely already have.

Why shower heads get clogged and dirty
Shower heads collect a few common types of buildup over time:
- Mineral deposits from hard water, which appear as white or crusty scale around nozzles and on internal parts.
- Soap scum and shampoo residues that can adhere to surfaces and trap minerals.
- Small particles and sediment carried in water that settle inside spray channels.
- Biological film in low-flow or rarely used fixtures, which is usually addressed by flushing and routine cleaning rather than harsh chemical disinfecting; see CDC guidance on household cleaning and disinfecting for more information from the CDC.
These issues mostly affect spray pattern and flow, making the shower feel weaker or uneven. Cleaning restores performance and can extend the life of the fixture when done gently and regularly.
Step 1: Check whether the shower head needs a light or deep clean
Decide how much work is needed before you start. A quick visual and functional check will guide the method:
- Light clean: no visible crust or only mild residue on the surface; spray pattern slightly uneven. Usually a wipe and a short soak will fix it.
- Deep clean: heavy crusting, multiple clogged nozzles, mold or grime in corners, or visible scale inside the head. Plan to remove the head if possible and soak parts for an extended time.
To inspect, run the shower briefly and look for weak or erratic jets. If the issue improves when you flex rubber nozzles, you may only need a light clean. If jets stay clogged, prepare for a deeper method involving removal and extended soaking.
Step 2: Remove surface buildup first
Before soaking, remove loose residue on the outside of the head so the soaking solution can work on the harder deposits. Follow these steps:
For a related walkthrough, see our guide to how to clean shower glass.
For a related walkthrough, see our guide to how to clean shower drain.
- Turn off water and allow the head to cool if it was hot.
- Use a soft cloth or sponge to wipe away soap scum and surface dirt.
- Use an old toothbrush to scrub around the face plate and edges to dislodge softened material.
- For stubborn bits in nozzle openings, a toothpick or wooden skewer used gently can help clear a passage. Avoid metal picks that can scratch or enlarge holes and damage finishes.
Removing surface grime first shortens soaking time and prevents loose particles from reattaching during the soak.
Step 3: Soak the shower head to loosen mineral deposits
Soaking is the core of most natural descaling methods because mild acids and abrasive pastes dissolve or soften mineral buildup so it can be removed without harsh scraping. Choose the soaking approach that fits your fixture and available supplies.
Vinegar soak (works well for most metal and plastic heads)
White distilled vinegar is a common household acid that helps loosen mineral deposits. Use it full-strength for faster action, or dilute with equal parts water if you prefer a milder solution. Two simple application methods:
- Attached head: fill a sealable plastic bag with enough vinegar to immerse the head, secure the bag around the neck with a rubber band, and let it sit.
- Removed head: unscrew the head, place it in a bowl or container, and pour vinegar to cover the nozzles and face. Make sure internal parts are submerged if possible.
Soak time varies by how much scale is present. Light buildup may respond in a short time, while heavier scale can require extended soaking, including overnight. After soaking, use a soft brush to remove loosened material.
Baking soda and vinegar paste (for build-up that resists a simple soak)
A paste of baking soda and a small amount of vinegar or water can give a mild abrasive boost. Apply the paste to the face plate and nozzle area, allow it to react briefly, then scrub gently with a brush and rinse. Baking soda adds mechanical cleaning without harsh chemicals.
Citric acid or lemon (alternative natural acids)
If you prefer not to use vinegar, powdered citric acid dissolved in water or concentrated lemon juice can also soften mineral scale. Citric acid may be sold as a food-grade powder and is effective in warm solutions. Use the same soaking approach as with vinegar and follow by gentle scrubbing.
Safety note: avoid mixing vinegar or other acids with household bleach or products that contain bleach. Mixing acids and bleach can release hazardous gases. If you have questions about household cleaner exposure or need emergency guidance, consult Poison Control. Keep cleaning solutions out of reach of children and pets and work in a well-ventilated space.
Step 4: Scrub the nozzles gently
Once scale has softened, remove stubborn deposits with care so you do not damage the finish or internal parts.
- Use an old toothbrush or a soft nylon brush to scrub the face plate and nozzle area. Nylon bristles clean effectively without scratching chrome or plated finishes.
- For rubber nozzles, roll or flex them with your fingers to pop mineral deposits out. Many modern shower heads have flexible silicone nozzles designed for this quick cleaning action.
- Use wooden or plastic picks if necessary to clear holes, but do so gently to avoid enlarging passages. Avoid metal picks and wire that could scratch or gouge.
- If the head disassembles into parts, clean each piece separately, including flow restrictors and screens. Keep track of small parts and reassemble in the same order.
Be mindful of decorative finishes like brushed nickel or oil-rubbed bronze. Avoid abrasive pads or aggressive scrubbing that can dull or remove finish layers.
Step 5: Rinse and run water through it
Thorough rinsing is essential to remove residual vinegar, loosened scale, and any baking soda paste. Follow this sequence:
- Rinse the head and parts under warm running water to remove visible residue.
- Reattach the shower head securely, using a new rubber washer if the old one looks worn or flattened.
- Turn on the shower and run water through the head to flush internal channels and remove lingering odors or tastes from vinegar or lemon. Check spray pattern while the water runs to confirm even flow.
If you removed the head and cleaned in a bowl, flush the line before reattaching by letting the water run for a short time without the head attached to clear loosened sediment from the pipe.
Step 6: Prevent future buildup
After cleaning, adopt a few simple habits to slow future scale and keep your shower head performing well:
- Wipe the face and nozzles with a cloth after use to remove soap residue and mineral droplets.
- Flex silicone nozzles periodically to dislodge early mineral formation.
- Perform a light vinegar soak from time to time for routine maintenance, or more frequently in homes with very hard water.
- Consider installing a shower head with rubber nozzles designed for easy manual cleaning, or choose a model with a removable face plate for easier access.
- If reducing water use or selecting efficient fixtures is part of your plan, see guidance on water-efficient bathroom fixtures from EPA WaterSense at EPA WaterSense.
- If mineral buildup is severe throughout the home, a whole-house water-softening solution may help, but evaluate options and maintenance needs before installing one.
Small regular steps are less work than infrequent deep scrubs and can keep flow strong and spray even for longer.
Common mistakes to avoid
Learn from common missteps to avoid damaging the shower head or plumbing:
- Avoid metal tools and harsh abrasive pads on plated or decorative finishes; they can scratch and expose base metal.
- Do not mix vinegar or other acids with bleach or products containing sodium hypochlorite. If you need guidance about risks from mixing cleaners, refer to Poison Control for safety information.
- Do not overtighten connections when reattaching the shower head; overtightening can crack plastic threads or strip fittings. Hand-tighten and then secure with an appropriate tool while protecting the finish.
- Do not ignore worn washers or seals; replacing a small rubber gasket is inexpensive and prevents leaks that can hide scale problems behind the head.
- Do not use concentrated acids like muriatic acid or products intended for outdoor masonry on indoor fixtures. Those solutions are too aggressive for most plumbing finishes and can cause corrosion or injury.
Frequently asked questions
How often should I clean my shower head?
Frequency depends on water hardness and usage. Light surface cleaning and occasional soaking for maintenance help keep buildup under control. In very hard water areas, perform maintenance more often.
Can I use vinegar on any shower head?
Vinegar is safe for most ceramic, chrome, stainless, brass, and plastic fixtures, but if you have a specialty finish or manufacturer instructions that prohibit vinegar, follow the maker’s guidance. When in doubt, test vinegar on a small, hidden area first and rinse thoroughly.
Will vinegar damage rubber seals or gaskets?
Brief soaks are unlikely to harm good-quality rubber gaskets. Inspect washers and seals during reassembly and replace any that look degraded.
Can I clean the shower head without disassembling it?
Yes. The bag-or-bowl vinegar soak method works well for attached heads and avoids disassembly. If deposits are internal or heavy, removing the head allows a deeper clean and inspection of internal screens and flow restrictors.
Is a commercial descaler better than vinegar?
Commercial descalers can be effective but may contain stronger acids or chemicals that require careful handling. If you choose a commercial product, follow label directions and safety precautions carefully. Many household vinegar and citric acid methods remove scale effectively without stronger chemicals.
My shower head is brass or has a plated finish. Any special tips?
Be gentle. Use mild solutions, short soak times, and soft brushes. Avoid abrasive pads, wire brushes, and harsh chemical soak baths that could dull or remove finishes. If the head has a manufacturer care guide, follow that first.
Final thoughts
Cleaning a shower head naturally is straightforward and effective using common household items. Start with a quick inspection, remove surface grime, and use a vinegar soak or citric acid solution to loosen mineral deposits. Follow with gentle scrubbing, thorough rinsing, and a flush to restore flow. Keep the fixture well maintained with small regular steps to minimize the need for long, intensive cleanings. For safety around household cleaners and accidental exposures, consult Poison Control for guidance. For ideas on water-saving fixtures and bathroom efficiency, refer to EPA WaterSense guidance on efficient fixtures. With a few simple tools and modest routine care, you can keep your shower head working well without harsh chemicals or complicated equipment.

Ethan Carter is the Founder & Editor of HomeCleanSecrets. Based in the United States, he has 5 years of experience creating practical home cleaning, laundry care, stain removal, decluttering, and home organization content. His goal is to help everyday households clean smarter and build simple routines that are easier to maintain.
Read more about Ethan Carter on his author page: https://homecleansecrets.com/ethan-carter/