
A dresser or nightstand collects more than ordinary dust. The top may hold drinks, cosmetics, lamps, chargers, medication, jewelry, and hair products, while drawer pulls pick up skin oils and the interiors trap lint, crumbs, and loose fibers. Cleaning it safely requires a different approach from simply wiping every surface with an all-purpose spray.
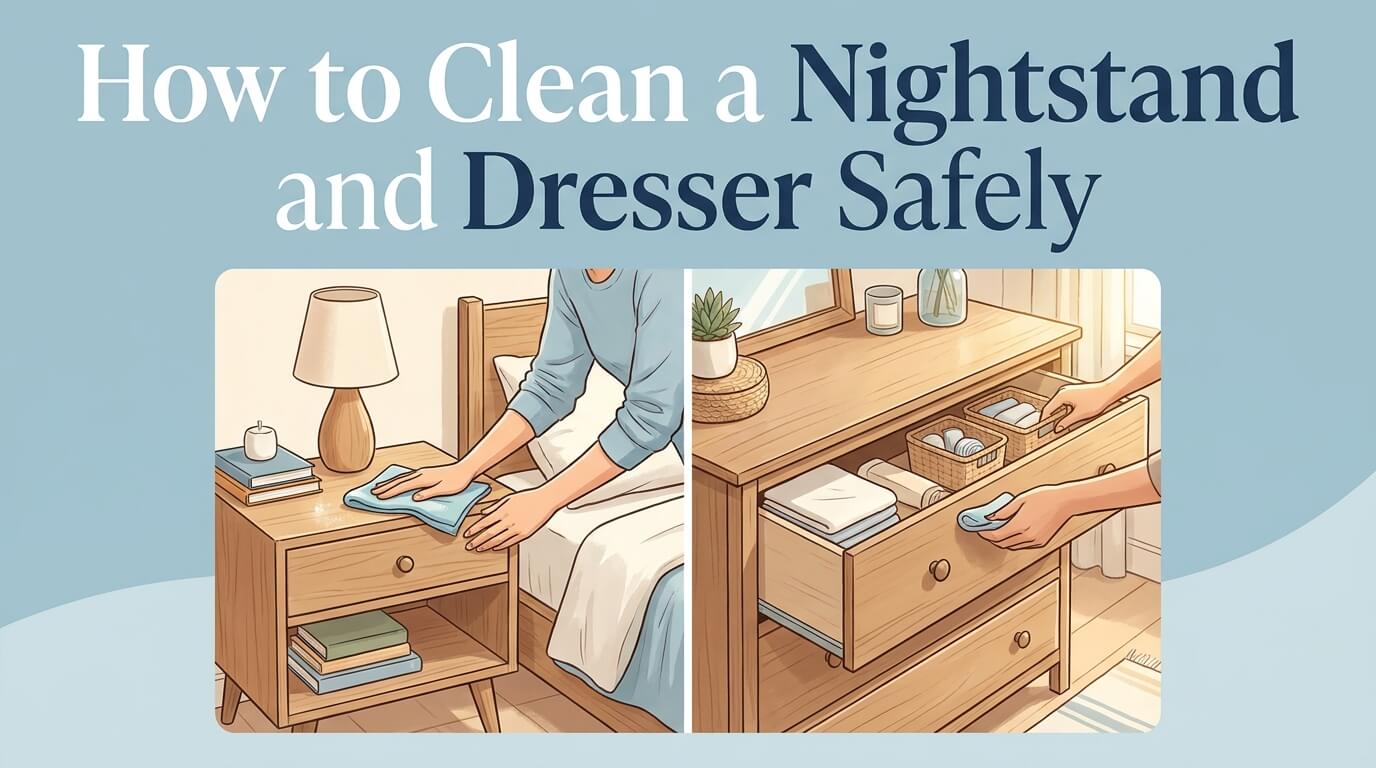
Work from the outside inward, identify the finish before using moisture, and empty only one drawer at a time. Keep the furniture stable, protect vulnerable seams and edges, and stop when a mark appears to be damage rather than removable residue.
Quick Answer: Clean the Surface Before the Drawers
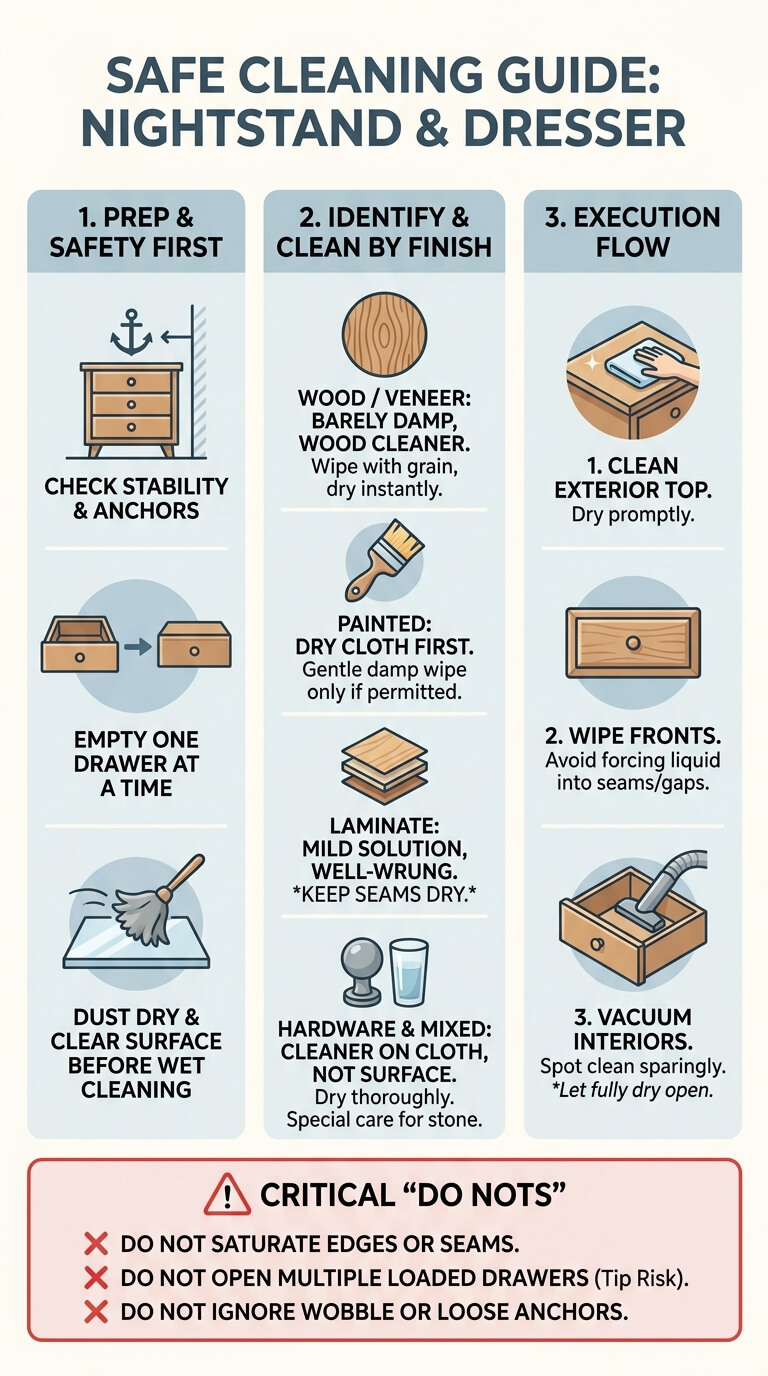
Clean the exterior first so loose soil does not fall into open drawers. Move inward only after the top, fronts, and hardware are dry. For the broader cleaning order and the relationship between routine, deep, furniture, floor, and textile tasks, use the bedroom and living room cleaning guide.
Identify the finish
Look at the back, underside, drawer edge, product label, receipt, or model page. A wood-look surface may be solid wood, thin veneer, laminate, painted fiberboard, or a mixed construction. Glass, stone, metal, and coated hardware may also be present on the same piece.
Remove loose items without reorganizing the room
Place objects from the top in a tray or box, keeping chargers and medications together. Throw away obvious trash, but do not start sorting every drawer, closet, or keepsake. The immediate goal is a clear work surface and safe access.
Dust first, then use minimal moisture
Lift grit, hair, and crumbs before applying any liquid. Otherwise, the debris can turn into streaks or scratch a glossy finish. Put an approved cleaner on the cloth rather than spraying the furniture, wring the cloth well, and dry the surface promptly. Edges, joints, chips, and screw holes need even less moisture than the broad top.
Prepare the Furniture Safely
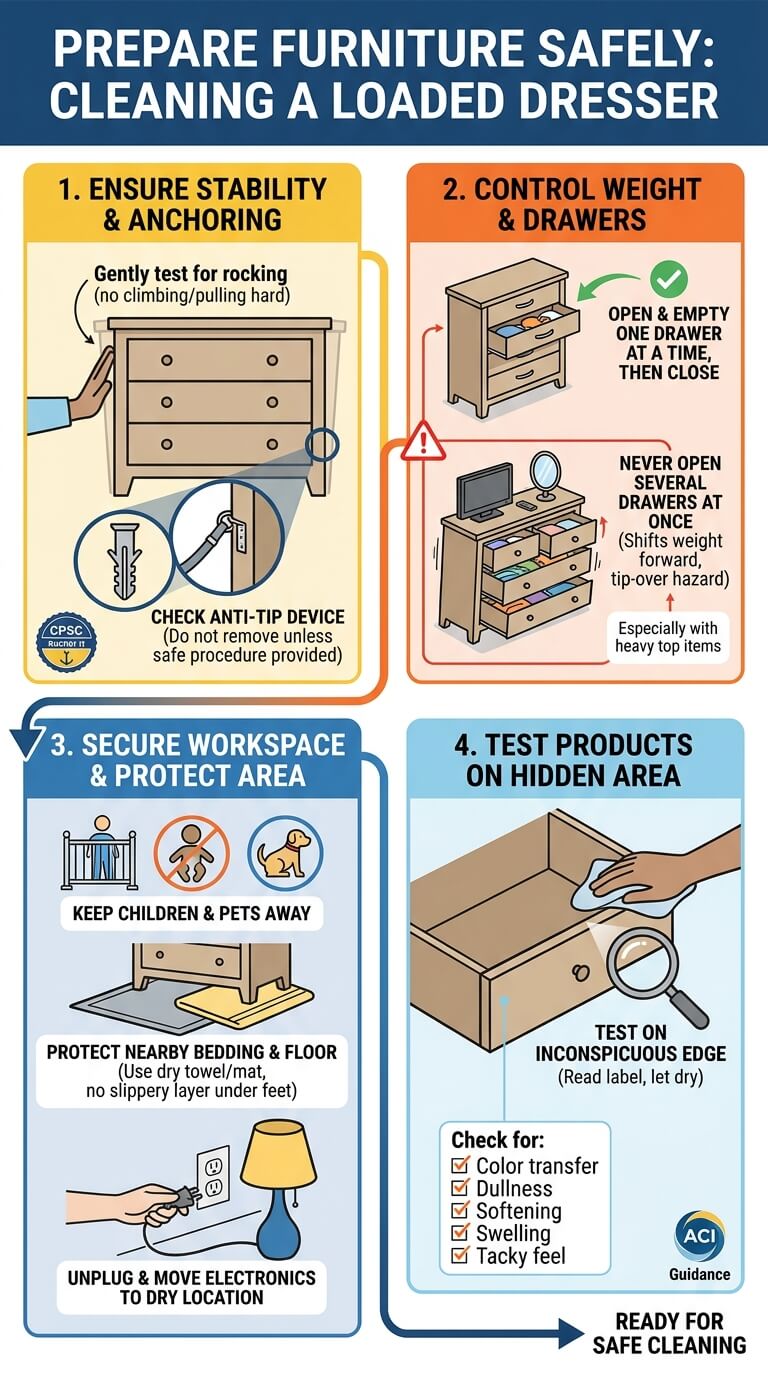
A loaded dresser can become unstable when drawers open or the piece moves. Control weight, access, cords, and the work area before cleaning.
Check stability and wall anchoring
Gently test for rocking without climbing, leaning, or pulling hard. Look for an installed anti-tip device and check whether it appears loose or detached. The CPSC Anchor It information center recommends securing furniture to help prevent tip-overs. Cleaning is not the time to remove an anchor unless the furniture instructions provide a safe procedure.
Never open several loaded drawers at once
Open and empty one drawer, close it, and then move to the next. Multiple extended drawers shift weight forward, especially when the top also holds a television, mirror, or heavy decor. Keep children and pets away from the work area. If a drawer binds, do not pull with your full body weight or use the open drawer as support.
Protect nearby bedding, floor, and electronics
Move pillows, blankets, and clothing out of splash range. Put a dry towel or washable mat beneath the work side, but do not create a slippery layer under the furniture feet. Unplug removable lamps and chargers according to their directions, then move them to a dry location.
Test products on a hidden area
Read the cleaner label for surfaces it should and should not touch. The American Cleaning Institute guidance for hard surfaces emphasizes following label directions. Test underneath a rear corner or inside an inconspicuous edge, let it dry, and check for color transfer, dullness, softening, swelling, streaking, or a tacky feel.
Identify the Material and Finish
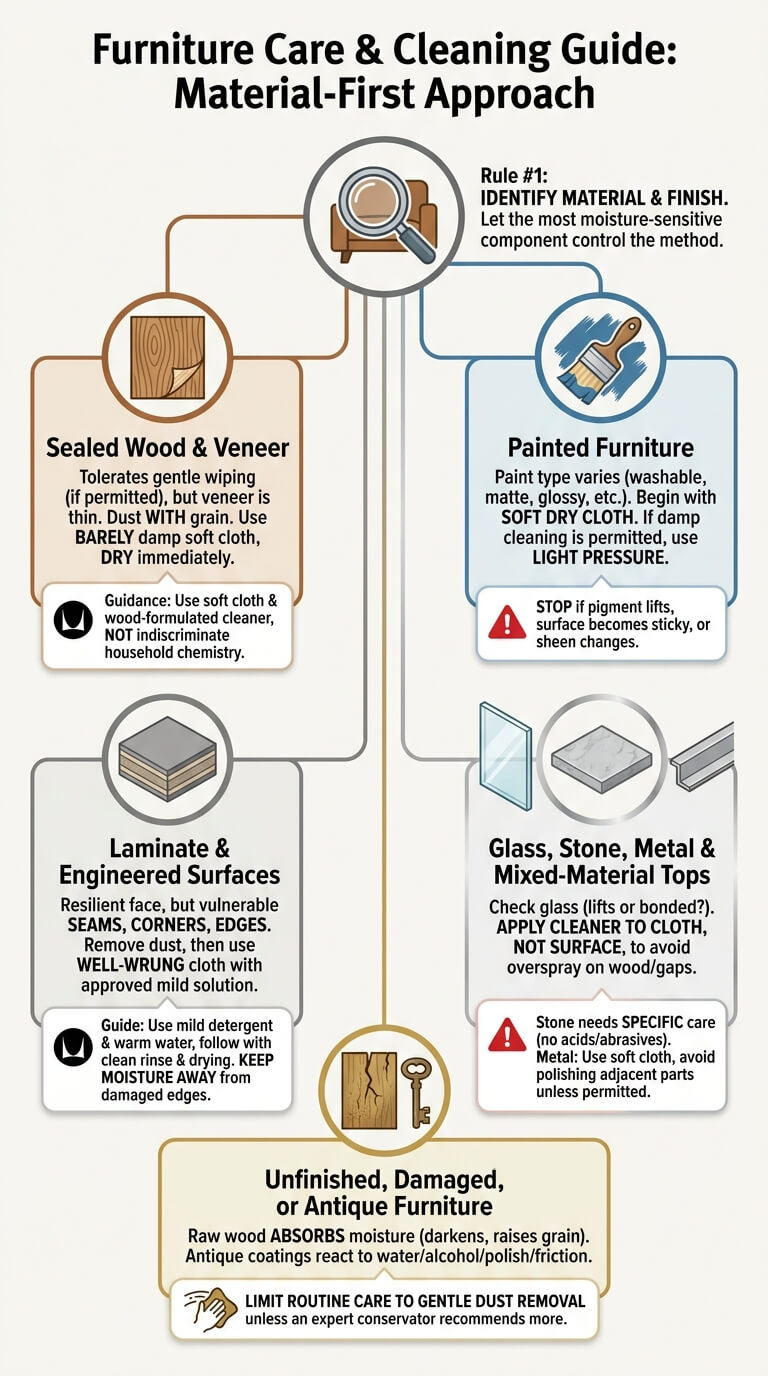
Let the most moisture-sensitive component control the method, especially around veneer, paint, seams, and mixed-material tops.
Sealed solid wood and veneer
Sealed wood usually tolerates gentle wiping with a product approved for the finish, but veneer is only a thin layer of real wood over another core. Dust with the grain, use a barely damp cloth when permitted, and dry immediately. Herman Miller’s wood and veneer care guidance calls for a soft cloth and a cleaner formulated for wood furniture rather than indiscriminate household chemistry.
Painted furniture
Paint may be washable, delicate, matte, glossy, chalk-style, lacquered, or already weakened by age. Begin with a soft dry cloth. If the maker permits damp cleaning, use light pressure and avoid repeated rubbing in one spot. Stop if pigment appears on the cloth, the surface becomes sticky, or the sheen changes.
Laminate and engineered surfaces
Laminate can be resilient across the broad face but vulnerable at seams, corners, drilled holes, and exposed particleboard edges. Remove dust, then use a well-wrung cloth and approved mild solution. Herman Miller’s care and maintenance guide uses mild detergent and warm water for compatible laminates, followed by a clean rinse and drying. Keep moisture away from damaged edges.
Glass, stone, metal, and mixed-material tops
Confirm whether a glass panel lifts out or is bonded in place. Apply glass cleaner to the cloth so overspray does not reach wood, backing, drawer gaps, or the wall. Natural stone and engineered stone need their own care directions because acids and abrasive powders may alter some finishes. For metal trim, use a soft cloth and avoid polishing adjacent painted or plated parts unless each surface permits it.
Unfinished, damaged, or antique furniture
Raw wood absorbs moisture and can darken, raise grain, or develop rings. Antique coatings may react to water, alcohol, silicone polish, or friction. Limit routine care to gentle dust removal unless the maker, dealer, or furniture conservator recommends more.
Step-by-Step Exterior Cleaning
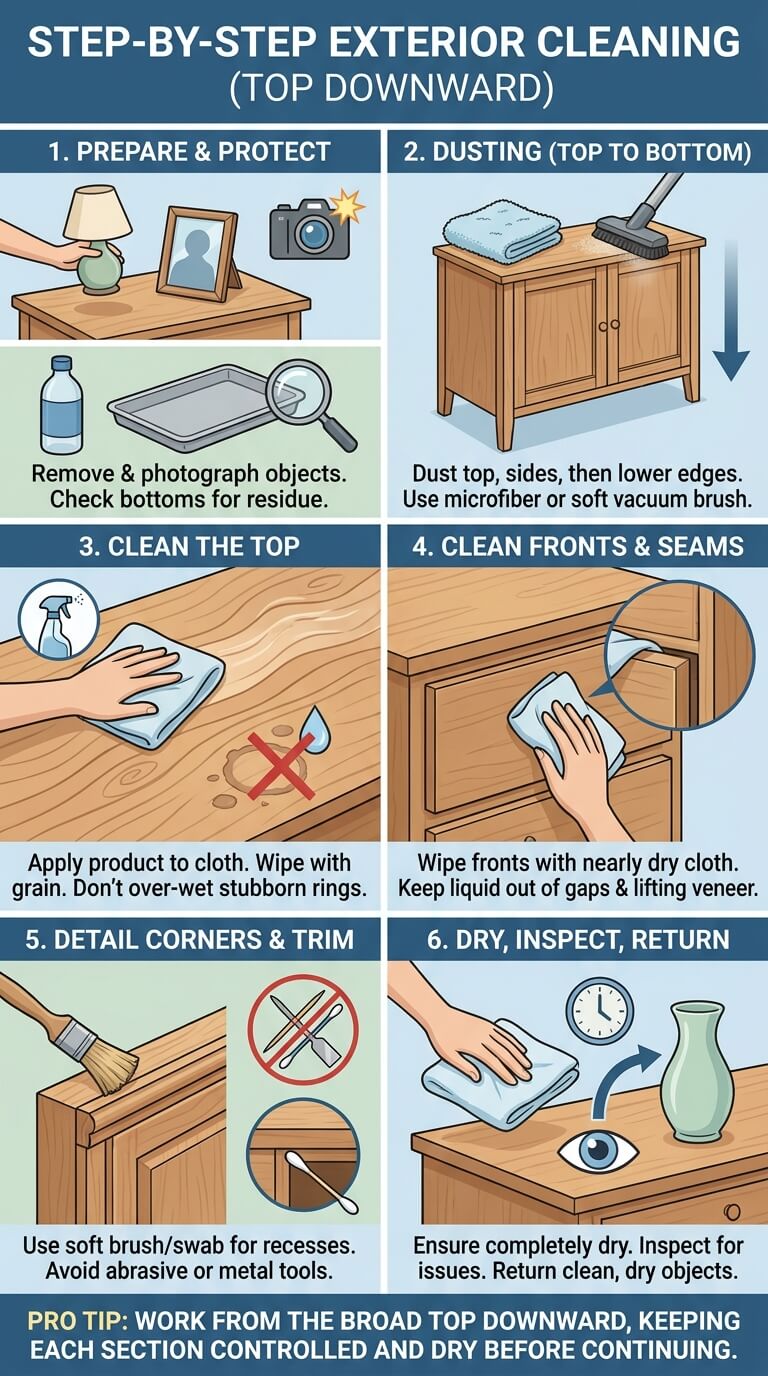
Work from the broad top downward, keeping each section controlled and dry before continuing.
Remove objects and photograph the setup if useful
Lift items rather than sliding them across the top. Photograph cable routes, lamp placement, felt pads, and stacked objects if you want to restore the arrangement. Check the bottoms of bottles, trays, clocks, and decor for sticky residue that could transfer back.
Dust top, sides, front, legs, and lower edges
Use a clean microfiber cloth or a vacuum with a soft brush and low, controlled suction. Work top to bottom, turning the cloth as it loads with soil. Support decorative trim instead of pulling across it.
Clean the top with a finish-appropriate method
Apply the approved product to a cloth, not the furniture. Wipe in the direction of wood grain or in straight overlapping passes on smooth manufactured surfaces. Do not chase a stubborn ring with more liquid. Make one careful pass, dry it, inspect in angled light, and decide whether the remaining mark is residue, finish change, or a stain needing specialist advice.
Wipe fronts without forcing moisture into seams
Close drawers fully and wipe the fronts with a nearly dry cloth. Keep liquid away from gaps between fronts, edge banding, keyholes, and areas where veneer or laminate is lifting. For grooves, wrap the cloth over a soft detailing tool rather than flooding the recess.
Detail corners, trim, and underside lips
Body oils and dust collect beneath drawer lips, along carved trim, and at the lower edge of a nightstand top. Use a soft brush for dry debris, then a lightly moistened cotton swab only if the finish permits it. Rotate to a clean side frequently. Avoid toothpicks, metal tools, and abrasive sponges that can scratch or chip the coating.
Dry and inspect before returning items
Use a clean dry cloth, then wait until seams and edges no longer feel cool or damp. Check for streaks, tackiness, cloudy patches, raised fibers, or new rings. Return only clean, dry objects, and keep wet containers or cold drinks off the finished surface.
Clean Drawer Pulls and Hardware
Hardware receives frequent contact, yet its thin coating may be more sensitive than the furniture body.
Determine whether hardware is coated, plated, painted, or unfinished
Inspect a hidden underside and the area around the screws. Brass-colored hardware may be solid brass, plated metal, painted resin, or a clear-coated alloy. Tarnish on unfinished metal behaves differently from soil on a protective coating. When uncertain, use only a soft damp cloth followed by immediate drying, not metal polish.
Remove skin oils and residue with minimal product
Support the pull with one hand and wipe it with the other so you do not twist the mounting points. A small amount of label-approved mild solution on a cloth is usually easier to control than spray. Clean the rear of a handle and the finger contact area, then dry thoroughly.
Keep liquid away from screw holes and wood edges
Do not let cleaner run behind a backplate or into a drilled opening. Moisture can swell composite material, stain unfinished wood, or encourage corrosion around fasteners. For a tight edge, use a barely damp cotton swab and immediately follow with a dry one. Do not soak removable hardware in a bowl unless its manufacturer explicitly recommends that method.
Tighten only when the furniture manual allows
A loose pull may need a correctly sized screwdriver, but over-tightening can strip a screw, crack a brittle handle, or crush the drawer front. Hold the hardware aligned and make only a small adjustment. Stop if the screw spins without tightening, the backing material crumbles, or the drawer front flexes.
Clean Drawer Interiors
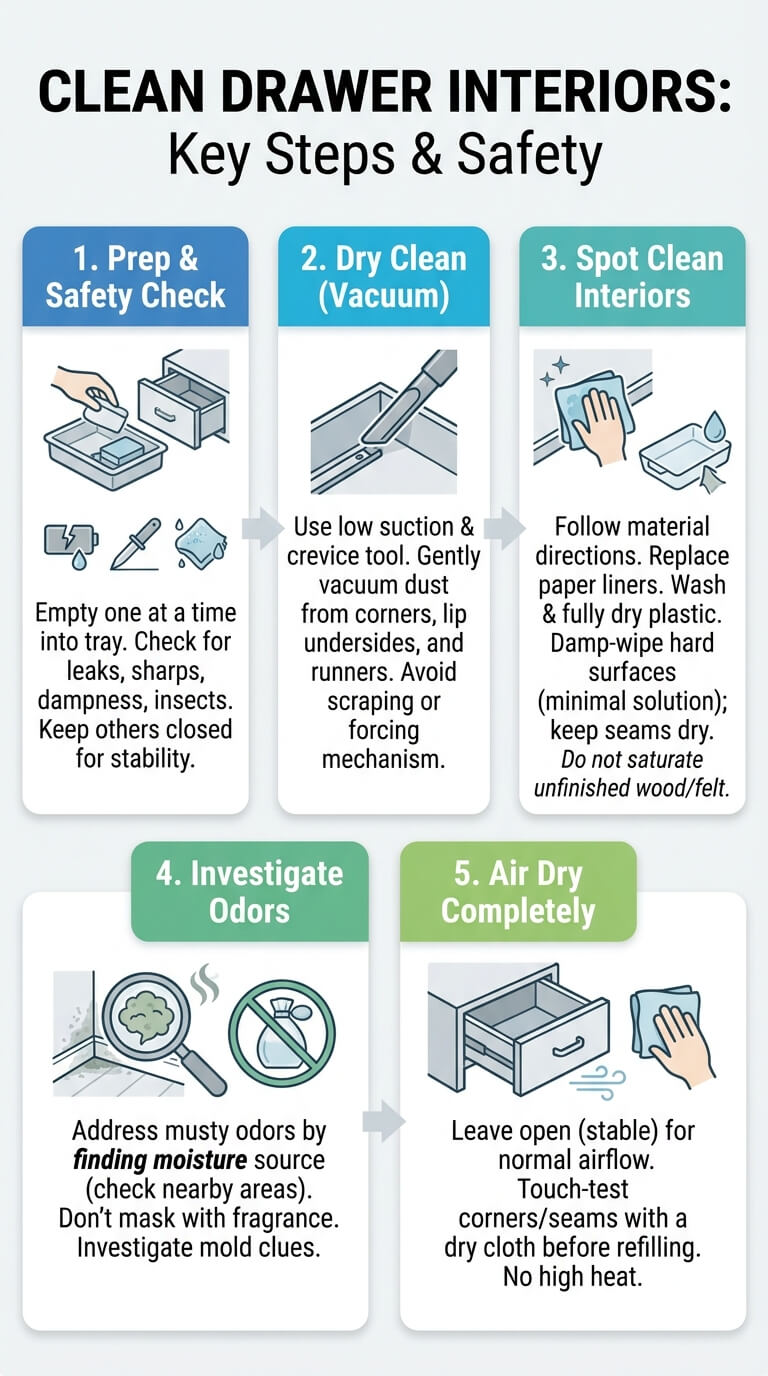
Closed drawers can hide dust, leaks, lint, and dampness even when the exterior looks clean.
Empty one drawer at a time
Place the contents in a shallow tray in their existing order. Check for uncapped products, leaking batteries, damp fabric, insects, sharp objects, and heavy items before reaching in. Keep the other drawers closed to maintain stability.
Vacuum dust, crumbs, and hair
Remove a loose liner if it can be lifted without tearing. Use a crevice tool at low suction, keeping the nozzle from scraping veneer, paper, or felt. Vacuum corners, the underside of the drawer lip, and accessible runner areas without forcing the tool into the mechanism.
Spot-clean liners and hard interiors
Follow the liner and furniture directions. Disposable paper may be better replaced than wetted. Washable plastic liners can be cleaned separately and dried fully. For a hard interior that permits damp wiping, use minimal solution and keep seams dry. Do not saturate unfinished wood, felt, flocking, cardboard backing, or glued fabric.
Address musty odor by finding moisture rather than adding fragrance
Remove the drawer and inspect only if the furniture instructions allow it and you can support it safely. Check the wall, baseboard, floor, drawer bottom, stored textiles, and nearby window for dampness or staining. EPA notes that a moldy or musty odor should be investigated. Fragrance sachets may hide the clue without correcting the moisture source.
Let drawers dry open before refilling
Leave the cleaned drawer extended only as far as is stable, or remove it and support it according to the manual. Provide normal room airflow without high heat. Touch corners, seams, and liners with a dry cloth before replacing contents.
Handle Common Dresser and Nightstand Messes
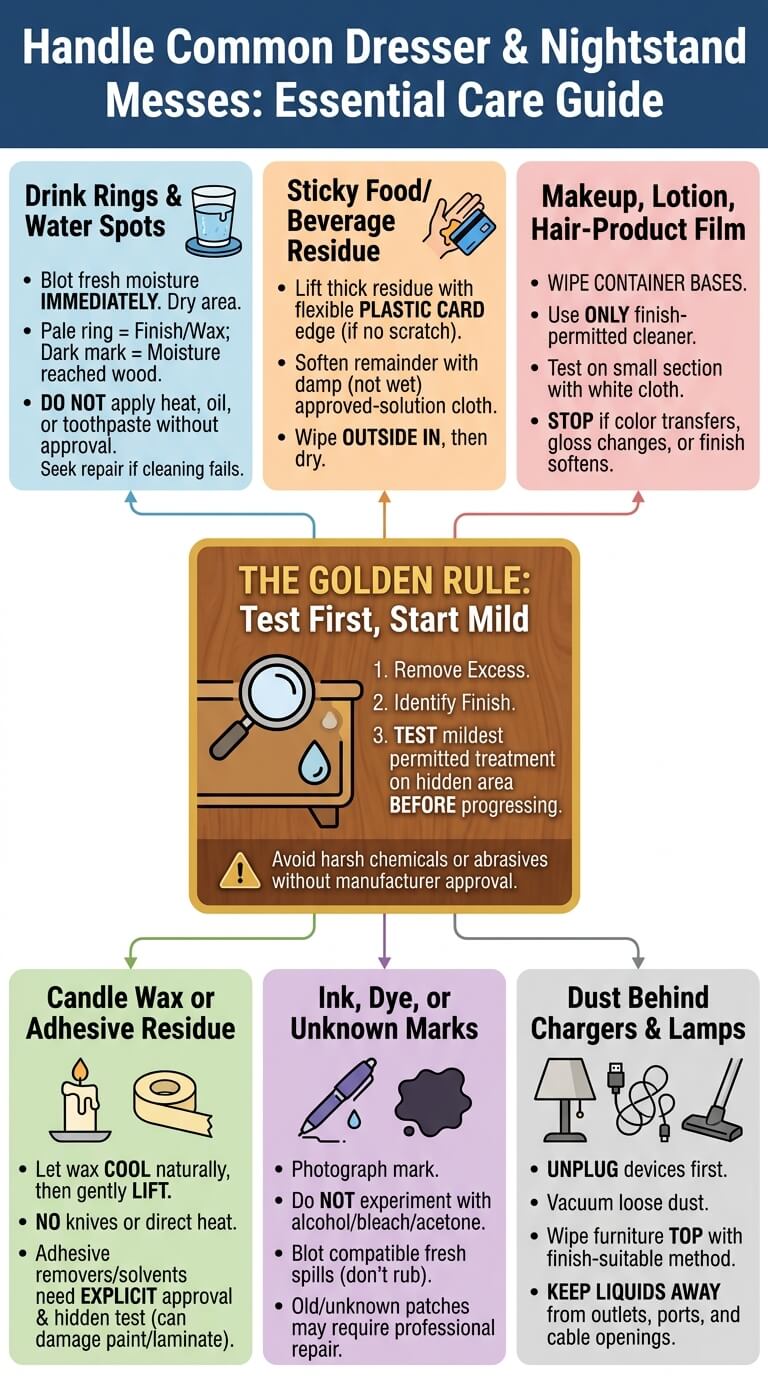
Remove excess material, identify the finish, and test the mildest permitted treatment before doing more.
Drink rings and water spots
Blot fresh moisture immediately and dry the area. A pale or cloudy ring may sit in wax or finish rather than on top of it, while a dark mark may indicate moisture reached the wood. Do not apply heat, oil, toothpaste, or abrasive powder without manufacturer approval. If ordinary finish-safe cleaning does not change the ring, seek repair guidance.
Sticky food or beverage residue
Lift thick residue with the edge of a flexible plastic card only when it will not scratch the finish. Soften the remainder with a cloth lightly dampened in an approved solution, holding it briefly rather than flooding the area. Wipe from the outside toward the center, then dry.
Makeup, lotion, and hair-product film
Remove containers and wipe their bases so the film does not return. Oil-based cosmetics may smear when water is added. Use only a cleaner permitted for the furniture finish, working on a small section with a white cloth. Stop for color transfer, gloss loss, or softening.
Candle wax or adhesive residue
Let warm wax cool naturally, then lift only what releases without force. Do not use a knife or direct heat. Adhesive removers and solvents can dissolve paint, stain coatings, or cloud laminate, so they require explicit finish approval and a hidden test.
Ink, dye transfer, or unknown marks
Photograph the mark and note whether it is fresh. Do not experiment with alcohol, bleach, acetone, or stain removers on an unidentified finish. Blot a compatible fresh spill without rubbing. Old ink, clothing dye, or an unknown dark patch may have penetrated the coating.
Dust behind chargers and lamps
Unplug devices as directed and move them by the body, not the cord. Vacuum loose dust from the furniture and wall, then wipe the top with a method suitable for the finish. Keep liquid away from outlets, power strips, lamp sockets, USB ports, and cable openings. When the shade itself needs more than exterior dusting, use the guide to clean lampshades by material.
Clean Behind and Beneath the Furniture
Access hidden floor and wall edges only when the furniture can be handled without losing stability. When furniture must move to expose wall and floor edges, place the task inside a planned guide to deep clean a bedroom.
Decide whether the piece can be moved safely
Check its weight, width, anchoring, mirror attachment, floor type, and the route available. Empty heavy drawers and remove top objects, but follow the maker’s directions before taking drawers out. Do not move a tall or bulky dresser alone. If access is unsafe, use a long vacuum tool from the sides or leave the area for qualified help.
Protect flooring and avoid tip-over risk
Never pull on an open drawer or top edge. Use proper lifting technique, adequate help, and furniture glides that suit the flooring when approved. Avoid dragging legs across wood, vinyl, laminate, or carpet transitions. Keep the piece upright and supported. If an anchor must be disconnected, arrange a safe reinstallation before the furniture returns to use.
Vacuum wall edges, baseboards, and cords
Capture dry soil before wiping. Clean the baseboard with a material-safe method and inspect for moisture, pest evidence, damaged cords, or wall discoloration. Do not vacuum directly over a frayed cable or force tools into an outlet area. Retrieve dropped medication, batteries, glass, and sharp objects with appropriate protection rather than bare hands.
Return furniture with ventilation and cable clearance
Allow any cleaned floor or baseboard to dry. Move the dresser back without pinching cords, blocking a vent, or pressing damp material against the wall. Restore the anti-tip device exactly as directed. Confirm drawers open smoothly, feet sit level, cables have slack, and the back has the clearance required by attached electronics or the furniture maker.
Maintenance Routine
Small, regular tasks prevent residue and drawer debris from becoming a difficult catch-up job.
Fast weekly surface reset
Remove cups and trash, return a few daily objects, dust the top and pulls, and wipe fresh compatible spills. Check beneath bottles and chargers for residue. This should take only a few minutes and does not require opening every drawer.
Monthly hardware and drawer-edge detail
Dust the ledges above drawer fronts, wipe handles, and check screws for visible looseness without over-tightening. Vacuum the floor line and inspect cable areas. Clean a small sticky spot before it spreads, and investigate any drawer that begins scraping or shifting.
Seasonal drawer-interior cleaning
Choose one drawer at a time, vacuum loose debris, inspect liners and stored products, and wipe only compatible hard surfaces. Seasonal attention is especially useful for drawers holding cosmetics, snacks, children’s items, pet supplies, or infrequently used linens.
Immediate response to spills and moisture
Blot liquid promptly, remove wet objects, and dry the surface according to its care instructions. Check the edge below the spill and the drawer beneath it. A leaking humidifier, plant saucer, cosmetic bottle, or cold drink can damage seams before the top appears badly affected.
Mistakes to Avoid
Wrong products, excess liquid, and unsafe force cause most preventable damage.
Using furniture polish on every finish
Polish is not a universal cleaner. It may leave silicone, wax, fragrance, or oily residue, and it can streak laminate, soften some coatings, or make later refinishing harder. Use it only when the furniture maker recommends that type for the identified finish.
Saturating veneer, laminate edges, or drawer joints
Water can travel beneath a thin surface and swell the core. Keep cloths well wrung, never spray seams, and dry edges at once. Pay close attention around screw holes, chipped corners, back panels, and the lower lip of the top.
Scrubbing glossy paint
Abrasive pads and repeated pressure can create a dull patch that is more visible than the original soil. Lift dry dust first, test a mild approved cleaner, and use straight gentle passes. If the cloth picks up color or the gloss changes, stop. A persistent mark may be within the paint rather than removable from its surface.
Mixing cleaning and organizing into one unfinished project
Emptying every drawer at once creates clutter, increases tip-over risk, and leaves contents exposed while surfaces dry. Clean one controlled zone, close or replace it, and continue. Set aside a small box for decisions that truly require organizing.
Moving or opening unstable furniture unsafely
Do not climb on a dresser, use drawers as steps, pull a tall piece by yourself, or leave several drawers open. Keep top-heavy loads off the furniture during cleaning. Stop if the unit rocks, the wall restraint is missing or damaged, a mirror shifts, or the floor prevents controlled movement.
When to Stop or Escalate
Pause when cleaning reveals damage, moisture, instability, or a finish that needs specialist care.
Swollen veneer, peeling laminate, or lifting paint
These changes indicate that the surface or bond is already compromised. Additional water and rubbing can spread the damage. Dry any active moisture, photograph the area, and ask the manufacturer or a furniture repair professional about the next step.
Mold or recurring musty odor
Stop refilling drawers when visible growth, repeated mustiness, wet backing, or wall staining is present. Identify and correct the moisture source. Porous liners, cardboard, unfinished wood, and stored textiles may need separate evaluation. A fragrance spray or bowl of deodorizer cannot replace inspection of the wall, floor, furniture back, and room humidity.
Loose anchoring or tip-over risk
Keep people away from a dresser that rocks, leans, separates from its restraint, or has damaged attachment points. Do not rely on placing heavy items in a lower drawer as a substitute for proper anchoring. Contact the furniture maker, landlord, or qualified installer for a compatible correction before normal use resumes.
Antique, lacquered, stone, or specialty finishes
Valuable pieces and unfamiliar finishes can be permanently altered by common cleaners. Lacquer may react to solvents, stone may etch, hand-painted decoration may lift, and aged veneer may loosen. Limit care to safe dry dusting and seek a conservator, stone professional, or furniture specialist who can identify the material.
Frequently Asked Questions
These answers cover common dresser and nightstand cleaning decisions.
What is the safest way to clean a wood dresser?
Confirm that the surface is sealed wood or veneer, remove dry dust with a soft cloth, and follow the furniture maker’s care directions. When damp wiping is permitted, use a well-wrung cloth and a cleaner formulated for that finish, wipe with the grain, and dry promptly. Keep water away from joints, chips, and raw edges.
How do I clean inside dresser drawers?
Empty one drawer at a time and keep the others closed. Vacuum dust and crumbs with a soft tool, then spot-clean only surfaces and liners that permit moisture. Avoid saturating unfinished wood, felt, paper, or glued fabric. Leave the drawer open in a stable position until every corner and liner is fully dry.
Can I use all-purpose cleaner on a nightstand?
Only when both the product label and the nightstand instructions say it is suitable for the identified finish. Many all-purpose cleaners are not intended for unfinished wood, certain paints, lacquer, natural stone, leather, or damaged veneer. Test a hidden area and apply the product to a cloth rather than spraying the furniture.
How do I remove sticky residue without damaging the finish?
Remove dry debris first, identify the finish, and test the mildest approved cleaner. Apply a small amount to a cloth, hold it briefly against the residue, and wipe gently from the outside inward. Avoid blades, abrasive pads, direct heat, and unapproved solvents.
Should I move a dresser to clean behind it?
Move it only when its weight, anchoring, mirror, flooring, and available help make the task safe. Remove top objects and heavy drawer contents first, following the manual. Do not pull by an open drawer. When movement is unsafe, clean accessible edges with a long vacuum attachment or arrange help.
How often should drawer interiors be cleaned?
Inspect them seasonally and clean when dust, crumbs, product leaks, hair, or odor appears. Drawers holding cosmetics, food, children’s items, or pet supplies may need more frequent attention, while protected linen drawers may need less.
Final Thoughts
Safe dresser and nightstand cleaning starts with stability and finish identification. Remove dry soil, use only a small amount of an approved product, and protect seams, raw edges, hardware holes, and drawer joints. Empty one drawer at a time and let it dry before refilling. Stop for swelling, peeling, persistent mustiness, unstable anchoring, or a valuable finish that needs specialist care.

Ethan Carter is the Founder & Editor of HomeCleanSecrets. Based in the United States, he has 5 years of experience creating practical home cleaning, laundry care, stain removal, decluttering, and home organization content. His goal is to help everyday households clean smarter and build simple routines that are easier to maintain.
Read more about Ethan Carter on his author page: https://homecleansecrets.com/ethan-carter/