
If your dryer is taking longer than usual, feels hot to the touch, or leaves lint around the outlet, a clogged dryer vent is a likely cause. This guide walks you through a safety-first step-by-step process to restore airflow: cleaning the lint screen, the vent hose, the wall duct, and the exterior vent. It also explains when a professional should handle the job and how to maintain a clear vent to reduce problems in the future.

Quick answer: the best way to clean a dryer vent
What to do first
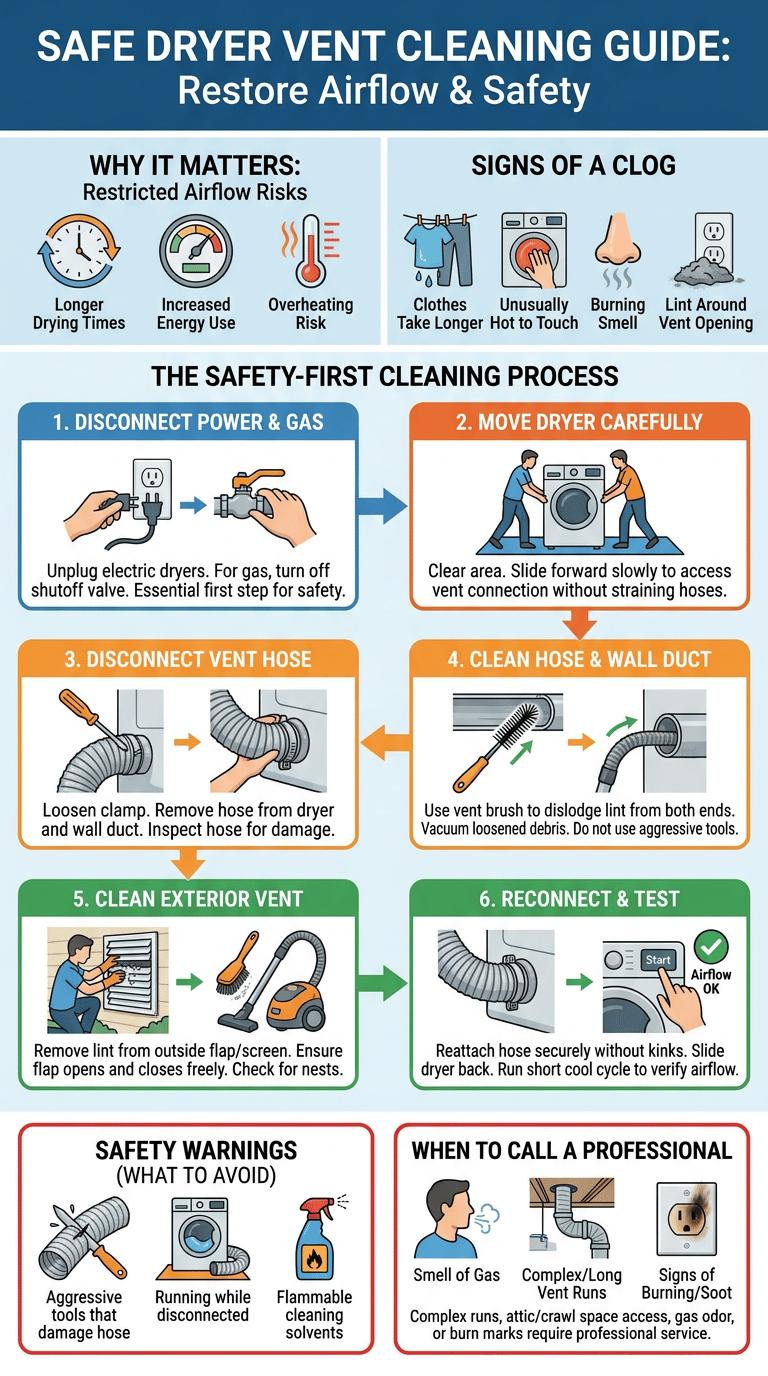
Start by turning power off at the wall and making sure the dryer is disconnected from gas or electricity. Remove and clean the lint screen after every load. Next, move the dryer to access the vent connection, disconnect the vent hose, and remove visible lint. Use a dryer vent brush and a vacuum to clear the hose and wall duct. Finish by cleaning the outside vent opening and testing a short drying cycle to confirm improved airflow.
For a related walkthrough, see our guide to how to clean hardwood floors.
For a related walkthrough, see our guide to how to clean humidifier.
For a related walkthrough, see our guide to how to clean shower glass.
What to avoid
- Aggressive tools that can puncture or crush the vent hose. Avoid metal screwdrivers or sharp implements inside flexible ducts.
- Running the dryer while it is still disconnected from the vent system. This vents lint and moisture into the laundry area and can cause overheating.
- Using flammable cleaning solvents near the dryer. If you use cleaning products, follow product safety guidance and first-aid directions.
- Delaying professional help when the vent runs through walls, ceilings, or complex runs. Complex systems may require a professional inspection or cleaning.
Why cleaning the dryer vent matters
Lint restricts airflow
Dryer lint collects inside the duct and narrows the pathway that warm, moist air needs to leave the dryer. Restricted airflow makes the dryer work harder to dry clothes and can trap extra heat and moisture inside the appliance and the vent system.
Drying takes longer
Restricted airflow slows moisture removal from clothing. When warm, humid air cannot exit freely, drying times increase and energy use goes up. Restoring clear airflow reduces cycle time and helps your dryer operate more efficiently.
Clogged vents can become a fire risk
Blocked vents allow heat and lint to build up. For safety, clear lint and restore airflow promptly, and do not use the dryer if it overheats, emits a burning smell, or makes unusual noises. If you are unsure whether the vent is safe, stop using the appliance and get a professional inspection.
Signs your dryer vent is clogged
Clothes take longer to dry
If loads require extra cycles or repeated runs on the same setting, restricted airflow is likely slowing moisture removal. Before adjusting settings, check the lint screen and vent system for blockages.
Dryer feels unusually hot
A dryer that is hotter than normal during operation is a sign of reduced ventilation. Feeling heat on the dryer cabinet or near the exhaust point indicates the appliance is not shedding heat efficiently.
Burning smell
A faint burning odor may indicate lint burning inside the dryer or vent. Stop the dryer, clean visible lint, and inspect the vent system. If the smell persists after cleaning, unplug the dryer and arrange for a professional service.
Lint around the vent opening
Lint collecting at the wall or exterior vent opening is a visible sign of a blockage further down the line. Clear the lint catch area and inspect the hose and wall duct for more buildup.
Step 1: unplug the dryer
Electric dryer safety
Always unplug electric dryers before working on the vent. This prevents the machine from starting unexpectedly and reduces the risk of electrical shock. If your dryer is hardwired, switch it off at the circuit breaker and lock out or tag the breaker if possible.
Gas dryer caution
For gas dryers, turn off the gas supply at the shutoff valve before you move or disconnect the unit. Do not attempt to disconnect gas fittings without basic plumbing or gas-safety knowledge. If you smell gas at any time, leave the area immediately and contact your gas utility or emergency services per local guidance.
When to call a professional
Call a qualified service technician if you smell gas, if the dryer is hardwired and you cannot safely isolate power, or if the vent route passes through shared walls, chase spaces, attics, or crawl spaces where you cannot easily reach the duct. Also call a professional if you see corrosion, broken gas fittings, soot, or evidence of burning around the appliance.
Step 2: move the dryer carefully
How to create working space
- Clear the area behind and around the dryer so you can work safely.
- Have a helper if the dryer is large or heavy. A second person reduces the risk of injury and accidental damage.
- Slide the dryer forward slowly a few inches to access the vent connection. You only need enough room to reach the hose clamp and the duct opening for cleaning.
Avoid pulling too hard
Do not yank the dryer out by the cord, control panel, or front panel. Use the base or the sides of the dryer to move it. If the dryer resists, stop and check for hoses or wiring that may still be attached.
Protect the floor
Place cardboard, a moving blanket, or a protective mat under the dryer to prevent scratches or scuffs. If the floor is carpeted, be cautious about stretching or bunching the carpet as you move the machine.
Step 3: disconnect the vent hose
How to loosen the clamp
Most vent hoses are secured with one of these fasteners: a worm-gear clamp, a spring band clamp, or a crimped foil tape. Use the appropriate tool to loosen the clamp:
- For worm-gear clamps, use a screwdriver to turn the screw counterclockwise until loose.
- For spring clamps, squeeze the tabs with pliers and slide the clamp away from the connection.
- Cut crimped foil tape with a utility knife, taking care not to damage the dryer outlet or sheet metal.
How to inspect the hose
After disconnecting, look through the open ends of the hose. If you see dense lint or obstructions, the hose needs cleaning or replacing. Flexible foil and plastic hoses crush easily and trap lint; a smooth-walled, metal semi-rigid or rigid duct is preferred where building codes allow.
When the hose should be replaced
Replace the hose if it is torn, crushed, kinked, corroded, or made of single-use plastic. Damaged hoses reduce airflow and can trap lint. Use a dryer vent hose that is recommended by the dryer manufacturer and that meets local code. If you are unsure, consult a technician.
Watch our video
Step 4: remove lint from the hose and vent
Use a dryer vent brush
Work from the dryer end and the outside end when possible. Insert a flexible dryer vent brush into the hose and push and pull to dislodge lint. Rotate the brush gently while you move it to reach bends and the wall duct entrance. Repeat until you pull out minimal lint.
Vacuum loose lint
After brushing, use a vacuum with a long hose attachment or a shop vac to remove loosened lint from the hose and duct opening. If you can reach into the wall duct, vacuum there as well. Collect lint in a bag or container and dispose of it in your household trash. If you suspect mold or heavy contamination, use protective gloves and a mask and follow product safety guidance for cleanup.
For basic information about household cleaning and safety when using cleaners, consult first-aid and exposure guidance from Poison Control and cleaning and disinfecting guidance from the CDC.
Poison Control guidance on household cleaner exposures
Clean the wall duct
Reach as far into the wall duct as you can with the brush and vacuum. Many home vent systems have a short transition from the dryer to the wall duct; others have longer runs that require more effort or professional equipment. If you cannot clear the duct completely from both ends, consider a professional inspection and cleaning.
Step 5: clean the outside vent opening
Remove lint from the exterior vent
On the outside of your home, locate the dryer vent outlet. Remove visible lint and debris from the throat of the exterior vent. Use a brush, gloved hand, or vacuum to clear lint. If the outside vent has a screen or grille, remove it to access deeper lint, clean it, and reattach it securely.
Check the flap
Exterior vents usually have a flap or louvered door designed to open when air flows out. Check that the flap opens freely and closes when the dryer is off, that the hinge is not stuck, and that there is no accumulation preventing closure. Free-closing flaps help prevent pests and rain from entering the duct when the dryer is not in use.
Look for bird nests or blockages
Birds, insects, and small animals sometimes nest in exterior vents. If you find nesting material, clear it carefully using gloves and a tool to pull it out, then vacuum the area. Take precautions to avoid contact with droppings and nesting materials. If you find evidence of animals frequently nesting in the vent, consider installing a vent cover designed to deter pests and consult local wildlife or building professionals if needed.
Step 6: reconnect and test the dryer
Reattach the vent hose
Reinstall the vent hose with a secure, but not over-tightened, clamp. Position the hose so it runs straight to the wall duct without sharp bends or kinks. Trim excess length rather than fold the hose to create a tight bend. Ensure the connection at the dryer outlet is tight enough to prevent leaks but not so tight that the clamp cuts into the duct.
Move the dryer back safely
Slide the dryer back into position slowly, watching that the hose does not crimp or pull out of alignment. Keep a few inches of clearance behind the dryer for air circulation and future access. Reconnect the power cord and, for gas dryers, turn the gas valve back on and check connections for leaks if you disconnected any gas fittings.
Run a test cycle
Run the dryer on a short or air-only cycle and check airflow at the exterior vent. You should feel steady air exiting the vent opening. Inspect the dryer exhaust area and the hose connection for unusual heat or odors. If airflow remains weak or unusual odors persist, stop the dryer and review the steps above or arrange for a professional inspection.
Dryer vent cleaning mistakes to avoid
Ignoring the outside vent
Cleaning only the internal hose and lint screen leaves buildup at the exterior vent. Always check and clean the outside vent opening to ensure the entire airflow path is clear.
Crushing the vent hose
Do not use a hose that is crushed, kinked, or flattened. These conditions block airflow and trap lint. Replace damaged hoses with approved rigid or semi-rigid metal ducts where possible and permitted by local code.
Using the dryer with poor airflow
Continuing to use the dryer when airflow is restricted can lead to longer dry times and increased wear on the appliance. If cleaning does not restore airflow, discontinue use and seek professional help to prevent equipment damage or unsafe conditions.
Skipping professional help when needed
Home cleaning tools reach only so far. Long or complex vent runs, vents that pass through shared building cavities, signs of soot or fire damage, or gas-fitting issues require a qualified technician. When in doubt, call a professional to inspect and clean or repair the ductwork safely.
Dryer vent maintenance checklist
After each use
- Clean the lint screen.
- Wipe visible lint from the dryer door opening and drum lip.
- Leave the dryer door open briefly after a cycle to let moisture escape from the drum.
Periodic tasks
- Inspect the hose connection and the area around the dryer for lint buildup.
- Check the exterior vent for visible lint or debris and remove what you can safely reach.
Deep cleaning and inspection
- Perform a full vent cleaning: disconnect the hose, brush, and vacuum both the hose and the wall duct, and clear the outside vent opening.
- Inspect the vent hose for wear and replace it if damaged or made of noncompliant materials.
- If you notice a persistent problem, consider a professional service that can access longer runs and use specialized equipment.
Frequently asked questions
How often should I clean my dryer vent?
Clean the lint screen after each use. Inspect and clean the vent hose and exterior vent regularly, and have a professional inspect or clean the vent run if it is long, complex, or inaccessible.
How do I know if my dryer vent is clogged?
Signs include longer drying times, heat or lint around the dryer area, a burning odor during operation, and reduced airflow at the exterior vent. If you see these signs, stop using the dryer until you have inspected and cleaned the system.
Can I clean a dryer vent myself?
Yes, many homeowners can clean the visible portions: lint screen, transition hose, and the exterior vent opening. Use a dryer vent brush and a vacuum to remove lint safely. However, call a professional if the vent run is inaccessible, passes through enclosed spaces, shows signs of damage, or if you find soot, corrosion, or potential gas leaks.
Is a clogged dryer vent dangerous?
A clogged vent reduces airflow and can cause the dryer to run hotter than normal. Those are safety concerns to address promptly. If you detect burning smells, smoke, or persistent overheating after cleaning, stop using the dryer and get a professional inspection.
When should I hire a professional?
Hire a professional if the vent run is long, passes through walls, attics, or crawl spaces, or if you find evidence of damage, persistent odors, signs of burning, or a suspected gas leak. Professionals have specialized tools for long runs and can inspect for damage you may not see.
Final thoughts
Keeping your dryer vent clear is fundamentally about restoring safe airflow. Regular, simple maintenance—cleaning the lint screen, checking the exterior vent, and performing a deep clean when needed—prevents most problems. Use the right tools, unplug or shut off gas before you work, and stop if you encounter issues that are beyond a straightforward cleanup. For questions about cleaner safety or exposure, consult Poison Control, and for guidance about indoor air and ventilation basics, see the EPA’s information on indoor air quality.
Learn indoor air quality basics from the EPA

Ethan Carter is the Founder & Editor of HomeCleanSecrets. Based in the United States, he has 5 years of experience creating practical home cleaning, laundry care, stain removal, decluttering, and home organization content. His goal is to help everyday households clean smarter and build simple routines that are easier to maintain.
Read more about Ethan Carter on his author page: https://homecleansecrets.com/ethan-carter/