
Quick answer: the best way to clean a humidifier
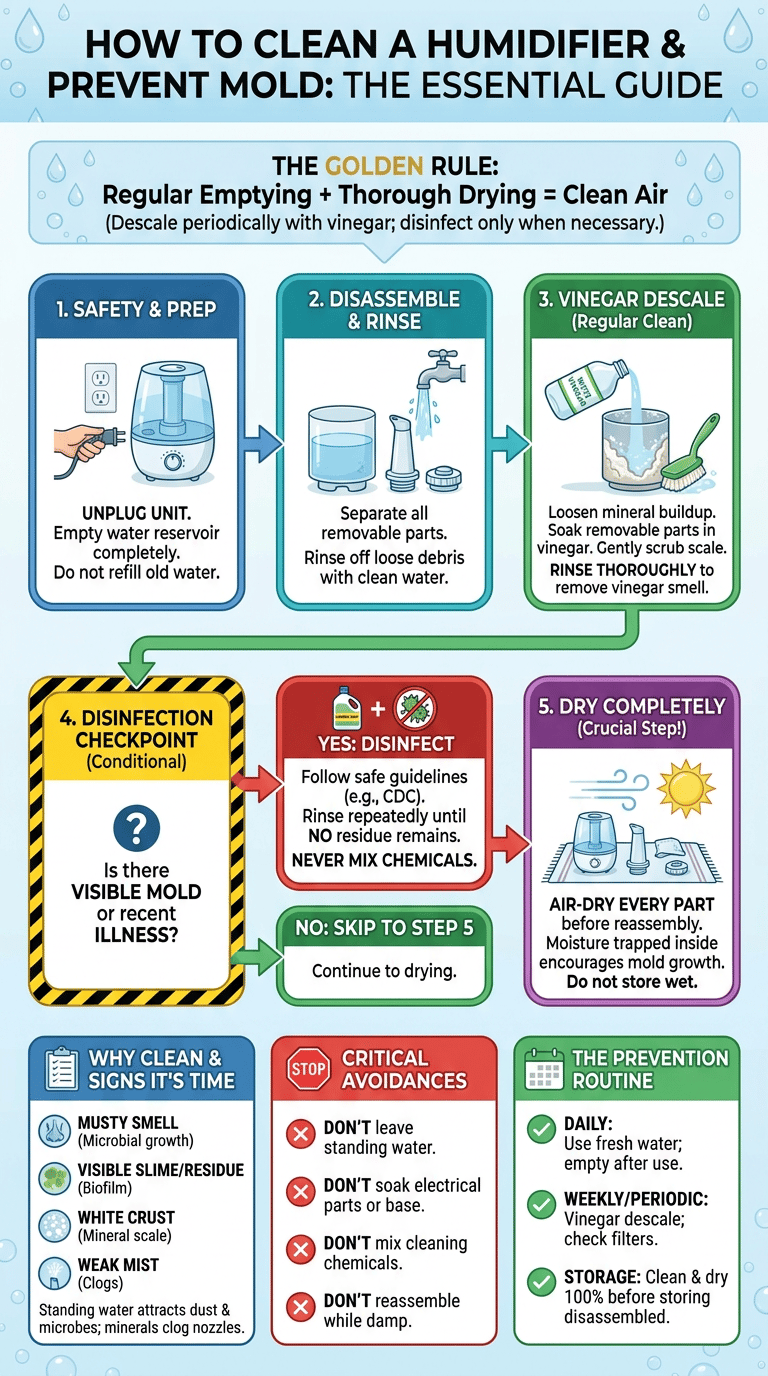
Empty and dry the humidifier regularly, descale periodically with white vinegar to remove mineral buildup, and disinfect only when necessary following public health guidance. Consistent drying and routine cleaning help prevent musty smells, visible residue, and mold growth.

What to do first
Unplug the unit and empty the water reservoir. Rinse the tank with clean water to remove loose debris, then use white vinegar to loosen mineral deposits on removable parts. After rinsing away the vinegar, allow all parts to dry completely before reassembly. If you need to disinfect because you see mold or after caring for someone who was ill, follow safe disinfecting instructions and rinse thoroughly.
What to avoid
- Avoid leaving standing water in the tank for extended periods.
- Do not mix cleaning chemicals or use incompatible products together.
- Do not soak or run electrical parts under water; follow manufacturer instructions for removable components.
- Do not reassemble or store parts before they are fully dry.
Why humidifiers need regular cleaning
Standing water encourages buildup
Humidifiers hold water in a confined space, and water that sits can collect dust, pollen, and organic matter. That accumulation can lead to musty odors and provide material that attracts microbes. Regular emptying and drying reduce the time water can stagnate and lower the chance of problems.
Minerals collect inside the tank
Tap water contains dissolved minerals that can leave visible white scale inside the tank and on the misting elements. Those mineral deposits can clog nozzles and reduce performance. Cleaning mineral buildup with a mild acid-based household agent such as white vinegar is a common, low-risk method for most tanks and bases.
Mold can grow in damp parts
Mold prefers damp, dark places and can grow on the damp surfaces inside a humidifier if moisture and organic residue are present. Preventing mold focuses on reducing moisture and food sources: emptying water, routine cleaning, and thorough drying. If visible mold appears, disassemble and follow a safe disinfection step before returning the unit to service.
Signs your humidifier needs cleaning
Musty smell
A persistent musty or stale odor when the humidifier runs is a common first sign that biofilm or microbial growth has developed inside the tank or on internal surfaces. Address the odor by emptying the tank, cleaning according to the steps below, and drying thoroughly.
For a related walkthrough, see our guide to how to clean cast iron skillet.
For a related walkthrough, see our guide to how to clean hardwood floors.
For a related walkthrough, see our guide to how to clean dryer vent.
For a related walkthrough, see our guide to how to clean washing machine.
Visible slime or residue
Slime or a slimy coating inside the tank or around openings indicates biological growth and requires a full clean and disinfection if persistent. Scrub accessible surfaces, rinse well, and dry completely before using the unit again.
White mineral scale
Crusty white powder or flaky deposits on the tank, mist outlet, or near the base are signs of mineral scale from hard water. Scale reduces mist flow and should be removed regularly with vinegar so it does not build up into stubborn clogs.
Reduced mist output
If the humidifier seems weaker than usual, mineral deposits, clogged nozzles, or accumulated residue are likely. Cleaning and descaling the affected parts usually restores normal output.
Step 1: Unplug and empty the humidifier
Why unplugging matters
Always unplug the unit before doing any cleaning or maintenance to eliminate the risk of electrical shock. Some humidifiers have internal fans and heating or ultrasonic components that could be damaged or dangerous if powered while wet.
Empty old water
Tip the tank over a sink and pour out all remaining water. Dispose of the water rather than refilling or topping it up. Standing water left in the reservoir encourages mineral buildup and microbial growth, so make emptying part of your regular routine when the unit is in use.
Separate removable parts
Remove the water tank, filter or wick if the model has one, mist nozzle or cap, and any other removable components the manufacturer allows you to remove. Lay parts on a clean towel or counter where they can be cleaned and dried. Keep track of small pieces and seals so reassembly is straightforward.
Step 2: Rinse the tank and base
Use clean water
Rinse the tank and other non-electrical parts with warm tap water to remove loose debris. Use enough water to flush out corners and the fill spout. For the base and any fixed areas that get wet during operation, use a damp cloth to wipe surfaces when the unit is unplugged.
Remove loose residue
After rinsing, use a soft brush or cloth to dislodge loose mineral flakes or residue. Avoid abrasive pads on plastic parts as they can scratch and create crevices where residue collects. For narrow openings, a bottle brush or a clean toothbrush works well.
Avoid soaking electrical parts
Do not immerse the power base, cord connection, or any section that houses electrical components. Wipe those areas with a lightly damp cloth and allow them to dry fully. Follow the manufacturer manual for any parts specified as non-submersible.
Step 3: Clean with vinegar
How vinegar removes mineral buildup
White vinegar contains acetic acid, which helps dissolve mineral deposits and loosen scale on humidifier tanks and parts. It is a common home remedy for descaling and is generally safe for many plastic and ceramic surfaces used in humidifiers. Apply vinegar to affected areas, allow time to work, then scrub gently and rinse well.
How long to soak parts
Soak removable, submersible components long enough for deposits to loosen; lighter buildup will require a shorter soak, while heavier scale may need a longer soak. Never soak electrical or electronic parts; soak only removable components that the manufacturer permits.
Where to scrub gently
Use a soft brush, sponge, or cloth to clean the tank interior, the fill spout, and the mist nozzle or cap. Pay attention to seams, corners, and rubber seals where deposits collect. For narrow areas, a bottle brush is helpful. After scrubbing, rinse thoroughly with clean water until any vinegar smell is gone.
Step 4: Disinfect the humidifier if needed
When disinfection is useful
Disinfection is appropriate when you see visible mold, persistent biological slime, or if someone in the home was recently ill and you want extra precaution before resuming use. Routine vinegar cleaning helps prevent buildup, but a disinfectant step removes microbes when they are already present.
Follow general household cleaning and disinfecting guidance from public health authorities when disinfection is needed. For a concise overview of safe cleaning and disinfection practices, see the CDC guidance on cleaning and disinfecting.
CDC guidance on cleaning and disinfecting
How to rinse thoroughly
After disinfecting, rinse every part that contacts water or emits mist repeatedly with clean water until no disinfectant residue remains. Any residual disinfectant can become aerosolized when the humidifier runs and may irritate airways or leave an unpleasant odor. Follow the disinfectant product label for contact time and rinsing instructions, and always allow parts to dry after rinsing.
Why you should not mix chemicals
Do not combine different cleaners or disinfectants, such as bleach and ammonia, because mixing can produce hazardous gases. Use one disinfectant at a time and follow the label instructions for safe use. When selecting products, consider safer alternatives and follow manufacturer guidance for compatibility with your humidifier materials. For information on safer cleaning product choices, see EPA Safer Choice resources.
EPA Safer Choice information on safer cleaning products
Step 5: Dry every part completely
Air-dry before reassembling
Allow all components to air-dry fully before putting the humidifier back together. Set parts on a clean towel in a well-ventilated area. Drying reduces remaining moisture that could support mold growth. To speed the process, pat parts dry with a clean lint-free towel before air drying.
Why moisture causes mold
Mold spores are common in indoor air and will grow on surfaces that remain damp and have organic residues present. Even a thin layer of moisture in a tank seam or inside a nozzle can support growth over time. Thorough drying after cleaning removes the moisture that mold needs to establish and proliferate.
How to store it between uses
- Store the humidifier disassembled with the tank and removable parts dry and separated if you will not use it for a period of time.
- Keep the unit in a cool, dry location away from direct sunlight and dust to reduce contamination risk during storage.
- For extended off-season storage, clean and dry all parts thoroughly and store them in a breathable container or on a shelf to prevent trapped moisture.
How to prevent mold in a humidifier
Use fresh water
Refill the tank with fresh water each time you use the humidifier rather than reusing water that has sat in the tank. Fresh water lowers the chance for bacterial or fungal growth and reduces mineral residue buildup.
Empty the tank when not in use
If you will not run the humidifier for a period of time, empty and dry the tank. This prevents standing water from serving as a growth medium for microbes and removes a potential source of musty odors.
Clean on a schedule
Establish a cleaning routine that fits your usage: regular emptying and rinsing, periodic vinegar descaling, and checking filters or wicks for replacement or deep cleaning per the manufacturer’s recommendations. Consistency prevents scale and microbial growth before they become problems.
Humidifier cleaning mistakes to avoid
Leaving water sitting
Leaving water in the tank for extended periods encourages stagnation, which increases the likelihood of odors and microbial growth. Make it a habit to empty the tank when the unit is not in active use.
Using harsh cleaners without rinsing
Harsh chemicals can damage plastics and seals and may leave residues that are unsafe to inhale if not rinsed thoroughly. Always follow product labels and rinse repeatedly to remove any cleaning agent.
Forgetting small parts
Small components like seals, nozzles, or misting caps can harbor residue. Clean and dry these parts along with the tank and base. Missing a tiny seal or cap during cleaning is a common source of ongoing odors.
Running a dirty humidifier
Operating a humidifier without routine maintenance can circulate contaminants into the air and reduce the unit’s performance. If you notice any signs of buildup, stop using the humidifier until it is cleaned and dried.
Humidifier maintenance checklist
After each use
- Unplug and empty the water tank after periods of use.
- Rinse the tank with clean water and allow it to dry if you will not use the unit again soon.
- Wipe the base with a lightly damp cloth if any water has accumulated; never submerge the electrical base.
Periodic descaling and filter care
- Descale the tank and removable parts with white vinegar as needed; soak until deposits loosen, then scrub gently and rinse thoroughly.
- Inspect and clean or replace filters, wicks, or cartridges per the manufacturer schedule.
End-of-season storage
- Perform a full clean and, if needed, a safe disinfection following public health guidance.
- Dry every component completely to prevent mold growth during storage.
- Store the humidifier disassembled in a dry place; consider labeling small parts and keeping them together.
Frequently asked questions
How often should I clean my humidifier?
Establish a cleaning routine based on how often you use the unit. Regular emptying and rinsing plus periodic descaling and inspection of filters will keep most models working well. If you notice odor, visible residue, or reduced output, clean immediately.
Can I clean a humidifier with vinegar?
Yes. White vinegar is a common household descaler for removing mineral deposits. Use it on removable, submersible parts and rinse thoroughly. Do not use vinegar on parts the manufacturer advises against and do not soak electrical components.
How do I remove mold from a humidifier?
If you see mold, disassemble the unit and clean with vinegar or a disinfectant, following product instructions and public health guidance. Rinse all parts thoroughly and dry completely before reassembly. If mold is extensive or returns after cleaning, consider replacing porous parts such as filters or contacting the manufacturer.
Why is there white dust from my humidifier?
White dust is mineral residue from hard water. It can settle on surfaces in the room. To reduce white dust, use distilled or demineralized water, clean the humidifier regularly, or use a model designed to limit mineral emission. Regular descaling with vinegar also reduces the accumulation that creates dust.
Should I empty my humidifier when I’m not using it?
Yes. Emptying and drying the tank when the humidifier is not in use prevents standing water from developing odors or supporting microbial growth.
Final thoughts
Keeping a humidifier clean is straightforward when you adopt simple routines: empty and dry after use, descale periodically with white vinegar, disinfect only when necessary using safe methods, and ensure full drying before reassembly. These steps minimize mineral buildup, reduce the risk of mold, and help the unit run efficiently. When disinfecting or choosing cleaning products, follow public health guidance and product labels to protect household members and the appliance. If visible mold persists or you suspect internal contamination that cleaning cannot resolve, replace filters or consult the manufacturer for parts replacement or guidance.

Ethan Carter is the Founder & Editor of HomeCleanSecrets. Based in the United States, he has 5 years of experience creating practical home cleaning, laundry care, stain removal, decluttering, and home organization content. His goal is to help everyday households clean smarter and build simple routines that are easier to maintain.
Read more about Ethan Carter on his author page: https://homecleansecrets.com/ethan-carter/