
A small entryway works best when it stores only what people need at the door and gives the rest of the space back to movement. The goal is not to fit everything into a tiny entrance. Protect the walking path, keep the door easy to use, and create reliable homes for daily items.
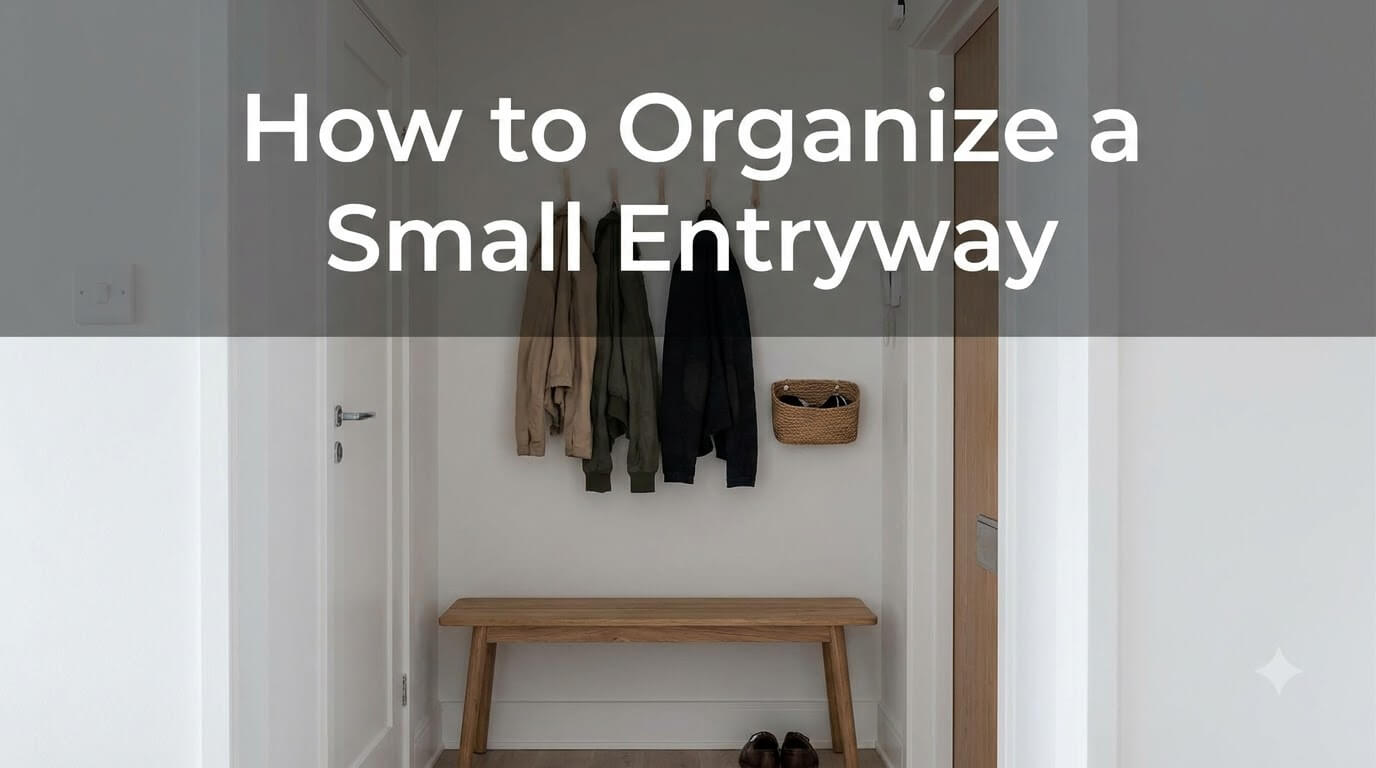
Start with the space you actually have. Measure door movement, the narrowest point in the walkway, and usable wall depth while allowing for people carrying bags or groceries. Then reduce the daily inventory until the entrance can handle it without piles spreading onto the floor.
Quick Answer: Store Less, Protect the Path, Use the Walls

A tiny entrance works when storage supports movement.
Before optimizing a tight footprint, it helps to understand the broader entryway and mudroom organization framework so every near-door category has a clear role.The minimum viable small-entryway system
Most tiny entrances need fewer storage elements than people expect. A practical starting setup is one place for active footwear, one place for the outer layer or bag used most often, and one small home for keys or another essential pocket item. Add more only after those basics work during a normal week.
What should leave the entrance immediately
Anything that is not used for arriving or leaving should earn its place elsewhere. Extra décor, unopened deliveries, old mail, reusable bags that are rarely used, off-season footwear, spare coats, sports equipment, and miscellaneous household supplies can make a tiny entrance feel full before daily items even arrive.
When This Guide Fits Your Entryway
The same capacity-first approach works across several small entrance layouts.
If the footprint is adequate but keys, bags, and paper still land randomly, the problem may be the arrival routine; a simple entryway drop zone can solve that without adding much furniture.Narrow hallway entrance
In a narrow hall, depth matters more than width. Storage that projects too far from the wall can turn a passable corridor into a shoulder-squeezing route. Favor shallow wall storage, flat hooks, a slim shoe zone, or no floor furniture at all. Keep the opposite side visually and physically quiet so people are not weaving between objects.
One-wall entryway
A single usable wall can still carry the essentials if each item has a clear vertical level. Low storage can handle a limited footwear rotation, middle-height hooks can hold light daily items, and a shallow upper ledge can handle objects that do not need frequent access. The important part is to avoid stacking so many functions on the wall that items overlap and fall into the walkway.
No-closet entryway
Without a closet, the entrance cannot imitate one. Keep only active outerwear and daily carry items near the door, then send backups and seasonal items to bedroom closets or another storage area. Open hooks are often easier to use than trying to create makeshift enclosed storage in a very small footprint.
Apartment door opening into a living room
When the door opens directly into a living room, storage should define a small functional boundary without building a visual wall. A shallow tray, a few hooks, and a compact shoe location may be enough. Closed storage can reduce visible clutter, but deep cabinets may make the room feel smaller and interrupt circulation.
Tiny foyer with competing doorways
If the entry sits between a front door, closet door, bathroom door, or stair path, the free wall area can be misleading. Mark every door arc before choosing storage. A blank section of wall is not usable if an open door covers it or if a person must stand there to reach another room.
Step 1: Measure the Usable Entry Zone
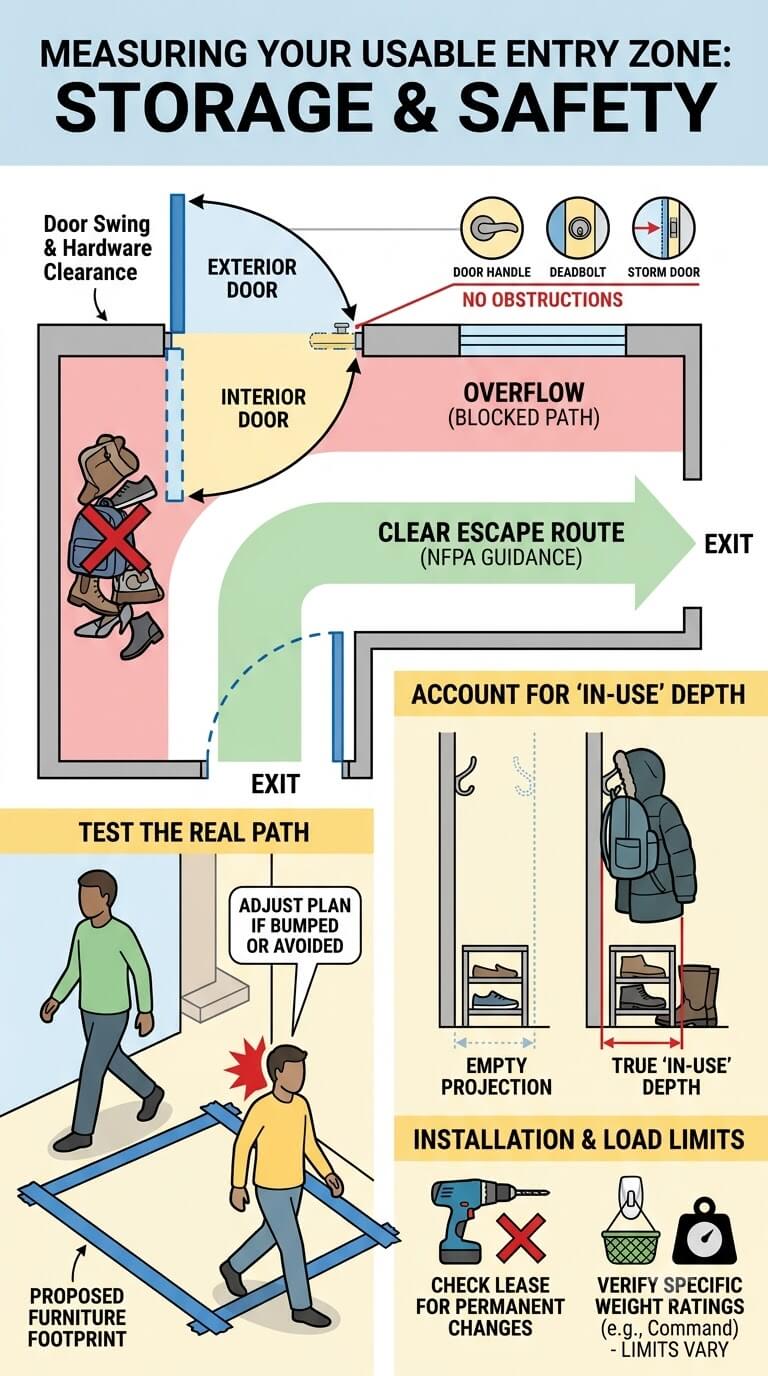
Measure the space while doors and people are moving, not only when the area is empty.
Mark door swing and hardware clearance
Open the exterior door through its normal range and note where the door edge, handle, deadbolt, and any storm door travel. Storage should not require the door to scrape, bounce off furniture, or stop short because shoes or baskets are in the way. If your home has a second door at the entrance, test both doors together.
Fire escape planning also depends on usable ways out of the home. The National Fire Protection Association’s home escape guidance emphasizes planning and practicing ways out. That makes the entrance path a poor place for overflow that can migrate in front of a door.
Measure the real walking path
Use painter’s tape or removable paper markers to outline the footprint of proposed furniture for a day or two. Walk through the area during busy times. If people repeatedly bump the taped area, step around it, or place objects on the floor because the storage is hard to reach, change the plan before buying anything.
Identify wall depth and floor pinch points
Measure how far shelves, hooks, and handles will project from the wall when they are in use, not just when empty. A shallow hook can become much deeper once a bulky backpack or winter coat hangs from it. Similarly, a narrow shoe rack may project farther once larger shoes extend past the frame.
Note renter or installation constraints
Renters should check lease requirements before drilling or making permanent changes. Removable products can be useful for light items, but they still have surface and load limits. For example, Command publishes specific weight ratings for its hanging products; the correct limit depends on the exact product and installation conditions rather than the general idea of an adhesive hook.
Step 2: Define the Minimum Daily Inventory

Decide what truly needs near-door access before assigning hooks, shelves, or floor space.
Count active shoes, outerwear, bags, and key items
Make a quick count of what each person genuinely uses during an ordinary week. Include the shoes most often worn out, the current jacket or coat, the work or school bag, and the keys needed for routine departures. This is the working inventory the entrance needs to support.
Separate daily from occasional use
Create two groups: active and overflow. Active items earn near-door space because they are used repeatedly. Overflow includes formal coats, specialty shoes, travel bags, backup umbrellas, off-season accessories, and extra tote bags. Store overflow where capacity is higher, then rotate items forward when the season or routine changes.
Remove decor and non-entry categories that consume function
Decor does not have to disappear, but it should not compete with the functions the entrance must perform. If a large vase takes the only safe surface for keys, or a floor plant makes people push shoes into the walkway, the decorative item is costing the room more than it contributes.
Set per-person limits
A shared entrance needs limits that reflect available space. One household might have room for one daily pair of shoes and one hanging item per person. Another might handle two pairs of shoes but only one shared basket for accessories. The number is not universal; it is whatever fits while leaving the path functional.
Step 3: Decide What Can Use Floor Space
Floor storage should earn its footprint by solving a daily problem without creating a bottleneck.
When a narrow bench is realistic
A bench can help if sitting to remove shoes is genuinely useful and the bench does not interrupt circulation. It should fit fully within the usable wall zone, remain stable, and still allow the door and nearby doors to work normally. Test the footprint before committing.
When floor furniture makes the entry less functional
Freestanding cabinets also deserve a stability check, especially in homes with children. The U.S. Consumer Product Safety Commission’s Anchor It guidance recommends securing top-heavy furniture and following manufacturer instructions. If a unit needs anchoring, plan that before placing it in the entrance.
Under-bench storage without creating a shoe pile
If a bench works, define exactly what can live underneath it. A low tray or divided cubby can hold the active footwear limit. Avoid turning the entire cavity into an open dumping space, because bags and shoes will expand until they block access to one another.
Floor-free layouts for very tight entrances
Some entrances work best with almost nothing on the floor. Wall hooks, a narrow ledge, and a small wall-mounted pocket can handle coats, bags, keys, or sunglasses while footwear moves to a nearby closet or designated area just beyond the entrance.
Step 4: Use Vertical Space Deliberately

Vertical storage is most useful when placement, item weight, and reach are considered together.
Hooks for high-frequency lightweight items
Hooks are most effective for items that are light enough for the hardware and used often enough to justify open access. Think daily jackets, hats, a light tote, or a child’s small backpack if the hook and wall system are rated for it.
Slim wall shelves and shallow ledges
A narrow ledge can create a home for keys, sunglasses, or one small tray without adding a deep console. Keep the surface intentionally shallow enough that it cannot become a large landing area for unrelated objects.
Wall-mounted baskets or pockets for small items
Wall pockets can work for gloves, hats, dog-walking waste bags, or other light grab-and-go items if those items are truly used at the exit. Give each pocket one job. A single catch-all pocket usually turns into a place where small objects disappear.
Installation and load-limit checks
Read the instructions for the exact hook, shelf, rail, or adhesive system before loading it. Weight ratings can depend on the number of fasteners, wall material, curing time, surface preparation, and how the load is applied. A heavy school backpack behaves very differently from a light scarf.
Step 5: Choose Open or Closed Storage
Choose visibility or concealment based on item behavior, ventilation needs, and available depth.
Open storage for speed and ventilation
Open storage is useful when speed matters and items may arrive slightly damp. Hooks, open shelves, and low racks make it obvious where things belong and reduce the number of doors or lids involved in putting them away.
Closed storage for visual clutter control
Closed storage can make an entrance calmer when it is shallow enough to fit safely. A small cabinet may hide a few shoes or accessories, but it cannot solve excess inventory. If the door will not close without compressing items, the unit is over capacity.
Why small spaces cannot hide unlimited overflow
Closed doors can disguise clutter for a while, which makes it easy to miss a capacity problem. Once a cabinet, drawer, or cubby becomes difficult to open, the first response should be removal, not another organizer inside the same cramped space.
When a shallow tray works better than a basket
A tray is useful when you want a visible boundary and easy retrieval. Keys, sunglasses, or one daily pair of shoes can be easier to manage when you can see the entire contents. Deep baskets are better for lightweight categories that do not need to be searched constantly, but they should still have a clear limit.
Layout Plans for Common Small Entryways

Match the layout to your entrance instead of copying a different floor plan.
One-wall linear layout
Arrange functions from low to high: limited footwear at the bottom, hooks at accessible heights, then a shallow shelf or ledge above if needed. Keep the busiest items closest to the natural hand path as people enter. Avoid placing a bag hook where a full bag will swing into the doorway.
Narrow hall with storage on one side
Choose one wall for storage and let the other remain clear. Keep projections shallow and place the bulkiest hanging items where the hallway is widest. If one end of the hall opens into a larger room, move overflow toward that room rather than crowding the threshold.
No-closet wall-and-door layout
Use the wall for daily outerwear and small carry items, then reserve the floor for the smallest practical shoe footprint. Over-door storage may be an option only if it does not interfere with door operation, hardware, seals, or the product’s instructions.
Entry directly into living room
Create a compact boundary with one visually quiet storage element rather than several small pieces. A narrow closed unit plus a few hooks can look calmer than a mix of baskets, racks, and freestanding stands. Keep the transition open enough that the living room still feels connected.
Small family setup with assigned vertical zones
Give each person a defined hook or small vertical section instead of equal floor territory. Children need placements they can reach without climbing. Adults can use higher hooks or shelves for less frequently handled accessories. Shared items should have one clearly named location rather than migrating among individual zones.
Fit Daily Shoes Without Turning the Entry Into Shoe Storage
Footwear near the door should stay limited to the pairs currently earning daily access.
Keep only the active rotation
Near-door footwear should be the pairs people are actually wearing now. If the shoe area is full, rotate a less-used pair out before adding another. Dress shoes, specialty footwear, and off-season pairs can live with the rest of the wardrobe.
Use a tray, low rack, or limited under-bench zone
Choose the simplest option that fits the space. A tray contains dirt, a low rack separates pairs, and under-bench storage uses otherwise empty space. Whichever you choose, define a pair limit so the system does not expand across the floor.
Move wet footwear through a drying step
Muddy or wet shoes should not go directly into closed storage. Let them drain or dry in a suitable contained area first, and protect nearby flooring according to its care instructions. Once dry, return only the pairs that belong in the active rotation.
Send rarely used pairs to closet storage
If a pair has not been worn during the current routine or season, it probably does not need premium space at the door. Moving it out is often more effective than finding a smaller rack.
Fit Coats, Bags, and Keys Into the Remaining Capacity
After footwear is placed, give remaining capacity to the most-used departure items.
One active outer layer per person when practical
Keep the coat or jacket being used most often near the exit and move backups elsewhere. In changing weather, a second layer may be reasonable, but overloaded hooks are a sign that seasonal rotation has stalled.
Bag parking without straps entering the walkway
Park backpacks, purses, and work bags where their full shape fits. A hook that seems well placed while empty may put long straps at ankle height once loaded. If a bag is heavy, use hardware rated for that load or choose a stable shelf or cubby instead.
A tiny permanent key home
Keys need very little space, which makes them a good fit for a small entrance. A small hook, tray, or drawer near the normal arrival point is enough. The best location is one people can reach without placing other items down first.
Why mail may need a different intake point
If the entry has no safe surface capacity, mail does not have to stay there. A small intake location just beyond the entrance can work better than allowing papers to cover a narrow shelf meant for keys. The entrance only needs to support a quick handoff, not long-term paper storage.
Before-and-After Layout Decision Framework

When a setup feels crowded, change inventory and placement in a deliberate order.
What to remove first when the space feels crowded
Remove off-season items, duplicates, rarely used shoes, extra bags, and unrelated household objects first. Then reassess the space before removing useful daily storage. Many small entrances improve dramatically when the inventory is reduced without changing the hardware.
What to raise off the floor
Lightweight, frequently used items are the best candidates for wall storage. Keys, hats, light jackets, and empty reusable bags often move upward easily. Heavy bags, unstable furniture, and bulky footwear need more careful support.
What to move behind a door or to another room
Only use behind-door space if the door can still open and close normally and the organizer is designed for that installation. Otherwise, move overflow to the nearest room with real capacity. A bedroom closet, hall closet, utility space, or wardrobe can take seasonal items that the entrance cannot support.
How to test the layout during a real departure
Test the setup on a busy morning. Can each person reach shoes, outerwear, bag, and keys without crossing another person’s path repeatedly? Can someone leave while another person is arriving? If the sequence causes collisions, change placement rather than asking everyone to remember a complicated routine.
Small-Entryway Storage Mistakes
Most failures come from using too much depth, storing too much, or ignoring how the door and walkway behave.
Assuming every entry needs a bench
A bench is optional. If it removes more standing room than it adds practical value, skip it. A clear floor and one wall of storage can be far more functional in a tiny entrance.
Buying deep furniture for a shallow zone
Deep consoles and cabinets can dominate a narrow passage even when they fit on the wall. Compare the furniture depth with the usable path and with the projection of doors and bags before buying.
Keeping every family category by the door
Sports equipment, pet supplies, school papers, reusable shopping bags, hats, umbrellas, footwear, and cleaning supplies do not all need near-door storage. Keep only the categories that are active at that entrance and give the rest a different home.
Letting baskets become unlimited catch-alls
A basket without a category fills with whatever is easiest to drop. Give each container one purpose and a physical limit. When it is full, empty or rotate the contents instead of stacking another basket nearby.
Installing storage without checking door movement
Always test door swing before drilling, anchoring, or placing furniture. Remember that coats, bags, and shoes extend beyond the empty storage unit. The finished setup must work when loaded, not only when photographed empty.
When the Entryway Cannot Store Everything
Overflow is normal in a small entrance; decide where it should go.
Move seasonal coats to closets
Keep the current outerwear rotation near the exit and store off-season or formal coats with the rest of the wardrobe. Rotating them back when weather changes is easier than keeping every layer at the door year-round.
Move extra shoes to wardrobe storage
The front door is best for active footwear, not the full shoe collection. Store specialty and rarely worn pairs elsewhere so the entrance can handle everyday shoes without stacks.
Move papers to a downstream paperwork system
Papers should leave the entrance after the initial handoff. Action items, records, school forms, and documents need a separate place where they can be reviewed or filed. A small foyer is too limited to become permanent paper storage.
Keep only daily bags in the entrance
Work bags, school backpacks, or the tote used every day can stay near the door. Travel luggage, spare purses, extra gym bags, and rarely used totes should move to closets or storage areas with more capacity.
Daily Reset for a Small Entryway
A short reset keeps temporary items from becoming permanent.
Clear the floor and return active items
At the end of the day, return shoes to their defined zone, hang the active coat or bag, and put keys in their permanent home. The reset should take only a few minutes because the system holds a small number of items.
Remove overflow before it becomes permanent
Carry upstairs items upstairs, move mail to its next destination, return shopping bags to their storage area, and remove anything that appeared temporarily. Temporary items become clutter when they survive several resets without a decision.
Check that the exit path still works
Finish by looking at the floor and door. Nothing should be sitting where feet catch it or where a door needs to move. If the same item repeatedly blocks the path, change its home rather than repeatedly moving it out of the way.
FAQ About Organizing a Small Entryway
These practical answers cover the decisions that cause the most confusion in very small entrances.
How do you organize a tiny entryway with no closet?
Keep only active items near the door. A small shoe zone, properly installed hooks, and a shallow key spot may be enough. Move seasonal coats, extra shoes, and rarely used bags to storage with more capacity.
What furniture works in a narrow entryway?
Choose furniture only if it preserves door movement and a comfortable walking path. A shallow cabinet or narrow bench may work, but some entrances function better with no floor furniture. Tape the footprint first and test it.
How many shoes should stay by the door?
Keep only the pairs that fit neatly in the assigned shoe area without spilling into the walkway. When the zone is full, move a less-used pair out before adding another.
How can renters add storage without major installation?
Use removable or freestanding options that fit lease rules and item weight. For adhesive products, follow the manufacturer’s surface preparation, curing, removal, and load instructions instead of assuming every wall finish is suitable.
What should never be stored in a small entryway?
Avoid items that block doors, create trip hazards, overload storage, or do poorly in entrance moisture or temperature conditions. Full seasonal wardrobes, bulky luggage, large paper piles, and unrelated household supplies usually belong elsewhere.
Final Thoughts
The best small entryway is not the one with the most storage. It lets people enter, put away the few items they use every day, and leave without stepping around clutter. Measure first, protect the path, reduce the active inventory, and add storage only where daily movement proves it useful.
If the entrance keeps overflowing after a reset, treat that as a capacity problem. Move seasonal and occasional items elsewhere before adding another basket, hook, or piece of furniture. A small space stays easier to maintain when every near-door item has a clear reason and limit.

Ethan Carter is the Founder & Editor of HomeCleanSecrets. Based in the United States, he has 5 years of experience creating practical home cleaning, laundry care, stain removal, decluttering, and home organization content. His goal is to help everyday households clean smarter and build simple routines that are easier to maintain.
Read more about Ethan Carter on his author page: https://homecleansecrets.com/ethan-carter/