
Quick Answer: The Best Way to Organize a Messy Pantry
The simplest, most maintainable pantry system starts with simplifying first. Empty the shelves, remove what you do not need, sort items into broad groups, and then build a layout that matches how your household actually cooks and snacks. Favor few, flexible zones over dozens of tiny categories, and use containers only where they solve a visible problem.

What to do first
Start by clearing space to work. Pull everything out so you can see what you have and remove obvious trash or expired food. Make fast keep-or-remove decisions, then group like items together. This approach makes decluttering quicker and prevents you from buying containers for items you will get rid of.
If you want a simple method to speed decisions while you sort, consider the no-contact decluttering approach. For a clear explanation of that method, see the no-contact decluttering method described by Real Simple.
What to avoid
- Do not buy lots of matching containers before you know what you will keep.
- Avoid organizing by too many tiny subcategories that will be hard to maintain.
- Do not place rarely used items in the spots reserved for daily use.
- Resist copying complicated, picture-perfect pantries that do not reflect your daily routines.
Why Pantries Get Messy So Fast
Understanding common causes makes it easier to design a system that resists clutter. Most messy pantries share patterns that are simple to fix when you plan around real use, not idealized perfection.
Too many categories
When every single item gets its own niche, it becomes harder to put things back. Small, specific categories increase decision fatigue. Broad categories reduce the number of choices each time you put something away and make daily maintenance quicker.
Buying storage before decluttering
People often buy containers at a sale or because a picture looked nice online, then realize those containers fit only a fraction of their items. That leaves excess inventory, mixed shapes, and partial containers that create new clutter. Declutter first, then buy storage only for recurring problems you actually have.
No reset routine
A well-designed pantry still needs brief, regular checks. Without a short reset routine, small piles and stray items accumulate until the pantry feels overwhelming again. Built-in micro-routines prevent backsliding and keep your system useful.
Signs Your Pantry Organization System Is Not Working
If your pantry creates extra work instead of reducing it, it is time to simplify. Look for these common signs and treat them as signals to change your approach.
You cannot find what you need quickly
If you regularly pull out multiple boxes or jars to find one item, your categories are too narrow or your layout does not match how you use the pantry. Aim for ease of access and logical placement rather than perfect visual symmetry.
Food expires before you use it
Items expiring in the back of the pantry suggest poor visibility or a mismatch between stock levels and actual consumption. Keep backup stock modest and place older items where you will see and use them first.
The pantry gets messy again within a few days
When a system requires constant effort to maintain, it is too complicated. Simplify categories, limit the number of specialized containers, and create a short weekly reset to restore order in minutes.
Step 1: Empty the Pantry and Remove Obvious Clutter
Emptying the pantry is not about creating a photo-ready space. It is about seeing what you own, removing things you will not use, and making space to create a practical layout.
What to take out right away
- Open packages with insect damage or mold.
- Boxes or jars with stale or off smells.
- Brittle or broken packaging that could spill.
- Duplicates you never use because they are the wrong size or format.
Place items you are unsure about in a “maybe” pile to review after an initial pass. This keeps momentum while you sort.
What to throw away, donate, or relocate
- Throw away perishable food that is spoiled or unsafe to eat.
- Donate unopened, unexpired items that your household will not use to local food programs if they accept pantry donations.
- Relocate non-food items that do not belong in the pantry, such as batteries, pet supplies, or cleaning tools, to their proper storage zones in the home.
When deciding whether to donate or discard unopened items, follow local guidance for food donations and safety. Avoid donating compromised or recalled goods.
How to make faster keep-or-remove decisions
- Ask two quick questions: Have I used this in the last six months? Will I use it in the next six months? If both answers are no, remove it.
- Use time limits: give yourself one minute per shelf or set a timer for the sorting session to avoid overthinking.
- Group duplicates and ask if you need all of them. Excess backups often become clutter.
Step 2: Group Similar Food and Household Items Together
After decluttering, grouping items is the next step. The goal is broad, predictable categories that make it fast to find and return items.
Pantry categories that work for most homes
- Breakfast items – cereal, oats, spreads used in morning routines.
- Cooking staples – oils, vinegars, salt, pepper, basic spices you reach for while cooking.
- Baking essentials – flour, sugar, baking powder, baking soda, and common mix-ins.
- Dry goods – rice, pasta, grains, and legumes.
- Snacks – chips, granola bars, and packable items for lunches.
- Canned goods – soups, tomatoes, beans, and canned proteins.
- Condiments and sauces – frequently used jars and bottles.
- Backstock – bulk items and overflow that you restock less often.
- Non-food household items – paper goods, pet food, and extra light bulbs placed where they make sense.
How broad your categories should be
Keep categories broad enough that returning items is almost automatic. For example, combine “baking essentials” rather than separate sugar, flour, and chocolate into individual spots unless you use each daily. The fewer categories, the fewer decisions each time you put something away.
What to do with odd or miscellaneous items
Create a single miscellaneous basket for infrequently used odd items. Empty or reassess this basket during your weekly reset. If the same items repeatedly live in miscellaneous, consider creating a small permanent home for them or removing them entirely.
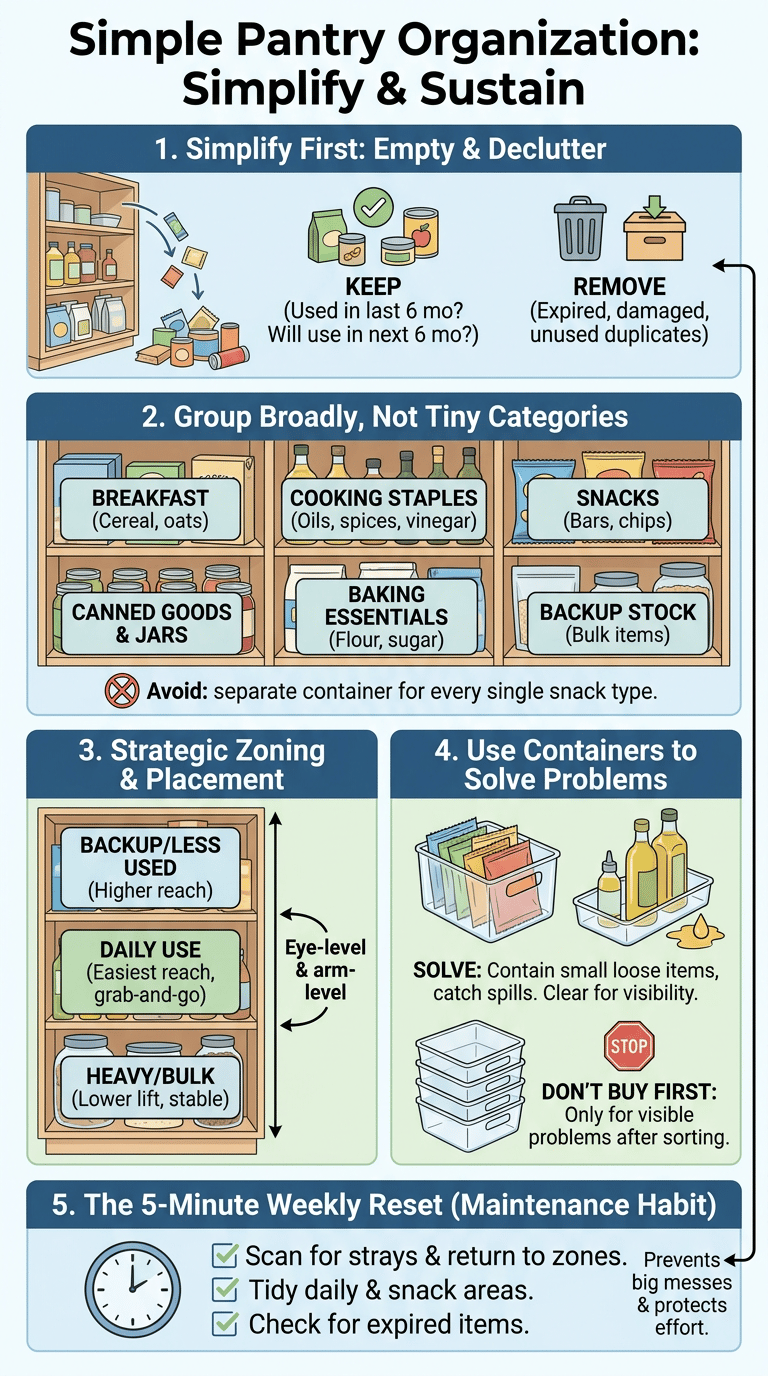
Step 3: Create Broad Pantry Zones That Are Easy to Maintain
Think in zones based on how you use the pantry, not by product line alone. Zones make it obvious where things belong and help family members return items correctly.
Daily-use zone
Place everyday items where they are easiest to reach. This includes breakfast staples, milk alternatives you keep on the shelf, or things you grab without thinking. Keeping these items together reduces morning friction and makes it easier for everyone to put items back.
Meal-prep and cooking zone
Keep cooking oils, frequently used spices, and ingredients for weeknight meals close to the stove area or a shelf near prep surfaces. If your pantry is separate from your cooking area, put a designated shelf for meal-prep items to minimize cross-house walking during cooking.
Backup stock zone
Reserve upper or lower shelves for overflow and bulk items. Keep quantities reasonable so that backstock rotates into daily-use zones before the item expires. If you use bulk bins, store them here and pull from this zone to refill your daily shelves.
Snacks and lunch-packing zone
Designate a child-friendly shelf at a reachable height for snacks and lunch items if multiple household members pack their own lunches. Clear boundaries here reduce the temptation to toss snack wrappers in the main pantry area and make it easier for children to be independent while still returning used items.
Step 4: Put Everyday Items in the Easiest-to-Reach Spots
Placement matters. Arrange shelves so the most-used items require the least effort to access, and less-used items are higher or lower.
Eye-level placement rules
Eye-level and arm-level shelves should hold the items your household reaches for most often. If kids regularly use specific items, consider placing those within their reach on a mid or lower shelf. Keep heavier or bulky items off eye-level shelves to avoid accidents.
Where to store heavier items
Store heavy items on lower shelves to reduce the risk of dropping them and to make lifting safer. This includes bulk drinks, large bags of rice, or heavy jars. Keeping heavy items low also helps maintain balance when shelves are full.
How to place kid-accessible items if needed
Set a kid-friendly zone with clearly defined items children can access without help. Use shallow bins or labeled baskets so children can find and return snacks and lunch components. Teach a simple rule for what stays in the child zone to avoid overflow.
Step 5: Use Containers Only Where They Actually Help
Containers are useful when they reduce spills, improve visibility, or keep like items together. They are not needed everywhere. Use them strategically to solve specific problems.
When bins help
- Group small items like snack bars or single-serve packets so they do not scatter across a shelf.
- Contain loose items that can tip or fall when pulled from a shelf.
- Use a shallow bin to hold cooking oils and sauces to avoid greasy spills on the shelf.
When clear containers help
Clear containers are helpful when you want quick visual inventory at a glance, such as with frequently used grains or cereal. If visibility would reduce duplicate purchases or expired items lurking in the back, a clear container can be worth it.
When labels are useful and when they are not
Labels are helpful when a container removes visual information about contents. For example, an opaque bin that holds snack bars benefits from a label. Avoid labeling every jar or container by micro-category. Broad labels like “Baking” or “Breakfast” strike a balance between clarity and flexibility.
Why too many containers can make a pantry harder to maintain
Excessive containers create extra tasks: refilling, cleaning, and finding the right spot for each container. They can hide items and create partial-fill zones where similar items accumulate. Use containers to reduce visible problems, not to achieve a particular aesthetic.
Step 6: Make a Small Pantry Work in a Practical Way
Small pantries require smarter use of space rather than more items. Focus on improving access and visibility using inexpensive solutions and by rearranging what you keep.
How to use shelves better
- Arrange items by frequency of use, with daily items front and center.
- Use shelf risers for stacked items so you can see labels on cans and jars.
- Store similar items together and use shallow baskets to prevent items from getting pushed to the back.
How to handle deep shelves
Pull-out trays or shallow baskets can turn deep shelves into usable space by making it easy to reach items at the back. If you do not want to buy hardware, use a simple shallow bin to create a pull-forward zone so the back items are not forgotten.
How to use doors, baskets, or risers without overdoing it
Door storage and hanging baskets are useful for small items and wraps, but avoid stacking too much on doors so it becomes heavy or noisy. Use one or two door-mounted solutions for frequently accessed lightweight items. Risers are excellent for canned goods and spices but do not overfill them; leave room so you can see what is behind each item.
Step 7: Build a Simple Weekly Pantry Reset
A short weekly reset keeps your pantry functioning without major effort. Make it a habit that takes five minutes and protects all your earlier work.
Five-minute weekly reset
- Scan shelves and move any items that are out of their zone back into place.
- Pull out any expired or damaged items and toss them.
- Check snack and child zones to ensure they are not overflowing.
Doing this once a week prevents small messes from becoming large problems and keeps the system tuned to your household rhythms.
What to check before grocery shopping
- Look at your backup stock to see if you already have what you planned to buy.
- Note open items that need to be used soon so they are prioritized in meal planning.
- Make a short list from what is low in your daily-use zone rather than a full inventory of every item.
How to keep clutter from building back up
Set simple rules for returning items. For example, if an item is removed from a shelf, put it back in the same area immediately after use. Encourage household members to follow the zones and the weekly reset to prevent stray items from starting new piles.
Pantry Organization Mistakes That Create More Work
Certain common mistakes turn organization into extra maintenance. Avoid these traps to keep your pantry efficient and low-effort.
Organizing by tiny categories
When each product type has its own tiny spot, putting things away slows down and mistakes become common. Combine similar items and let a few small containers handle the rest.
Keeping too much backup stock
Excess backup leads to expired food and wasted space. Keep only what your household will realistically use before the item expires, and stagger restocking so old items move forward.
Copying picture-perfect pantry systems that do not fit real life
Stylized pantries in photos often omit the daily reality of children, pets, or small kitchens. Prioritize function over appearance. If a system looks great but is hard to maintain, it will be abandoned.
A Simple Pantry Maintenance Checklist
Use this checklist to keep your pantry functional with minimal effort. The tasks are short and focused on preserving the system you set up.
Weekly tasks
- Quickly scan for expired items and discard them.
- Return stray items to their zones.
- Replenish daily items from backup zones as needed.
Monthly tasks
- Do a shelf-by-shelf sweep and remove anything that does not belong.
- Wipe down shelves as needed to remove crumbs or spills.
- Reassess categories; if something consistently ends up in the wrong place, adjust the zone to match how you use it.
Seasonal tasks
- Rotate holiday or seasonal items in and out of easy reach.
- Do a deeper clean and re-evaluate bulk items to prevent unnecessary stockpiling.
- Check for pantry pests or signs of moisture and treat problems promptly.
When cleaning surfaces, follow current guidance for household cleaning and disinfecting, especially after spills or if you are concerned about contamination. For practical cleaning and disinfecting steps, see the CDC guidance on cleaning and disinfecting: CDC cleaning and disinfecting guidance.
Frequently Asked Questions
How do I organize a pantry if I do not have matching containers?
You do not need matching containers to have an organized pantry. Use whatever bins, baskets, and jars you already own. Focus on grouping like items and keeping frequently used items visible. Clear plastic or reused containers are fine; if a container helps you see and access contents more easily, it is doing its job.
How do I organize a pantry in a small apartment?
Prioritize visibility and reach. Keep daily items up front and at an easy height. Use shallow baskets or pull-forward trays for deep shelves, and consider one door-mounted holder for lightweight, frequently used items. Limit backup stock so that the space stays manageable.
How often should I clean out my pantry?
Perform a five-minute weekly reset and a deeper monthly sweep. A seasonal clean is useful for rotating holiday items and checking for pests or moisture. Regular short efforts prevent the need for a full overhaul.
Should snacks and baking supplies be stored together?
Store items together if it makes sense for how you use them. If snacks are packed for lunches by one spot, keep those items together. Baking supplies can live together in a baking zone. The goal is functional grouping, not strict rules, so place items where they will be used and seen.
What is the best way to organize canned goods?
Store canned goods on a shelf where you can see labels. Use a two-row system or a shallow basket so older cans move forward. Keep canned ingredients near the cooking zone if you use them for meals, or in the backup zone if they are for occasional use.
Final Thoughts
Simplifying first and then organizing broadly creates a pantry that stays useful in real life. Focus on removing unneeded items, grouping by broad categories, and placing frequently used things where they are easiest to reach. Use containers sparingly to solve visible problems, and adopt a short weekly reset to protect your effort. With a few simple choices, you can turn a messy pantry into a practical, low-maintenance space that supports your daily routine.

Ethan Carter is the Founder & Editor of HomeCleanSecrets. Based in the United States, he has 5 years of experience creating practical home cleaning, laundry care, stain removal, decluttering, and home organization content. His goal is to help everyday households clean smarter and build simple routines that are easier to maintain.
Read more about Ethan Carter on his author page: https://homecleansecrets.com/ethan-carter/