
Air-drying clothes indoors can work well in an apartment, during wet weather, or whenever tumble drying is not suitable.

No single drying time works for every home or garment. A thin shirt in a ventilated room may dry quickly, while a hoodie, waistband, towel, or folded seam may stay damp much longer.
Quick Answer: Remove More Water, Add Space, Move Air, and Verify Dryness
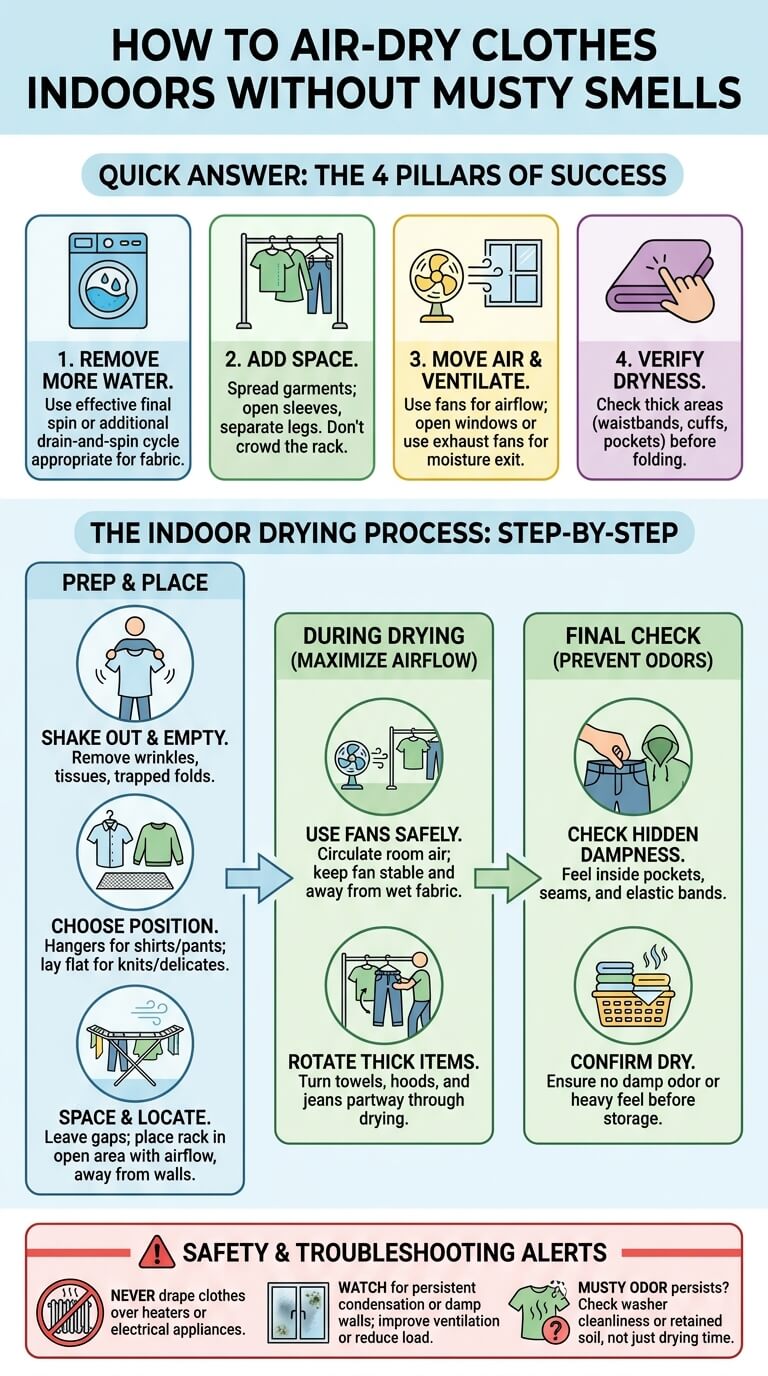
A reliable indoor setup starts before clothes reach the rack: extract suitable loads well, expose damp surfaces, create safe airflow, and confirm that thick areas are dry.
Start with an effective final spin when labels allow
A higher or additional spin can shorten air-drying time because the washer removes more water before the load enters the room. Use only a spin speed that suits the garment and machine. The Whirlpool laundry-cycle guide explains that drain-and-spin removes excess water without adding a new wash or rinse, which can help with wet towels, hand-washed items, or a load that finished unusually damp.
Spread garments rather than crowding them
Give every item its own section of the rack. Open sleeves, separate trouser legs, unfold waistbands, and avoid placing one wet item directly over another.
Place the rack where air can move and moisture can leave
An open area near safe ventilation is usually better than a packed closet, closed bathroom, or corner blocked by furniture.
Check thick areas before folding
Touch the inside of waistbands, cuffs, pockets, hoods, elastic, double-layer seams, and towel hems. These areas can remain damp after the main panel feels dry.
Why Indoor Laundry Dries Slowly or Smells Musty
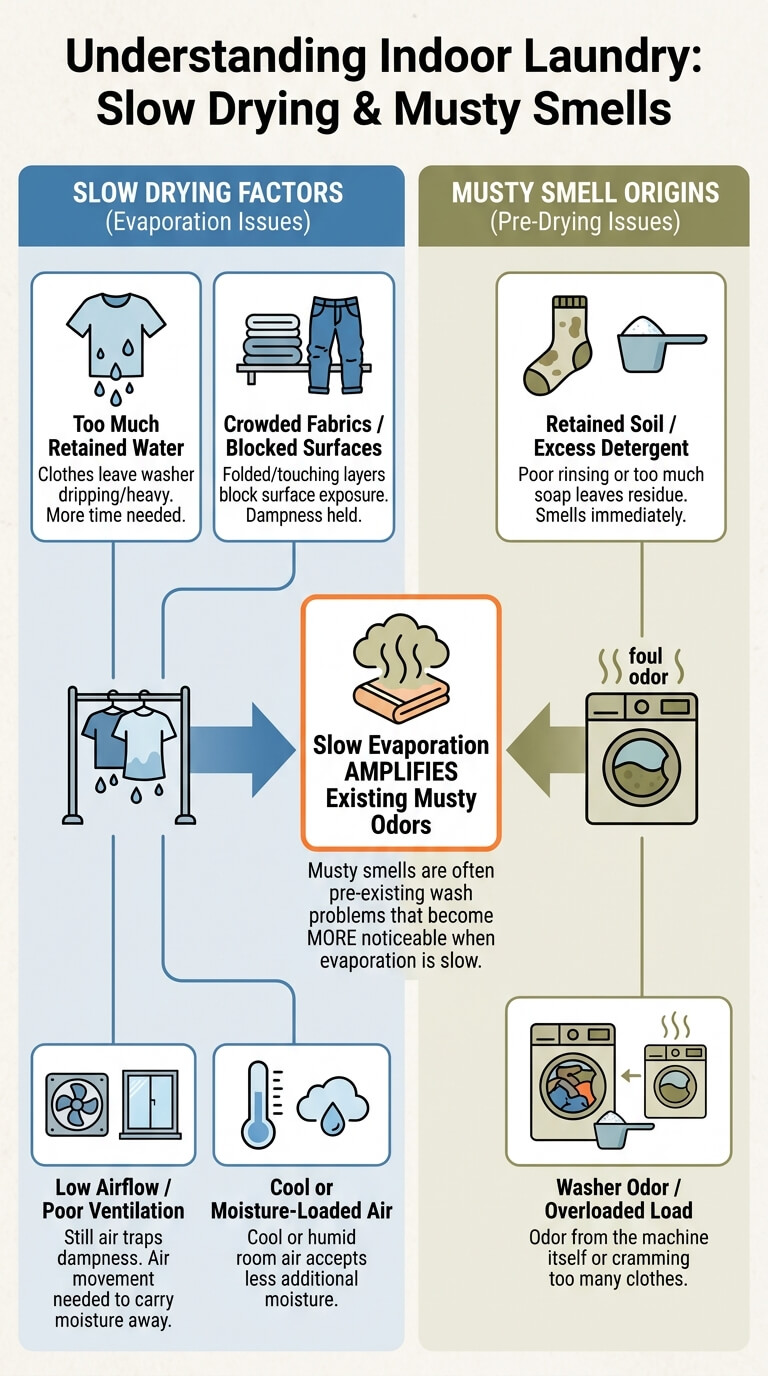
Musty-smelling laundry is not always a drying problem, but slow evaporation creates conditions in which an existing wash problem becomes more noticeable.
Too much retained water
Clothes that leave the washer dripping or unusually heavy need more time and release more moisture into the room.
Crowded fabrics and blocked evaporation
Fabric dries from exposed surfaces. A shirt folded over two rack bars, jeans with legs touching, or socks piled on a tray hold damp layers together.
Low airflow or poor ventilation
Still air near wet fabric becomes moisture-laden and slows further evaporation. Air movement carries that damp air away, while ventilation gives the moisture somewhere to go.
Cool or moisture-loaded rooms
Drying often slows in a cool room or during humid weather because the surrounding air can accept less additional moisture.
Retained soil, washer odor, and other causes drying cannot solve
If clothing smells musty immediately after washing, the cause may be retained soil, excess detergent, poor rinsing, an overloaded load, or an odor inside the washer.
The Indoor Drying Framework
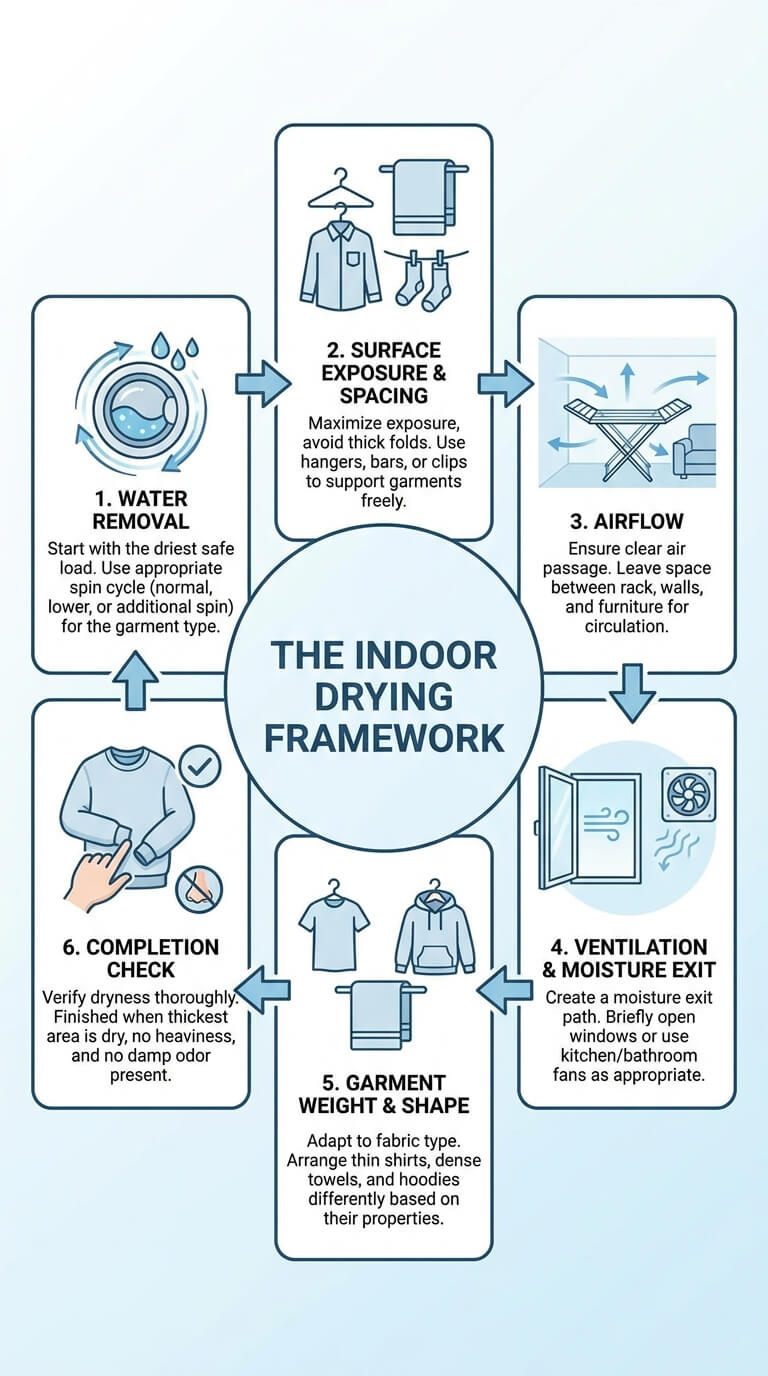
Think of indoor drying as a six-part process. A weakness in one part can slow the whole load, even when the rack itself is large.
Water removal
Begin with the driest load the garment can safely tolerate. Use the normal final spin, a lower spin for fragile pieces, or an additional drain-and-spin for suitable heavy items.
Surface exposure and spacing
Expose both sides of the fabric whenever possible. Use hangers, bars, clips, or a flat mesh surface in a way that supports the garment without creating thick folds.
Airflow
Air should pass around, above, and below the laundry. Leave space between the rack and walls or furniture.
Ventilation and moisture exit
Moist air needs a path out of the drying area. The EPA notes that opening a window briefly or using kitchen or bathroom ventilation can help manage indoor moisture when appropriate. Review the agency’s home moisture-control guidance and adapt it to local weather, building rules, and safe operation.
Garment weight and shape
Thin woven shirts, dense towels, stretch knits, lined trousers, and hoodies should not be arranged the same way.
Completion check
Drying is finished when the thickest area is dry, the garment no longer feels unusually heavy, and no damp odor appears when folds are opened.
Step 1: Prepare Clothes Before They Reach the Rack
Good preparation can remove hours of unnecessary drying and prevents stains, tissues, and trapped folds from becoming harder to deal with.
Use a label-compatible final spin
Read the garment’s drying and washing instructions before increasing spin. Durable towels and jeans may tolerate more extraction than lace, loose knits, molded garments, or pieces with embellishment.
Run rinse-and-spin only when appropriate
Use rinse-and-spin when the load genuinely needs another rinse, such as after visible detergent residue and when the product and garment instructions permit it.
Shake out folds and separate layers
Remove clothes promptly and shake each item gently. Smooth collars, uncurl socks, open sleeves, separate trouser legs, and release fabric trapped inside fitted sheets or duvet covers.
Empty pockets and open thick areas
Check pockets for tissues, receipts, coins, and objects that retain water or stain fabric. Pull pocket bags outward when the construction permits.
Remove unresolved stains from the heat workflow
Air-drying does not set stains with dryer heat, but a visible mark still needs inspection before the garment is stored or ironed.
Step 2: Choose Flat Drying or Hanging
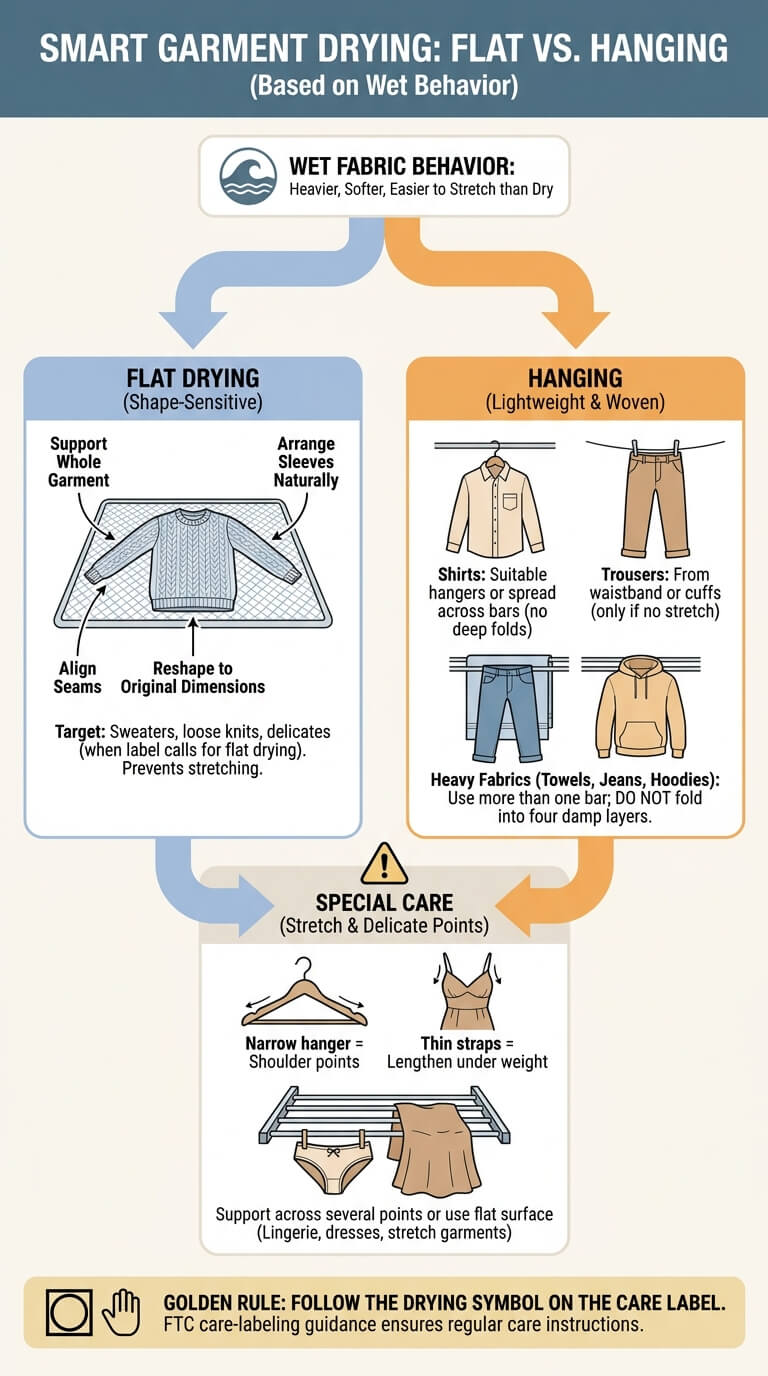
The safest position depends on how the garment behaves while wet. Wet fabric can be heavier, softer, and easier to stretch than dry fabric.
Shape-sensitive knits and delicates
Lay sweaters, loose knits, and other shape-sensitive pieces flat when the care label calls for flat drying. Support the whole garment, arrange sleeves naturally, align seams, and reshape to its original dimensions.
Shirts, trousers, socks, and lightweight garments
Hang woven shirts on suitable hangers or spread them across rack bars without deep folds. Hang trousers from the waistband or cuffs only if that position does not stretch the fabric.
Towels, jeans, hoodies, and heavy fabrics
Use more than one bar for heavy items, but do not fold them into four damp layers.
Straps, shoulders, waistbands, and garments that stretch when wet
A narrow hanger can leave shoulder points, and thin straps can lengthen under the weight of a wet garment. Support lingerie, dresses, and stretch garments across several points or use a flat surface. Follow the drying symbol on the care label. The FTC care-labeling guidance explains the role of regular care instructions for garments sold in the United States.
Step 3: Space Garments for Maximum Exposed Surface
Spacing is the simplest improvement for most crowded indoor setups. It costs nothing, but it may require drying fewer items at once.
Leave a gap between items
A precise measurement is not necessary. Leave enough room that neighboring garments do not touch when the fan runs or when you walk past the rack.
Avoid folded-over bars and stacked layers
One loose fold may be unavoidable, but a deep fold creates a wet center.
Separate sleeves, legs, and waistbands
Open tubular sections so air can enter. Use clips or adjacent bars to keep sleeves and trouser legs from lying flat against the garment body.
Rotate or reposition thick items when needed
Check heavy pieces partway through drying. Turn a towel, reverse a hoodie, move clips away from a wet hem, or expose the inside of jeans.
Step 4: Place the Drying Rack Safely
Choose a location that supports drying without creating a trip, electrical, heat, or moisture problem.
Use an open area with room around the rack
Leave clearance from walls, curtains, upholstered furniture, cardboard boxes, and stored textiles. Do not wedge a full rack into a closet.
Provide access to ventilation or moving air
A room with a safely opened window, operating exhaust ventilation, or a suitable fan is often easier to manage than a sealed space.
Protect walls, floors, and walkways from persistent dampness
Do not let wet hems touch painted walls, wood furniture, or flooring. Use a washable drip tray only for items that may release drops, and clean it after use.
Keep wet laundry away from heaters, flames, and electrical appliances
Never drape clothes over a space heater, radiator not approved for drying, oven, stove, lamp, or electrical device.
Step 5: Create Airflow and a Moisture Exit
Air movement and ventilation solve different parts of the problem. Movement replaces damp air at the fabric surface, while ventilation reduces the moisture accumulating in the room.
Use natural cross-ventilation when conditions allow
Opening windows on different sides of a room can improve air exchange, but only when outdoor air, weather, security, insects, and building rules make it sensible.
Use fans with electrical and placement safety
Place a stable fan where it cannot be touched by wet fabric or splashed. Use a gentle setting that circulates room air across the rack.
Use exhaust ventilation where appropriate
A properly vented bathroom or utility-room exhaust fan can remove moisture, but the room must still have enough space for the rack and safe airflow.
Recognize closed-room limitations
A closed door may keep the rack out of the way, but it also restricts air exchange.
Understand why moving air alone may still be slow
A fan continuously recirculating moisture-laden air has diminishing value. When this happens, add a safe moisture exit, use a smaller load, or choose mechanical drying for compatible items.
Step 6: Watch Indoor Moisture Without Universal Guarantees
Humidity numbers can provide context, but visible conditions and drying performance also matter. Homes differ in climate, insulation, ventilation, room size, and surface temperature.
Watch for condensation, damp surfaces, persistent room odor, and slow drying
Fogged windows, water collecting on glass, damp wall areas, or a room that remains clammy after laundry is removed are warning signs. Indoor clotheslines add moisture to the home, as noted by the University of Minnesota’s home moisture guidance. One load does not automatically create damage, but repeated unmanaged moisture needs correction.
Use a hygrometer as context rather than a guarantee
A basic humidity meter can show whether moisture rises during drying and falls after ventilation. Compare patterns over time instead of treating one reading as proof that a room is safe or unsafe.
Account for local climate and building differences
Cold windows may collect condensation even when the room does not feel humid. In a hot, humid climate, outdoor air may slow drying.
Move laundry or use an alternate method when the room is not coping
Reduce the load, spread items across two sessions, relocate the rack to a ventilated area, or machine-dry compatible heavy pieces.
Garment-by-Garment Drying Guide
Arrange each item according to its thickest or most shape-sensitive feature, not just its overall size.
T-shirts and shirts
Shake out wrinkles, open the collar, separate sleeves, and use a hanger that supports the shoulders. For heavy cotton shirts, leave more space and turn them once if the back remains damp.
Pants and jeans
Open the waistband, zipper area, and pockets. Separate the legs and avoid hanging dense wet denim from a point that may distort it.
Towels and thick cottons
Spread towels to one layer when possible. If a towel must fold over a bar, keep the two halves apart and reverse it later.
Socks and small items
Clip socks individually by an edge that will not stretch. Keep pairs near each other without overlapping them.
Hoodies and layered garments
Pull the hood away from the back, open pockets, loosen drawstrings, and separate cuffs. Turn the garment when the body is dry but the hood, waistband, or pocket lining still feels cool and heavy.
Delicates and shape-sensitive knits
Follow the drying symbol and support the item while wet. Lay knitwear flat, reshape seams, and keep it away from direct heat.
Small-Apartment Drying Setup
Limited floor area makes load size and rack placement more important. The goal is a temporary drying zone, not a rack permanently blocking the room.
Choose compact rack placement carefully
Use an area with stable flooring, ventilation, and enough clearance to walk safely. A bathtub may catch drips, but only if the room has effective ventilation and the rack is stable.
Keep airflow paths open
Do not fill every bar simply because it is available. Leave the rack away from the wall and avoid hanging a large sheet around the outside like a curtain, which can trap damp air inside.
Dry smaller loads
A half load with good spacing often performs better than a full washer load compressed onto one rack.
Manage overnight loads
Put the load up early enough to check the setup before bed. Confirm that the rack is stable, nothing is dripping near electricity, and ventilation can operate safely.
Return the room to normal after drying
Fold the rack only after garments and rack joints are dry. Wipe any condensation or drips, return furniture to its normal position, and allow the room to ventilate before starting another large load.
Drying Overnight
Overnight drying is practical when the load is well prepared and the room remains safe without repeated adjustments.
Reduce water before bed
Use the appropriate final spin and avoid hanging items that are still dripping. Hand-washed garments should be pressed or towel-rolled according to their labels before they are placed flat.
Space for unattended hours
Arrange the load more generously than you would during the day, because you will not be rotating items frequently.
Make safe ventilation and fan decisions
Use only equipment suitable for continuous operation and follow its instructions. Do not leave an unsafe window open, run a damaged fan, or route cords through a walkway.
Rotate and inspect thick areas in the morning
Turn jeans, towels, hoods, and waistbands after waking. Move nearly dry thin items off the rack to create more space for damp pieces.
Do not rely on a fixed overnight drying time
Eight hours is not a universal standard. Drying depends on the starting moisture, fabric, room temperature, airflow, ventilation, humidity, and rack spacing.
How to Tell When Clothes Are Fully Dry
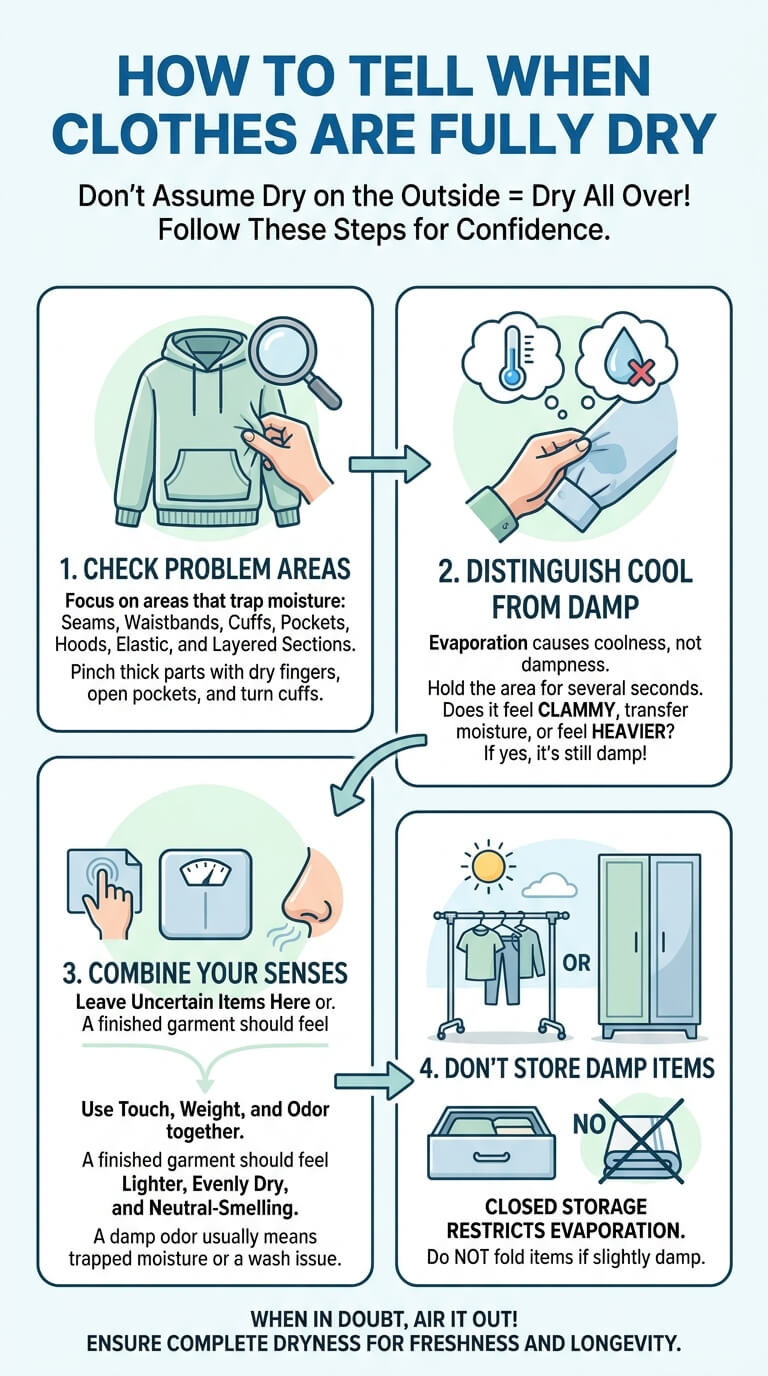
Check the part most likely to hold moisture. A dry front panel does not prove that every layer is ready for storage.
Check seams, waistbands, cuffs, pockets, hoods, elastic, and layered areas
Pinch thick sections between clean, dry fingers. Open pocket bags, turn cuffs, and feel inside hoods.
Distinguish cool fabric from damp fabric
Evaporation can make fabric feel cool. Hold the area for several seconds, then check whether it feels clammy, transfers moisture, or remains heavier than the surrounding fabric.
Use touch, weight, and odor together
A garment that feels lighter, evenly dry, and neutral-smelling is more likely to be finished. A damp odor released when you open a fold suggests trapped moisture or a wash problem that needs investigation.
Do not fold slightly damp items into storage
Closed drawers, closets, baskets, and suitcases restrict evaporation. Leave uncertain items on the rack or move them to a better drying position.
Troubleshooting Slow Drying or Musty Odor
Change one cause at a time. This makes it easier to learn whether the problem began in the washer, on the rack, in the garment, or in the room.
Setup problem: crowding, poor air movement, or moisture accumulation
Remove half the load, open folded areas, move the rack away from the wall, and add safe ventilation.
Wash problem: retained soil or excess detergent
Clothes that smell or feel coated immediately after washing may need a corrected wash process, not fragrance or longer hanging.
Washer problem: odor or incomplete extraction
If every load leaves unusually wet or carries the same odor, check the manual, load balance, drain, and selected spin.
Garment problem: thick construction or unsuitable drying position
A hoodie may need its hood separated, a sweater may need a flat mesh surface, and lined trousers may need turning.
Musty odor remains after the setup is corrected
Once spacing, airflow, and room moisture are reasonable, persistent odor needs its own diagnosis. Possible causes include retained soil, detergent residue, washer buildup, or a garment that was stored damp previously.
Signs the Room Setup Is Contributing Too Much Moisture
The drying routine needs to change when effects persist beyond the rack or appear repeatedly after ordinary loads.
Repeated condensation, damp walls or windows, persistent humidity, and very slow loads
One briefly fogged window is different from water collecting after every load. Watch for repeated damp patches, peeling finishes, swelling materials, or a room that never returns to normal after laundry is removed.
Move the rack to a better-ventilated area
Choose a larger room, a safe area near working exhaust ventilation, or another part of the home where moisture clears more readily.
Reduce the load size
Split one washer load into two drying sessions or machine-dry compatible towels and jeans while air-drying lighter clothing.
Use mechanical drying or broader moisture control when appropriate
A dryer, dehumidifier, or building ventilation adjustment may be useful, but the correct choice depends on the home and equipment.
Common Indoor Air-Drying Mistakes
Most failures come from trying to dry too much fabric in too little moving air.
Crowding the rack
When garments touch from top to bottom, remove some items. Additional bars do not help if the load forms one dense wall of wet fabric.
Folding items into multiple layers
Deep folds hide damp centers. Use wider spacing, extra hangers, or a second drying session.
Skipping the final spin
Do not accept a soaking-wet durable load without checking whether the cycle completed and the load was balanced.
Placing wet clothes beside heat or electrical hazards
Direct heat can damage fabric and create a fire or burn risk. Dripping water near plugs, cords, lights, and appliances creates an electrical hazard.
Assuming time alone proves dryness
A thick waistband can remain damp long after a shirt body dries. Inspect the garment, not the clock.
Storing clothes with damp seams
Do not place slightly damp items beneath dry laundry. Keep them separated until every layer is dry.
When to Stop and Get More Help
Indoor air-drying should not continue unchanged when the problem points to the appliance, garment construction, or the building.
Persistent room dampness or visible moisture damage
Stop adding wet laundry to an area with ongoing condensation, damp walls, damaged finishes, or visible growth. Address the room condition through the landlord, building manager, or a qualified professional as appropriate.
Repeated washer odor or drainage issues
Standing water, repeated error codes, burning smells, leaking, or unusual mechanical noise require appliance guidance. Unplug or stop using the machine when the manual identifies a safety concern.
Professional-care or shape-sensitive garments
Follow labels that require professional care, flat drying, or special handling. Structured, sentimental, leather-trimmed, suede, heavily embellished, or unknown garments are not good candidates for improvised drying.
Musty odor remains after the setup is corrected
Separate the affected items from clean laundry and investigate the wash, washer, previous storage, and fabric condition.
Indoor Air-Drying FAQ
These answers cover the decisions that most often affect drying speed, safety, and room moisture.
How far apart should clothes be on a rack?
Leave enough space that neighboring garments do not touch and air can reach both sides. Thin shirts may need only a modest gap, while towels, jeans, and hoodies need more room.
Is a fan safe and useful for indoor drying?
A stable fan can improve air movement when it is kept on a dry surface, away from dripping clothes, and used according to its instructions.
Can clothes be dried overnight?
Yes, when the load has been well spun, garments are spaced, the rack is stable, and ventilation or fan use is safe for unattended hours.
Why are waistbands still damp?
Waistbands contain multiple layers, elastic, seams, and closures that hold more water than the main fabric. Open the waistband, reposition the garment, and give it more airflow.
Does indoor drying cause mold?
Indoor drying releases moisture, but it does not automatically create mold. Risk rises when moisture repeatedly accumulates, ventilation is poor, condensation persists, or surfaces stay damp.
When should a dehumidifier or mechanical dryer be considered?
Consider another drying method when the room cannot clear moisture, loads remain damp despite good spacing and airflow, or condensation returns repeatedly.
Final Thoughts
Successful indoor air-drying is less about finding a perfect number of hours and more about controlling starting moisture, garment position, airflow, ventilation, and final inspection. Give heavy pieces extra room, support shape-sensitive garments, and change the setup when the room stays damp.

Ethan Carter is the Founder & Editor of HomeCleanSecrets. Based in the United States, he has 5 years of experience creating practical home cleaning, laundry care, stain removal, decluttering, and home organization content. His goal is to help everyday households clean smarter and build simple routines that are easier to maintain.
Read more about Ethan Carter on his author page: https://homecleansecrets.com/ethan-carter/