
Kids’ clothing can become confusing even when the closet itself is tidy. A child may have shirts that fit now, pajamas bought one size ahead, winter gear that will not be useful for months, and a bin of hand-me-downs waiting for a younger sibling. When all of those pieces share the same drawer or shelf, the problem is not simply lack of space. The real problem is that clothing from different stages is competing for the same active zone. If clothing is competing with toys, books, or other child-use categories for the same room, plan its storage within the whole kids’ room setup instead of expanding the active closet by default.
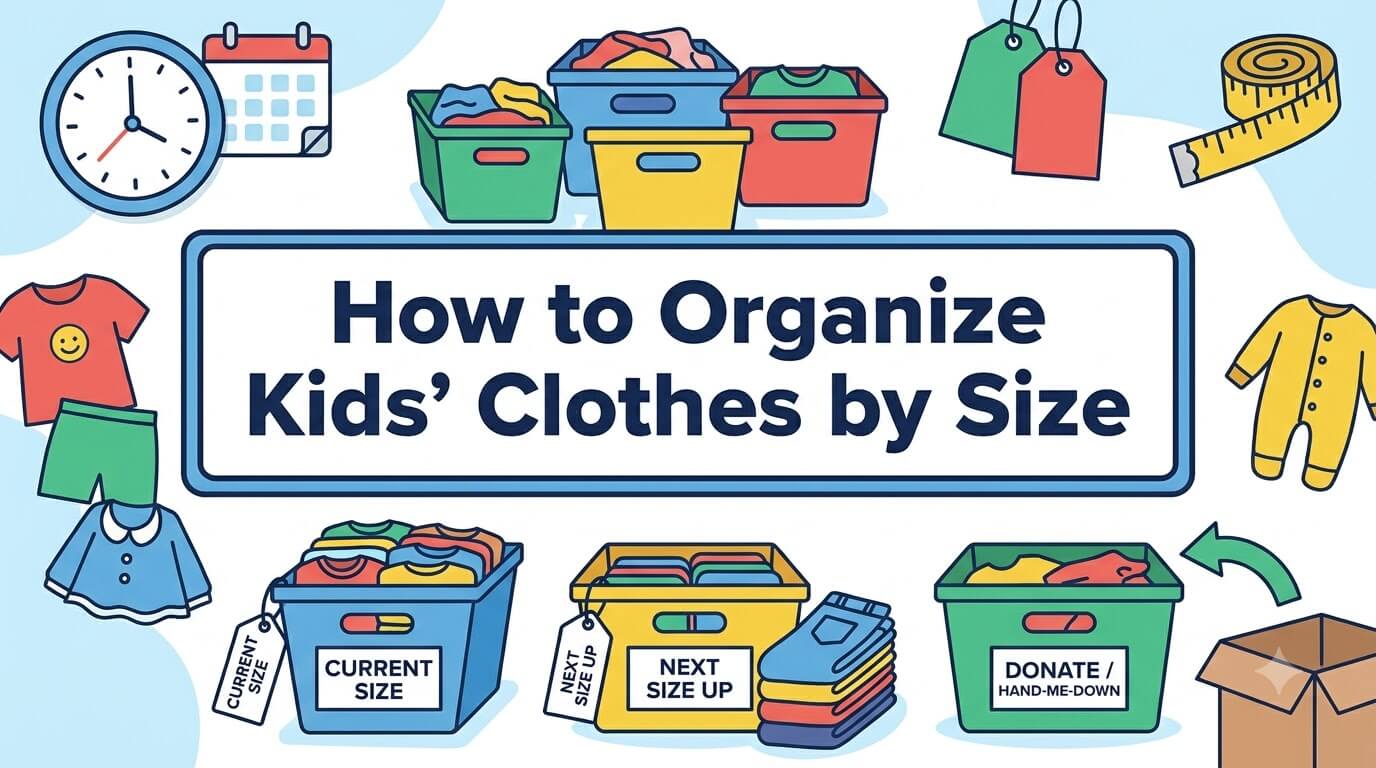
A workable system separates clothing by what happens next. Keep current clothing easy to reach, place the next size in a small transition zone, store later sizes outside daily space, and move outgrown pieces into a short-term decision area. Add season and child name only where they help you make the next decision faster.
Quick Answer: Separate Current, Future, Outgrown, and Seasonal Clothing
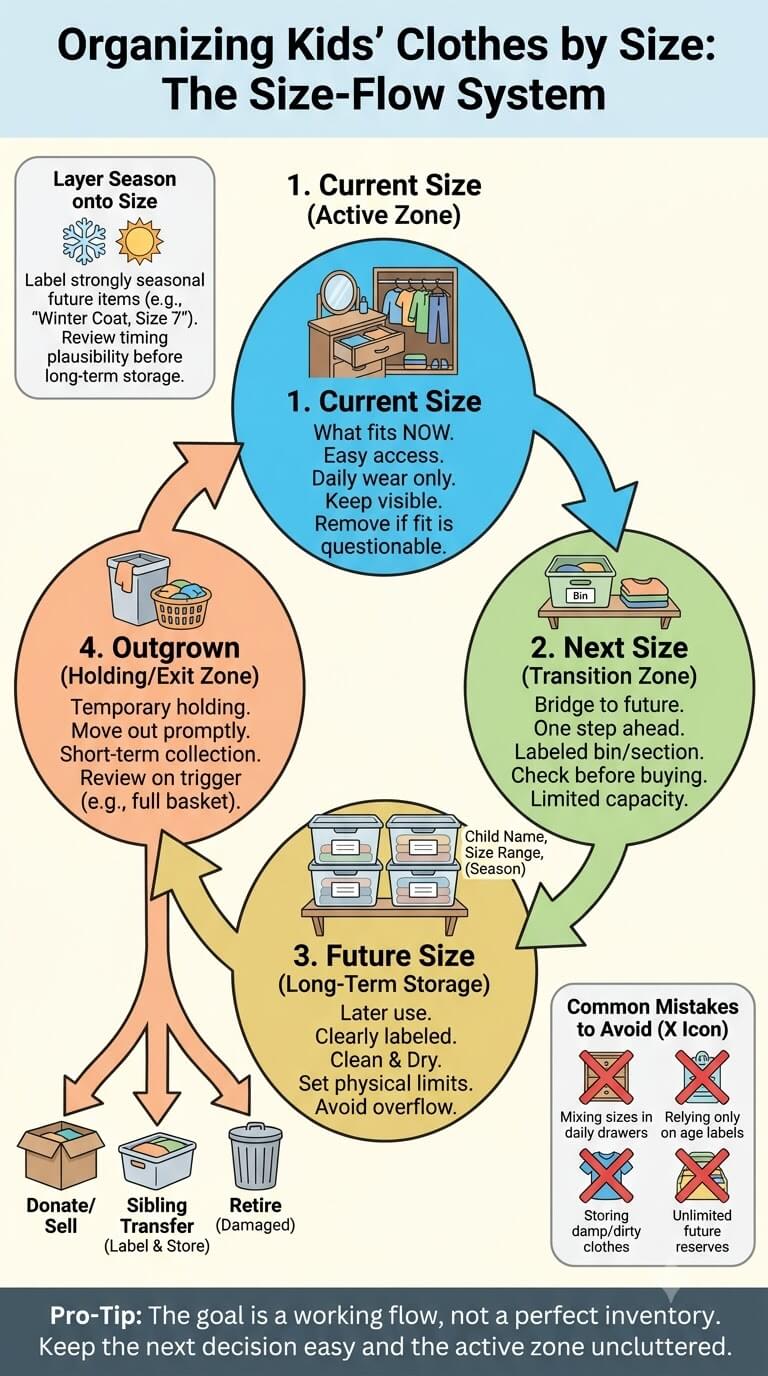
The size-flow system
Think of children’s clothing as moving through a simple sequence: current size, next size, future size, outgrown, then hand-me-down, donate, sell, or retire. Seasonal clothing can sit within any of those stages. A winter coat might be current size but off-season, while a swimsuit might be a future size that is unlikely to match the child’s next summer.
Give each stage a physical home. Daily drawers hold what fits now, one labeled section holds the likely next size, longer-term containers hold later sizes, and a separate basket catches outgrown pieces until review.
Keep Size Flow Separate From Full Closet Organization
This method is about size transitions, not about redesigning the entire closet. Keep your existing hanging, folding, drawer, and wardrobe-category setup if it works. The change is to stop asking active storage to hold several growth stages at once. Shoes, school uniforms, adult clothing, and a complete seasonal wardrobe system need their own decisions.
Inventory Clothing by Child and Current Fit
Start with what the child currently wears
Begin with one child at a time. Pull together the clothing that is supposed to be in active use and check what is actually being worn. You do not need to empty every long-term storage bin yet. Start with drawers, hanging space, laundry-return piles, and any nearby baskets where everyday clothes accumulate.
A good test is whether you would choose the item for the child today. If fit is questionable, create a small try-on pile instead of leaving it mixed into the drawer.
Separate obvious too-small and too-large items
Move clothing that is clearly too small out of the active zone immediately. Do the same with pieces that are obviously too large. This one pass often creates more usable drawer space than buying new organizers because daily clothing is no longer buried under items the child cannot wear.
Do not decide every outgrown item’s final destination at the dresser. First separate current from not-current; hand-me-down and donation decisions can follow.
Note seasonal and special-occasion pieces without rebuilding the whole wardrobe system
Mark pieces that fit but are temporarily irrelevant because of weather or occasion. Heavy snow pants in July do not need prime drawer space, but they should not automatically be treated as future clothing either. Likewise, a current-size formal outfit may be used rarely but still needs a place where you will remember it before an event.
Use Size Labels Carefully
Manufacturer size labels as a starting point
Use the garment label to create rough groups, then verify fit before treating that group as reliable. Manufacturer charts may include height, weight, chest, waist, or other measurements. For example, Carter’s kids’ size chart shows measurement ranges rather than treating the printed age alone as a guarantee of fit.
When brands are mixed, treat the tag as a sorting shortcut, not a promise that every garment will fit at the same time.
Why age labels are only secondary guidance
Labels such as 3T, 4T, or 6 years can help you make a first pass, but children grow at different rates and brands cut garments differently. If a child currently wears one brand’s size 5 pants and another brand’s size 6 shirts, forcing everything into a single age-based group can hide usable clothing.
Fit, brand variation, and garment condition
Within a labeled size, separate obvious exceptions. A narrow-waist pant, shrunken shirt, or roomy sweatshirt may fit differently. Condition matters too: a future-size garment with a broken zipper should not occupy prime storage just because its tag says it will fit later.
Avoid treating size labels as standardized measurements
When you inherit clothing from several families or buy across brands, expect overlap. Instead of relabeling every garment, label the container by the most useful range, such as “Alex, 5-6, cool weather.” Before moving that container into active use, do a quick fit check. That prevents the label on the bin from becoming more trusted than the clothing itself.
Create the Active Current-Size Zone
Keep current everyday clothing in the normal drawer or closet system
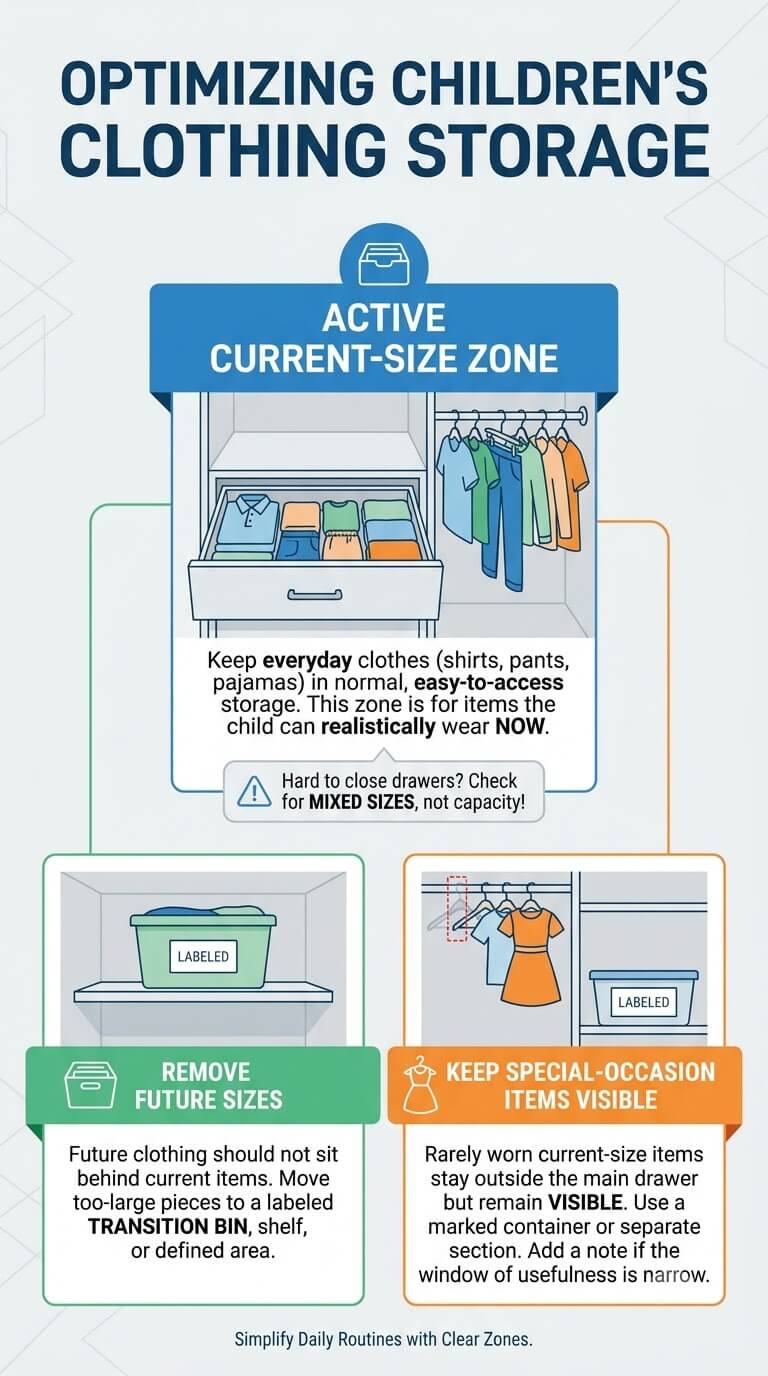
Active storage should contain the clothes the child can realistically wear now. Keep everyday shirts, pants, underwear, pajamas, and other routine categories where the family already expects them. This is the zone that should be easiest to see, return to, and maintain.
If a drawer is hard to close, check for wrong-size clothing before changing the drawer system. Mixed sizes often create a false capacity problem.
Remove future sizes from active daily space
Future clothing should not sit behind current shirts or under current pajamas unless there is no other practical storage. When children or caregivers must sort through too-large pieces every morning, the active zone is doing two jobs. Move future sizes to a labeled transition bin, closet shelf, or another defined storage area.
Keep special-occasion items visible enough to remember
Rarely worn current-size items can stay outside the main daily drawer, but do not bury them with future sizes. A small labeled hanger section or a clearly marked container works better. Add a brief note to your seasonal review if the item has a narrow window of usefulness, because children may outgrow it before the next occasion.
Build a Next-Size-Up Zone
Identify the most likely upcoming size
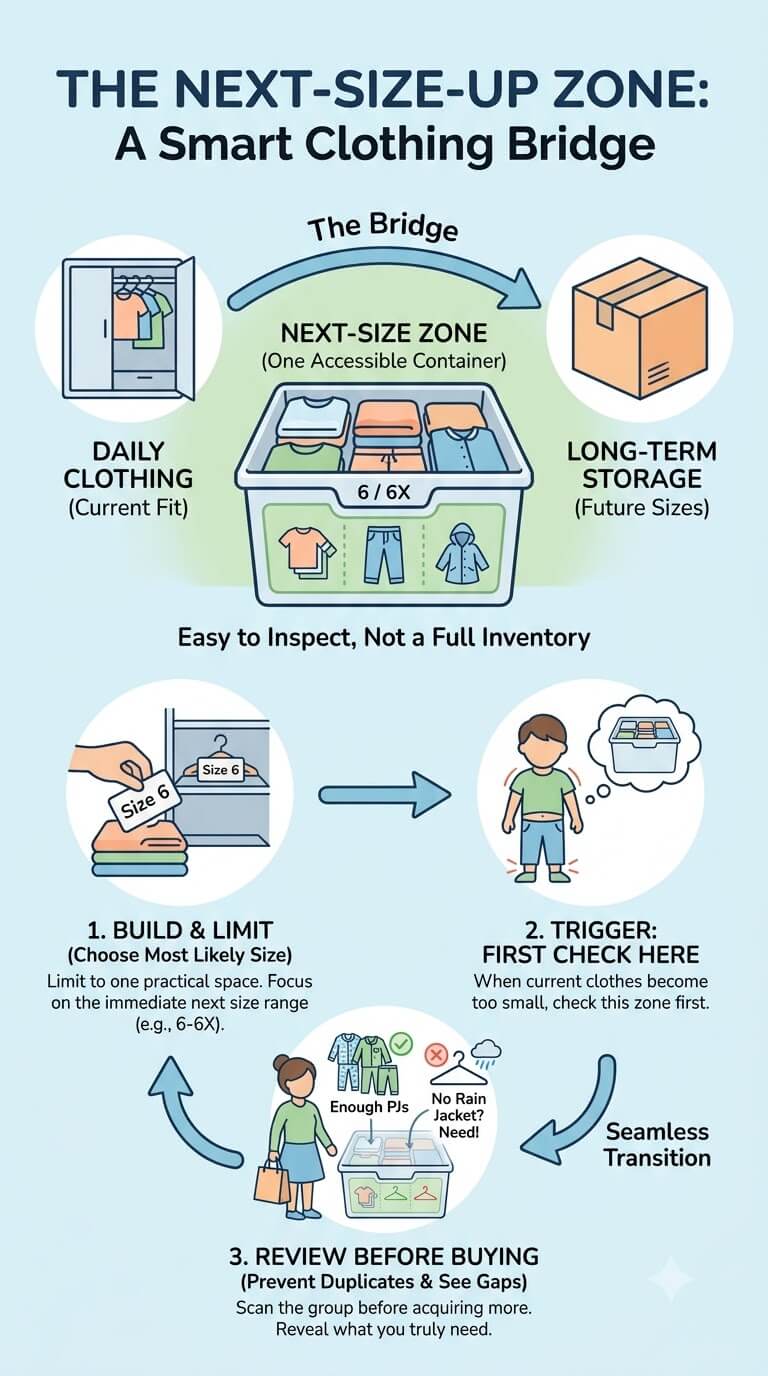
The next-size zone is a bridge between daily clothing and long-term storage. Choose the size that is most likely to be needed next, based on the child’s current fit and the actual garments you have. You do not need a perfect prediction. The purpose is to keep the next transition easy to inspect.
Keep one accessible transition bin or section
Limit this area to one practical container, shelf section, or drawer segment. It can include a modest range when brands overlap, such as 6 and 6X, but it should not become the home for every piece the child might wear over the next three years. When current pants get short or shirts become snug, this is the first place you check.
Review the next-size zone before buying more
Before purchasing or accepting more clothes, scan the next-size group. You may already have enough pajamas but no rain jacket, or several dressy outfits but few everyday pants. A two-minute review prevents duplicates and makes gaps visible without turning the system into a detailed wardrobe inventory.
Store Future Sizes by Child, Size, and Season
Use clear size labels
Longer-term containers should quickly show whose clothing is inside, the size, and when it may be useful. Put the child’s name and size outside; avoid vague labels such as “kids clothes” or “later.”
Add season where it changes usefulness
Season matters when it changes whether the size will be useful at the right time. “Maya, size 7, winter” is more informative than “size 7” if the bin contains coats, sweaters, and snow gear. Basic year-round T-shirts may not need a seasonal label at all.
Keep future inventory bounded by storage capacity
Choose the space first, then decide how much future clothing can reasonably live there. One or two designated shelves or a defined number of containers creates a visible limit. If future clothing exceeds that limit, review duplicates, unlikely seasonal matches, and pieces you would not choose if they became the right size tomorrow.
Avoid oversized reserves that will be forgotten
Large future reserves are easy to forget, and the season may no longer match when the size finally fits. Keep clothing with a realistic path to use rather than storing bargains for years.
Create an Outgrown Holding Zone
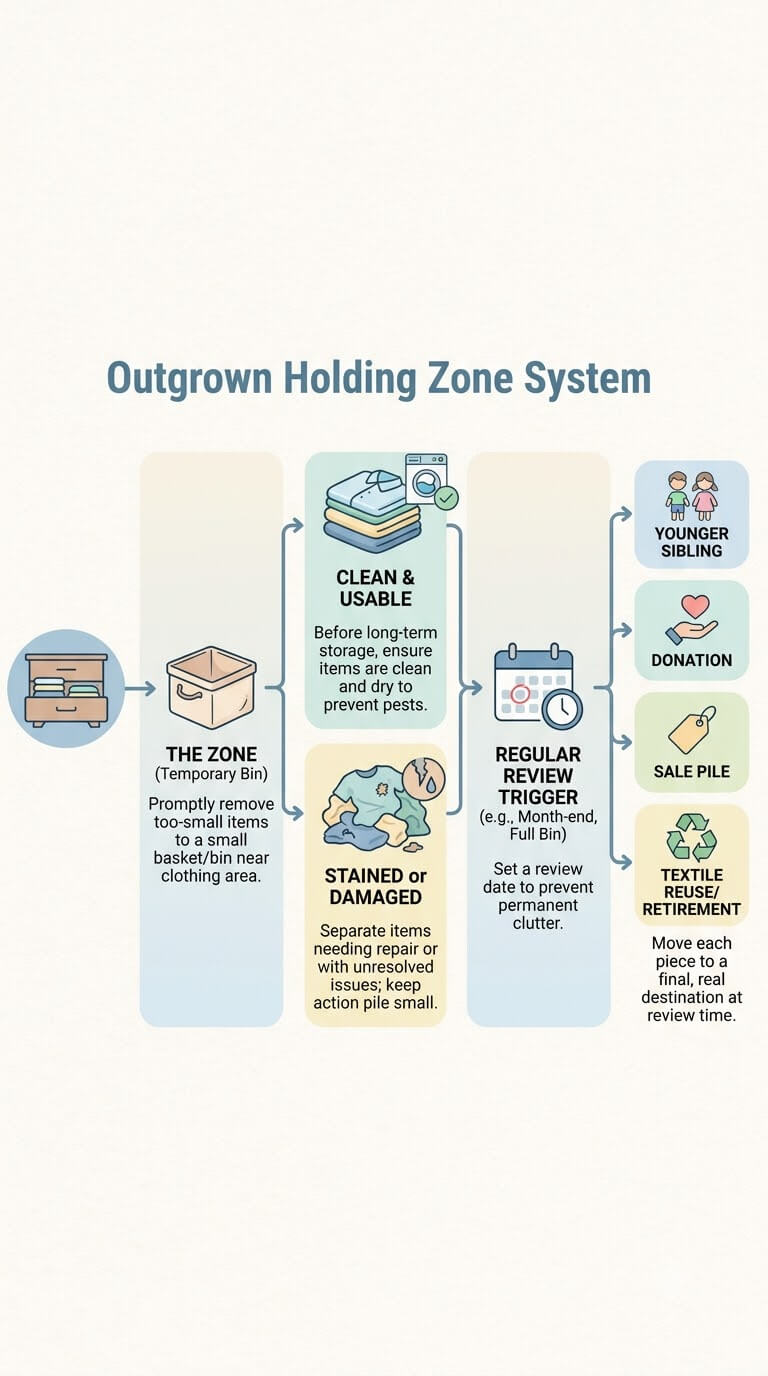
Remove too-small items from active drawers promptly
Keep a small basket or bin near the clothing area for pieces discovered to be too small. This prevents one tight shirt from returning to the drawer after laundry and being tested again next week. The holding zone should be easy for adults to use but limited enough that it demands a review before it becomes another permanent storage pile.
Separate clean, usable pieces from stained or damaged pieces
Before placing clothing into longer-term hand-me-down or donation storage, check condition. Clothing that needs repair, has unresolved stains, or is still damp should not disappear into a closed container. Utah State University Extension notes in its guidance on fabric-damaging dermestid beetles that susceptible items should be clean before storage. Keep a small action pile only if you genuinely plan to repair or evaluate it soon.
Set a review date so the holding zone does not become permanent clutter
Choose a trigger such as month-end, the next size change, or the bin’s fill line. At review time, move each piece to a real destination: younger sibling, donation, sale pile, textile reuse, or retirement.
Decide Hand-Me-Down, Donate, Sell, or Retire
Hand-me-down based on likely fit, condition, and sibling need
Keep a hand-me-down when the garment is in usable condition, the receiving child is likely to reach the size in a reasonable period, and you have space to store it. Do not keep five nearly identical sweatshirts automatically because they once fit the older child. The receiving child’s likely need matters as much as the garment’s condition.
Donation according to recipient rules
Donation rules vary by organization and location. Goodwill, for example, accepts clothing and other goods through local organizations, and its donate-goods information directs donors to local options. Check the recipient’s current requirements before filling the car, especially for damaged textiles, specialty items, or locations with limited acceptance.
Sell-or-donate as a simple exit decision, not a resale strategy
If an item is worth selling, give it a short deadline. A small dated sell bin is manageable; several boxes waiting for perfect listings are not. When the deadline passes, list it or move it to donation.
Retire damaged items appropriately
Clothing that is severely torn, contaminated, or otherwise unsuitable for reuse should not be handed to a donation center just to clear space. Check local textile recycling or waste rules when appropriate, and confirm the receiving organization’s current requirements before drop-off.
Manage Sibling Transfers
Label the receiving child and expected size
A hand-me-down container should say who it is for and what size it contains. “For Leo, size 5” is more useful than “Sam’s old clothes” because it points to the next action.
Keep transfer bins out of the active closet when they are not current
Hand-me-downs can overwhelm a shared bedroom when several future sizes remain in the same closet as daily clothes. If possible, move noncurrent transfer bins to an upper adult-managed shelf, under-bed area that suits the container, or another household storage zone. Keep the next likely size closest.
Recheck season alignment before storing long term
A sibling may reach a labeled size at a different season than the older child did. Before storing bulky winter wear for years, consider whether the timing is plausible. You do not need to predict growth exactly. You only need to avoid saving large amounts of season-specific clothing when the chance of use appears low.
Layer Season Onto the Size System
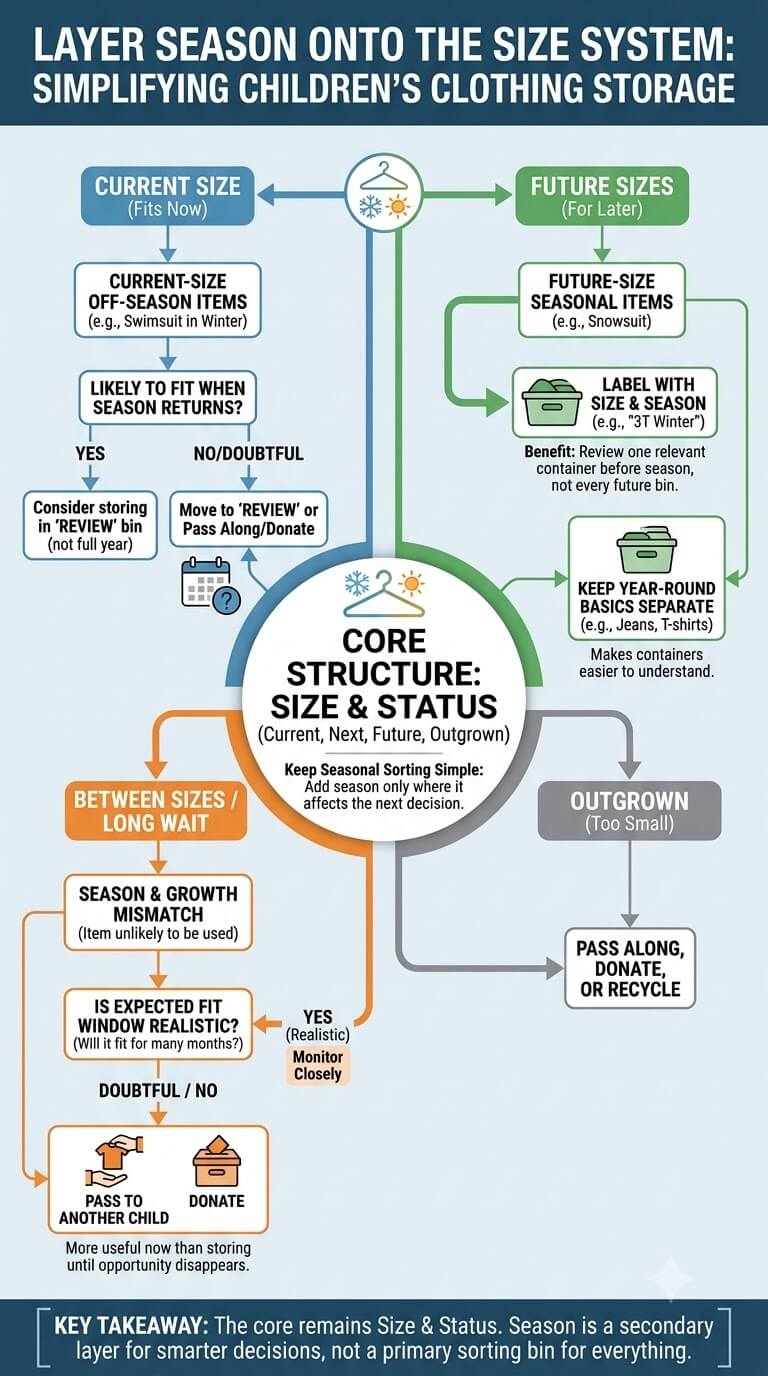
Current-size off-season items
If an item fits now but the weather makes it unusable, consider whether the child is likely to remain in that size when the season returns. Move doubtful pieces to review instead of automatically storing them for a full year.
Future-size seasonal items
Label strongly seasonal future clothing with both size and season. This makes it possible to review one relevant container before winter or summer instead of opening every future-size bin. Keep year-round basics separate when that makes the containers easier to understand.
When season and growth make an item unlikely to be used
If the child is between sizes and a seasonal item will not be needed for many months, ask whether the expected fit window is realistic. When the answer is doubtful, passing the item to another child or donating it may be more useful than storing it until the opportunity disappears.
Keep Seasonal Sorting Simple
Add season only where it affects the next decision. The core structure remains size and status: current, next, future, or outgrown.
Store Clothing Safely for Longer Periods
Store only clean, fully dry garments
Long-term storage should begin with garments that are clean enough for storage and fully dry. Moisture trapped inside a closed container can create odor or material problems. If an item is wet, heavily soiled, or needs treatment, keep it out of the future-size bin until the issue is resolved.
Follow garment care labels
Care instructions vary by fabric and construction. The FTC’s apparel-labeling information explains that manufacturers and importers provide care instructions so consumers know how products should be cleaned. Read the garment’s own label before washing, drying, ironing, or preparing a special fabric for storage.
Choose containers based on fabric and storage environment rather than assuming vacuum bags fit everything
Match the container to the garment and storage area. A sturdy lidded bin may suit everyday items in a clean, dry place, while delicate or structured garments may need different treatment. Do not assume compression is harmless to every fabric, insulation, embellishment, or shape.
If you are storing natural-fiber pieces for a long period, check the area periodically rather than treating a closed container as maintenance-free. Watch for moisture, pests, or garment damage when you open the container for a size review.
Label Containers for Fast Review
Child name
Use a child name when clothing is being saved for a specific person. This is especially useful in families with several children or when storage is shared. If the clothing is not assigned yet, a neutral label such as “unassigned, size 8” is clearer than guessing a future recipient.
Clothing size
Make size the largest piece of information on a future-clothing label. If the bin contains a range because brands overlap, write the range. Avoid clever labels that require memory, such as “later clothes” or “blue bin.” The container should make sense even six months after you packed it.
Season when relevant
Add “winter,” “summer,” or another useful season only when most of the contents depend on weather. A bin of mixed basics does not need unnecessary detail. A container full of snow pants, fleece, and coats does.
Review date or status when useful
A review month can help with bins that may soon change status. Labels such as “donate,” “sell by October,” or “waiting for sibling” should stay short enough to understand at a glance.
Build a Size-Change Review Routine
Signs the current size is changing
Common practical signs include waistbands that no longer sit comfortably, sleeves or pant legs that are clearly short, closures that are difficult, or a child repeatedly rejecting items because they no longer fit well. Check several garments before assuming the entire labeled size is finished, since brands and cuts vary.
Move the next size into active use
When several current pieces stop fitting, bring out the transition group and try the most likely items. Move only pieces that work now into active drawers. Anything still too large can remain in the next-size zone rather than cluttering daily storage.
Move too-small clothing out at the same time
Make the transition a swap, not an addition. For every group entering daily storage, remove the clearly outgrown group. This keeps drawer capacity steady and prevents two or three sizes from accumulating in the same active space.
Update hand-me-down and donation destinations
Once the change is complete, review the outgoing basket. Label sibling pieces for the next child, move donation items toward the exit, and retire items that are no longer suitable for use. Doing this during the size change is easier than trying to reconstruct the history of a large mixed bin months later.
Prevent Future-Clothes Overflow
Set a maximum container or shelf capacity
Give future clothing a fixed physical boundary. The exact number of bins is less important than having a limit that fits your home. When the space is full, review before adding another container. Storage capacity is useful feedback about how much clothing you can realistically track.
Review duplicates and unlikely seasonal matches
When a future-size bin overflows, look first for multiples that exceed likely need and seasonal pieces with a weak chance of matching the child’s growth. Keep the best-condition, most useful items rather than treating every free or discounted garment as equally valuable.
Move overflow to an adjacent storage area only if it has a defined home
Another closet, under-bed zone, or household storage shelf can hold later sizes if it is clearly assigned and labeled. Avoid migrating bags from room to room. If you cannot name where the overflow belongs and when it will be reviewed, the better answer may be to reduce it.
Baby Versus Older-Child Differences
Faster size turnover for babies and toddlers
Smaller children may move through labeled sizes quickly, so the next-size bin needs to be easier to reach and reviewed more often. Keep the system simple enough that you can swap sizes without repacking several containers each time. A single transition bin is often more useful than a highly detailed archive.
Slower transitions but more activity-specific clothing for older children
Older children may stay in a size longer while accumulating clothing for sports, events, weather, or hobbies. Keep size flow as the main structure without rebuilding daily categories that already work.
Avoid rigid age-based size assumptions
Do not decide that a child “should” be in a certain size because of age. Fit, garment measurements, brand, body proportions, and comfort are more useful than the birthday printed beside a size range. Labels organize clothing; they do not define the child.
Common Kids’ Clothing Size-Organization Mistakes
Mixing several sizes in active drawers
This makes mornings slower and hides what actually fits. Keep the active drawer for current wear and move the next size to a nearby but separate transition area.
Labeling only by age
An age-only label can be misleading across brands and children. Add the actual garment size and use age only as a secondary note when it helps.
Storing dirty or damp garments
Do not seal wet, sweaty, or heavily soiled clothing into future-size or hand-me-down containers. Resolve the care issue first and make sure the garment is dry before long-term storage.
Keeping unlimited future clothing
Future clothing still consumes space and attention. If it exceeds the capacity you assigned, review duplicates, condition, likely season, and realistic need rather than automatically adding bins.
Letting outgrown holding bins become permanent
An outgrown basket is a temporary staging area. Without a review trigger, it becomes another mixed-size archive. Give outgoing clothes a destination while you still remember why each piece left active use.
FAQ About Organizing Kids’ Clothes by Size
Should I organize kids’ clothes by age or size?
Use garment size as the main sorting shortcut, then verify fit. Age can be a secondary note. When brands overlap, a range such as “5-6” may be more useful than forcing every item into one number.
Where should I store the next size up?
Keep the next likely size close enough to inspect during a growth change but separate from daily clothing. A labeled bin, one closet shelf, or a dedicated drawer section works well. Later sizes can live farther from the active wardrobe.
How do I organize hand-me-down clothes between siblings?
Label the container for the receiving child, size, and season when needed. Keep only clothing in usable condition that the younger child is reasonably likely to need. Recheck seasonal pieces before long-term storage because siblings may reach the same size at different times of year.
How long should I keep outgrown clothes before deciding?
There is no universal number of days. Use a practical trigger such as a monthly review, the next size change, or the fill line on a small holding bin. The important part is that the holding zone remains temporary and each item eventually moves to a defined destination.
Should seasonal clothes be sorted by size too?
Yes, when size affects whether the child will be able to use the item when that season arrives. Label strongly seasonal future clothing with both size and season. For year-round basics, size alone may be enough.
A simple size system should make the next clothing decision obvious. Keep what fits now in active space, maintain one manageable next-size group, label later sizes clearly, and move outgrown clothing to a short-term decision zone. Review the flow whenever fit changes. That keeps children’s clothing moving with the child instead of letting several growth stages compete for the same drawer.

Ethan Carter is the Founder & Editor of HomeCleanSecrets. Based in the United States, he has 5 years of experience creating practical home cleaning, laundry care, stain removal, decluttering, and home organization content. His goal is to help everyday households clean smarter and build simple routines that are easier to maintain.
Read more about Ethan Carter on his author page: https://homecleansecrets.com/ethan-carter/