
Learning how to organize a laundry room starts with a practical goal: make laundry easier to begin, move, finish, and put away. A useful room has clear zones, safe product storage, open work surfaces, and basket paths that do not depend on perfect habits. You do not need custom cabinets or a full makeover. You need to remove what does not belong, place the remaining items by task, and leave enough space for the washer, dryer, baskets, doors, and people to move normally.
This step-by-step guide is for a dedicated laundry room that feels cluttered, inefficient, or hard to reset after a busy week. It stays focused on whole-room setup. It will mention supplies, baskets, sorting, and upkeep only where they affect the room layout, without turning this into a full inventory system, a small-space hack list, or a recurring cleaning schedule.

Quick Answer: The Best Order to Organize a Laundry Room
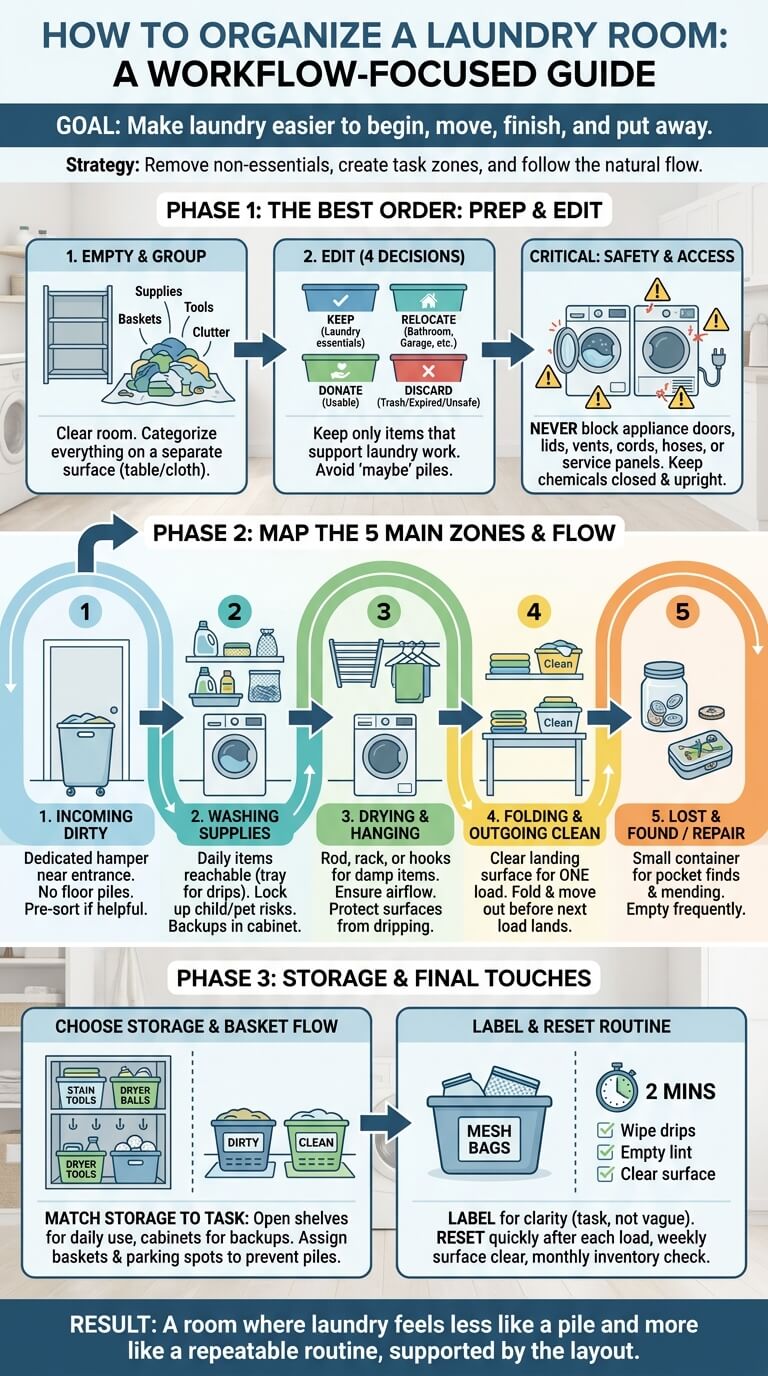
The best order is to empty the room, group what you own, remove what does not belong, map the main zones, choose storage for each zone, set a basket flow, label only the categories that need help, and finish with a short reset routine. This order prevents the common mistake of buying bins before you know what truly needs a home.
Clear the space before buying storage
Take items off shelves, machine tops, counters, hooks, and the floor before deciding what storage to buy. Put everything on a nearby table or clean drop cloth so you can see duplicates, broken items, and non-laundry clutter together. A good test is whether the room already feels easier to understand once the surfaces are empty. If it does, storage was not the first problem. Editing was.
Build zones around how laundry actually moves
Think through one normal load: dirty laundry enters, products are used, wet items may need hanging, clean items need a landing surface, and odd pieces need a temporary hold. Each of those steps deserves a zone, even if the zone is only one basket, hook, tray, or shelf. When the layout follows the path of a load, you stop using the floor as the backup plan.
Before You Start: Set the Boundaries of the Room
For a broader overview of how every laundry zone fits together, start with the full laundry room organization guide before you make detailed storage decisions.
A laundry room becomes hard to organize when it quietly turns into overflow storage. Before you choose bins or shelves, decide what the room is allowed to hold. This keeps the project manageable and protects access to appliance doors, hoses, plugs, vents, shutoff valves, and service panels.
What belongs in a laundry room
Keep items that directly support laundry work: detergent, boosters you actually use, stain tools, mesh bags, dryer balls or sheets, lint rollers, clothespins, hangers, a small sewing kit, clean cloths for quick wipe-downs, and baskets or hampers. The item should help with washing, drying, folding, hanging, repairing, or moving laundry. If it only lives there because a shelf was empty, question it.
What should move to a utility closet, bathroom, or garage
Move bulk paper goods, paint, outdoor chemicals, car supplies, holiday decor, luggage, gift wrap, and general tools to better homes when possible. Bathroom products usually belong near bathrooms. Garage and yard products usually belong away from clothing and laundry supplies. One temporary exit box is fine during the project, but write a date on it so it does not become permanent clutter.
What to avoid near appliances and outlets
Do not store loose bottles, baskets, towels, or bins where they block appliance doors, washer lids, dryer vents, cords, hoses, shutoff valves, or access panels. Keep products upright and closed. Follow laundry product label directions for use and storage, especially if you use bleach, packets, sprays, or specialty products. If a shelf or cart makes maintenance access difficult, the setup is too tight.
Step 1: Empty, Sort, and Edit the Laundry Room
Work by category rather than by shelf. Clearing one cabinet and putting everything back into that same cabinet can hide duplicates and unrelated items. Sorting the whole room shows how much space laundry actually needs before you return anything.
Group supplies, baskets, tools, and non-laundry items
Make simple piles for washing products, drying products, stain tools, garment care, baskets, hangers, cleaning cloths, pocket finds, repair items, trash, and items that belong elsewhere. Keep loose socks and clothing pieces together until you can decide whether they are dirty, clean, damaged, or orphaned. Small trays help keep clips, buttons, and coins from rolling under machines while you sort.
Check duplicates, expired products, and damaged containers
Line up products by type and look for half-used duplicates, empty bottles, cracked containers, sticky lids, missing labels, and tools that no longer work. Keep the products you can identify and use. Do not combine unknown leftovers or decant products into decorative containers without clear label and safety information. If a container is leaking or damaged, read the label and follow local disposal guidance.
Decide what to keep, relocate, donate, or discard safely
Use four decisions. Keep items that support laundry and fit the room. Relocate items that belong in a bathroom, garage, kitchen, utility closet, or mudroom. Donate only usable items accepted by your local donation option. Discard trash, broken tools, empty packaging, and unsafe containers. Avoid a large “maybe” pile because a laundry room is a work area, not a waiting room for unfinished decisions.
Step 2: Map the Main Laundry Zones
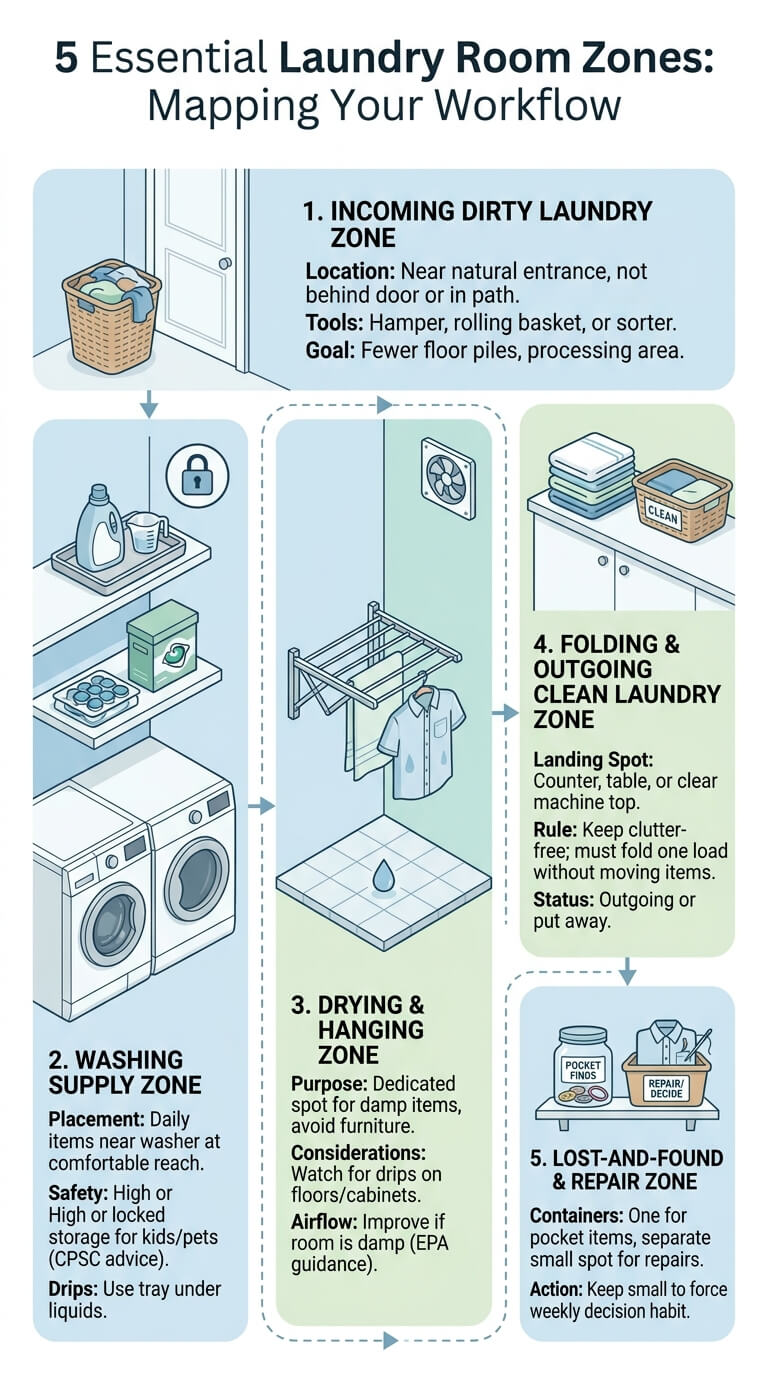
After editing, assign a purpose to each part of the room before returning items. Most laundry rooms need five zones: incoming dirty laundry, washing supplies, drying or hanging, folding and outgoing clean laundry, and a small lost-and-found or repair area.
Incoming dirty laundry zone
This is where dirty items wait before washing. Use a hamper, rolling basket, or sorter near the natural entrance to the room, not behind a door or in the path of the washer. If people drop clothes in bedrooms or bathrooms, keep collection there and treat the laundry room as the processing area. The goal is fewer floor piles, not more baskets.
Washing supply zone
Place daily detergent and common washing tools near the washer, ideally at a comfortable reach height. Less-used products can sit in a nearby cabinet or backup bin. Use a tray under liquids to catch drips. When children or pets can enter the room, use high or locked storage. The CPSC advises that household cleaners should be locked up and kept out of reach of children.
Drying and hanging zone
Give damp items a real place to hang so they do not end up on cabinet pulls, machine doors, or chairs. Use a wall rack, short rod, foldable drying rack, or over-door hooks, depending on the room. Place the zone where dripping will not damage cabinets or flooring. If the room often feels damp, improve airflow before adding more hanging space. EPA indoor air guidance such as the Care for Your Air guide is useful when a small laundry room has moisture, product fumes, or limited ventilation.
Folding and outgoing clean laundry zone
Clean laundry needs a clean landing spot. This can be a counter, a folding table, a clear machine top, or one clean-only basket. Keep detergent, mail, tools, and dirty items off this zone. A good test is whether you can fold one load without moving clutter first. If not, the room still needs editing or a stronger outgoing rule.
Lost-and-found and repair holding zone
Create one small container for pocket finds such as coins, hair ties, receipts, and buttons. Add a separate small spot for clothing that needs a button, seam repair, de-pilling, or a decision. Keep both containers small enough to force action. If they overflow, the answer is usually a weekly decision habit, not a bigger bin.
Step 3: Choose Storage by Zone
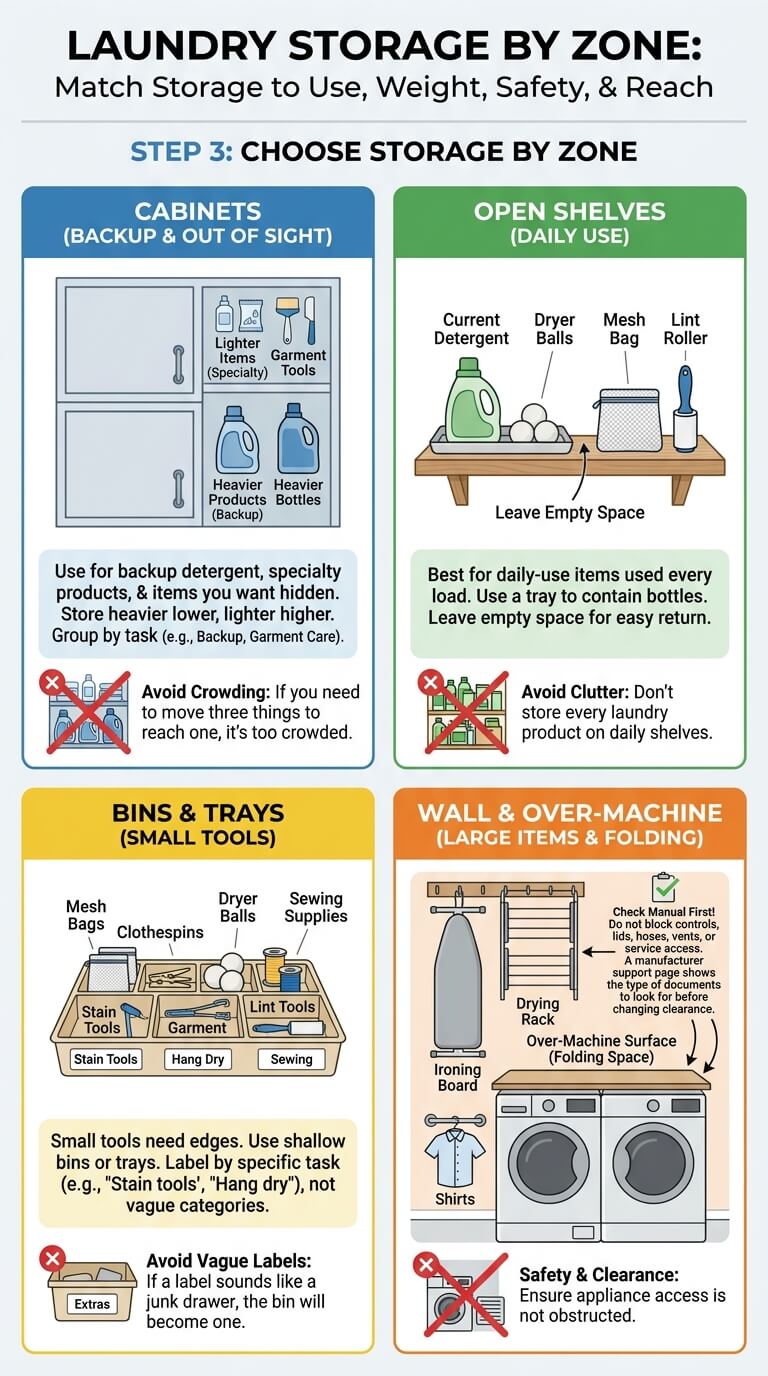
Storage should match use, weight, safety, and reach. Daily items need easy access. Backup items can be less visible. Products with child or pet risk need safer placement. Heavy bottles should not live on high shelves if reaching them invites spills.
Cabinets for products you do not need every load
Use cabinets for backup detergent, specialty laundry products, garment tools, and items you want out of sight. Store heavier products lower and lighter items higher. Group by task: backup products, garment care, and rarely used tools. If you need to move three things to reach one bottle, the cabinet is too crowded or the categories are too narrow.
Open shelves for daily-use items
Open shelves work best for the few things used almost every load: current detergent, dryer balls, mesh bags, and a lint roller. Use a tray to stop bottles from spreading across the shelf. Leave empty space so returning items is easy. If a shelf holds every laundry product you own, daily use will keep turning it back into clutter.
Bins and trays for small tools
Small tools need edges around them. Use shallow bins or trays for mesh bags, clothespins, dryer balls, sewing supplies, garment clips, and lint tools. Label by task, not vague categories. “Stain tools” is clearer than “extras.” “Hang dry” is clearer than “miscellaneous.” If a label sounds like a junk drawer, the bin will become one.
Wall hooks, rods, and over-machine surfaces
Wall hooks can hold an ironing board, drying rack, garment bag, or basket. A rod near the dryer can hold hangers for shirts that should not sit in a basket. Over-machine surfaces can add folding space, but only if they do not block controls, lids, hoses, vents, or service access. Check your own manual first. A manufacturer support page shows the type of appliance documents to look for before changing clearance.
Step 4: Create a Simple Basket and Sorting Flow
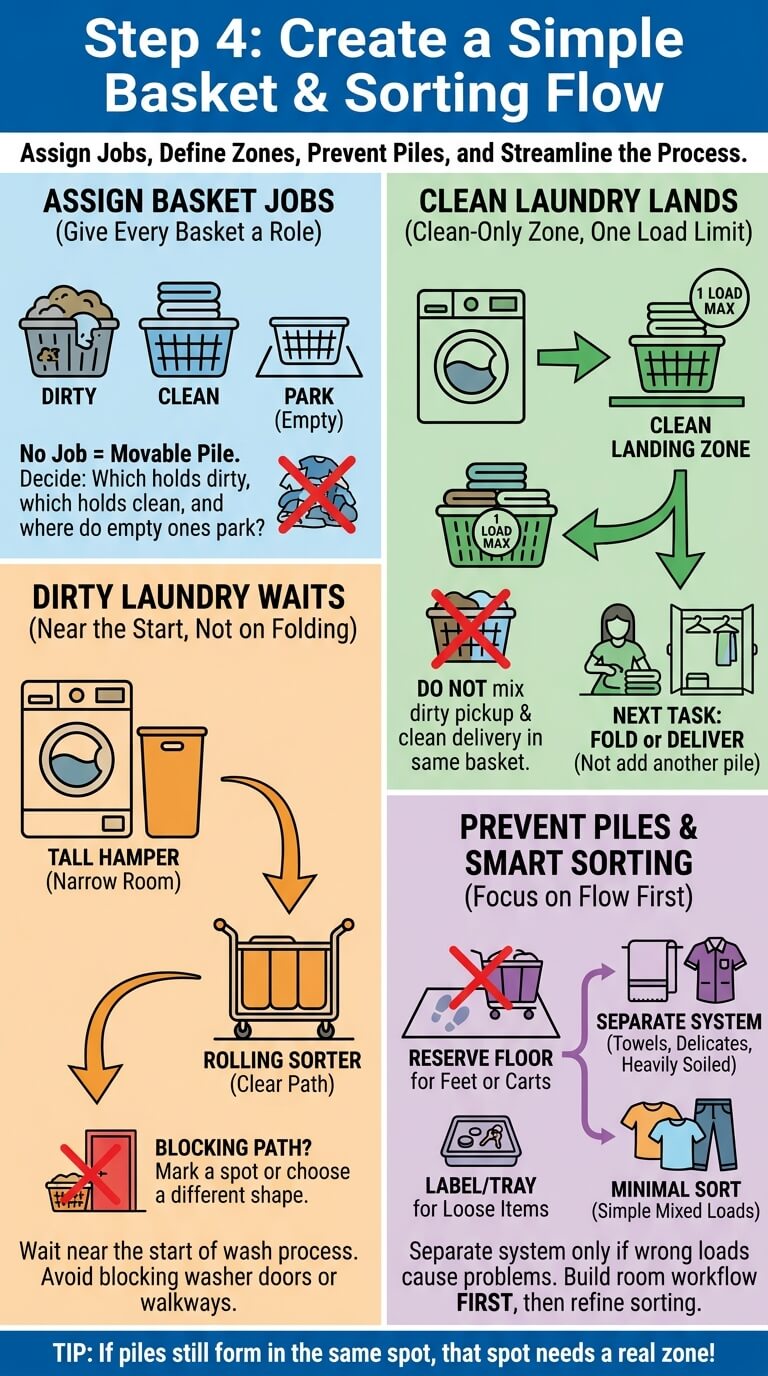
Baskets need assigned jobs. Without a job, a basket becomes a movable pile. Decide which basket holds dirty laundry, which one holds clean laundry, and where empty baskets park between loads.
Where dirty laundry waits
Dirty laundry should wait near the beginning of the wash process, not on the folding surface. A tall hamper may work better than several floor baskets in a narrow room. A rolling sorter can help if the path is clear. If a basket blocks the washer door or walkway, it needs a marked parking spot or a different shape.
Where clean laundry lands
Baskets work better when they have assigned jobs, so give yourself a clear plan to store laundry baskets when they are empty, full, or waiting to be put away.
Clean laundry should land in a clean-only basket or on a clean surface. Do not use the same basket for dirty pickup and clean delivery unless it is emptied and appropriate for reuse. Limit the clean landing zone to one load. When that zone is full, the next task is folding or delivery, not adding another clean pile.
How to prevent floor piles
Floor piles usually mean there is no landing spot, the baskets are inconvenient, or the system has too many categories. Reserve the floor for feet, a rolling cart, or a parked basket. Put a label or tray where loose items keep landing. If piles form in the same place after organizing, that spot is telling you where a real zone is needed.
When a separate sorting system is worth it
If the room keeps filling with mixed piles, it may be time to create a laundry sorting system before changing the shelves.
A separate sorting system is useful when wrong loads cause the biggest problem. Towels, delicates, uniforms, pet items, or heavily soiled clothes may need their own path. If your household mostly washes simple mixed loads, keep sorting minimal at this stage. Build the room workflow first, then refine sorting later if laundry still stalls.
Step 5: Label and Place Supplies Without Overbuilding
Labels should make the next action obvious. They are most useful on hidden bins, shared shelves, and categories other people confuse. They are not needed on every bottle, basket, or obvious item.
Labels that help beginners and family members
Use plain task labels such as daily detergent, stain tools, mesh bags, hang dry, pocket finds, repair, clean cloths, and backup laundry. Place labels where people see them before opening or moving a container. If someone still asks where an item goes, change the label to match the action more clearly.
Clear versus opaque containers
Clear containers help you see quantities and prevent overbuying, but they can make open shelves look busy. Opaque containers calm the room visually, but they need labels and occasional checks. Use clear bins for small tools and refills. Use opaque bins for visual clutter such as rags, odd clips, or repair items. Keep original product labels when safety information matters.
How much backup product to keep
If the shelf is mostly cluttered with detergents, pods, sprays, and backups, focus on how to organize laundry supplies before adding more containers.
One open product plus one backup is enough for many daily-use items. Specialty products should earn their space by being used regularly. Store backups behind, below, or beside daily-use products, not in front of them. Write the purchase month on bulky backups if you tend to overbuy, then check inventory before adding more.
Step 6: Finish With a Reset Routine
The room stays organized through small repeats, not one perfect project. Make the reset short enough that it can happen after real laundry loads on busy days.
Two-minute after-load reset
Once the room is organized, the next step is learning how to keep the laundry room clean and organized with a repeatable reset.
After each load, return products, close lids, wipe obvious drips, empty lint into the trash, move pocket finds to their container, and clear the folding surface. Put baskets back in their parking spots. If the reset takes much longer than two minutes, the room may have too many categories or not enough open surface.
Weekly surface and shelf reset
Once a week, clear machine tops, the folding area, open shelves, and basket parking spots. Return non-laundry items to their homes. Check whether the dirty zone and clean outgoing zone are staying separate. This is not a deep cleaning session. It is a quick check that the room can handle another week.
Monthly inventory check
Once a month, check detergent, boosters, dryer supplies, mesh bags, labels, trays, and backup products before shopping. Look for open duplicates, empty containers, cracked bins, and products you no longer use. Monthly inventory prevents slow shelf creep and keeps the room from absorbing household overflow again.
Common Mistakes When Organizing a Laundry Room
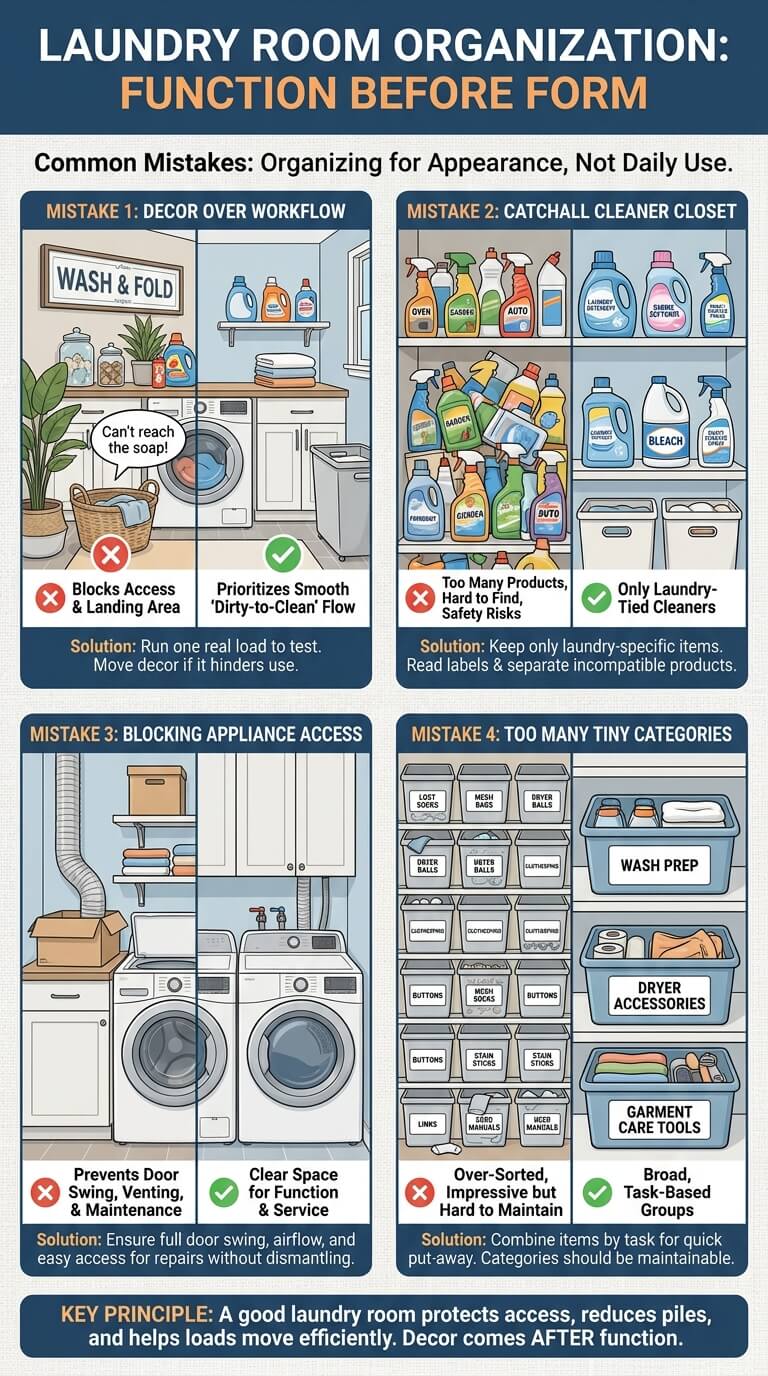
Most mistakes happen when the room is organized for appearance instead of daily use. A good laundry room can look nice, but it should first protect access, reduce piles, and help loads move from dirty to clean to put away.
Organizing around decor instead of workflow
Decor belongs after the room works. If a jar, sign, basket, shelf, or plant makes detergent harder to reach or blocks a clean landing area, it is not helping. Run one real load after organizing. If you must move decorative items to use the room, adjust the layout before adding anything else.
Storing every household cleaner in the laundry room
Do not turn the laundry room into a catchall cleaner closet unless the room is designed for that job. Too many products make laundry supplies harder to find and can create safety issues. Keep only cleaners tied to laundry or routine surface care. Read labels, keep lids tight, and separate products that should not be handled together.
Blocking appliance doors, vents, or access panels
Storage should never prevent appliances from opening, venting, draining, or being serviced. Leave room for front-load door swing, top-load lid height, dryer airflow, cords, hoses, and shutoff valves. Stop before installing shelves or counters that trap machines in place. If basic maintenance would require dismantling storage, the setup is too tight.
Creating too many tiny categories
Tiny categories look impressive at first and fail during normal laundry. Most homes do not need separate bins for every small clip, bag, sheet, ball, and brush. Combine items by task so people can put things away quickly. Categories should be specific enough to find items and broad enough to maintain without overthinking.
Edge Cases and Adjustments
Some laundry rooms also serve as mudrooms, pet stations, utility storage, or rental spaces. Keep the same zone method, but make the shared boundaries more visible.
Laundry room also used as a mudroom
Keep entry items on one side of the room and laundry tasks on the other. Shoes should not sit under clean laundry, and coats should not crowd the drying rod. Use a washable mat, boot tray, and hooks so outdoor mess does not spread across the folding surface or washing supply zone.
Laundry room also used for pet supplies
Pet towels, washable bedding, leashes, and grooming cloths can stay if they have a separate bin or shelf. Keep pet items away from detergent and clean laundry. Use a closed container for pet laundry waiting to be washed so hair and odor do not spread through the room. Avoid letting pet storage become the center of the laundry workflow.
Rental laundry room with no built-ins
For a narrow space where the floor path is the biggest issue, use small laundry room organization ideas instead of copying a full-room layout.
Renters can use a rolling cart, freestanding shelf, tension rod, over-door rack, removable labels, and adhesive hooks rated for the surface. Keep heavy products low and avoid anything that blocks maintenance access. Check the lease before mounting hardware, and test removable products carefully in humid rooms.
Shared family laundry room with multiple users
Shared rooms need obvious systems. Use visible basket parking, clear task labels, and a simple rule for clean laundry. If each person has a basket, each basket needs a home. Keep the after-load reset easy enough that every user can return products, clear the surface, and move clean laundry out.
FAQ
These answers focus on setup decisions that come up while organizing the room, especially first steps, zones, storage type, clean-laundry piles, and budget limits.
What is the first thing to do when organizing a laundry room?
The first thing is to empty the visible storage and group everything by category. Do not begin with new bins. Once supplies, baskets, tools, clothing pieces, and non-laundry items are visible together, you can decide what stays, what moves, and what storage is actually needed.
How many laundry zones do I need?
Most laundry rooms need five zones: incoming dirty laundry, washing supplies, drying or hanging, folding and outgoing clean laundry, and lost-and-found or repair. Small rooms can still use all five zones, but each one may be a hook, tray, shelf, or basket rather than a large area.
Are open shelves or cabinets better in a laundry room?
Open shelves are better for a small number of daily-use items that are safe and easy to reach. Cabinets are better for backups, specialty products, and items that should be out of sight or secured. Many rooms work best with open storage for current supplies and closed storage for overflow.
How do I stop clean laundry from piling up?
Create one clean landing zone and limit it to one load. When that spot is full, the clean laundry must be folded, delivered, or moved out before another load lands there. This boundary matters more than buying another basket because extra baskets often create extra piles.
How can I organize a laundry room on a small budget?
Remove what does not belong first, then reuse containers you already own. A tray for current products, one small pocket-finds container, a hook for hangers, and a marked basket parking spot can make the room work better. Spend money only after you know which zone is still failing.
Final Thoughts
An organized laundry room should make each load easier to complete, not create a system that only works for photos. Clear the space, edit what stays, build zones around the real path of laundry, and choose storage that fits the task. Keep daily supplies reachable, protect clean landing space, give baskets a home, and reset the room in small moments. When the room supports the work, laundry feels less like a pile and more like a repeatable routine.

Ethan Carter is the Founder & Editor of HomeCleanSecrets. Based in the United States, he has 5 years of experience creating practical home cleaning, laundry care, stain removal, decluttering, and home organization content. His goal is to help everyday households clean smarter and build simple routines that are easier to maintain.
Read more about Ethan Carter on his author page: https://homecleansecrets.com/ethan-carter/