
Introduction
Why 30 days is realistic
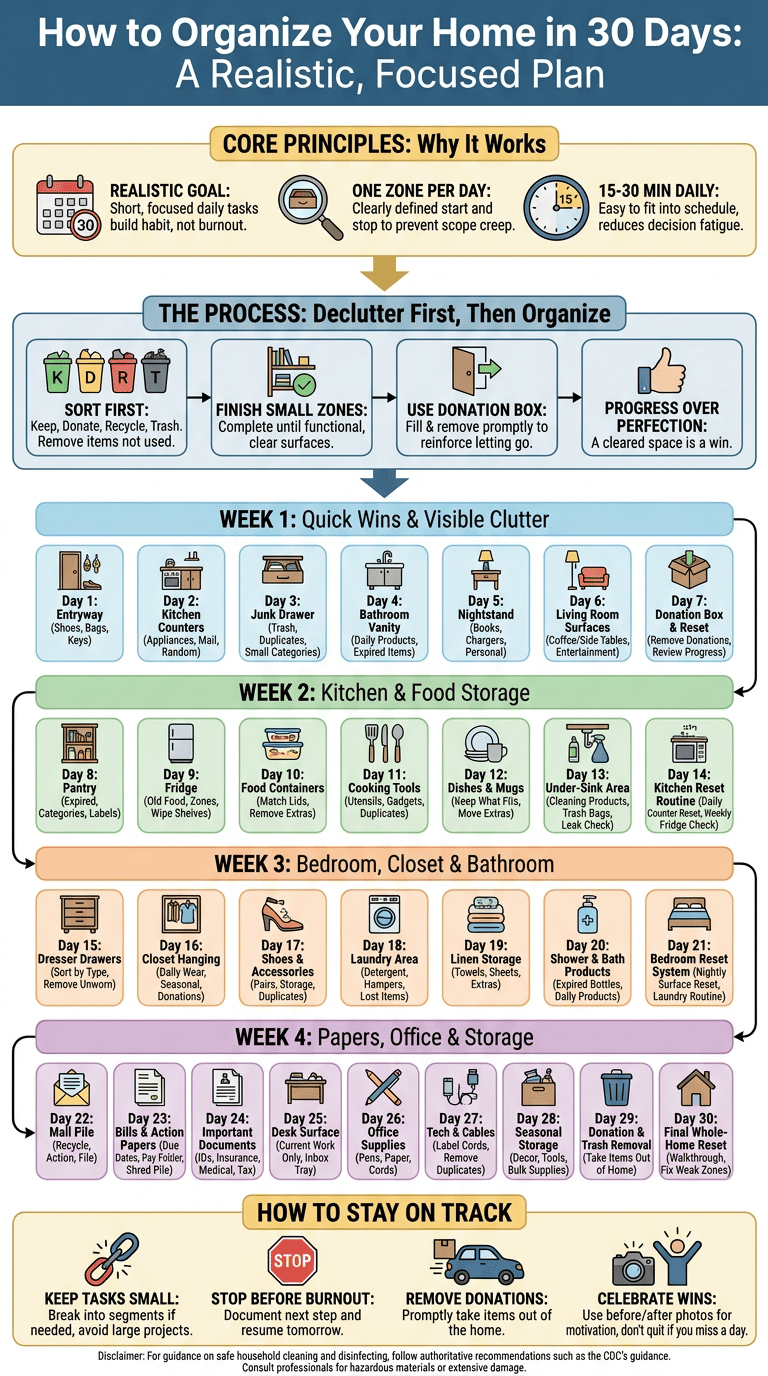
A 30-day plan can help you tackle every visible area without marathon sessions that lead to burnout. A short, focused task each day builds momentum, creates visible progress, and turns organizing into a habit rather than an overwhelming project. The goal is steady, consistent progress rather than perfection.

One area per day
Pick one clearly defined zone each day so you know exactly where to start and stop. A zone can be as small as a single drawer or as large as the kitchen pantry. Defining the zone keeps decisions simple and prevents scope creep.
15 to 30 minutes daily
Most daily tasks are designed for 15 to 30 minutes. Short sessions are easier to fit into a schedule and are less likely to cause decision fatigue. If you find a task needs more time, stop at the end of your planned session and resume the next day.
Lower overwhelm
Breaking work into short, daily actions reduces overwhelm. Progress accumulates quickly when small tasks stack over weeks. Focus on completion rather than perfection: a cleared drawer or a sorted shelf is a win.
How the plan works
Declutter before organizing
Before adding bins or labels, remove items you no longer use. Sorting into keep, donate, recycle, and trash reduces the amount you need to organize. For practical decluttering tips and simple methods to make decisions easier, see Martha Stewart’s decluttering guidance for home simplification and stepwise advice here.
Finish small zones
Complete a zone until it is functional: items returned to a place, surfaces cleared, and trash and donation items removed. A finished small zone is more motivating than an unfinished large one.
Use a donation box throughout
Keep a donation box in a convenient spot and add items as you decide to let them go. When the box is full, remove it from your home right away. This prevents donated items returning to the living space and reinforces the habit of letting go.
Week 1: Quick Wins and Visible Clutter
Day 1: Entryway
Start where you and guests first interact with your home. The entryway sets the tone.
For a related walkthrough, see our guide to how to clean and organize your home in one day.
For a related walkthrough, see our guide to how to organize your home.
Shoes
- Pull every pair out and match them. Discard damaged pairs or those you never wear.
- Designate a specific storage method: rack, tray, or basket. Keep daily-use shoes near the door and seasonal or special-occasion shoes elsewhere.
Bags
- Sort purses, backpacks, and totes. Remove trash and items that belong elsewhere.
- Store bags you use weekly in a reachable spot and less-used bags in a higher or less accessible shelf.
Keys
- Create a single, reliable spot for keys: hook, bowl, or dish. If you often misplace keys, add a small sign or color-coded keychain to reinforce the habit.
Day 2: Kitchen counters
Counters are highly visible and influence how clean the whole kitchen feels.
Appliances
- Move appliances you rarely use into cabinets. Keep only daily-use items on counters.
- Wipe bases and cords as you clear items.
- Sort mail into shred, action, file, and recycle. Handle time-sensitive items first.
- Set up a small in-and-out station to prevent future pileup.
Random items
- Return stray items to their proper homes immediately, or place them in a temporary “put away” basket to handle later that day.
Day 3: Junk drawer
The junk drawer is a quick win that pays off every day.
Trash
- Empty contents and discard obvious trash such as old receipts and broken items.
Duplicates
- Remove duplicate tools or items. Keep the best-condition example of each tool or gadget.
Small categories
- Group similar items together: pens, tape, batteries, rubber bands. Use small containers within the drawer for separation.
Day 4: Bathroom vanity
A tidy vanity saves time every morning and reduces product clutter.
Daily products
- Keep only the products you use daily within reach. Store backups elsewhere.
Expired items
- Discard expired or separated products. Dispose of medications properly following local guidelines.
Day 5: Nightstand
A clear nightstand supports better sleep and a calmer bedtime routine.
Books
- Keep one or two current reads. Move finished books to a donation or home library spot.
Chargers
- Designate a single charging spot. Remove and store spare cords you rarely use.
Personal items
- Limit personal items to essentials: a lamp, alarm, device, and a small dish for jewelry or glasses.
Day 6: Living room surfaces
The living room is a high-traffic area where small resets add up.
Coffee table
- Keep one central decorative item and a small tray for remotes. Remove or relocate non-living-room items.
Side tables
- Clear surfaces and leave only essentials. Create a small catch-all for mail to be processed later.
Entertainment items
- Sort DVDs, games, and controllers. Donate or sell items you no longer use and keep cables tidy.
Day 7: Donation box and reset
Consolidate progress from the week and remove items from the home.
Remove donations
- Take the donation box out of the house to prevent second-guessing. If you cannot donate immediately, schedule a drop-off or pick-up date this week.
Review progress
- Take a slow walk through the zones you cleared. Note what felt easy and what felt slow, and adjust the next week if needed.
Week 2: Kitchen and Food Storage
Day 8: Pantry
Pantries become chaotic when items accumulate without category or order.
Expired food
- Remove expired and stale items. Check dates and smell test suspicious products.
Categories
- Group items by type: baking, canned goods, snacks, grains. Keep frequently used categories at eye level.
Labels
- Label containers and shelves so everyone knows where each item belongs. Clear containers help you see quantities at a glance.
Day 9: Fridge
A tidy refrigerator reduces food waste and makes meal prep easier.
Old food
- Discard spoiled or unrecognizable items. Use a clear bin for items that need to be used within a few days.
Food zones
- Create zones for dairy, produce, condiments, and ready-to-eat items so family members can find things quickly.
Wipe shelves
- Remove shelves where possible and wipe with warm, soapy water. For guidance on household cleaning and disinfecting, consult the CDC’s recommendations here.
Day 10: Food containers
Busy kitchens collect unmatched lids and containers that clutter cabinets.
Match lids
- Pair containers with their lids. Discard containers with no lid or warped pieces that no longer seal.
Remove extras
- Keep a reasonable number of each size and donate or recycle extras. Stack containers neatly by size to maximize space.
Day 11: Cooking tools
Streamline the tools you keep in reach to simplify cooking.
Utensils
- Keep only the utensils you use regularly. Store specialty tools you rarely use elsewhere.
Gadgets
- Test gadgets before deciding to keep them. If something hasn’t been used in a year, consider letting it go.
Duplicates
- Keep one reliable example of each tool type unless multiple are essential for meal prep timing.
Day 12: Dishes and mugs
Too many dishes take up space and make tasks like unloading the dishwasher more cumbersome.
Keep what fits
- Keep the number of dishes that fit in regular loading for everyday use. Extras can be stored for guests or special occasions.
Move extras
- Relocate seldom-used sets to lower cabinets or storage. Consider donating single mismatched pieces.
Day 13: Under-sink area
Under-sink cabinets often become a jumbled catchall for cleaning products and supplies.
Cleaning products
- Group like items and move hazardous products out of reach of children. Store frequently used items near the front.
Trash bags
- Keep an accessible supply and remove empty boxes and packaging that take up space.
Leak check
- Quickly inspect for signs of leaks or moisture. If you see mold, persistent moisture, or suspect sewer issues, contact a professional instead of doing DIY remediation.
Day 14: Kitchen reset routine
Finish Week 2 by building simple habits that prevent clutter from returning.
Daily counter reset
- Commit to clearing kitchen counters every evening: put away appliances, wipe crumbs, and return stray items to their homes.
Weekly fridge check
- Set one weekday to check the fridge and pantry for items that need to be used, donated, or tossed.
Week 3: Bedroom, Closet, and Bathroom
Day 15: Dresser drawers
Dresser drawers can accumulate unworn items and folded clutter.
Sort by clothing type
- Empty each drawer and sort items into categories. Re-fold what you keep and place unworn or mismatched items in the donation box.
Remove unworn items
- If you have not worn an item in a year or it no longer fits or suits your style, consider letting it go.
Day 16: Closet hanging clothes
Closets can hide a lot of decision fatigue; small actions clarify what you actually wear.
Daily wear
- Group everyday clothes together for quick access. Rotate items seasonally to reduce visible clutter.
Seasonal items
- Store out-of-season clothing in labeled bins or a high shelf. This frees space for current needs.
Donation items
- Place items that are still in good condition in the donation box. Remove them promptly from the house so they do not return to the closet.
Day 17: Shoes and accessories
Pairing and storing shoes correctly preserves their condition and saves time.
Pairs
- Match shoes, repair what can be fixed, and discard or donate worn-out pairs.
Storage
- Store shoes by frequency of use. Use clear bins or labeled shelves to keep pairs together.
Duplicates
- Remove duplicate accessories that serve the same function and keep versatile pieces you love.
Day 18: Laundry area
A tidy laundry space streamlines washing, folding, and storage.
Detergent
- Keep detergent and essentials close to the washer. Store hazardous items away from children and pets.
Hampers
- Use labeled hampers for lights, darks, and delicates to simplify sorting at wash time.
Lost items
- Check pockets and keep a small bin for items found in laundry to be returned to their owners.
Day 19: Linen storage
Organized linens make it easy to change bedding and towels without searching.
Towels
- Keep a set number of towels per household member and move extra sets to seasonal storage or donate if surplus.
Sheets
- Store sheet sets folded together with a label indicating size and bed they fit.
Extras
- Keep a clear inventory of spare pillows, blankets, and guest linens so you know when you truly need more.
Day 20: Shower and bath products
Bathroom cabinets collect a lot of half-used tubes and single-use items.
Expired bottles
- Discard expired products or those with changed color or odor. For items that may be hazardous, follow disposal guidance from local waste authorities.
Daily products
- Keep shower caddies minimal: a shampoo, conditioner, soap, and one treatment product. Store backups elsewhere to avoid cluttered shelves.
Day 21: Bedroom reset system
Finish Week 3 by creating nightly habits that keep surfaces clear and laundry moving.
Nightly surface reset
- Spend five minutes each night returning items to their places, emptying small trash, and setting out clothes for the next day.
Laundry routine
- Do a small load more often if large loads pile up. A regular schedule keeps laundry from becoming a major chore.
Week 4: Paperwork, Office, and Storage
Day 22: Mail pile
Paper piles breed procrastination. An action plan clears them quickly.
Recycle
- Immediately recycle junk mail and promotional flyers. Keep a shred bin for anything with personal information.
Action
- Create an “action” pile for items requiring a phone call, reply, or short task. Handle items that take less than two minutes immediately.
File
- File documents you need to keep in a labeled filing system so they are accessible when required.
Day 23: Bills and action papers
Organize bill-paying to avoid late fees and clutter.
Due dates
- Note due dates on a single calendar or tracker and set reminders to avoid missed payments.
Pay folder
- Create a small pay folder for bills that need to be paid and clear it weekly.
Shred pile
- Shred sensitive documents you no longer need, such as old statements with account numbers.
Day 24: Important documents
Keep critical records safe and easy to access when needed.
IDs
- Collect identification documents and store them in a fire-resistant safe or secure file.
Insurance
- Organize insurance policies by type and keep recent contact information handy.
Medical
- Keep medical records and prescriptions in a clearly labeled folder for quick access.
Tax
- Store tax documents for the recommended number of years and keep receipts organized by year.
Day 25: Desk surface
A clear desk supports focus and productivity.
Current work only
- Clear the surface of items unrelated to current projects. Use a small tray or inbox for ongoing papers.
Inbox tray
- Keep a single inbox tray for items that truly require your attention and schedule time to clear it regularly.
Day 26: Office supplies
Supplies multiply quickly. Keep only what you use.
Pens
- Discard dried pens and keep a limited number of reliable writing tools.
Paper
- Store printer paper and notepads in a single location and recycle outdated pads.
Cords
- Wrap cords neatly and label them so you can find the right one without tangles.
Day 27: Tech and cables
Technology clutter is common and frustrating. A little labeling goes a long way.
Label cords
- Label chargers and cables with their device name or a color tag so you can match them quickly.
Remove duplicates
- Keep only the chargers and cables you actually use. Recycle or donate extras and keep one backup if needed.
Day 28: Seasonal storage
Organize seasonal items so they are easy to access and do not take up prime space year-round.
Decor
- Sort seasonal decor into clearly labeled bins and discard broken or disliked items.
Tools
- Store seasonal tools together and keep a basic toolkit accessible year-round.
Bulk supplies
- Group bulk household supplies together and keep an inventory to avoid overbuying.
Day 29: Donation and trash removal
Get rid of items you decided to remove earlier in the month so they do not return to the home.
Take items out of home
- Schedule a drop-off, pick-up, or community donation collection. Removing items immediately prevents second-guessing.
Day 30: Final whole-home reset
Wrap up the challenge with a walkthrough and fix any weak zones.
Walkthrough
- Walk through each room and look for unfinished spots. Take five minutes per room to clear surfaces and return stray items.
Fix weak zones
- Identify one or two recurring problem areas and set a simple system to fix root causes: new storage, clearer labels, or a daily habit.
How to Stay on Track
Keep each task small
Small, focused tasks are more likely to be completed and repeated. If a task begins to feel large, break it into 10-minute segments and complete them over consecutive days.
Stop before burnout
When energy wanes, stop and document the next small action you will take. Returning the next day with a clear starting point prevents avoidance.
Do not skip donation removal
It is common to collect items for donation and then allow them to linger. Commit to removing donations within a set timeframe so clutter does not return.
Clutter must leave the home
Leaving donation items in the garage or car keeps them within easy reach for second-guessing. Removing donated items promptly reinforces the decision to let them go.
Take before and after photos
Photos provide visual motivation and a record of progress, especially when improvements are gradual but meaningful.
Use progress for motivation
- Review photos weekly to celebrate wins and notice what systems worked well. This helps you keep momentum after the 30 days.
Repeat missed days without quitting
Missing a day is not failure. Simply pick up with the next scheduled task or revisit the missed task when convenient.
Resume with the next small task
- Keep the plan forward-focused: moving ahead preserves energy and keeps the challenge achievable.
30-Day Home Organization Checklist
Week 1 checklist
Visible clutter and quick wins
- Day 1: Entryway – shoes, bags, keys
- Day 2: Kitchen counters – appliances, mail, random items
- Day 3: Junk drawer – trash, duplicates, small categories
- Day 4: Bathroom vanity – daily products, expired items
- Day 5: Nightstand – books, chargers, personal items
- Day 6: Living room surfaces – coffee table, side tables, entertainment items
- Day 7: Donation box and reset – remove donations, review progress
Week 2 checklist
Kitchen and food storage
- Day 8: Pantry – expired food, categories, labels
- Day 9: Fridge – old food, zones, wipe shelves
- Day 10: Food containers – match lids, remove extras
- Day 11: Cooking tools – utensils, gadgets, duplicates
- Day 12: Dishes and mugs – keep what fits, move extras
- Day 13: Under-sink area – cleaning products, trash bags, leak check
- Day 14: Kitchen reset routine – daily counter reset, weekly fridge check
Week 3 checklist
Bedroom, closet, bathroom
- Day 15: Dresser drawers – sort by type, remove unworn items
- Day 16: Closet hanging clothes – daily wear, seasonal items, donations
- Day 17: Shoes and accessories – pairs, storage, duplicates
- Day 18: Laundry area – detergent, hampers, lost items
- Day 19: Linen storage – towels, sheets, extras
- Day 20: Shower and bath products – expired bottles, daily products
- Day 21: Bedroom reset system – nightly reset, laundry routine
Week 4 checklist
Papers, office, storage
- Day 22: Mail pile – recycle, action, file
- Day 23: Bills and action papers – due dates, pay folder, shred pile
- Day 24: Important documents – IDs, insurance, medical, tax
- Day 25: Desk surface – current work only, inbox tray
- Day 26: Office supplies – pens, paper, cords
- Day 27: Tech and cables – label cords, remove duplicates
- Day 28: Seasonal storage – decor, tools, bulk supplies
- Day 29: Donation and trash removal – take items out of home
- Day 30: Final whole-home reset – walkthrough, fix weak zones
FAQs
Can I organize my whole home in 30 days?
Yes with small tasks and realistic goals
Thirty days is realistic if you follow a zone-per-day approach and keep sessions short. The aim is functional organization and sustainable habits rather than absolute perfection.
What if I miss a day?
Continue without restarting
Missing a day is normal. Continue with the next scheduled task or catch up when convenient. The important part is consistency over time, not an unbroken streak.
How much time should I spend each day?
15 to 30 minutes for most tasks
Most daily tasks are designed to be completed in 15 to 30 minutes. If a zone needs more time, break it into smaller steps. Short, frequent sessions preserve energy and reduce decision fatigue.
Safety and cleaning notes: For guidance on safe household cleaning and disinfecting, follow authoritative recommendations such as the CDC’s cleaning and disinfecting guidance linked above. If you encounter mold, extensive water damage, or potentially hazardous materials, consult professionals instead of attempting large-scale DIY remediation.

Ethan Carter is the Founder & Editor of HomeCleanSecrets. Based in the United States, he has 5 years of experience creating practical home cleaning, laundry care, stain removal, decluttering, and home organization content. His goal is to help everyday households clean smarter and build simple routines that are easier to maintain.
Read more about Ethan Carter on his author page: https://homecleansecrets.com/ethan-carter/