
Food storage containers get messy faster than almost anything else in the kitchen because every piece depends on another piece. A bowl without its lid is annoying. A lid without its base is useless. A stack that looks fine at eye level can still slide out every time someone unloads the dishwasher.
The best way to fix the problem is not to buy a new matching set first. Start by gathering every container, matching what you already own, removing the pieces that no longer work, then giving bases and lids a storage method that matches your real kitchen routine. This guide focuses on reusable food storage containers for leftovers, lunches, freezer meals, and meal prep, not pantry food organization or cookware storage.
Container clutter usually affects more than one shelf, so use the full pantry and kitchen storage system if containers, cabinets, drawers, and pantry food are competing for the same space.

Quick Answer: Match, Reduce, Separate, and Store by Use

A reliable container system has four jobs: every base needs a lid, every kept piece needs a purpose, daily pieces need the easiest spot, and damaged pieces need to leave before they cause leaks or clutter.
The simplest container reset
Empty every container zone, match each base with a lid, and keep only the pieces you can use without frustration. Sort them into daily leftovers, meal prep, freezer or lunch containers, specialty pieces, and extras. Then choose one home for daily containers and one smaller backup area for rarely used pieces.
Why lids need their own plan
Lids are usually the real problem. Bases can nest, but lids slide, hide, and bend. Give lids a vertical file, a shallow bin, or a drawer divider so each one can be pulled out without lifting the whole stack. A good test is simple: you should be able to find a lid in five seconds without emptying the cabinet.
What to check before keeping damaged pieces
Before a container goes back into storage, inspect the rim, corners, seal, hinge, and base. Retire pieces that are cracked, melted, badly warped, chipped, or unable to close. For plastic, glass, and silicone pieces, read the manufacturer label or symbol before using them in the microwave, freezer, or dishwasher.
Why Food Storage Containers Become Messy So Fast
Container clutter usually comes from small daily habits rather than one big mistake. Once you know which habit is causing the mess, the fix becomes much simpler.
Too many sizes
A kitchen can look organized while still having too many container sizes. The problem shows up when each size needs a different lid and each lid only fits one forgotten base. Most households do better with a small set of repeating sizes: one small snack size, one medium leftovers size, one shallow meal prep size, and one larger family portion size.
If lids are the main problem, a shallow drawer or divider can work better than stacking them behind bowls, especially when you organize kitchen drawers for small pieces.
Missing or warped lids
Missing lids often come from the dishwasher, lunch bags, the freezer, and the back of the fridge. Warped lids usually come from heat, pressure, or forcing a lid onto the wrong base. If a lid pops off, leaks during normal carrying, or no longer sits flat, do not let it stay in the daily stack.
Mixing meal prep, leftovers, and pantry containers
Meal prep containers, leftover bowls, lunch boxes, and dry-food bins serve different jobs. When they share one crowded shelf, the daily containers disappear behind tall bins and specialty pieces. Keep pantry decanting containers with dry foods, and keep reusable leftovers containers near the fridge, dishwasher, or lunch-packing area.
Before using containers for dry goods, make sure the food shelves have a clear home with a pantry reset so empty containers do not create another clutter zone.
Cabinet depth and stacking problems
Deep cabinets make container storage look larger than it feels. Items in the back become invisible, low stacks spread out, and lids fall behind other items. If the cabinet is deep, use a bin that pulls forward or choose a lower drawer for the items you reach for most.
Most container systems need one dependable shelf or pull-out area, which is easier to choose after you organize kitchen cabinets around daily use.
Step 1: Gather Every Container and Lid
The reset only works when the whole collection is visible at once. Otherwise, you will keep organizing the same shelf while missing the lids and bases scattered around the kitchen.
Pull from cabinets, drawers, dishwasher, lunch bags, and fridge
Do not judge your container collection from the cabinet alone. Check the dishwasher, drying rack, lunch bags, picnic bags, car, office bag, freezer, and refrigerator. Put every clean piece on a table or counter. If a container is holding old food, empty and wash it before sorting, and use normal food safety judgment if anything looks spoiled or smells wrong.
Match bases to lids
Match one base at a time instead of stacking everything first. Close each lid fully. Turn the container upside down over the sink if you need to test a seal for regular leftovers, but do not use this as a promise that it will be leakproof in a bag. Some containers are designed for storage, not transport.
Separate no-lid, no-base, damaged, and specialty items
Create four temporary groups: bases with no lid, lids with no base, damaged pieces, and specialty items. Specialty items include holiday cookie containers, large party containers, baby food trays, bento inserts, and extra freezer sets. Keeping them separate prevents rare-use items from taking space in the daily zone.
Step 2: Decide What to Keep, Recycle, Relocate, or Replace

After matching pieces, sort by job instead of by wishful thinking. A container earns space when it fits a real routine, closes properly, and can be cleaned according to its care instructions.
Daily-use containers
Daily containers should be easy to wash, easy to match, and easy to return to storage. Keep the sizes your household actually uses for leftovers, chopped fruit, lunch portions, and dinner extras. If three containers do the same job, keep the easiest two and move the third to backup or donation if it is in good condition.
Meal prep sets
Meal prep works best with repeating sizes. Matching rectangular or shallow containers stack better than a mix of round bowls, tall tubs, and odd takeout containers. Keep enough for the number of meals you realistically prepare, not the number you hope to prepare during a perfect week.
Freezer or lunch containers
Freezer containers need lids that close securely and materials that are labeled for freezer use. Lunch containers need to survive transport, fit the lunch bag, and open easily for the person using them. If a container works in the fridge but leaks in a backpack, move it to home leftovers only.
Pantry decanting containers
Dry-food containers for flour, cereal, rice, snacks, or pasta should not compete with leftover containers. They usually need different shapes, scoop access, and labels. Store them with pantry food or baking supplies so the leftovers area stays open for items that rotate in and out every day.
When stained, cracked, warped, or damaged pieces should go
Stains alone do not always mean a container is unsafe, but cracks, deep scratches, melted spots, chipped glass, peeling coatings, and warped seals are stronger reasons to replace a piece. The American Cleaning Institute plastic container cleaning guidance recommends checking whether plastic items are dishwasher safe and following proper cleaning steps, which is especially important when old containers have odor or residue.
Step 3: Choose the Best Storage Location

The right location depends on how often you use the containers and how the clean pieces return from the sink or dishwasher. Choose the spot that makes the daily routine easier, not the spot that only looks good when empty.
Cabinet storage for stacked bases
A cabinet works well when the shelf is not too deep and the bases nest cleanly. Put the largest bases on the bottom and the most-used size at the front. Use one shelf, not two scattered shelves, so the collection has a clear limit. If the stack gets taller than your hand can steady, split it into two shorter stacks.
Drawer storage for low stacks and lids
A drawer is often better for small kitchens because you can see every shape from above. Store bases in short nested stacks and lids in a divider beside them. Measure drawer height before committing. Tall glass containers or domed lids may need a cabinet instead.
Deep bin storage for backup pieces
Backup containers do not need prime space. Put party containers, extra freezer sets, and rarely used large tubs in a labeled bin on a higher shelf, lower cabinet, or utility shelf. A bin keeps odd shapes contained and makes it easier to pull everything out when you need one large piece.
Small kitchen and apartment options
In a small kitchen, the best system is usually smaller, not more complex. Keep one stack of daily bases, one lid file, and one small set for lunch or freezer use. If you have no extra cabinet space, a lidded basket on top of the fridge can hold backup pieces, but daily containers should still live where they can be reached without a step stool.
Why containers should not crowd cookware or pantry food
Containers get knocked around when they share space with pans, mixing bowls, or dry goods. Heavy cookware can crack plastic lids or chip glass corners, while pantry food can hide small lids. Give containers their own boundary, even if that boundary is only one bin inside a cabinet.
Step 4: Store Lids So They Stay Matched
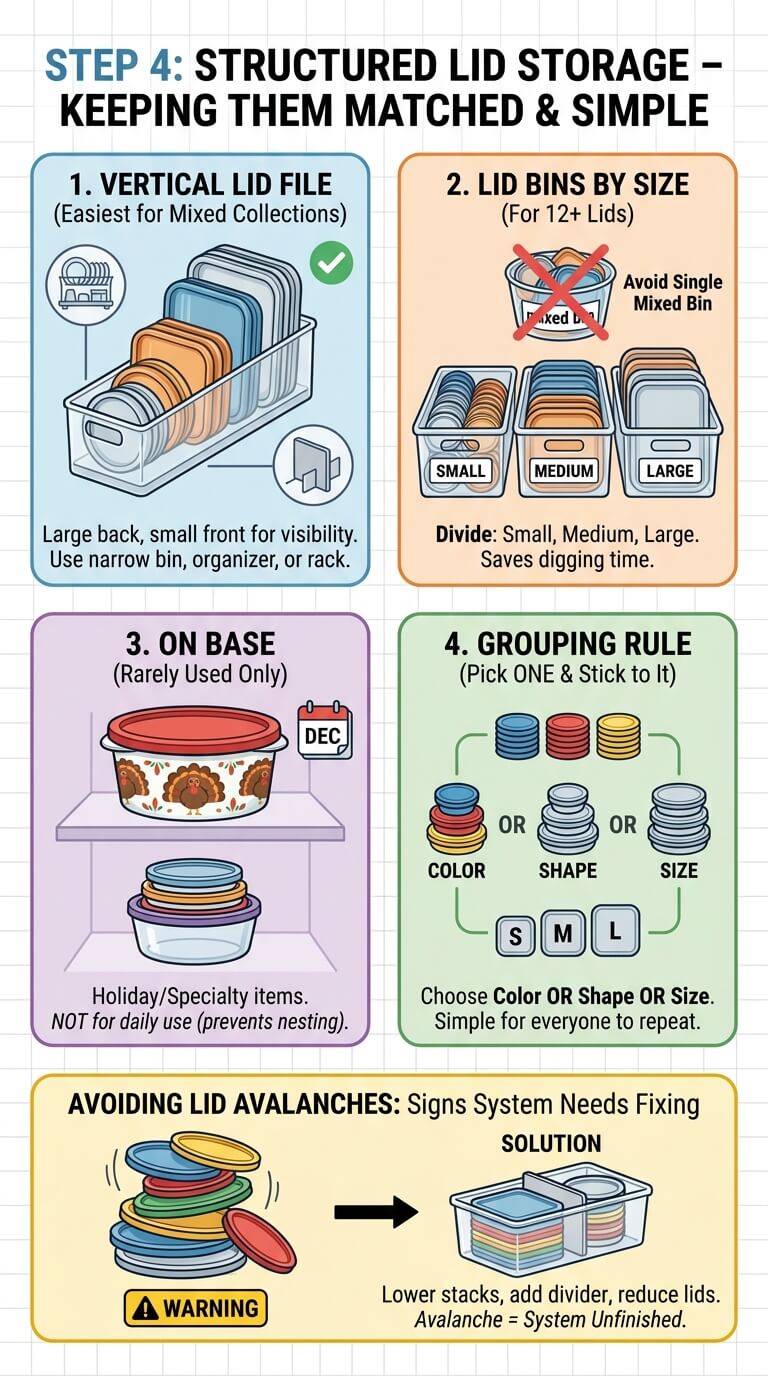
Lid storage needs more structure than base storage because lids are thin, flexible, and easy to lose behind larger items. Pick one method and keep it simple enough for everyone in the house to repeat.
Vertical lid file
A vertical file is the easiest method for most mixed collections. Use a narrow bin, a lid organizer, a small dish rack, or a sturdy divider. Place large lids in the back and small lids in the front. This makes it easy to see shape and size without spreading lids across the shelf.
Lid bin by size
If you prefer bins, divide lids into small, medium, and large. A single mixed lid bin works only when the collection is small. Once you have more than ten or twelve lids, a size split saves time because you stop digging through big lids to find a small square one.
Keep lids on rarely used containers
For specialty pieces, storing the lid on the base can make sense. This works for holiday containers, large salad carriers, and occasional freezer containers because they are not used every day. Do not use this method for every daily piece unless you have plenty of space, because it prevents nesting.
Color, shape, or size grouping
Choose one grouping rule that your household can follow. Color works if each size has a different color. Shape works if you own round, square, and rectangular containers. Size works for most mixed sets. Avoid a system that only one person understands.
Avoiding lid avalanches
A lid avalanche is a sign that the storage method is fighting the collection. Lower the stack, reduce the number of lids, add a divider, or move rarely used items out. If lids fall every time the dishwasher is unloaded, the system is not finished.
Step 5: Build a Daily Maintenance Rule
The container area stays organized when small decisions happen during normal kitchen routines. Set rules for new pieces, clean returns, leftovers, and mismatches so clutter does not rebuild quietly.
One-in-one-out container control
Set a clear limit for new containers. When a new reusable piece enters the kitchen, an old duplicate should leave or move to backup. This rule matters most after takeout, holidays, school events, or meal prep purchases, when random containers tend to multiply.
Dishwasher return routine
Unload containers only when they are fully dry. Wet nesting traps moisture and can cause odor. Put bases back into their stack and lids back into the lid zone immediately, not on the counter for later. If a lid does not have a matching base during unloading, place it in a small mismatch tray for the monthly sweep.
Fridge leftover check
A container system is easier to maintain when the fridge is not full of forgotten food. Check leftovers before trash day or before a grocery trip. The USDA leftovers guidance notes that refrigerated leftovers are generally kept for 3 to 4 days, while frozen leftovers are best for quality within 3 to 4 months.
Monthly mismatch sweep
Once a month, match the small pile of questionable lids and bases. If the missing partner still has not appeared, recycle or discard according to your local rules and the item condition. This keeps one missing lid from becoming a permanent resident in the cabinet.
Material and Safety Considerations

Food storage containers are not all designed for the same heat, cold, cleaning method, or food contact use. Treat the label and condition of each piece as part of the organizing decision.
Plastic container label and symbol checks
Plastic containers vary widely. Some are meant for cold storage only, some can handle microwave reheating, and some should stay out of the dishwasher. Check the bottom symbol and manufacturer directions. Do not assume a takeout tub can do the same jobs as a reusable container designed for repeated food storage.
Glass container weight and chip checks
Glass containers stack neatly and resist staining, but they are heavier and can chip at the rim. Store them on a lower shelf or in a drawer if possible. Stop using a glass food container if the rim is chipped, the lid no longer seals, or the base has a crack.
Silicone lids and seals
Silicone lids and seals can stretch, hold odors, or collect residue in grooves. Remove removable seals when the care instructions allow it, wash them thoroughly, and let them dry before reassembling. If a silicone seal stays tacky, cracked, or loose, it may not be worth keeping.
Microwave, freezer, and dishwasher limits from labels
Do not use storage containers beyond their labeled limits. Some lids need to be vented or removed before reheating. Some glass containers should not move directly from freezer to hot oven or microwave. The FDA food storage guidance also reminds home cooks to use tight containers for leftovers and to store foods at safe temperatures.
Food contact and cleaning basics
Containers that touch food need to be clean, dry, and in good condition before storage. Let hot food cool safely according to food guidance, use shallow containers when needed, and avoid sealing steam inside a container that is not meant for heat. The FoodSafety.gov cold storage chart is useful when deciding whether leftovers should stay in the refrigerator, move to the freezer, or be discarded.
Container Layout Examples

Use these layouts as practical models, then adjust the number of pieces to fit your household. The goal is a setup that can be reset quickly after washing, not a perfect photo-style cabinet.
Small drawer system
Use one drawer for the whole daily collection. Place nested bases on the left, lids in a vertical divider on the right, and lunch pieces in the front. This layout works well for renters and small kitchens because it is visible from above and easy to reset after washing.
Deep lower cabinet system
Use two pull-out bins in a deep cabinet. One bin holds nested bases, and the other holds lids upright. Backup or party containers can sit behind the bins if they are rarely used. The pull-out method prevents containers from disappearing at the back.
Meal prep household system
Keep meal prep containers together as a set. Stack equal bases, file equal lids, and store them near the fridge or lunch-packing zone. If meal prep happens once a week, the set can live slightly outside prime reach, but it should still be easy to pull out as one group.
Kid lunch container system
Put kid lunch containers where the child or caregiver can reach them safely. Keep small snack containers, bento inserts, and matching lids in one shallow bin. Avoid mixing these with large leftover bowls, because small lids disappear quickly in a mixed adult container stack.
Small containers can help with lunch packing and snack portions, but they work best when they support a simple pantry snack system instead of creating extra lid clutter.
Minimalist container set
A minimalist setup might include three or four medium containers, two small snack containers, two freezer-safe containers, and one larger family-size container. The exact number depends on household size, but the idea is to keep repeated shapes and remove pieces that solve the same problem badly.
Mistakes to Avoid
Most container systems fail because they keep too many problem pieces or store lids in a way that looks tidy but works poorly. These mistakes are easy to fix once you can spot them.
Keeping every takeout container
Takeout containers are useful for short-term leftovers, but they should not become the main storage system unless they are durable, cleanable, and appropriate for the way you use them. Keep only a small number for sending food home with guests or storing noncritical items.
Stacking lids flat under containers
Flat lid stacks look tidy for one day and become frustrating once someone needs the bottom lid. Store lids vertically or in small groups instead. The goal is not the prettiest stack, but the fastest match.
Mixing pantry decanting bins with leftover containers
Dry-food bins are usually larger, taller, and less flexible than leftovers containers. If they share the same shelf, they push daily containers into awkward spots. Keep dry-food storage with pantry food and keep leftover containers near the fridge or dishwasher flow.
Buying a new set before measuring
A matching set can still fail if it does not fit your drawer, cabinet height, shelf depth, dishwasher, or lunch bag. Measure the storage area first. Check whether the tallest stacked base, the widest lid, and the full set can return to the same space after washing.
Ignoring cracked or warped pieces
A damaged container is not just clutter. It can leak, trap residue, scratch other pieces, or fail at the worst time in a lunch bag. When this happens, remove it from the daily system instead of letting it stay because it might be useful someday.
What to Fix After the Container Cabinet Works
Once containers and lids are under control, nearby kitchen zones may still need a small adjustment. Fix the next pressure point only if it is making the container area harder to maintain.
When pantry containers need a separate plan
If dry-food bins are still mixed with leftovers containers, move them into a separate pantry or baking zone. Pantry containers need labels, scoop space, and shelf height. Leftovers containers need fast access and easy lid matching.
When cabinet shelves need re-zoning
If the container stack still blocks bowls, mugs, or plates, the cabinet needs a zone reset. Keep food storage pieces in one contained area and move unrelated items to a better shelf. This reduces the number of times a container stack is touched during normal cooking.
When drawers work better than cabinets
Switch to a drawer if you keep losing lids in the back of a cabinet or if containers fall from an upper shelf. Drawers are especially helpful for short users, small apartments, and kitchens where daily containers are used for lunches every morning.
When meal prep needs fewer container sizes
If meal prep still feels chaotic, reduce the number of shapes. A meal prep routine usually works better with six matching containers than with fifteen mismatched ones. Fewer shapes mean faster packing, easier fridge stacking, and fewer lids to maintain.
FAQ
These answers focus on the practical problems that come up after the first reset: lids, quantity, small kitchens, and when old pieces should leave.
What is the best way to organize food storage container lids?
The best method for most kitchens is vertical storage. Use a narrow bin, divider, or lid organizer and group lids by size or shape. This keeps lids visible and prevents the bottom-lid problem that happens when lids are stacked flat.
Should containers be stored with lids on or off?
Store daily containers with lids off so the bases can nest and dry fully. Store rarely used specialty containers with lids on if that makes them easier to find and you have the space. Do not seal damp containers before storing them.
How many food storage containers should I keep?
Keep enough for your normal leftovers, lunches, and meal prep, plus a small backup amount. A small household may need fewer than ten daily pieces, while a larger meal prep household may need more. The right number is the amount you can store neatly and match easily.
How do I organize containers in a small kitchen?
Choose one daily stack, one lid file, and one backup spot. Use a drawer if possible, or use a pull-out bin in a cabinet. Avoid keeping large specialty containers in prime space, and do not let pantry bins take over the leftovers area.
When should I throw away plastic food containers?
Replace plastic food containers when they are cracked, melted, deeply scratched, warped, peeling, or unable to close correctly. Also remove pieces that hold persistent odor after proper cleaning or that no longer match their lid. When in doubt, follow the manufacturer directions and replace questionable food-contact items.
Final Thoughts
Food storage container organization works when the system respects how the pieces are actually used. Match every lid, reduce duplicate sizes, separate daily containers from backup pieces, and choose a storage location that makes returning clean items easy. Once the lids have a real home and damaged pieces are gone, the cabinet or drawer becomes much easier to maintain after every meal.

Ethan Carter is the Founder & Editor of HomeCleanSecrets. Based in the United States, he has 5 years of experience creating practical home cleaning, laundry care, stain removal, decluttering, and home organization content. His goal is to help everyday households clean smarter and build simple routines that are easier to maintain.
Read more about Ethan Carter on his author page: https://homecleansecrets.com/ethan-carter/